一、Tomcat
Tomcat,全名Apache Tomcat,最初是由Sun发起,后来捐赠给ASF,是Apache Jakarta下的一个子项目。
Tomcat是对Servlet API定义的容器的一个完整实现,同时它也不仅仅是一个容器,也完全可以当做一个纯Java实现的HTTP服务器来使用,Tomcat自带的Servlet容器的名称为Catalina。
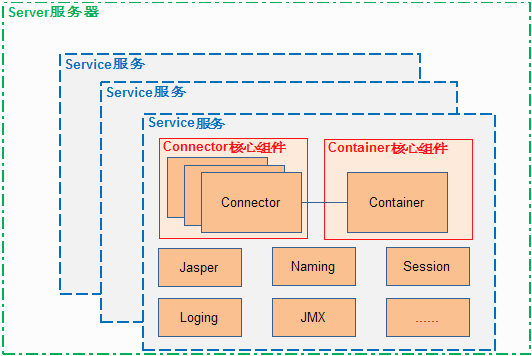
Tomcat 的心脏是两个组件:Connector 和 Container,一个 Container 可以选择对应多个 Connector。多个 Connector(多个Connector的原因应该是多种网络协议吧) 和一个 Container 就形成了一个 Service,有了 Service 就可以对外提供服务了,但是 Service 还要一个生存的环境,该环境由Server提供,所以整个 Tomcat 的生命周期由 Server 控制。
即:
Server:控制Tomcat的start/stop,通过server的start/stop,能够一路畅通地把下面所有的service/connector/container一起start/stop
Service:配置多个Connector的目的一般是为了适应不同的http协议,即不同的协议由不同的connector处理,但都关联到一个Container
Container:Container由四个级别,有高层到底层分别为Engine、Host、Context、Wrapper,具体介绍在下一篇博客解释
二、Tomcat连接器Connector的启动
Tomcat不推荐使用默认连接器,而是使用Coyote(郊狼),但默认的链接器依然是一个比较好的学习范本。本小结的分析就是基于默认连机器。
Connector 组件的主要任务是负责接收浏览器的发过来的 tcp 连接请求,创建一个 Request 和 Response 对象分别用于和请求端交换数据,然后会产生一个线程来处理这个请求,并把 Request 和 Response 对象传给处理这个请求的线程。
Connector连接器处理请求的时序图:
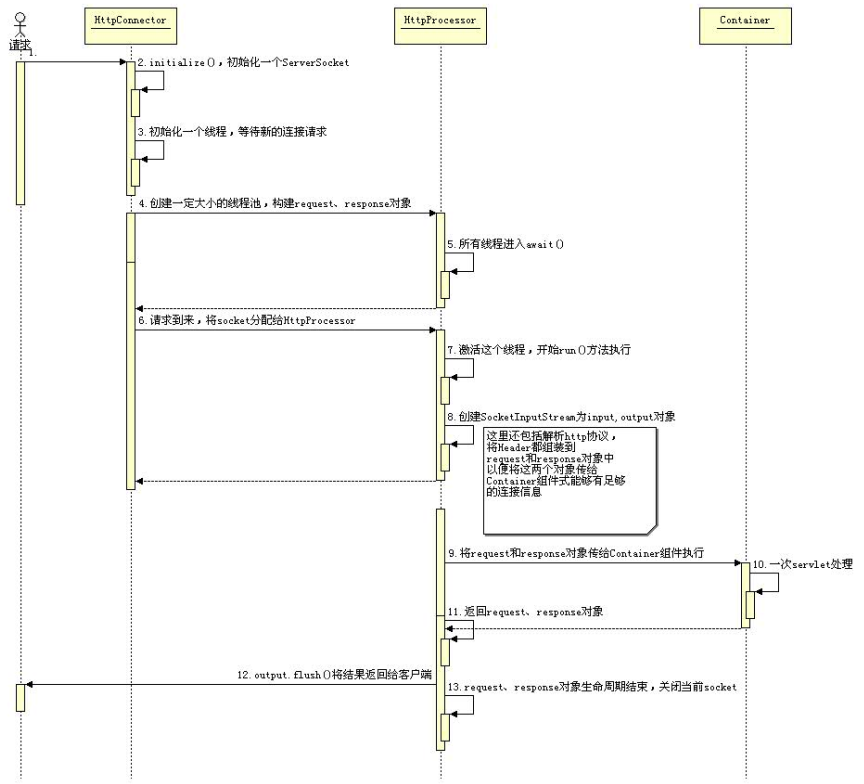
下面是Connector启动的入口:
public final class Bootstrap {
public static void main(String[] args) {
HttpConnector connector = new HttpConnector();
SimpleContainer container = new SimpleContainer();
connector.setContainer(container);
connector.initialize();//对应上图第一步,创建全局的ServerSocket
connector.start();
}
}
HttpConnector的start方法如下:
public void start() throws LifecycleException {
lifecycle.fireLifecycleEvent(START_EVENT, null);
started = true;
// Start our background thread
threadStart();
// Create the specified minimum number of processors
while (curProcessors < minProcessors) {
if ((maxProcessors > 0) && (curProcessors >= maxProcessors))
break;
//创建多个processor,并且每个processor都调用了本线程的start方法进行启动
//将process压入堆栈,该堆栈用来保存多个processor
HttpProcessor processor = newProcessor();
recycle(processor);
}
}
threadStart()会启动后台线程,于是进入该connector的run()方法,上图中的第3步
private void threadStart() {
thread = new Thread(this, threadName);
thread.setDaemon(true);
thread.start();
}

public void run() {
while (!stopped) {
// Accept the next incoming connection from the server socket
Socket socket = null;
try {
socket = serverSocket.accept();//connector会阻塞在accept方法,等待http连接
socket.setTcpNoDelay(tcpNoDelay);
}

// Hand this socket off to an appropriate processor
// 连接带来后获取processor,获取方式很简单,就是从stack中弹出一个
HttpProcessor processor = createProcessor();
// 调用processor的assign方法,assing会通知processor线程去处理具体的动作
// 本处调用直接返回,提高了效率
processor.assign(socket);
// The processor will recycle itself when it finishes
}//结束while
synchronized (threadSync) {
  threadSync.notifyAll();
}
}//结束run
上述为Connector线程的启动过程,下面就要讲Processor线程的处理过程了,注意二者是不同的处理线程。
上面讲到processor线程进行了启动,即每个线程都运行了run方法,该run方法如下:
public void run() {
// Process requests until we receive a shutdown signal
while (!stopped) {

// Wait for the next socket to be assigned
// 线程阻塞在这里,等待通知
Socket socket = await();
if (socket == null)
continue;
// Process the request from this socket
process(socket);

// Finish up this request
connector.recycle(this);
}

// Tell threadStop() we have shut ourselves down successfully
synchronized (threadSync) {
threadSync.notifyAll();
}
}
await方法会阻塞住,直到被通知,这是上图中的第5步骤,这个通知的发出是由connector调用processor的assign方法发出的。await()和assing的实现如下:
private synchronized Socket await() {
// Wait for the Connector to provide a new Socket
while (!available) {
try {
wait();
} catch (InterruptedException e) {
}
}
// Notify the Connector that we have received this Socket
Socket socket = this.socket;
available = false;
notifyAll();

if ((debug >= 1) && (socket != null))
log(" The incoming request has been awaited");

return (socket);

}
Procesor的assign方法如下:
synchronized void assign(Socket socket) {
// Wait for the Processor to get the previous Socket
while (available) {
try {
wait();
} catch (InterruptedException e) {
}
}

// Store the newly available Socket and notify our thread
this.socket = socket;
available = true;
notifyAll();
}
整个过程描述总结如下:
1、processor线程启动的时候,avaliable=false,线程会在await方法中等待,直到其他线程调用notify()或者notifyAll()方法。
2、客户端发起请求,新的socket通过assing()方法传入processor,此时avaliable依然为false,assign方法会跳过while,设置available=true,并发出通知,告诉processor线程可以向下继续运行
3、processor线程收到通知,此时avaliable=true,await方法会跳过while,执行process方法,进行处理。
4、process方法中,将处理好request和response, connector.getContainer().invoke(request, response);交给container去处理。问题是,到底交个container中的哪个servlet去处理呢?后续文章介绍吧
参考资料
《Tomcat深度剖析》
https://www.ibm.com/developerworks/cn/java/j-lo-tomcat1/