之前有笔记记录使用filebeat收集主机日志及容器日志
参考:https://www.cnblogs.com/minseo/p/12469176.html
该笔记使用了主机搭建elasticsearch及kibana,本文记录全部使用容器及K8s搭建ELK系统过程
前提条件
- K8s集群 搭建参考:https://www.cnblogs.com/minseo/p/12361731.html
- Heketi管理的glusterfs集群 搭建参考:https://www.cnblogs.com/minseo/p/12575604.html
下载镜像,为了部署速度,本次下载镜像以后提交私有镜像参考harbor
docker pull docker.elastic.co/elasticsearch/elasticsearch:6.6.2
docker pull docker.elastic.co/kibana/kibana:6.6.2
docker pull docker.elastic.co/logstash/logstash:6.6.2
docker pull docker.elastic.co/beats/filebeat:6.6.2
一,搭建elasticsearch+kibana
elasticsearch配置文件
# cat elasticsearch.yml
cluster.name: my-es
#node.name: dev-es-kibana
path.data: /usr/share/elasticsearch/data
#path.logs: /var/log/elasticsearch
bootstrap.memory_lock: false
network.host: 0.0.0.0
http.port: 9200
#集群个节点IP地址,也可以使用els、els.shuaiguoxia.com等名称,需要各节点能够解析
#discovery.zen.ping.unicast.hosts: ["172.16.30.11", "172.17.77.12"]
#集群节点数
#discovery.zen.minimum_master_nodes: 2
#增加参数,使head插件可以访问es
http.cors.enabled: true
http.cors.allow-origin: "*"
http.cors.allow-headers: Authorization,X-Requested-With,Content-Length,Content-Type
kibana配置文件
注意kibana连接的主机使用了域名,是由有状态应用statefulset创建的Pod
# cat kibana.yml
server.port: 5601
server.host: "0.0.0.0"
elasticsearch.url: "http://es-kibana-0.es-kibana.kube-system:9200"
kibana.index: ".kibana"
创建elasticsearch和kibana的配置文件configmap
本次把日志收集系统放置在命名空间kube-system
kubectl create configmap es-config -n kube-system --from-file=elasticsearch.yml
kubectl create configmap kibana-config -n kube-system --from-file=kibana.yml
es存储pvc配置文件
# cat es-pvc.yaml
apiVersion: v1
kind: PersistentVolumeClaim
metadata:
  name: es-pv-claim
  namespace: kube-system
  labels:
    app: es
spec:
  accessModes:
    - ReadWriteMany
  storageClassName: "gluster-heketi-storageclass"
  resources:
    requests:
      storage: 200Gi
前提条件:storageClass需要提前创建好,本次使用的是heketi管理的glusterfs存储
创建pvc
kubectl apply -f es-pvc.yaml
查看创建的pvc
# kubectl get pvc -n kube-system
NAME          STATUS   VOLUME                                     CAPACITY   ACCESS MODES   STORAGECLASS                  AGE
es-pv-claim   Bound    pvc-5fa351ee-730f-4e2c-9b62-8091532ed408   200Gi      RWX            gluster-heketi-storageclass   23h
创建es-kibana的yaml配置文件
# cat es-statefulset.yaml
apiVersion: apps/v1
kind: StatefulSet
metadata:
  labels:
    app: es-kibana
  name: es-kibana
  namespace: kube-system
spec:
  replicas: 1
  selector:
    matchLabels:
      app: es-kibana
  serviceName: "es-kibana"
  template:
    metadata:
      labels:
        app: es-kibana
    spec:
      imagePullSecrets:
      - name: registry-pull-secret
      containers:
      - image: 192.168.1.11/project/elasticsearch:kube-system
        imagePullPolicy: Always
        name: elasticsearch
        resources:
          requests:
            memory: "4Gi"
            cpu: "1000m"
          limits:
            memory: "8Gi"
            cpu: "2000m"
        volumeMounts:
        - name: es-config
          mountPath: /usr/share/elasticsearch/config/elasticsearch.yml
          subPath: elasticsearch.yml
        - name: es-persistent-storage
          mountPath: /usr/share/elasticsearch/data
      - image: 192.168.1.11/project/kibana:kube-system
        imagePullPolicy: Always
        name: kibana
        volumeMounts:
        - name: kibana-config
          mountPath: /usr/share/kibana/config/kibana.yml
          subPath: kibana.yml
      volumes:
      - name: es-config
        configMap:
          name: es-config
      - name: kibana-config
        configMap:
          name: kibana-config
      - name: es-persistent-storage
        persistentVolumeClaim:
          claimName: es-pv-claim
      #hostNetwork: true
      #dnsPolicy: ClusterFirstWithHostNet
      nodeSelector:
       kubernetes.io/hostname: 172.16.30.1
创建es-kibana应用
kubectl apply -f es-statefulset.yaml
查看
# kubectl get pod -n kube-system es-kibana-0
NAME          READY   STATUS    RESTARTS   AGE
es-kibana-0   2/2     Running   0          22h
正常运行没有报错代表elasticsearch及kibana创建成功
测试elasticsearch及kibana是否正常
首先获取到Pod的IP

使用curl命令测试elasticsearch是否正常
# curl 172.17.77.7:9200
{
  "name" : "kqddSiw",
  "cluster_name" : "my-es",
  "cluster_uuid" : "1YTsqP6mTfKLtUrzEcx7zg",
  "version" : {
    "number" : "6.6.2",
    "build_flavor" : "default",
    "build_type" : "tar",
    "build_hash" : "3bd3e59",
    "build_date" : "2019-03-06T15:16:26.864148Z",
    "build_snapshot" : false,
    "lucene_version" : "7.6.0",
    "minimum_wire_compatibility_version" : "5.6.0",
    "minimum_index_compatibility_version" : "5.0.0"
  },
  "tagline" : "You Know, for Search"
}
此时kibana会出现访问elasticsearch错误提示,原因是没有创建es-kibana的cluserip的svc
# cat es-cluster-none-svc.yaml
apiVersion: v1
kind: Service
metadata:
  labels:
    app: es-kibana
  name: es-kibana
  namespace: kube-system
spec:
  ports:
  - name: es9200
    port: 9200
    protocol: TCP
    targetPort: 9200
  - name: es9300
    port: 9300
    protocol: TCP
    targetPort: 9300
  clusterIP: None
  selector:
    app: es-kibana
  type: ClusterIP
该yaml配置文件可以使用以下命令生成
kubectl create service clusterip es-kibane -n kube-system --clusterip=None --tcp=9200:9200 --tcp=9300:9300 --dry-run -o yaml
命令解析
 kubectl create service clusterip #创建一个内部clusterip
es-kibana #对应的statefulset本次为es-kibana
-n kube-system #命名空间
--clusterip=None#clusterip为None内部使用DNS域名访问
 --tcp=9200:9200 #映射的端口
--tcp=9300:9300
--dry-run #不运行检查命令是否正确
-o yaml#输出yaml
创建svc
kubectl apply -f es-cluster-none-svc.yaml
创建完以后kiban及可以正常连接elasticsearch
为了查看方便创建一个nodeport
# cat es-nodeport-svc.yaml
apiVersion: v1
kind: Service
metadata:
  labels:
    app: es-kibana
  name: es-kibana-nodeport-svc
  namespace: kube-system
spec:
  ports:
  - name: 9200-9200
    port: 9200
    protocol: TCP
    targetPort: 9200
    #nodePort: 9200
  - name: 5601-5601
    port: 5601
    protocol: TCP
    targetPort: 5601
    #nodePort: 5601
  selector:
    app: es-kibana
  type: NodePort
创建nodeport的svc
kubectl apply -f es-nodeport-svc.yaml
查看创建的随机端口

使用nodeip+port访问,本次端口为51652
页面显示正常即可
二,创建logstash服务
logstash.yml配置文件
输出至es使用域名配置
http.host: "0.0.0.0"
xpack.monitoring.elasticsearch.url: http://es-kibana-0.es-kibana.kube-system:9200
logstash.conf配置文件
# cat logstash.conf
input {
  beats {
     port => 5044
  }
}

filter {
 #需要配置否则host是一个json不是文本则无法输出至elasticsearch
  mutate {
    rename => { "[host][name]" => "host" }
  }
}

output {
           elasticsearch {
              hosts => ["http://es-kibana-0.es-kibana.kube-system:9200"]
              index => "k8s-system-log-%{+YYYY.MM.dd}"
           }
          stdout{
              codec => rubydebug
           }
}
创建两个配置文件
kubectl create configmap logstash-yml-config -n kube-system  --from-file=logstash.yml
kubectl create configmap logstash-config -n kube-system  --from-file=logstash.conf
logstash的yaml配置文件
# cat logstash-statefulset.yaml
apiVersion: apps/v1
kind: StatefulSet
metadata:
  labels:
    app: logstash
  name: logstash
  namespace: kube-system
spec:
  serviceName: "logstash"
  replicas: 1
  selector:
    matchLabels:
      app: logstash
  template:
    metadata:
      labels:
        app: logstash
    spec:
      imagePullSecrets:
      - name: registry-pull-secret
      containers:
      - image: 192.168.1.11/project/logstash:6.6.2
        name: logstash
        volumeMounts:
        - name: logstash-yml-config
          mountPath: /usr/share/logstash/config/logstash.yml
          subPath: logstash.yml
        - name: logstash-config
          mountPath: /usr/share/logstash/pipeline/logstash.conf
          subPath: logstash.conf
      volumes:
      - name: logstash-yml-config
        configMap:
          name: logstash-yml-config
      - name: logstash-config
        configMap:
          name: logstash-config
      nodeSelector:
       kubernetes.io/hostname: 172.16.30.1
创建logstash应用
kubectl apply -f logstash-statefulset.yaml
查看

日志不报错并且可以通对应Pod的5044端口及启动正常

三,创建filebeat服务
filebeat.yml配置文件
# cat filebeat.yml
filebeat.inputs:
- type: log
  enabled: true
  paths:
    - /messages
  fields:
    app: k8s
    type: module
filebeat.config.modules:
  path: ${path.config}/modules.d/*.yml
  reload.enabled: false
setup.template.settings:
  index.number_of_shards: 3
setup.kibana:
output.logstash:
  hosts: ["logstash-0.logstash.kube-system:5044"]
processors:
  - add_host_metadata:
  - add_cloud_metadata:
解析
容器日志路径为/messages 需要在启动Pod时候把该路径对应挂载
使用的是k8s内部的dns配置elasticsearch服务
创建filebeat的configmap
kubectl create configmap filebeat-config -n kube-system --from-file=filebeat.yml
filebeat的yaml文件
# cat filebeat-daemonset.yaml
apiVersion: apps/v1
kind: DaemonSet
metadata:
  labels:
    app: filebeat
  name: filebeat
  namespace: kube-system
spec:
  selector:
    matchLabels:
      app: filebeat
  template:
    metadata:
      labels:
        app: filebeat
    spec:
      imagePullSecrets:
      - name: registry-pull-secret
      containers:
      - image: 192.168.1.11/project/filebeat:6.6.2
        name: filebeat
        volumeMounts:
        - name: filebeat-config
          mountPath: /etc/filebeat.yml
          subPath: filebeat.yml
        - name: k8s-system-logs
          mountPath: /messages
        #使用配置文件启动filebeat
        args: [
          "-c", "/etc/filebeat.yml",
          "-e",
        ]
        resources:
          requests:
            cpu: 100m
            memory: 100Mi
          limits:
            cpu: 500m
            memory: 500Mi
        #设置访问容器的用户ID本次设置为0即访问容器为root用户
        #不设置默认容器用户为filebeat则会出现访问日志文件没权限的问题
        #设置该参数使用kubelet exec登录容器的用户为root用户
        securityContext:
          runAsUser: 0
      volumes:
      - name: filebeat-config
        configMap:
          name: filebeat-config
      #把主机的日志/var/logs/messages挂载至容器
      - name: k8s-system-logs
        hostPath:
          path: /var/log/messages
          type: File
本次使用DaemonSet保证每个node有且仅调度一个Pod用于收集node主机的/var/log/messages日志
启动
kubectl apply -f filebeat-daemonset.yaml
查看启动的Pod会在每一个node启动一个

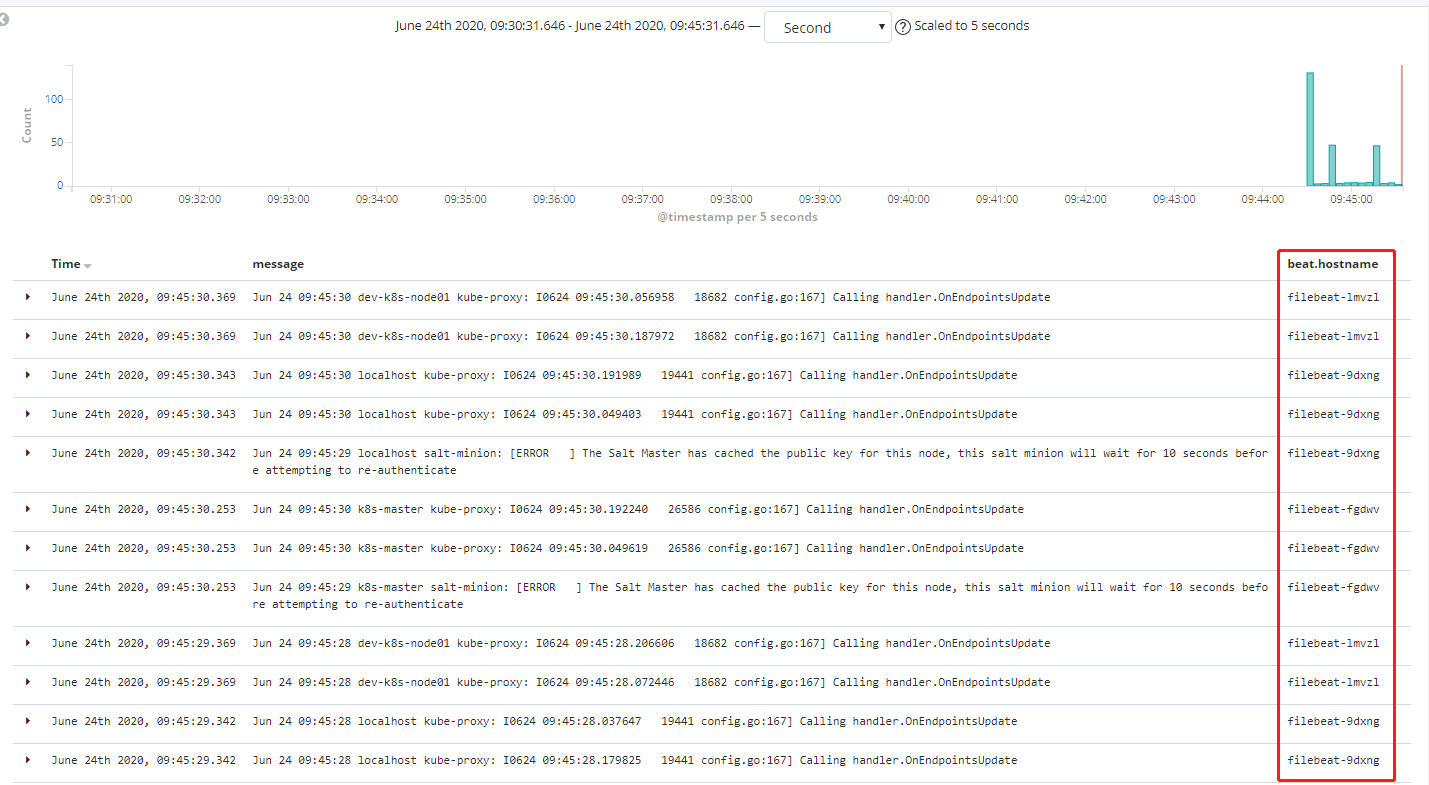
在kibana添加日志索引以后查看

注意:使用该方式部署的主机的host名为对应Pod的主机名,而不是原始主机的主机名,原始日志无原始主机主机名,该问题不知如何解决