环境: python3、windows
模块:requests、BeautifulSoup
安装模块:
pip3 install BeautifulSoup4
pip3 install requests
一、以汽车之家为例子,来一段简单的爬虫代码。
rt requests
from bs4 import BeautifulSoup

# 找到所有新闻
# 标题,简介,url,图片
#get方式向汽车之家新闻页面发送请求,获取返回的页面信息
response = requests.get('http://www.autohome.com.cn/news/')
#get请求默认编码是utf8,而国内网站许多如汽车之家则需改成gbk
response.encoding = 'gbk'

#以python标准库解析html文档
soup = BeautifulSoup(response.text,'html.parser')
#查找id=xx的标签,以此基础查找所有li标签
li_list = soup.find(id='auto-channel-lazyload-article').find_all(name='li')

#通过f12查看新闻板块下此标签的li包含我们需要的信息。再将每一个需要的标签通过BeautifulSoup方法解析出来。
for li in li_list:
    title = li.find('h3')
    #h3标签中会有None,可能是广告,直接跳过
    if not title:
        continue
    #简介
    summary = li.find('p').text

    #详细页url,找到a标签,a标签的所有属性都在attrs的字典里,可以attrs取值,也可以直接get方法取值
    # url = li.find('a').attrs['href']
    url = li.find('a').get('href')

    #同理先拿到图片url,再通过url向服务器发送请求,写入本地
    img_url = li.find('img').get('src')
    img = requests.get(img_url)

    #这里是伪代码,实际运行过程,文章标题会有许多的特殊字符,不可作为图片名称。可用其它名称,
    #或者通过正则替换掉特殊字符。
    file_name = title.text
    with open(file_name+'.jpg','wb') as f:
        f.write(img.content)
二、通过代码进行登录验证:
1.登录github:
首先我们进入github登录页面,输入错误的用户名以及密码,通过f12 NetWork一栏查看htttp请求状态

点击session,在Headers一栏,可以看到接收我们登录信息的URL是哪一个
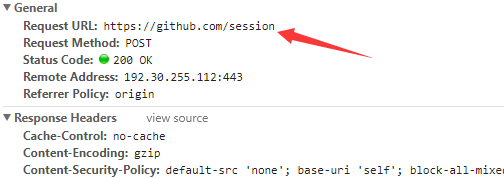
此时,再查找服务端需要的Data信息,再最下方找到了Form Data

根据这个格式,我们向github服务端发送post请求:
import requests
from bs4 import BeautifulSoup

#获取token
r1 = requests.get('https://github.com/login')
s1 = BeautifulSoup(r1.text,'html.parser')
#同样是通过f12查看源码搜索token,找到了作为CSRF禁止跨站请求的token的标签,通过解析取得它的值
token = s1.find(name='input',attrs={'name':'authenticity_token'}).get('value')
#有的网站会在第一次get请求时给客户端发送一组cookies,当客户端带着此cookies来进行验证才会通过,所以这里先获取未登录的cookies
r1_cookie_dict= r1.cookies.get_dict()

#将用户名密码token发送到服务端
r2 = requests.post('https://github.com/session',
                   data={
                       'utf8':'✓',
                       'authenticity_token':token,
                       'login':'Mitsui1993',
                       'password':'假装有密码',
                       'commit':'Sign in'
                   },
                   cookies = r1_cookie_dict
                   )

#获取登陆后拿到的cookies,并整合到一个dict里
r2_cookie_dict = r2.cookies.get_dict()
cookie_dict = {}
cookie_dict.update(r1_cookie_dict)
cookie_dict.update(r2_cookie_dict)

#带着cookies验证是否登录成功,查看登录后可见的页面
r3 = requests.get(
    url='https://github.com/settings/emails',
    cookies=cookie_dict
)

#text里包含我的用户名,由此判定已经登录成功。
print(r3.text)
2.通过requests对抽屉网进行点赞
import requests

#取得未登录第一次get请求的cookies
r1 = requests.get('http://dig.chouti.com')
r1_cookies = r1.cookies.get_dict()

#由于点赞前需要先登录,所以这里跟github一样,我们通过解析http请求知道需要发送的目标url以及所需数据
r2 = requests.post('http://dig.chouti.com/login',
                   data={
                       'phone':'8615xxxxx',
                       'password':'woshiniba',
                       'oneMonth':1
                   },
                   cookies = r1_cookies)

#获取登录后的cookies
r2_cookies = r2.cookies.get_dict()

#整合cookies
r_cookies = {}
r_cookies.update(r1_cookies)
r_cookies.update(r2_cookies)

#真正的点赞功能需要的是第一次get时的cookies里的gpsd,这也是为什么我们主张将登陆前后的cookies合并一起发送的原因,
#这将大大提高我们请求的容错率。
# r_cookies = {'gpsd':r1_cookies['gpsd']}

#点赞格式url格式linksId=后面为文章id
r3 = requests.post('http://dig.chouti.com/link/vote?linksId=13921736',
              cookies = r_cookies)

#获得正确的状态码及返回信息,则正面已经成功。
print(r3.text)
三。requests模块与 模块的其它方法:


 1 def request(method, url, **kwargs):
 2     """Constructs and sends a :class:`Request <Request>`.
 3
 4     :param method: method for the new :class:`Request` object.
 5     :param url: URL for the new :class:`Request` object.
 6     :param params: (optional) Dictionary or bytes to be sent in the query string for the :class:`Request`.
 7     :param data: (optional) Dictionary, bytes, or file-like object to send in the body of the :class:`Request`.
 8     :param json: (optional) json data to send in the body of the :class:`Request`.
 9     :param headers: (optional) Dictionary of HTTP Headers to send with the :class:`Request`.
10     :param cookies: (optional) Dict or CookieJar object to send with the :class:`Request`.
11     :param files: (optional) Dictionary of ``'name': file-like-objects`` (or ``{'name': file-tuple}``) for multipart encoding upload.
12         ``file-tuple`` can be a 2-tuple ``('filename', fileobj)``, 3-tuple ``('filename', fileobj, 'content_type')``
13         or a 4-tuple ``('filename', fileobj, 'content_type', custom_headers)``, where ``'content-type'`` is a string
14         defining the content type of the given file and ``custom_headers`` a dict-like object containing additional headers
15         to add for the file.
16     :param auth: (optional) Auth tuple to enable Basic/Digest/Custom HTTP Auth.
17     :param timeout: (optional) How long to wait for the server to send data
18         before giving up, as a float, or a :ref:`(connect timeout, read
19         timeout) <timeouts>` tuple.
20     :type timeout: float or tuple
21     :param allow_redirects: (optional) Boolean. Set to True if POST/PUT/DELETE redirect following is allowed.
22     :type allow_redirects: bool
23     :param proxies: (optional) Dictionary mapping protocol to the URL of the proxy.
24     :param verify: (optional) whether the SSL cert will be verified. A CA_BUNDLE path can also be provided. Defaults to ``True``.
25     :param stream: (optional) if ``False``, the response content will be immediately downloaded.
26     :param cert: (optional) if String, path to ssl client cert file (.pem). If Tuple, ('cert', 'key') pair.
27     :return: :class:`Response <Response>` object
28     :rtype: requests.Response
29
30     Usage::
31
32       >>> import requests
33       >>> req = requests.request('GET', 'http://httpbin.org/get')
34       <Response [200]>
35     """
36 复制代码