摘要
要开发一款优秀的application,控件肯定是必不可少的,uwp就为开发者提供了各种各样的系统控件,AutoSuggestBox就是uwp极具特色的控件之一,也是相对于之前win8.1的uap较新的控件,今天我们就来谈谈AutoSuggestBox的基本用法及其自定义UI方法。
A Simplest Sample
话不多说,先来个小Demo。
<!-- MainPage.xaml -->
<Page
    x:Class="AutoSuggestBoxSample.MainPage"
    xmlns="http://schemas.microsoft.com/winfx/2006/xaml/presentation"
    xmlns:x="http://schemas.microsoft.com/winfx/2006/xaml"
    xmlns:local="using:AutoSuggestBoxSample"
    xmlns:d="http://schemas.microsoft.com/expression/blend/2008"
    xmlns:mc="http://schemas.openxmlformats.org/markup-compatibility/2006"
    mc:Ignorable="d">

    <StackPanel VerticalAlignment="Center" Background="{ThemeResource ApplicationPageBackgroundThemeBrush}">
        <AutoSuggestBox x:Name="autoSuggestBox"
                        PlaceholderText="Type a control name"
                        TextChanged="AutoSuggestBox_TextChanged"
                        QueryIcon="Find"
                        QuerySubmitted="AutoSuggestBox_QuerySubmitted"
                        Width="300"
                        HorizontalAlignment="Center"/>
        <TextBlock x:Name="textBlock" HorizontalAlignment="Center" Margin="10"/>
    </StackPanel>
</Page>
//MainPage.xaml.cs

using System;
using System.Collections.Generic;
using System.Collections.ObjectModel;
using System.IO;
using System.Linq;
using System.Runtime.InteropServices.WindowsRuntime;
using Windows.Foundation;
using Windows.Foundation.Collections;
using Windows.UI.Xaml;
using Windows.UI.Xaml.Controls;
using Windows.UI.Xaml.Controls.Primitives;
using Windows.UI.Xaml.Data;
using Windows.UI.Xaml.Input;
using Windows.UI.Xaml.Media;
using Windows.UI.Xaml.Navigation;

namespace AutoSuggestBoxSample
{
    /// <summary>
    /// An empty page that can be used on its own or navigated to within a Frame.
    /// </summary>
    public sealed partial class MainPage : Page
    {

        public MainPage()
        {
            suggestions = new ObservableCollection<string>();
            this.InitializeComponent();
        }

        private ObservableCollection<String> suggestions;

        private void AutoSuggestBox_QuerySubmitted(AutoSuggestBox sender, AutoSuggestBoxQuerySubmittedEventArgs args)
        {
            if (args.ChosenSuggestion != null)
                textBlock.Text = args.ChosenSuggestion.ToString();
            else
                textBlock.Text = sender.Text;
        }

        private void AutoSuggestBox_TextChanged(AutoSuggestBox sender, AutoSuggestBoxTextChangedEventArgs args)
        {
            suggestions.Clear();
            suggestions.Add(sender.Text + "1");
            suggestions.Add(sender.Text + "2");
            sender.ItemsSource = suggestions;
        }
    }
}
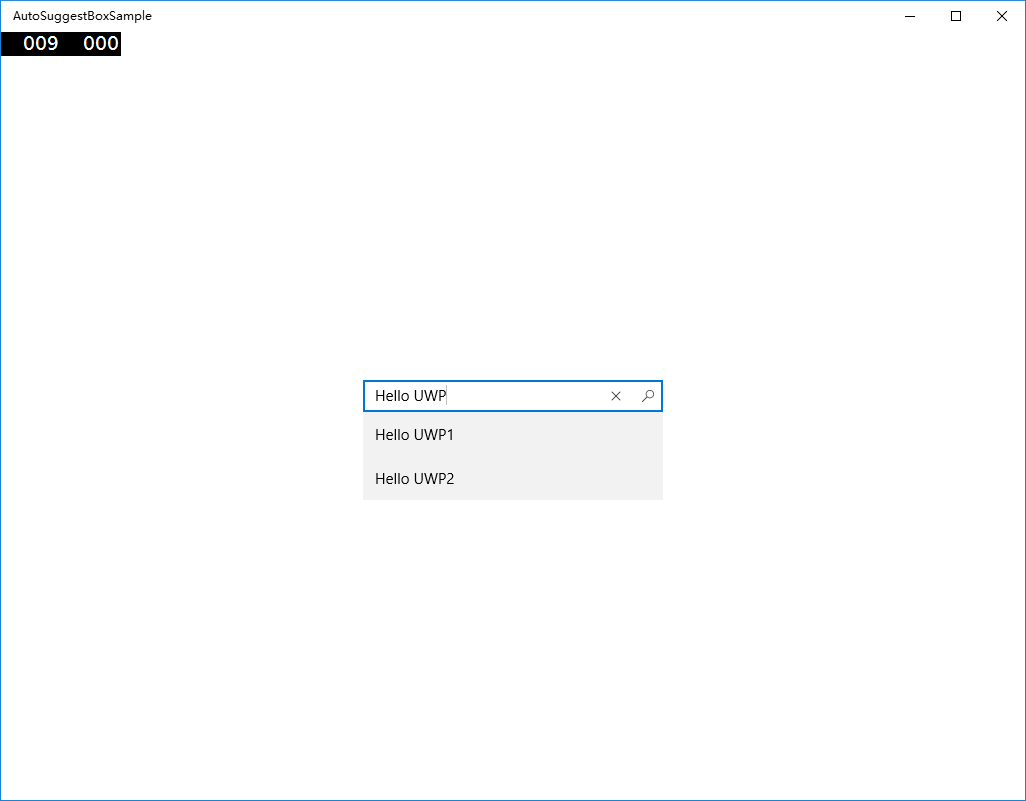
运行结果如图所示:
Understand the code above
上面的代码定义了一个最简单的AutoSuggestBox,先看xaml部分,在AutoSuggestBox标签部分,定义了PlaceHolderText,就是在没有输入的时候显示的Hint。QueryIcon是控件最右边的搜索按钮,等号右边的Find是系统自带的icon,当然也可以选择其它icon,后面我们会说,这个属性可以不设置,这样的话,AutoSuggestBox则不会显示最右边的搜索按钮。而TextChanged和QuerySubmitted对应的是两个事件,事件的定义在MainPage.xaml.cs里面。这里注意一下,除了这两个事件外,还有一个会经常用到并且容易理解错误的事件SuggestionChosen,每次在List选择之后,会自动触发这个事件,除此之外,QuerySubmitted也会触发一次,所以在使用过程中,搞清楚两者之间的关系是必要的。
What if the data set is something else?
细心的读者可能会发现,在上面的例子中,我们仅仅是显示了一个字符串列表,可是在实际开发中,谁又能保证suggestions只能是字符串呢?这当然是不可能的。幸运的是,AutoSuggestBox的Suggestion List其实就是一个ListView,我们可以通过定义ItemTemplate来使ListViewItem展示不同的数据,对AutoSuggestBox来说,当然也是可行的。举例来说,当数据集为SampleSuggest对象:
    public class SampleSuggest
    {
        public int Index { set; get; }
        public String Value { set; get; }
    }
若要正常显示ListViewItem,则需要在XAML里面定义AutoSuggestBox的ItemTemplate属性,如下所示:
        <AutoSuggestBox x:Name="autoSuggestBox"
                        PlaceholderText="Type a control name"
                        TextChanged="AutoSuggestBox_TextChanged"
                        QueryIcon="Find"
                        QuerySubmitted="AutoSuggestBox_QuerySubmitted"
                        Width="300"
                        HorizontalAlignment="Center">
            <AutoSuggestBox.ItemTemplate>
                <DataTemplate x:DataType="local:SampleSuggest">
                    <StackPanel Orientation="Horizontal">
                        <TextBlock Text="{x:Bind Path=Index}"/>
                        <TextBlock Margin="10,0,0,0" Text="{x:Bind Path=Value}"/>
                    </StackPanel>
                </DataTemplate>
            </AutoSuggestBox.ItemTemplate>
        </AutoSuggestBox>
这样ListViewItem就能按照我们的定义显示了:
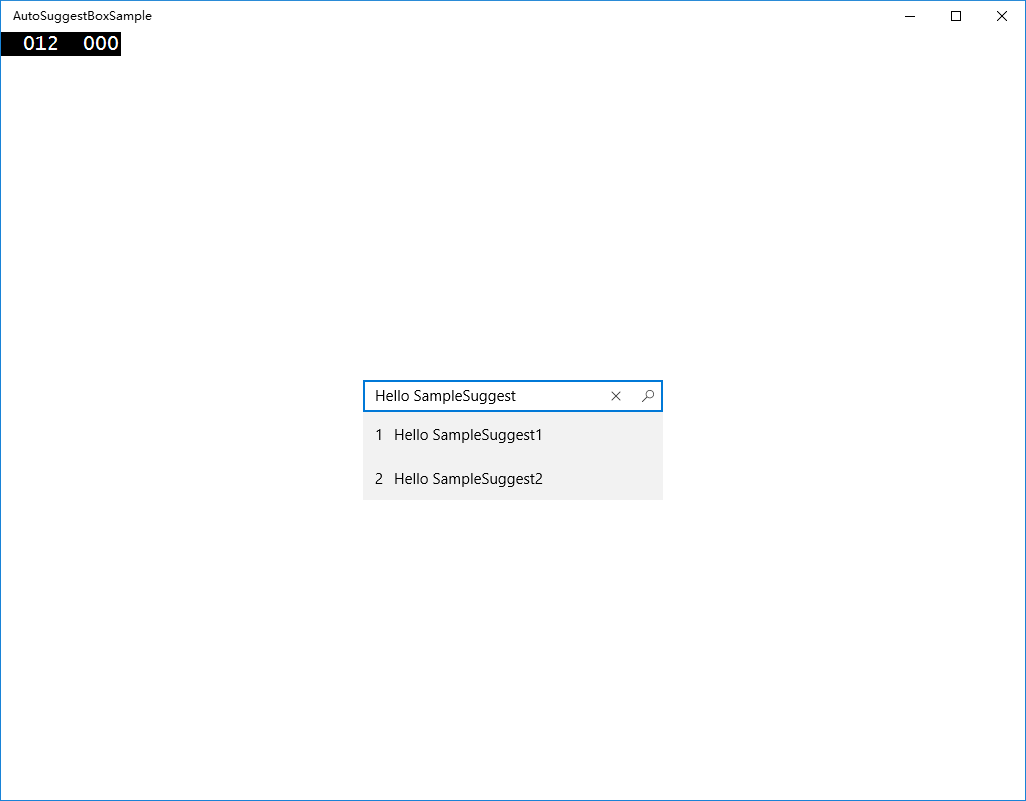
但是,当我们点击列表时,TextBox里面显示的却是AutoSuggestBoxSample.SampleSuggest,这显然不是我们想要的。因为在选择ListViewItem的时候,系统会自动调用选中数据的ToString()方法,将得到的字符串显示在TextBox中。为了放着这种情况发生,我们可以选择重写SampleSuggest的ToString()方法,或者为AutoSuggestBox添加 SuggestionChosen事件,在事件中根据Suggestion决定TextBox中显示的内容,在这里,文章将使用第二种方法。
首先,在AutuSuggestBox的XAML定义中,添加以下属性:
SuggestionChosen="AutoSuggestBox_SuggestionChosen"
然后,在相应的cs文件中添加如下代码:
        private void AutoSuggestBox_SuggestionChosen(AutoSuggestBox sender, AutoSuggestBoxSuggestionChosenEventArgs args)
        {
            SampleSuggest suggest = args.SelectedItem as SampleSuggest;
            if (suggest == null)
                return;
            sender.Text = suggest.Value;
        }
这样,一个AutoSuggestBox的功能就基本完成了!!
[Ignorable]
A story which is not interesting
这里,请允许小编插入一段不是很有趣的故事……不喜欢的读者可以直接跳过……
小编接到任务,需要开发一个这样的控件:

小编看到,立刻就开心了,这不是AutoSuggestBox嘛!!简单!!
于是,小编很兴奋地写下了以下代码:
<AutoSuggestBox x:Name="autoSuggestBox"
                        PlaceholderText="anything to search?"
                        BorderThickness="0"
                        Background="#232323"
                        Foreground="White"
                        QueryIcon="Find"
                        VerticalContentAlignment="Center"
                        Width="500"
                        Height="50"
                        HorizontalAlignment="Center"/>
结果出来的结果是这个样子的……

此时,小编的心情是这样的……

于是乎,小编便下定决心要改改这个AutoSuggestBox,就有了下边的内容……
Style the AutoSuggestBox
通过以上的程序,我们实现了AutoSuggestBox的基本功能,但是这样一个控件一般都不会满足我们程序开发的需求,因为它长得似乎不那么漂亮,或者说,不那么满足我们的需求。所以,我们要自己定义AutoSuggestBox的style,让它看上去更有范儿!
在VS designer的Document Outline面板中右键点击定义的AutoSuggestBox -> Edit Template -> Edit a Copy…,则会在XAML里生成AutoSuggestBox的Style。
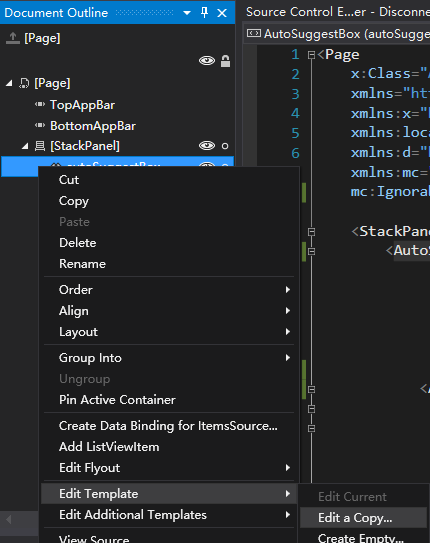
通过观察以下由VS生成的Style代码,我们可以知道,这个神奇的AutoSuggestBox其实就是由一个TextBox和一个Popup构成的:
            <Setter Property="Template">
                <Setter.Value>
                    <ControlTemplate TargetType="AutoSuggestBox">
                        <Grid>
                            <VisualStateManager.VisualStateGroups>
                                <VisualStateGroup x:Name="Orientation">
                                    <VisualState x:Name="Landscape"/>
                                    <VisualState x:Name="Portrait"/>
                                </VisualStateGroup>
                            </VisualStateManager.VisualStateGroups>
                            <TextBox x:Name="TextBox" ScrollViewer.BringIntoViewOnFocusChange="False" DesiredCandidateWindowAlignment="BottomEdge" Header="{TemplateBinding Header}" Margin="0" PlaceholderText="{TemplateBinding PlaceholderText}" Style="{TemplateBinding TextBoxStyle}" Width="{TemplateBinding Width}" Canvas.ZIndex="0"/>
                            <Popup x:Name="SuggestionsPopup">
                                <Border x:Name="SuggestionsContainer">
                                    <Border.RenderTransform>
                                        <TranslateTransform x:Name="UpwardTransform"/>
                                    </Border.RenderTransform>
                                    <ListView x:Name="SuggestionsList" BorderBrush="{ThemeResource SystemControlForegroundBaseMediumLowBrush}" BorderThickness="{ThemeResource AutoSuggestListBorderThemeThickness}" Background="{ThemeResource SystemControlBackgroundChromeMediumLowBrush}" DisplayMemberPath="{TemplateBinding DisplayMemberPath}" IsItemClickEnabled="True" ItemTemplate="{TemplateBinding ItemTemplate}" ItemContainerStyle="{TemplateBinding ItemContainerStyle}" ItemTemplateSelector="{TemplateBinding ItemTemplateSelector}" MaxHeight="{ThemeResource AutoSuggestListMaxHeight}" Margin="{ThemeResource AutoSuggestListMargin}">
                                        <ListView.ItemContainerTransitions>
                                            <TransitionCollection/>
                                        </ListView.ItemContainerTransitions>
                                    </ListView>
                                </Border>
                            </Popup>
                        </Grid>
                    </ControlTemplate>
                </Setter.Value>
            </Setter>
那么AutoSuggestBox的外观,基本就是由其中的TextBox决定的,其中对应的就是一个AutoSuggestBoxTextBoxStyle:
        <Style x:Key="AutoSuggestBoxTextBoxStyle" TargetType="TextBox">
            <Setter Property="MinWidth" Value="{ThemeResource TextControlThemeMinWidth}"/>
            <Setter Property="MinHeight" Value="{ThemeResource TextControlThemeMinHeight}"/>
            <Setter Property="Foreground" Value="{ThemeResource SystemControlForegroundBaseHighBrush}"/>
            <Setter Property="Background" Value="#ffdddddd"/>
            <Setter Property="BorderBrush" Value="{ThemeResource SystemControlForegroundChromeDisabledLowBrush}"/>
            <Setter Property="SelectionHighlightColor" Value="{ThemeResource SystemControlHighlightAccentBrush}"/>
            <Setter Property="BorderThickness" Value="{ThemeResource TextControlBorderThemeThickness}"/>
            <Setter Property="FontFamily" Value="{ThemeResource ContentControlThemeFontFamily}"/>
            <Setter Property="FontSize" Value="{ThemeResource ControlContentThemeFontSize}"/>
            <Setter Property="ScrollViewer.HorizontalScrollBarVisibility" Value="Hidden"/>
            <Setter Property="ScrollViewer.VerticalScrollBarVisibility" Value="Hidden"/>
            <Setter Property="ScrollViewer.IsDeferredScrollingEnabled" Value="False"/>
            <Setter Property="Padding" Value="{ThemeResource TextControlThemePadding}"/>
            <Setter Property="Template">
………
        </Style>
有了这个,我们就可以轻松定义AutoSuggestBox的外观啦!我们再看这个AutoSuggestBoxTextBoxStyle,它主要由以下几个部分构成:ContentElement,它是一个ScrollViewer,就是我们TextBox中的输入部分;PlacehoderTextContentPresenter,通过它的名字,我们可以知道它就是显示PlacehoderText的部分;还有DeleteButton和QueryButton两个按钮,分别对应控件中的删除按钮和查询按钮:
    <Border x:Name="BackgroundElement" Background="{TemplateBinding Background}" Grid.ColumnSpan="3" Margin="{TemplateBinding BorderThickness}" Opacity="{ThemeResource TextControlBackgroundRestOpacity}" Grid.Row="1" Grid.RowSpan="1"/>
    <Border x:Name="BorderElement" BorderBrush="{TemplateBinding BorderBrush}" BorderThickness="{TemplateBinding BorderThickness}" Grid.ColumnSpan="3" Grid.Row="1" Grid.RowSpan="1"/>
    <ContentPresenter x:Name="HeaderContentPresenter" Grid.ColumnSpan="3" ContentTemplate="{TemplateBinding HeaderTemplate}" Content="{TemplateBinding Header}" Foreground="{ThemeResource SystemControlForegroundBaseHighBrush}" FontWeight="Normal" Margin="0,0,0,8" Grid.Row="0" TextWrapping="Wrap" Visibility="Collapsed" x:DeferLoadStrategy="Lazy"/>
    <ScrollViewer x:Name="ContentElement" AutomationProperties.AccessibilityView="Raw" HorizontalScrollMode="{TemplateBinding ScrollViewer.HorizontalScrollMode}" HorizontalScrollBarVisibility="{TemplateBinding ScrollViewer.HorizontalScrollBarVisibility}" IsTabStop="False" IsHorizontalRailEnabled="{TemplateBinding ScrollViewer.IsHorizontalRailEnabled}" IsVerticalRailEnabled="{TemplateBinding ScrollViewer.IsVerticalRailEnabled}" IsDeferredScrollingEnabled="{TemplateBinding ScrollViewer.IsDeferredScrollingEnabled}" Margin="{TemplateBinding BorderThickness}" Padding="{TemplateBinding Padding}" Grid.Row="1" VerticalScrollBarVisibility="{TemplateBinding ScrollViewer.VerticalScrollBarVisibility}" VerticalScrollMode="{TemplateBinding ScrollViewer.VerticalScrollMode}" ZoomMode="Disabled"/>
    <ContentControl x:Name="PlaceholderTextContentPresenter" Grid.ColumnSpan="3" Content="{TemplateBinding PlaceholderText}" Foreground="{ThemeResource SystemControlPageTextBaseMediumBrush}" IsHitTestVisible="False" IsTabStop="False" Margin="{TemplateBinding BorderThickness}" Padding="{TemplateBinding Padding}" Grid.Row="1"/>
    <Button x:Name="DeleteButton" BorderThickness="{TemplateBinding BorderThickness}" Grid.Column="1" FontSize="{TemplateBinding FontSize}" IsTabStop="False" Margin="{ThemeResource HelperButtonThemePadding}" MinWidth="34" Grid.Row="1" Style="{StaticResource DeleteButtonStyle}" Visibility="Collapsed" VerticalAlignment="Stretch"/>
    <Button x:Name="QueryButton" BorderThickness="{TemplateBinding BorderThickness}" Grid.Column="2" FontSize="{TemplateBinding FontSize}" IsTabStop="False" Margin="{ThemeResource HelperButtonThemePadding}" MinWidth="34" Grid.Row="1" Style="{StaticResource QueryButtonStyle}" VerticalAlignment="Stretch"/>
这下就清楚很多了,那么我们就开始改造我们的AutoSuggestBox吧!
首先是Foreground和Background,将AutoSuggestBoxTextBoxStyle里以下代码替换为:
            <Setter Property="Foreground" Value="White"/>
            <Setter Property="Background" Value="#232323"/>
然后,去掉Border:
<Setter Property="BorderThickness" Value="0"/>
改变DeleteButton的VisualState,主要是PointOver和Pressed两种状态:
    <VisualState x:Name="PointerOver">
        <Storyboard>
            <ObjectAnimationUsingKeyFrames Storyboard.TargetProperty="Background" Storyboard.TargetName="BorderElement">
                <DiscreteObjectKeyFrame KeyTime="0" Value="{ThemeResource SystemControlHighlightTransparentBrush}"/>
            </ObjectAnimationUsingKeyFrames>
            <ObjectAnimationUsingKeyFrames Storyboard.TargetProperty="Foreground" Storyboard.TargetName="GlyphElement">
                <DiscreteObjectKeyFrame KeyTime="0" Value="Goldenrod"/>
            </ObjectAnimationUsingKeyFrames>
        </Storyboard>
    </VisualState>
    <VisualState x:Name="Pressed">
        <Storyboard>
            <ObjectAnimationUsingKeyFrames Storyboard.TargetProperty="Background" Storyboard.TargetName="BorderElement">
                <DiscreteObjectKeyFrame KeyTime="0" Value="Goldenrod"/>
            </ObjectAnimationUsingKeyFrames>
            <ObjectAnimationUsingKeyFrames Storyboard.TargetProperty="Foreground" Storyboard.TargetName="GlyphElement">
                <DiscreteObjectKeyFrame KeyTime="0" Value="{ThemeResource SystemControlHighlightAltChromeWhiteBrush}"/>
            </ObjectAnimationUsingKeyFrames>
        </Storyboard>
    </VisualState>
接着去Style我们的QueryButton,首先是QueryIcon:
        <AutoSuggestBox x:Name="autoSuggestBox"
                        PlaceholderText="anything to search?"
                        BorderThickness="0"
                        Background="#232323"
                        Foreground="White"
                        VerticalContentAlignment="Center"
                        Width="500"
                        Height="50"
                        HorizontalAlignment="Center" Style="{StaticResource AutoSuggestBoxStyle1}">
            <AutoSuggestBox.QueryIcon>
                <BitmapIcon UriSource="ms-appx:Assets/actionbar_searchicon.png"/>
            </AutoSuggestBox.QueryIcon>
        </AutoSuggestBox>
然后是Button的大小,从Style里面去更改:
<Button x:Name="QueryButton" Width="50" Height="50" BorderThickness="{TemplateBinding BorderThickness}" Grid.Column="2" FontSize="{TemplateBinding FontSize}" IsTabStop="False" Margin="{ThemeResource HelperButtonThemePadding}" MinWidth="34" Grid.Row="1" Style="{StaticResource QueryButtonStyle}" VerticalAlignment="Stretch"/>
修改QueryButton的Background,注意这里并不能直接在Button里添加Background属性,而是在QueryButtonStyle里的ContentPresenter里面修改,同时把Margin设置为0,以便于能填充全部背景:
<ContentPresenter x:Name="ContentPresenter" AutomationProperties.AccessibilityView="Raw" Background="Goldenrod" ContentTemplate="{TemplateBinding ContentTemplate}" ContentTransitions="{TemplateBinding ContentTransitions}" Content="{TemplateBinding Content}" HorizontalAlignment="{TemplateBinding HorizontalContentAlignment}" Margin="0" VerticalAlignment="{TemplateBinding VerticalContentAlignment}"/>
因为调整了QueryButton的高度,所以控件整体高度会变高,为了让TextBox里面的Text能够垂直居中,需要在AutoSuggestBoxTextBoxStyle中,将显示正文的ContentElement和显示hint的PlaceholderTextContentPresenter的VerticalAlignment设为Center,同时设置FontSize:
  <ScrollViewer x:Name="ContentElement" AutomationProperties.AccessibilityView="Raw" FontSize="20" HorizontalScrollMode="{TemplateBinding ScrollViewer.HorizontalScrollMode}" HorizontalScrollBarVisibility="{TemplateBinding ScrollViewer.HorizontalScrollBarVisibility}" IsTabStop="False" IsHorizontalRailEnabled="{TemplateBinding ScrollViewer.IsHorizontalRailEnabled}" IsVerticalRailEnabled="{TemplateBinding ScrollViewer.IsVerticalRailEnabled}" IsDeferredScrollingEnabled="{TemplateBinding ScrollViewer.IsDeferredScrollingEnabled}" Margin="{TemplateBinding BorderThickness}" Padding="{TemplateBinding Padding}" Grid.Row="1" VerticalAlignment="Center" VerticalScrollBarVisibility="{TemplateBinding ScrollViewer.VerticalScrollBarVisibility}" VerticalScrollMode="{TemplateBinding ScrollViewer.VerticalScrollMode}" ZoomMode="Disabled"/>
  <ContentControl x:Name="PlaceholderTextContentPresenter" FontSize="20" Grid.ColumnSpan="3" Content="{TemplateBinding PlaceholderText}" Foreground="{ThemeResource SystemControlPageTextBaseMediumBrush}" IsHitTestVisible="False" IsTabStop="False" Margin="{TemplateBinding BorderThickness}" Padding="{TemplateBinding Padding}" Grid.Row="1" VerticalAlignment="Center"/>
程序运行结果如下图所示:

和目标发现,好像还有什么不一样的……对!是Background!可是我们已经设置过Background啦……这是为什么呢?通过观察Style,我们发现,有许多VisualState的Background都有Transparent的属性,也就是说,AutoSuggestBox显示出来的Background和它的父控件式相关的。简单起见,我们直接为AutoSuggestBox添加一个背景色相同的Grid就好:
  <Grid Width="500" Background="#232323" VerticalAlignment="Center" HorizontalAlignment="Center">
      <AutoSuggestBox x:Name="autoSuggestBox"
                  PlaceholderText="anything to search?"
                  Style="{StaticResource AutoSuggestBoxStyle1}">
          <AutoSuggestBox.QueryIcon>
              <BitmapIcon UriSource="ms-appx:Assets/actionbar_searchicon.png"/>
          </AutoSuggestBox.QueryIcon>
      </AutoSuggestBox>
  </Grid>
再执行程序,发现和目标就相同了!!

Consulting
本文概括地介绍了AutoSuggestBox的使用方法以及简单自定义Style,希望初次使用该控件的开发者能够从中得到些许帮助并交流一些开发经验,谢谢!