在TensorFlow 的官网上,有一个很有趣的教程,就是用 TensorFlow 以及训练好的深度卷积神经(GoogleNet)网络去生成一些有趣的pattern,通过这些pattern,可以更加深入的去了解神经网络到底学到了什么, 这个教程有四个主要部分:
1:简单的单通道纹理pattern的生成;
2:利用tiled computation 生成高分辨率图像;
3:利用 Laplacian Pyramid Gradient Normalization 生成各种有趣的视觉效果;
4:生成类似 Deepdream的图像;
这个教程还提供了一个生成pattern的图像库,
http://storage.googleapis.com/deepdream/visualz/tensorflow_inception/index.html
在这个库里,可以看到神经网络每一层上生成的pattern。
在学习这个教程之前,请确保你已经安装好了Tensorflow 以及 Jupyter.
这个教程里的所有pattern都是基于训练好的Googlenet 生成的,Googlenet 网络先在 ImageNet 上进行了足够的训练。
先看第一部分:
简单的单通道纹理pattern的生成
# boilerplate code
from __future__ import print_function
import os
from io import BytesIO
import numpy as np
from functools import partial
import PIL.Image
from IPython.display import clear_output, Image, display, HTML

import tensorflow as tf

# 运行以下这句代码将训练好的网络模型下载解压到本地:
!wget https://storage.googleapis.com/download.tensorflow.org/models/inception5h.zip && unzip inception5h.zip

model_fn = 'tensorflow_inception_graph.pb'

# creating TensorFlow session and loading the model
# 加载模型
graph = tf.Graph()
sess = tf.InteractiveSession(graph=graph)
with tf.gfile.FastGFile(model_fn, 'rb') as f:
    graph_def = tf.GraphDef()
    graph_def.ParseFromString(f.read())
t_input = tf.placeholder(np.float32, name='input') # define the input tensor
imagenet_mean = 117.0
t_preprocessed = tf.expand_dims(t_input-imagenet_mean, 0)
tf.import_graph_def(graph_def, {'input':t_preprocessed})

# 获取网络的层数以及总的通道数
layers = [op.name for op in graph.get_operations() if op.type=='Conv2D' and 'import/' in op.name]
feature_nums = [int(graph.get_tensor_by_name(name+':0').get_shape()[-1]) for name in layers]

print('Number of layers', len(layers))
print('Total number of feature channels:', sum(feature_nums))

# Picking some internal layer. Note that we use outputs before applying the ReLU nonlinearity
# to have non-zero gradients for features with negative initial activations.
# 选择某些中间层,以及某个通道
layer = 'mixed4d_3x3_bottleneck_pre_relu'
channel = 139 # picking some feature channel to visualize

# start with a gray image with a little noise
# 先生成一个噪声图像
img_noise = np.random.uniform(size=(224,224,3)) + 100.0

def showarray(a, fmt='jpeg'):
    a = np.uint8(np.clip(a, 0, 1)*255)
    f = BytesIO()
    PIL.Image.fromarray(a).save(f, fmt)
    display(Image(data=f.getvalue()))

def visstd(a, s=0.1):
    # Normalize the image range for visualization
    return (a-a.mean())/max(a.std(), 1e-4)*s + 0.5

def T(layer):
    # Helper for getting layer output tensor
    return graph.get_tensor_by_name("import/%s:0"%layer)

def render_naive(t_obj, img0=img_noise, iter_n=20, step=1.0):
    t_score = tf.reduce_mean(t_obj) # defining the optimization objective
    t_grad = tf.gradients(t_score, t_input)[0] # behold the power of automatic differentiation!

    img = img0.copy()
    for i in range(iter_n):
        g, score = sess.run([t_grad, t_score], {t_input:img})
        # normalizing the gradient, so the same step size should work
        g /= g.std()+1e-8         # for different layers and networks
        img += g*step
        print(score, end = ' ')
    clear_output()
    showarray(visstd(img))

render_naive(T(layer)[:,:,:,channel])
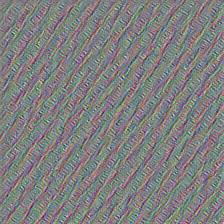
我们看看生成的效果图:
layer = ‘mixed4d_3x3_bottleneck_pre_relu’ channel = 139
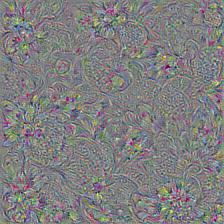
layer = ‘mixed3b_3x3_bottleneck_pre_relu’ channel =10
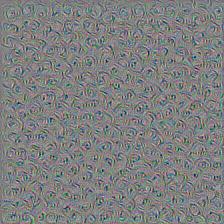
layer = ‘mixed3a_3x3_bottleneck_pre_relu’ channel =20