Netty服务启动源码
Server启动实例
public class Server {
    private int port;
    public Server(int port) {
        this.port = port;
    }
    public void run() {
        NioEventLoopGroup bossGroup = new NioEventLoopGroup(1);
        NioEventLoopGroup workerGroup = new NioEventLoopGroup();
        try {
            ServerBootstrap serverBootstrap = new ServerBootstrap();
            serverBootstrap.group(bossGroup, workerGroup)
                    .channel(NioServerSocketChannel.class)
                    .option(ChannelOption.SO_BACKLOG, 128)
                    .childOption(ChannelOption.SO_KEEPALIVE, true)
                    .childHandler(new ChannelInitializer<SocketChannel>() {
                        @Override
                        protected void initChannel(SocketChannel ch) throws Exception {
                            ChannelPipeline pipeline = ch.pipeline();
                            pipeline.addLast("decoder", new StringDecoder());
                            pipeline.addLast("encoder", new StringEncoder());
                            pipeline.addLast(new ServerHandler());
                        }
                    });
            ChannelFuture ch = serverBootstrap.bind(port).sync();
            ch.channel().closeFuture().sync();
        } catch (InterruptedException e) {
            e.printStackTrace();
        } finally {
            bossGroup.shutdownGracefully();
            workerGroup.shutdownGracefully();
        }
    }
    public static void main(String[] args) {
        new Server(7000).run();
    }
}
一、NioEventLoopGroup的创建
首先创建两个NioEventLoopGroup对象
NioEventLoopGroup bossGroup = new NioEventLoopGroup(1);
NioEventLoopGroup workerGroup = new NioEventLoopGroup();
- Boss Group:专门负责接受TCP请求,将请求转交给WorkerGroup;
- Worker Group:获得连接,进行通信,包括读写,编解码等;
EventLoopGroup本质是事件循环线程组;
执行流程
- 创建
NioEventLoopGroup对象
NioEventLoopGroup workerGroup = new NioEventLoopGroup();
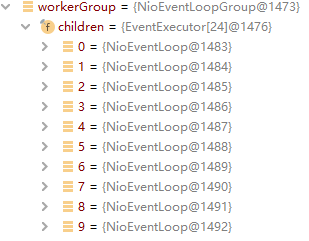
NioEventLoopGroup对象内有一个children数组对象:EventExecutor[] children
每一个EventExecutor都会创建一个NioEventLoop实例;也就是Netty模型中的处理每个连接读写的一个线程;
-
调用无参构造器:线程数为0
最终会调用父类
MultithreadEventLoopGroup的构造器
public NioEventLoopGroup() {
    this(0);
}
// 传入线程数,默认Executor为null
public NioEventLoopGroup(int nThreads) {
    this(nThreads, (Executor) null);
}
public NioEventLoopGroup(int nThreads, Executor executor) {
    this(nThreads, executor, SelectorProvider.provider());
}
public NioEventLoopGroup(int nThreads, Executor executor, final SelectorProvider selectorProvider,
                         final SelectStrategyFactory selectStrategyFactory) {
    super(nThreads, executor, selectorProvider, selectStrategyFactory, RejectedExecutionHandlers.reject());
}
-
MultithreadEventLoopGroup的构造器;如果nThreads=0,则赋值默认线程数为
DEFAULT_EVENT_LOOP_THREADS=CPU核数*2
protected MultithreadEventLoopGroup(int nThreads, Executor executor, Object... args) {
    super(nThreads == 0 ? DEFAULT_EVENT_LOOP_THREADS : nThreads, executor, args);
}
// 其中DEFAULT_EVENT_LOOP_THREADS = CPU处理器 * 2
// NettyRuntime.availableProcessors() * 2
static {
        DEFAULT_EVENT_LOOP_THREADS = Math.max(1, SystemPropertyUtil.getInt(
                "io.netty.eventLoopThreads", NettyRuntime.availableProcessors() * 2));
}
-
继续往下走,会再调用其父类
MultithreadEventExecutorGroup的构造方法:主要是:
(1)执行器
executor的初始化为ThreadPerTaskExecutor(2)
children初始化为线程数的EventExecutor数组:new EventExecutor[nThreads]每一个
children[i]传入一个executor执行器(ThreadPerTaskExecutor)这里每一个
children[i]都是Netty模型中的一个NioEventLoop(3)
chooser选择器:用于选择executor执行器,通过next方法;这里根据线程数是否为2的幂次方,来返回不同的
EventExecutorChooser,如果是2的幂次方,返回
PowerOfTwoEventExecutorChooser,使用&来调用next;(这里类似于HashMap的优化:在2的幂次方下&运算比%运算快)
(在自定义线程数的时候,最好是2的n次方)
如果不是,返回
GenericEventExecutorChooser,使用%来调用next;(4)为
children下的每个EventExecutor注册监听器terminationListener,监听终止事件;(5)最终,创建了
childrenSet本质是LinkedHashSet;将每个EventExecutor(每一个单例线程池)添加进去;
protected MultithreadEventExecutorGroup(int nThreads, Executor executor,
                                        EventExecutorChooserFactory chooserFactory, Object... args) {
    if (nThreads <= 0) {
        throw new IllegalArgumentException(String.format("nThreads: %d (expected: > 0)", nThreads));
    }
	// 执行器初始化为ThreadPerTaskExecutor
    if (executor == null) {
        executor = new ThreadPerTaskExecutor(newDefaultThreadFactory());
    }
	// 挨个初始化children,不成功shutdown
    children = new EventExecutor[nThreads];
    for (int i = 0; i < nThreads; i ++) {
        boolean success = false;
        try {
            // 这里真正创建了Netty模型中的NioEventLoop
            children[i] = newChild(executor, args);
            success = true;
        } catch (Exception e) {
            throw new IllegalStateException("failed to create a child event loop", e);
        } finally {
            if (!success) {
                for (int j = 0; j < i; j ++) {
                    children[j].shutdownGracefully();
                }

                for (int j = 0; j < i; j ++) {
                    EventExecutor e = children[j];
                    try {
                        while (!e.isTerminated()) {
                            e.awaitTermination(Integer.MAX_VALUE, TimeUnit.SECONDS);
                        }
                    } catch (InterruptedException interrupted) {
                        Thread.currentThread().interrupt();
                        break;
                    }
                }
            }
        }
    }
    // 选择器:根据线程数是否为2的幂次方,来决定next方法的不同
    chooser = chooserFactory.newChooser(children);
    // 创建监听器
    final FutureListener<Object> terminationListener = new FutureListener<Object>() {
        @Override
        public void operationComplete(Future<Object> future) throws Exception {
            if (terminatedChildren.incrementAndGet() == children.length) {
                terminationFuture.setSuccess(null);
            }
        }
    };
	// 绑定监听器
    for (EventExecutor e: children) {
        e.terminationFuture().addListener(terminationListener);
    }

    Set<EventExecutor> childrenSet = new LinkedHashSet<EventExecutor>(children.length);
    Collections.addAll(childrenSet, children);
    readonlyChildren = Collections.unmodifiableSet(childrenSet);
}
-
单独说一下:
children[i] = newChild(executor, args);此方法最终调用了:NioEventLoop类下的构造函数:
NioEventLoop类就有
selector对象这个属性;在构造函数中,通过
selector = selectorTuple.selector;进行了初始化
// newChild方法,中args参数包含了多个对象
protected EventLoop newChild(Executor executor, Object... args) throws Exception {
    return new NioEventLoop(this, executor, (SelectorProvider) args[0],
                            ((SelectStrategyFactory) args[1]).newSelectStrategy(), (RejectedExecutionHandler) args[2]);
}
// 最终调用NioEventLoop构造函数
NioEventLoop(NioEventLoopGroup parent, Executor executor, SelectorProvider selectorProvider,
             SelectStrategy strategy, RejectedExecutionHandler rejectedExecutionHandler) {
    super(parent, executor, false, DEFAULT_MAX_PENDING_TASKS, rejectedExecutionHandler);
    if (selectorProvider == null) {
        throw new NullPointerException("selectorProvider");
    }
    if (strategy == null) {
        throw new NullPointerException("selectStrategy");
    }
    provider = selectorProvider;
    final SelectorTuple selectorTuple = openSelector();
    // 初始化selector
    selector = selectorTuple.selector;
    unwrappedSelector = selectorTuple.unwrappedSelector;
    selectStrategy = strategy;
}
- 至此,创建
NioEventLoopGroup对象成功;
二、ServerBootstrap的创建配置
ServerBootstrap serverBootstrap = new ServerBootstrap();
serverBootstrap.group(bossGroup, workerGroup)
    .channel(NioServerSocketChannel.class)
    .option(ChannelOption.SO_BACKLOG, 128)
    .childOption(ChannelOption.SO_KEEPALIVE, true)
    .childHandler(new ChannelInitializer<SocketChannel>() {
        @Override
        protected void initChannel(SocketChannel ch) throws Exception {
            ChannelPipeline pipeline = ch.pipeline();
            pipeline.addLast("decoder", new StringDecoder());
            pipeline.addLast("encoder", new StringEncoder());
            pipeline.addLast(new ServerHandler());
        }
    });
这里主要有两个类:ServerBootstrap和其父类AbstractBootstrap,分工不同
- 所有针对
bossGroup的配置由其父类AbstractBootstrap完成; - 所有针对
workerGroup的配置由ServerBootstrap完成;
-
调用
ServerBootstrap的无参构造器,接着调用其父类AbstractBootstrap的无参构造器虽然是空构造器,但是会初始化,此类的多项属性,即下列属性;
private final Map<ChannelOption<?>, Object> childOptions = new LinkedHashMap<ChannelOption<?>, Object>();
private final Map<AttributeKey<?>, Object> childAttrs = new LinkedHashMap<AttributeKey<?>, Object>();
private final ServerBootstrapConfig config = new ServerBootstrapConfig(this);
private volatile EventLoopGroup childGroup;
private volatile ChannelHandler childHandler;
主要初始化完成:
childOptions对象,是一个LinkedHashMap;options就是用来添加各项配置的对象;config对象,本质是ServerBootstrapConfig
public ServerBootstrap() { }
AbstractBootstrap() {}
-
初始化完成
ServerBootstrap后,就可以添加各项配置: -
.group(bossGroup, workerGroup)方法:主要:
(1)调用super在其父类中完成
bossgroup(parentGroup)的初始化(2)在本类中完成
workerGroup(childGroup)初始化
public ServerBootstrap group(EventLoopGroup parentGroup, EventLoopGroup childGroup) {
    // 父类进行bossgroup的初始化
    super.group(parentGroup);
    // 当前类,进行workergroup的初始化
    if (childGroup == null) {
        throw new NullPointerException("childGroup");
    }
    if (this.childGroup != null) {
        throw new IllegalStateException("childGroup set already");
    }
    this.childGroup = childGroup;
    return this;
}
-
.channel(NioServerSocketChannel.class)方法:下面的参数:channelClass即
NioServerSocketChannelAbstractBootstrap父类,通过反射创建了channelFactory是一个ReflectiveChannelFactory实例;
public B channel(Class<? extends C> channelClass) {
    if (channelClass == null) {
        throw new NullPointerException("channelClass");
    }
    return channelFactory(new ReflectiveChannelFactory<C>(channelClass));
}
// 将NioServerSocketChannel传入,赋值
public ReflectiveChannelFactory(Class<? extends T> clazz) {
    if (clazz == null) {
        throw new NullPointerException("clazz");
    }
    this.clazz = clazz;
}
-
.option(ChannelOption.SO_BACKLOG, 128)由
AbstractBootstrap初始化,主要通过options.put(option, value);完成添加配置;
public <T> B option(ChannelOption<T> option, T value) {
    if (option == null) {
        throw new NullPointerException("option");
    }
    if (value == null) {
        synchronized (options) {
            options.remove(option);
        }
    } else {
        synchronized (options) {
            options.put(option, value);
        }
    }
    return self();
}
-
.childHandler(new ChannelInitializer<SocketChannel>(){ })这里简单的,将传入的
ChannelInitializer对象,赋给本类的属性childHandler;
public ServerBootstrap childHandler(ChannelHandler childHandler) {
    if (childHandler == null) {
        throw new NullPointerException("childHandler");
    }
    this.childHandler = childHandler;
    return this;
}
三、pipeline.addLast方法
pipeline.addLast(new ServerHandler());
向管道中添加自定义的Handler或者编解码器的流程;
流程:
-
通过接口
ChannelPipeline的addLast方法(此接口的注释中,描述了ChannelPipeline内部读写结构)由其实现类
DefaultChannelPipeline来完成;最终会来到一个addLast方法
public final ChannelPipeline addLast(EventExecutorGroup group, String name, ChannelHandler handler) {
    // 新创建上下文对象ctx
    final AbstractChannelHandlerContext newCtx;
    // 同步
    synchronized (this) {
        checkMultiplicity(handler);
        // 实例化ctx,
        newCtx = newContext(group, filterName(name, handler), handler);
        // 将新建的ctx,插入到pipeline的双向链表中
        addLast0(newCtx);
        if (!registered) {
            newCtx.setAddPending();
            callHandlerCallbackLater(newCtx, true);
            return this;
        }
        EventExecutor executor = newCtx.executor();
        if (!executor.inEventLoop()) {
            newCtx.setAddPending();
            executor.execute(new Runnable() {
                @Override
                public void run() {
                    callHandlerAdded0(newCtx);
                }
            });
            return this;
        }
    }
    callHandlerAdded0(newCtx);
    return this;
}
addLast0(newCtx);在双向链表中的,尾部的前一个,插入上面新建的ctx;
private void addLast0(AbstractChannelHandlerContext newCtx) {
    AbstractChannelHandlerContext prev = tail.prev;
    newCtx.prev = prev;
    newCtx.next = tail;
    prev.next = newCtx;
    tail.prev = newCtx;
}
四、端口绑定serverBootstrap.bind()
ChannelFuture ch = serverBootstrap.bind(port).sync();
最终就是要完成绑定,返回ChannelFuture(异步执行结果)
这个绑定的过程主要是在serverBootstrap的父类AbstractBootstrap内进行完成的;
主要是两个方法:doBind和initAndRegister
serverBootstrap.bind(port)的走向
// 首先调用此方法,将port封装进InetSocketAddress
public ChannelFuture bind(int inetPort) {
    return bind(new InetSocketAddress(inetPort));
}
// 然后调用下面的方法,这里SocketAddress是InetSocketAddress的父类,没问题
public ChannelFuture bind(SocketAddress localAddress) {
    // 验证方法,主要验证ServerBootstrap是否初始化完成
    validate();
    if (localAddress == null) {
        throw new NullPointerException("localAddress");
    }
    // 最后调用doBind方法
    return doBind(localAddress);
}
doBind方法
private ChannelFuture doBind(final SocketAddress localAddress) {
    // 调用本类 initAndRegister方法
    // 主要是初始化返回一个 ChannelFuture对象 并 向bossGroup注册
    final ChannelFuture regFuture = initAndRegister();
    final Channel channel = regFuture.channel();
    if (regFuture.cause() != null) {
        return regFuture;
    }
	// regFuture创建完成
    if (regFuture.isDone()) {
        ChannelPromise promise = channel.newPromise();
        doBind0(regFuture, channel, localAddress, promise);
        return promise;
    } else {
        // 这里是以防万一,regFuture没有创建完成
        final PendingRegistrationPromise promise = new PendingRegistrationPromise(channel);
        regFuture.addListener(new ChannelFutureListener() {
            @Override
            public void operationComplete(ChannelFuture future) throws Exception {
                Throwable cause = future.cause();
                if (cause != null) {
                    promise.setFailure(cause);
                } else {
                    promise.registered();
                    doBind0(regFuture, channel, localAddress, promise);
                }
            }
        });
        return promise;
    }
}
-
initAndRegister方法主要是:完成channel的创建 并 向bossGroup注册
channelFactory.newChannel():完成channel的封装,通过反射将JDK的channel进行封装;ChannelFuture regFuture = config().group().register(channel);上面这一段:
config().group()是拿到bossGroup对象,进行Channel注册;
final ChannelFuture initAndRegister() {
    Channel channel = null;
    try {
        // 创建channel
        channel = channelFactory.newChannel();
        // 初始化channel
        init(channel);
    } catch (Throwable t) {
        // 如果异常,强制关闭已经创建的channel
        if (channel != null) {
            channel.unsafe().closeForcibly();
            return new DefaultChannelPromise(channel, GlobalEventExecutor.INSTANCE).setFailure(t);
        }
        return new DefaultChannelPromise(new FailedChannel(), GlobalEventExecutor.INSTANCE).setFailure(t);
    }
	// bossGroup注册channel
    ChannelFuture regFuture = config().group().register(channel);
    // 如果IO操作失败,也就是返回的cause存在,那么采取措施关闭Channel
    if (regFuture.cause() != null) {
        if (channel.isRegistered()) {
            channel.close();
        } else {
            channel.unsafe().closeForcibly();
        }
    }
    return regFuture;
}