一、利用iproute,简单模拟容器之间的通信
1、添加两个网络名称空间(network namespace)
[root@node2 ~]# ip netns add r1
[root@node2 ~]# ip netns add r2
[root@node2 ~]# ip netns list
r2
r1
2、创建虚拟网卡对。创建完毕后,会成对出现在宿主机上,默认是没有被激活。
[root@node2 ~]# ip link add name veth1.1 type veth peer name veth1.2
[root@node2 ~]# ip link show
1: lo: <LOOPBACK,UP,LOWER_UP> mtu 65536 qdisc noqueue state UNKNOWN mode DEFAULT qlen 1
    link/loopback 00:00:00:00:00:00 brd 00:00:00:00:00:00
2: eth0: <BROADCAST,MULTICAST,UP,LOWER_UP> mtu 1500 qdisc pfifo_fast state UP mode DEFAULT qlen 1000
    link/ether 00:0c:29:6e:cc:05 brd ff:ff:ff:ff:ff:ff
3: eth1: <BROADCAST,MULTICAST,UP,LOWER_UP> mtu 1500 qdisc pfifo_fast state UP mode DEFAULT qlen 1000
    link/ether 00:0c:29:6e:cc:0f brd ff:ff:ff:ff:ff:ff
4: docker0: <NO-CARRIER,BROADCAST,MULTICAST,UP> mtu 1500 qdisc noqueue state DOWN mode DEFAULT
    link/ether 02:42:9c:a8:8b:e0 brd ff:ff:ff:ff:ff:ff
5: veth1.2@veth1.1: <BROADCAST,MULTICAST,M-DOWN> mtu 1500 qdisc noop state DOWN mode DEFAULT qlen 1000
    link/ether 22:d8:37:b4:40:9f brd ff:ff:ff:ff:ff:ff
6: veth1.1@veth1.2: <BROADCAST,MULTICAST,M-DOWN> mtu 1500 qdisc noop state DOWN mode DEFAULT qlen 1000
    link/ether b2:a3:a7:ba:54:ca brd ff:ff:ff:ff:ff:ff
3、将其中一个虚拟网卡设备veth1.2移动到其中一个网络名称空间r1,并将名字修改为eth0
[root@node2 ~]# ip link set dev veth1.2 netns r1
[root@node2 ~]# ip netns exec r1 ip link set dev veth1.2 name eth0
4、激活网络空间r1名为eth0的网卡,以及留在宿主机上的veth1.1,并进行简单通信
[root@node2 ~]# ifconfig veth1.1 10.1.0.1/24 up
[root@node2 ~]# ifconfig
veth1.1: flags=4163<UP,BROADCAST,RUNNING,MULTICAST>  mtu 1500
        inet 10.1.0.1  netmask 255.255.255.0  broadcast 10.1.0.255
        inet6 fe80::b0a3:a7ff:feba:54ca  prefixlen 64  scopeid 0x20<link>
        ether b2:a3:a7:ba:54:ca  txqueuelen 1000  (Ethernet)
        RX packets 8  bytes 648 (648.0 B)
        RX errors 0  dropped 0  overruns 0  frame 0
        TX packets 8  bytes 648 (648.0 B)
        TX errors 0  dropped 0 overruns 0  carrier 0  collisions 0
[root@node2 ~]# ip netns exec r1 ifconfig eth0 10.1.0.2/24 up
[root@node2 ~]# ip netns exec r1 ifconfig
eth0: flags=4163<UP,BROADCAST,RUNNING,MULTICAST>  mtu 1500
        inet 10.1.0.2  netmask 255.255.255.0  broadcast 10.1.0.255
        inet6 fe80::20d8:37ff:feb4:409f  prefixlen 64  scopeid 0x20<link>
        ether 22:d8:37:b4:40:9f  txqueuelen 1000  (Ethernet)
        RX packets 8  bytes 648 (648.0 B)
        RX errors 0  dropped 0  overruns 0  frame 0
        TX packets 8  bytes 648 (648.0 B)
        TX errors 0  dropped 0 overruns 0  carrier 0  collisions 0
[root@node2 ~]# ping 10.1.0.2
PING 10.1.0.2 (10.1.0.2) 56(84) bytes of data.
64 bytes from 10.1.0.2: icmp_seq=1 ttl=64 time=0.266 ms
64 bytes from 10.1.0.2: icmp_seq=2 ttl=64 time=0.069 ms
64 bytes from 10.1.0.2: icmp_seq=3 ttl=64 time=0.062 ms
64 bytes from 10.1.0.2: icmp_seq=4 ttl=64 time=0.061 ms
64 bytes from 10.1.0.2: icmp_seq=5 ttl=64 time=0.060 ms
64 bytes from 10.1.0.2: icmp_seq=6 ttl=64 time=0.069 ms
64 bytes from 10.1.0.2: icmp_seq=7 ttl=64 time=0.067 ms
64 bytes from 10.1.0.2: icmp_seq=8 ttl=64 time=0.068 ms
^C
--- 10.1.0.2 ping statistics ---
8 packets transmitted, 8 received, 0% packet loss, time 7001ms
rtt min/avg/max/mdev = 0.060/0.090/0.266/0.066 ms
5、将宿主机上的虚拟网络设备veth1.1移动到另外一个网络名称空间r2中,进行简单通信
[root@node2 ~]# ip link set dev veth1.1 netns r2
[root@node2 ~]# ip netns exec r2 ifconfig veth1.1 10.1.0.3/24 up
[root@node2 ~]# ip netns exec r2 ping 10.1.0.2
PING 10.1.0.2 (10.1.0.2) 56(84) bytes of data.
64 bytes from 10.1.0.2: icmp_seq=1 ttl=64 time=0.084 ms
64 bytes from 10.1.0.2: icmp_seq=2 ttl=64 time=0.060 ms
64 bytes from 10.1.0.2: icmp_seq=3 ttl=64 time=0.058 ms
64 bytes from 10.1.0.2: icmp_seq=4 ttl=64 time=0.062 ms
64 bytes from 10.1.0.2: icmp_seq=5 ttl=64 time=0.056 ms
^C
--- 10.1.0.2 ping statistics ---
5 packets transmitted, 5 received, 0% packet loss, time 3999ms
rtt min/avg/max/mdev = 0.056/0.064/0.084/0.010 ms
以上就简单演示了两个容器的通信。
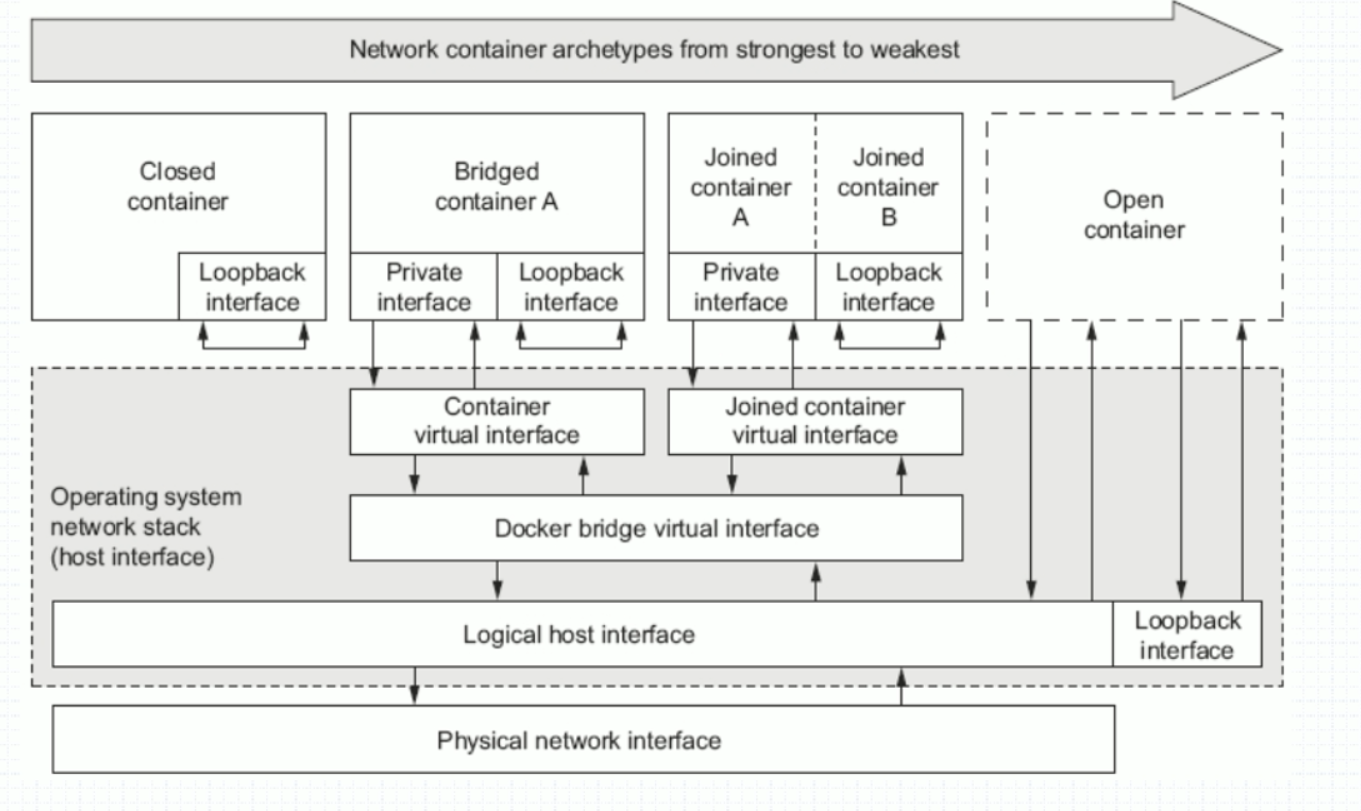
二、docker网络模式
显示docker的网络
[root@node2 ~]# docker network ls
NETWORK ID          NAME                DRIVER              SCOPE
e5703a4221ca        bridge              bridge              local
f2db12f815d3        host                host                local
2d0ce462eb59        none                null                local
2.1、none模式
定义:
网络模式为 none,即不为 Docker 容器构造任何网络环境。一旦Docker 容器采用了none 网络模式,那么容器内部就只能使用loopback网络设备,不会再有其他的网络资源。Docker Container的none网络模式意味着不给该容器创建任何网络环境,容器只能使用127.0.0.1的本机网络。
[root@node2 ~]# docker run --name t1 -it --rm --network none busybox:latest /bin/sh
/ # ifconfig
lo        Link encap:Local Loopback
          inet addr:127.0.0.1  Mask:255.0.0.0
          UP LOOPBACK RUNNING  MTU:65536  Metric:1
          RX packets:0 errors:0 dropped:0 overruns:0 frame:0
          TX packets:0 errors:0 dropped:0 overruns:0 carrier:0
          collisions:0 txqueuelen:1
          RX bytes:0 (0.0 B)  TX bytes:0 (0.0 B)

/ #
2.2 bridge模式
Docker 容器默认使用bridge模式的网络。
- 使用一个 linux bridge,默认为 docker0
- 使用 veth 对,一头在容器的网络 namespace 中,一头在 docker0 上
- 该模式下Docker Container不具有一个公有IP,因为宿主机的IP地址与veth pair的 IP地址不在同一个网段内
- Docker采用 NAT 方式,将容器内部的服务监听的端口与宿主机的某一个端口port 进行“绑定”,使得宿主机以外的世界可以主动将网络报文发送至容器内部
- 外界访问容器内的服务时,需要访问宿主机的 IP 以及宿主机的端口 port
- NAT 模式由于是在三层网络上的实现手段,故肯定会影响网络的传输效率。
- 容器拥有独立、隔离的网络栈;让容器和宿主机以外的世界通过NAT建立通信
默认不指定hostname,则为container ID;使用-h 指定hostname
[root@node2 ~]# docker run --name t1 -it --rm --network bridge busybox:latest
/ # hostname
b1bc9ce212d6
/ #

[root@node2 ~]# docker run --name t1 -it --rm --network bridge -h t1.mustark.com busybox:latest
/ # hostname
t1.mustark.com
/ #
指定DNS服务器地址与搜索域
[root@node2 ~]# docker run --name t1 -it --rm --network bridge -h t1.mustark.com --dns 114.114.114.114 --dns-search ilinux.io busybox:latest
/ # cat /etc/resolv.conf
search ilinux.io
nameserver 114.114.114.114
/ #
增加域名解析记录
[root@node2 ~]# docker run --name t1 -it --rm --network bridge -h t1.mustark.com --dns 114.114.114.114 --dns-search ilinux.io --add-host www.mageedu.com:1.1.1.1 busybox:latest
/ # cat /etc/hosts
127.0.0.1    localhost
::1    localhost ip6-localhost ip6-loopback
fe00::0    ip6-localnet
ff00::0    ip6-mcastprefix
ff02::1    ip6-allnodes
ff02::2    ip6-allrouters
1.1.1.1    www.mageedu.com
172.17.0.2    t1.mustark.com t1
/ #
将容器内部的服务监听的端口与宿主机的某一个端口port 进行“绑定”,使得宿主机以外的世界可以主动将网络报文发送至容器内部,将服务“暴露”
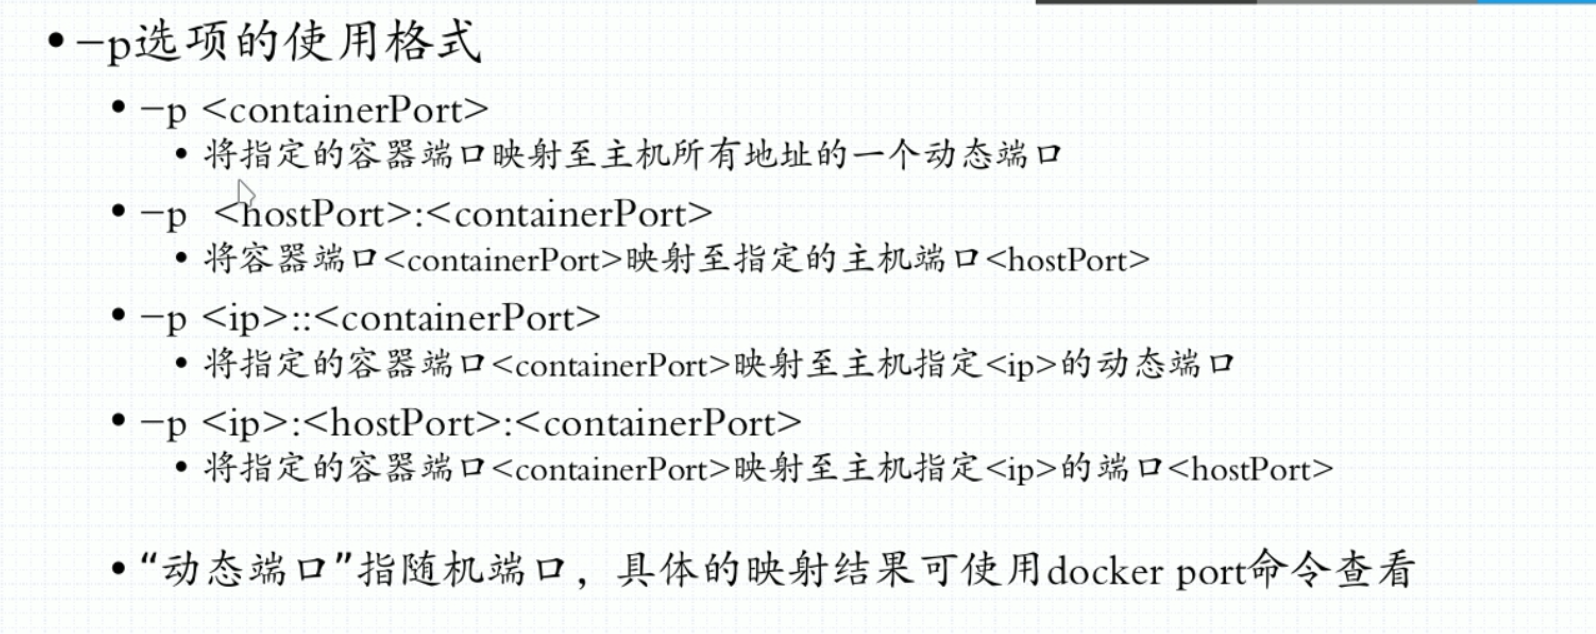
第一种,将指定容器端口映射至主机所有地址的一个动态端口
[root@node2 ~]# docker run --name myweb --rm -p 80 mustark/httpd:v0.2
利用iptables和docker port myweb查看对应的端口
[root@node2 ~]# docker port myweb
80/tcp -> 0.0.0.0:32768


[root@node2 ~]# iptables -t nat -vnL
Chain PREROUTING (policy ACCEPT 0 packets, 0 bytes)
 pkts bytes target     prot opt in     out     source               destination
    1    52 DOCKER     all  --  *      *       0.0.0.0/0            0.0.0.0/0            ADDRTYPE match dst-type LOCAL

Chain INPUT (policy ACCEPT 0 packets, 0 bytes)
 pkts bytes target     prot opt in     out     source               destination

Chain OUTPUT (policy ACCEPT 1 packets, 60 bytes)
 pkts bytes target     prot opt in     out     source               destination
    0     0 DOCKER     all  --  *      *       0.0.0.0/0           !127.0.0.0/8          ADDRTYPE match dst-type LOCAL

Chain POSTROUTING (policy ACCEPT 1 packets, 60 bytes)
 pkts bytes target     prot opt in     out     source               destination
    0     0 MASQUERADE  all  --  *      !docker0  172.17.0.0/16        0.0.0.0/0
    0     0 MASQUERADE  tcp  --  *      *       172.17.0.2           172.17.0.2           tcp dpt:80

Chain DOCKER (2 references)
 pkts bytes target     prot opt in     out     source               destination
    0     0 RETURN     all  --  docker0 *       0.0.0.0/0            0.0.0.0/0
    0     0 DNAT       tcp  --  !docker0 *       0.0.0.0/0            0.0.0.0/0            tcp dpt:32768 to:172.17.0.2:80
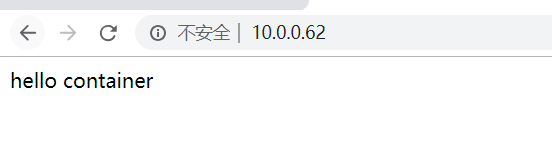
在浏览器访问

容器停止后,规则会自动删除。
第二种情况,将指定的容器端口映射到主机指定的IP地址的动态端口
[root@node2 ~]# docker run --name myweb --rm -p 10.0.0.62::80 mustark/httpd:v0.2


[root@node2 ~]# docker port myweb
80/tcp -> 10.0.0.62:32768
第三种情况,将容器的端口映射到主机的端口
[root@node2 ~]# docker run --name myweb --rm -p 80:80 mustark/httpd:v0.2


[root@node2 ~]# docker port myweb
80/tcp -> 0.0.0.0:80

第四种情况,将指定的容器端口映射到主机指定的IP地址的端口
[root@node2 ~]# docker run --name myweb --rm -p 10.0.0.62:8080:80 mustark/httpd:v0.2


[root@node2 ~]# docker port myweb
80/tcp -> 10.0.0.62:8080

联盟式容器
指使用某个已存在容器的网络接口的容器,接口被联盟内的各容器使用;彼此之间共享一个网络名称空间,但其他名称空间如User、mount等还是隔离的
基于busybox创建一个容器
[root@node2 ~]# docker run --name b1 -it --rm  busybox
/ # ifconfig
eth0      Link encap:Ethernet  HWaddr 02:42:AC:11:00:02
          inet addr:172.17.0.2  Bcast:172.17.255.255  Mask:255.255.0.0
          UP BROADCAST RUNNING MULTICAST  MTU:1500  Metric:1
          RX packets:8 errors:0 dropped:0 overruns:0 frame:0
          TX packets:0 errors:0 dropped:0 overruns:0 carrier:0
          collisions:0 txqueuelen:0
          RX bytes:648 (648.0 B)  TX bytes:0 (0.0 B)

lo        Link encap:Local Loopback
          inet addr:127.0.0.1  Mask:255.0.0.0
          UP LOOPBACK RUNNING  MTU:65536  Metric:1
          RX packets:0 errors:0 dropped:0 overruns:0 frame:0
          TX packets:0 errors:0 dropped:0 overruns:0 carrier:0
          collisions:0 txqueuelen:1
          RX bytes:0 (0.0 B)  TX bytes:0 (0.0 B)

/ #
基于b1这个容器创建一个容器,可以看到地址是用的b1容器的地址
[root@node2 ~]# docker run --name b2 --network container:b1 -it --rm busybox
/ # ifconfig
eth0      Link encap:Ethernet  HWaddr 02:42:AC:11:00:02
          inet addr:172.17.0.2  Bcast:172.17.255.255  Mask:255.255.0.0
          UP BROADCAST RUNNING MULTICAST  MTU:1500  Metric:1
          RX packets:8 errors:0 dropped:0 overruns:0 frame:0
          TX packets:0 errors:0 dropped:0 overruns:0 carrier:0
          collisions:0 txqueuelen:0
          RX bytes:648 (648.0 B)  TX bytes:0 (0.0 B)

lo        Link encap:Local Loopback
          inet addr:127.0.0.1  Mask:255.0.0.0
          UP LOOPBACK RUNNING  MTU:65536  Metric:1
          RX packets:0 errors:0 dropped:0 overruns:0 frame:0
          TX packets:0 errors:0 dropped:0 overruns:0 carrier:0
          collisions:0 txqueuelen:1
          RX bytes:0 (0.0 B)  TX bytes:0 (0.0 B)

/ #
两者彼此的共用网络IO接口,但是文件系统却是隔离的。
在b1上创建一个目录,b2上是没有的;在b1上启动一个http服务,b2是可以访问的
b1
/ # mkdir /tmp/testdir -p
/ # echo "hello world" >/tmp/index.html
/ # httpd -h /tmp/
/ # netstat -tnl
Active Internet connections (only servers)
Proto Recv-Q Send-Q Local Address           Foreign Address         State
tcp        0      0 :::80                   :::*                    LISTEN
b2
/ # ls /tmp
/ #
/ # wget -O - -q 127.0.0.1
hello world
/ #
host模式
Host 模式并没有为容器创建一个隔离的网络环境。而之所以称之为host模式,是因为该模式下的 Docker 容器会和 host 宿主机共享同一个网络 namespace,故 Docker Container可以和宿主机一样,使用宿主机的eth0,实现和外界的通信。换言之,Docker Container的 IP 地址即为宿主机 eth0 的 IP 地址。其特点包括:
-
- 这种模式下的容器没有隔离的 network namespace
- 容器的 IP 地址同 Docker host 的 IP 地址
- 需要注意容器中服务的端口号不能与 Docker host 上已经使用的端口号相冲突
- host 模式能够和其它模式共存
[root@node2 ~]# docker run --name b1 --network host -it --rm  busybox
/ # echo "hello container" > /tmp/index.html
/ # httpd -h /tmp/
/ # netstat -tnl
Active Internet connections (only servers)
Proto Recv-Q Send-Q Local Address           Foreign Address         State
tcp        0      0 0.0.0.0:22              0.0.0.0:*               LISTEN
tcp        0      0 127.0.0.1:25            0.0.0.0:*               LISTEN
tcp        0      0 :::80                   :::*                    LISTEN
tcp        0      0 :::22                   :::*                    LISTEN
tcp        0      0 ::1:25                  :::*                    LISTEN
/ # ifconfig
docker0   Link encap:Ethernet  HWaddr 02:42:9C:A8:8B:E0
          inet addr:172.17.0.1  Bcast:172.17.255.255  Mask:255.255.0.0
          inet6 addr: fe80::42:9cff:fea8:8be0/64 Scope:Link
          UP BROADCAST MULTICAST  MTU:1500  Metric:1
          RX packets:42 errors:0 dropped:0 overruns:0 frame:0
          TX packets:50 errors:0 dropped:0 overruns:0 carrier:0
          collisions:0 txqueuelen:0
          RX bytes:3329 (3.2 KiB)  TX bytes:5224 (5.1 KiB)

eth0      Link encap:Ethernet  HWaddr 00:0C:29:6E:CC:05
          inet addr:10.0.0.62  Bcast:10.0.0.255  Mask:255.255.255.0
          inet6 addr: fe80::20c:29ff:fe6e:cc05/64 Scope:Link
          UP BROADCAST RUNNING MULTICAST  MTU:1500  Metric:1
          RX packets:6597 errors:0 dropped:0 overruns:0 frame:0
          TX packets:4024 errors:0 dropped:0 overruns:0 carrier:0
          collisions:0 txqueuelen:1000
          RX bytes:1368597 (1.3 MiB)  TX bytes:460351 (449.5 KiB)

eth1      Link encap:Ethernet  HWaddr 00:0C:29:6E:CC:0F
          inet addr:172.16.1.62  Bcast:172.16.1.255  Mask:255.255.255.0
          inet6 addr: fe80::20c:29ff:fe6e:cc0f/64 Scope:Link
          UP BROADCAST RUNNING MULTICAST  MTU:1500  Metric:1
          RX packets:6 errors:0 dropped:0 overruns:0 frame:0
          TX packets:27 errors:0 dropped:0 overruns:0 carrier:0
          collisions:0 txqueuelen:1000
          RX bytes:360 (360.0 B)  TX bytes:1956 (1.9 KiB)

lo        Link encap:Local Loopback
          inet addr:127.0.0.1  Mask:255.0.0.0
          inet6 addr: ::1/128 Scope:Host
          UP LOOPBACK RUNNING  MTU:65536  Metric:1
          RX packets:0 errors:0 dropped:0 overruns:0 frame:0
          TX packets:0 errors:0 dropped:0 overruns:0 carrier:0
          collisions:0 txqueuelen:1
          RX bytes:0 (0.0 B)  TX bytes:0 (0.0 B)

/ #
自定义docker0网络桥
自定义docker0桥的网络属性信息:/etc/docker/daemon.json文件
{
"bip": "192.168.1.5/24",
"fixed-cidr": "10.20.0.0/16",
"fixed-cidr-v6": "2001:db8::/64",
"mtu": 1500,
"default-gateway": "10.20.1.1",
"default-gateway-v6": "2001:db8:abcd::89",
"dns": ["10.20.1.2","10.20.1.3"]
}
核心选项为bip,即bridge ip之意,用于指定docker0桥自身的IP地址;其它选项可通过此地址计算得出。
[root@node2 ~]# systemctl stop docker.service
[root@node2 ~]# cat /etc/docker/daemon.json
{
    "registry-mirrors": ["https://registry.docker-cn.com"],
    "bip": "172.20.0.1/16"
}
[root@node2 ~]# ifconfig
docker0: flags=4099<UP,BROADCAST,MULTICAST>  mtu 1500
        inet 172.20.0.1  netmask 255.255.0.0  broadcast 172.20.255.255
        inet6 fe80::42:9cff:fea8:8be0  prefixlen 64  scopeid 0x20<link>
        ether 02:42:9c:a8:8b:e0  txqueuelen 0  (Ethernet)
        RX packets 42  bytes 3329 (3.2 KiB)
        RX errors 0  dropped 0  overruns 0  frame 0
        TX packets 50  bytes 5224 (5.1 KiB)
        TX errors 0  dropped 0 overruns 0  carrier 0  collisions 0
[root@node2 ~]# systemctl start docker.service
此时,docker0桥由默认的172.17.0.1变成了我们定义的172.20.0.1。
dockerd守护进程的C/S,其默认仅监听Unix SOcket格式的地址,/var/run/docker.sock;如果使用TCP套接字,
Centos7下
/etc/docker/daemon.json会被docker.service的配置文件覆盖,直接添加daemon.json不起作用。可以有如下几种设置:
直接编辑配置文件:Centos中docker daemon配置文件在/lib/systemd/system/docker.service,找到以下字段,在后面添加如下,注意,此处不能用"fd://",否则报错
[Service]
······
ExecStart=/usr/bin/dockerd -H unix:///var/run/docker.sock -H tcp://0.0.0.0:2375
自定义网络桥
创建一个自定义网络桥
[root@node2 ~]# docker network create -d bridge --subnet "172.26.0.0/16" --gateway "172.26.0.1" mybr0
33ac621209dc27967f6918a29cb1a786c616c1be57228b2b5d82e33a6f651d9b
[root@node2 ~]# docker network ls
NETWORK ID          NAME                DRIVER              SCOPE
42344bf27e25        bridge              bridge              local
f2db12f815d3        host                host                local
33ac621209dc        mybr0               bridge              local
2d0ce462eb59        none                null                local
[root@node2 ~]# ifconfig
br-33ac621209dc: flags=4099<UP,BROADCAST,MULTICAST>  mtu 1500
        inet 172.26.0.1  netmask 255.255.0.0  broadcast 172.26.255.255
        ether 02:42:7f:07:36:f9  txqueuelen 0  (Ethernet)
        RX packets 0  bytes 0 (0.0 B)
        RX errors 0  dropped 0  overruns 0  frame 0
        TX packets 0  bytes 0 (0.0 B)
        TX errors 0  dropped 0 overruns 0  carrier 0  collisions 0

docker0: flags=4099<UP,BROADCAST,MULTICAST>  mtu 1500
        inet 172.20.0.1  netmask 255.255.0.0  broadcast 172.20.255.255
        ether 02:42:c2:e9:1e:38  txqueuelen 0  (Ethernet)
        RX packets 0  bytes 0 (0.0 B)
        RX errors 0  dropped 0  overruns 0  frame 0
        TX packets 0  bytes 0 (0.0 B)
        TX errors 0  dropped 0 overruns 0  carrier 0  collisions 0
利用自定义的网络桥创建容器
[root@node2 ~]# docker run --name b1 -it --network mybr0 --rm  busybox
/ # ifconfig
eth0      Link encap:Ethernet  HWaddr 02:42:AC:1A:00:02
          inet addr:172.26.0.2  Bcast:172.26.255.255  Mask:255.255.0.0
          UP BROADCAST RUNNING MULTICAST  MTU:1500  Metric:1
          RX packets:12 errors:0 dropped:0 overruns:0 frame:0
          TX packets:0 errors:0 dropped:0 overruns:0 carrier:0
          collisions:0 txqueuelen:0
          RX bytes:1016 (1016.0 B)  TX bytes:0 (0.0 B)

lo        Link encap:Local Loopback
          inet addr:127.0.0.1  Mask:255.0.0.0
          UP LOOPBACK RUNNING  MTU:65536  Metric:1
          RX packets:0 errors:0 dropped:0 overruns:0 frame:0
          TX packets:0 errors:0 dropped:0 overruns:0 carrier:0
          collisions:0 txqueuelen:1
          RX bytes:0 (0.0 B)  TX bytes:0 (0.0 B)

/ #