1. tf.image.resize_and_crop(net, bbox, 256, [14, 14], name) # 根据bbox的y1,x1,y2,x2获得net中的位置,将其转换为14*14,因此为[14, 14, 512], 256表示转换的个数,最后的维度为[256, 14, 14, 512]
参数说明:net表示输入的卷积层,bbox表示y1,x1,y2, x2的比例,256表示转换成多少个,[14, 14]表示转换的卷积,name表示名字
2. tf.slice(x, [0, 2], [-1, 1]) # 对x进行切片操作,[0, 2]表示0表示行,2表示列,[-1, 1]表示切片的范围,这里是所有数字
import tensorflow as tf

sess = tf.Session()
x = np.array([[1, 2, 3, 4],
              [2, 3, 4, 5]])
c = tf.squeeze(tf.slice(x, [1, 3], [-1, 1]))
print(sess.run(c))
3.x.argsort()[::-1] 将x进行从大到小的排序,返回的是其索引值
x = np.array([5, 2, 3, 4])

c = x.argsort()[::-1]
print(c)
4. np.empty((5,), dtype=np.float32) 生成空矩阵,这里可以用于生成标签值
参数说明: (5, ) 表示维度,np.float32表示数据类型
x = np.array([0.1, 0.3, 0.15, 0.5, 0.6])
label = np.empty((5, ), dtype=np.float)
label.fill(-1)
label[x > 0.2] = 1
print(label)
5. np.meshgrid(xx, yy) 生成二维的数据,
参数说明:xx为np.arange(0, 10)这样生成的数据
xx = np.arange(0, 3)
yy = np.arange(0, 3)
xx, yy = np.meshgrid(xx, yy)
print(xx)
print(yy)
##
xx = [[0, 1, 2], [0, 1, 2], [0, 1, 2]]
yy = [[0, 0, 0], [1, 1, 1], [2, 2, 2]]

二维的位置数据为第一个位置为0,1,即xx[0][0]和 yy[0][0]
6. np.where(x>1)[0] # 获得x大于1的索引值,[0]表示取出数值
x = np.array([0, 1, 2])
print(np.where(x>1)[0])

## [2] 输出结果
7. tf.gather(x, [0, 3, 5]) 从x中取出索引值为[0, 3, 5]的三个数
参数说明:x表示代取数,[0, 3, 5]表示索引值
import tensorflow as tf

sess = tf.Session()

x = np.arange(0, 10)
c = tf.gather(x, [0, 3, 5])
print(sess.run(c))

### [0, 3, 5] 输出值
参数说明:np.where表示索引值
faster-RCNN是在原有的faster-RCNN层的基础上加上了RPN层,RPN层主要是用于进行选框的获取
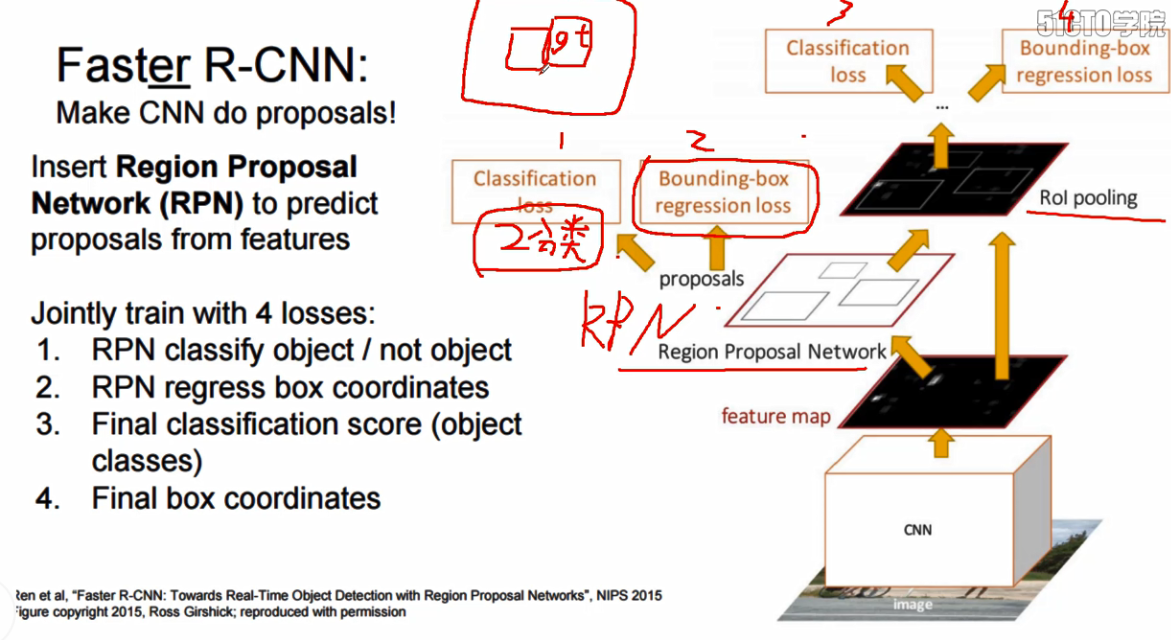
基于上面这个图做一个说明:
1.CNN层是采用训练好的VGG网络,
2.VGG卷积后的结果输入到Region Proposal Network中用于进行,建议框的获取,文章中的建议框的个数是300
Classification loss 说明:根据anchor与Bouding_box真实框的重叠率,将重叠率大于0.7或者与目标框最大重叠率的anchor的标签设置为1,小于0.3设置为0,中间的设置为-1,训练获得是否存在物体
Bouding-box regression loss : anchor框与真实框的回归值差,即 这里主要是为了获得选框的调整系数
dx = (g_centx - e_centx) / ex_width # (真实框中心x - 选框中心x)/ 选框的长
dy = (g_centy - e_centy) / ex_center #(真实框中心y - 选框中心y) / 选框的宽
dw = log(g_width / e_width) # 真实框的长 / 选框的长
dh = log(h_width / e_height) # 真实框的宽 / 选框的宽
3. 将300个预选框输入,获得256个正负样本的边框位置
classification,根据300个预选框与Bouding_box真实框重叠率,重叠率大于0.75,然后随机挑选出不高于0.25*256个正样本的标签,即2,6,8这种实际的物体标签值,重叠率较小的标签值为0。
Bouding-box regression loss : 256个正负样本框与真实框的回归值差,这里同样获得的是调整系数
4. 计算256个正负样本框在原始框中的比例, 使用cv2.image.crop_and_resize() 将VGG输出的网络,都转换为[256, 14, 14, 512]的输出结果,这一步被称为ROI pooling
5.将256, 14, 14, 521 接全连接层,最终的全连接层,用于进行label 和 regression的预测
代码说明:由于代码量较大,我对代码的思路做一个简要说明:
第一步:主要是获得图片的信息,如图片的label,边框的位置信息,图片的名称
第二步:模型的构建
第一步:构建net层,这里使用的是已经训练好的VGG16的卷积层
第二步:构建rpn,
第一步:构造选框anchor
第二步:将VGG16的卷积层经过一个3*3,在经过1*1,输出rpn_cls_score即得分值,输出rpn_bbox_pred即边框的调整比例
第三步:建立proposals
第一步:获得300个经过边框调整的proposals
第一步:使用上面获得的rpn_bbox_pred对anchor进行调整获得proposal
第二步:对得分socre进行从大到小的排序,获得前1200索引,根据索引重新组合proposal和score
第三步:使用nms,去除重叠率大于0.75的边框值索引,然后取前300个proposal和score
第二步:构造训练rpn的cls的label 和 rpn_bbox 的label
第一步:筛选边界内的anchor值
第二步:将构建256个anchor与真实框重叠率大于0.75的标签设置为1,真实框重叠率小于0.3设置为0,剩下的设置为-1
第三步:将边界内的anchor与真实边框做差异分析,求比例,作为rpn_bbox的label
dx = (g_centx - e_centx) / ex_width # (真实框中心x - 选框中心x)/ 选框的长
dy = (g_centy - e_centy) / ex_center #(真实框中心y - 选框中心y) / 选框的宽
dw = log(g_width / e_width) # 真实框的长 / 选框的长
dh = log(h_width / e_height) # 真实框的宽 / 选框的宽
第三步:将300个proposal预选框输入,构造最终proposal训练的cls和proposal_bbox的label,同时输出256个正负样本的边框值
第一步:将真实框与预选框做重叠率分析,获得每个预选框最大的真实框的索引,构造预选框的标签为最大真实框索引
第二步:获得预选框与真实框重叠率大于0.75的预选框,但是预选框的值不大于256*0.25,将小于0.5和大于0.1的标签设置为0,做proposal_cls的label
第三步:将256正负样本的边框与真实框做差异分析,求比例,作为proposal_bbox的label
第四步:返回256个的rios,x1,y1,x2,y2
第四步: 构建预测prediction,对256的边框输入做最终的类别判别和边框调整的预测
第一步:使用roi pool,使用x1 / width, x2/width, y1/height, y2/height获得比例用于获得部分卷积层,使用tf.image.resize_and_crop()每个边框调整后的卷积层,输入为256, 14, 14, 512, 然后使用池化层,输出的维度为256, 7, 7, 512
第二步:将输出的结果进行维度变化,适合进行全连接操作,接上3层全连接层,最后一层接输出层,一个输出为cls_score, 一个输出为bbox_pred
第五步: 构建损失值函数,将上述的四个损失值进行加和
第六步:进行模型的训练操作
1.anchor框的生成,由于经过了四次pool,因此倍数相差16倍,构造16*16的面积,然后与倍数相除,求平均值,然后根据倍数获得w和h的值,然后根据scale,来增加
w和h的值,使用np.meshgrid生成16*16的网格坐标,将anchor与网格坐标进行相加获得最终的anchor值
代码:
# 用于生成矩形框anchor
def generate_anchors(base_size=16, ratios=[0.5, 1, 2],
                     scales=2 ** np.arange(3, 6)):
    """
    Generate anchor (reference) windows by enumerating aspect ratios X
    scales wrt a reference (0, 0, 15, 15) window.
    """
    # 每个anchor对应的base_anchor为0, 0, 15, 15
    base_anchor = np.array([1, 1, base_size, base_size]) - 1
    ratio_anchors = _ratio_enum(base_anchor, ratios)
    # scales等于[8, 16, 32]
    anchors = np.vstack([_scale_enum(ratio_anchors[i, :], scales)
                         for i in range(ratio_anchors.shape[0])])
    return anchors


def _whctrs(anchor):
    """
    Return width, height, x center, and y center for an anchor (window).
    """
    # anchor框的w
    w = anchor[2] - anchor[0] + 1
    # anchor框的h
    h = anchor[3] - anchor[1] + 1
    # anchor框的中心位置x
    x_ctr = anchor[0] + 0.5 * (w - 1)
    # anchor框的中心位置y
    y_ctr = anchor[1] + 0.5 * (h - 1)
    return w, h, x_ctr, y_ctr


def _mkanchors(ws, hs, x_ctr, y_ctr):
    """
    Given a vector of widths (ws) and heights (hs) around a center
    (x_ctr, y_ctr), output a set of anchors (windows).
    """
    # 创建achor, 大小为
    ws = ws[:, np.newaxis]
    hs = hs[:, np.newaxis]
    anchors = np.hstack((x_ctr - 0.5 * (ws - 1),
                         y_ctr - 0.5 * (hs - 1),
                         x_ctr + 0.5 * (ws - 1),
                         y_ctr + 0.5 * (hs - 1)))
    return anchors


def _ratio_enum(anchor, ratios):
    """
    Enumerate a set of anchors for each aspect ratio wrt an anchor.
    """
    # 根据x1,y1,x2,y2的坐标生成w, h, x_ctr, y_ctr
    w, h, x_ctr, y_ctr = _whctrs(anchor)
    # 根据w * h 获得当前anchor的面积
    size = w * h
    # 使用ratio扩大面积
    size_ratios = size / ratios
    # 对面积求平均作为ws
    ws = np.round(np.sqrt(size_ratios))
    # 根据比例获得hs的大小
    hs = np.round(ws * ratios)
    # 构造anchors值,根据圆心的位置,重新获得x1,x2,y1,y2
    anchors = _mkanchors(ws, hs, x_ctr, y_ctr)
    return anchors


def _scale_enum(anchor, scales):
    """
    Enumerate a set of anchors for each scale wrt an anchor.
    """
    # 根据anchor,获得中心点的位置
    w, h, x_ctr, y_ctr = _whctrs(anchor)
    # 将w和h乘以scale的倍数
    ws = w * scales
    hs = h * scales
    # 根据ws,hs,x_ctr,y_tr获得anchor的x1,y1,x2,y2
    anchors = _mkanchors(ws, hs, x_ctr, y_ctr)
    return anchors
2.nms非极大值抑制,这里需要对score进行排序,然后从第一个开始,获得第一个与其他的roi,使用np.where找出小于阈值的roi值,重新构造索引值
import numpy as np

def py_cpu_nms(dets, thresh):
    """Pure Python NMS baseline."""
    # 获得最终预测框的x1, y1, x2, y2
    x1 = dets[:, 0]
    y1 = dets[:, 1]
    x2 = dets[:, 2]
    y2 = dets[:, 3]
    # 获得每个框的得分值
    scores = dets[:, 4]
    # 获得面积值
    areas = (x2 - x1 + 1) * (y2 - y1 + 1)
    # 对得分进行一个排序
    order = scores.argsort()[::-1]
   # 构造用于存储序号
    keep = []
    while order.size > 0:
        # 获得得分值最大的值
        i = order[0]
        # 添加到keep中
        keep.append(i)
        # 两两矩阵,获得与x1[i]做对比,取较大值
        xx1 = np.maximum(x1[i], x1[order[1:]])
        # 两两矩阵,获得与y1[i]做对比,取较大值
        yy1 = np.maximum(y1[i], y1[order[1:]])
        # 两两矩阵,获得与x2[i]做对比, 取较小值
        xx2 = np.minimum(x2[i], x2[order[1:]])
        # 两两矩阵,获得与y2[i]做对比,取较小值
        yy2 = np.minimum(y2[i], y2[order[1:]])
        # 构造交叉部分的面积乘积
        w = np.maximum(0.0, xx2 - xx1 + 1)
        h = np.maximum(0.0, yy2 - yy1 + 1)
        inter = w * h
        # 使用交叉面积 / (原始面积 + 原始面积1 - 交叉面积)
        ovr = inter / (areas[i] + areas[order[1:]] - inter)
        # 重新组合获得小于thresh的order值
        inds = np.where(ovr <= thresh)[0]
        order = order[inds + 1]

    return keep
3. ROI_POOl操作,输入的为256个边框的位置,使用图片的height和width,对位置做比例化操作,然后使用tf.image.resize_and_crop(conv, boxs, 256, [14, 14]),
将特征图上的对应位置转换为(256, 14, 14, 512)的维度
    def _crop_pool_layer(self, bottom, rois, name):
        # 对输入的矩形框进行维度的压缩,即rio-pool
        with tf.variable_scope(name):
            # 标签值
            batch_ids = tf.squeeze(tf.slice(rois, [0, 0], [-1, 1], name="batch_id"), [1])
            # Get the normalized coordinates of bboxes, 卷积层的维度
            bottom_shape = tf.shape(bottom)
            height = (tf.to_float(bottom_shape[1]) - 1.) * np.float32(self._feat_stride[0])
            width = (tf.to_float(bottom_shape[2]) - 1.) * np.float32(self._feat_stride[0])
            # 获得x1,y1,x2,y2在图像上的比例
            x1 = tf.slice(rois, [0, 1], [-1, 1], name="x1") / width
            y1 = tf.slice(rois, [0, 2], [-1, 1], name="y1") / height
            x2 = tf.slice(rois, [0, 3], [-1, 1], name="x2") / width
            y2 = tf.slice(rois, [0, 4], [-1, 1], name="y2") / height
            # Won't be backpropagated to rois anyway, but to save time
            bboxes = tf.stop_gradient(tf.concat([y1, x1, y2, x2], axis=1))
            # 7 * 2 = 14
            pre_pool_size = cfg.FLAGS.roi_pooling_size * 2
            # 每个特征图中取出x1,x2,y1,y2重构为14*14,一共有512个特征图,一共有256个框
            crops = tf.image.crop_and_resize(bottom, bboxes, tf.to_int32(batch_ids), [pre_pool_size, pre_pool_size], name="crops")
        # 进行一次池化操作
        return slim.max_pool2d(crops, [2, 2], padding='SAME')