BIO:同步阻塞IO(平常说的IO指的是BIO)
NIO:同步非阻塞IO
AIO:异步非阻塞IO
io操作分为两部分,发起io请求,和io数据读写。
阻塞、非阻塞主要是针对线程发起io请求后,是否立即返回来定义的,立即返回称为非阻塞io,否则称为阻塞io。
同步、异步主要针对io数据读写来定义的,读写数据过程中不阻塞线程称为异步io,否则,称为同步io。
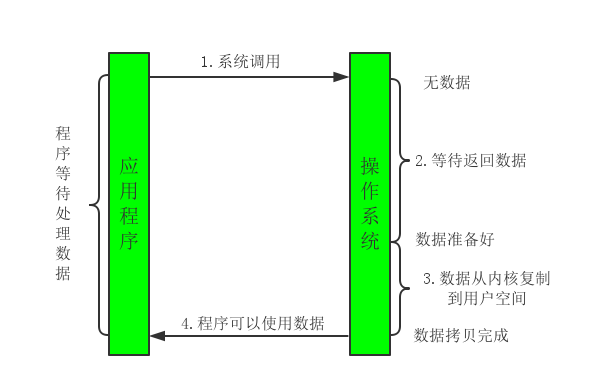
一、BIO
线程发起io请求后,一直阻塞(阻塞io),直到数据就绪后,用户线程将数据写入socket空间,或从socket空间读取数据(同步)。
JDK5之前, JDK的IO模式只有BIO(同步阻塞)。
问题:因为阻塞的存在, 需对每个请求开启一个线程. 过多的线程切换影响操作系统性能。
解决:使用线程池, 处理不过来的放入队列, 再处理不过来的会触发其他机制。
问题::超过线程池数量的请求需要等待。
1. 客户端


public class Client {

    final static String ADDRESS = "127.0.0.1";
    final static int PORT = 8765;

    public static void main(String[] args) throws IOException {
        Socket socket = null;
        BufferedReader in = null;
        PrintWriter out = null;
        try {
            socket = new Socket(ADDRESS, PORT);
            in = new BufferedReader(new InputStreamReader(socket.getInputStream()));
            out = new PrintWriter(socket.getOutputStream(), true);  // true自动flush
            //向服务器端发送数据
            out.println("来自客户端的请求");
            //从服务端接收数据
            String response = in.readLine();  // 阻塞
            System.out.println("Client获取数据: " + response);
        } catch (Exception e) {
            e.printStackTrace();
        } finally {
            out.close();
            in.close();
            socket.close();
        }
    }
}
2. 服务端
(1) 一个请求~一个线程
public class Server {
    final static int PROT = 8765;
    public static void main(String[] args) throws IOException {
        ServerSocket server = null;
        try {
            server = new ServerSocket(PROT);
            System.out.println("server start");
            while(true){
                Socket socket = server.accept();  //监听 阻塞 , socket底层会新建线程处理与客户端的三次握手
                //建立线程处理获取的 socket
                new Thread(new ServerHandler(socket)).start();
            }
        } catch (Exception e) {
            e.printStackTrace();
        } finally {
            server.close();
        }
    }
}

class ServerHandler implements Runnable {
    private Socket socket;
    public ServerHandler(Socket socket) {
        this.socket = socket;
    }

    @Override
    public void run() {
        BufferedReader in = null;
        PrintWriter out = null;
        try {
            in = new BufferedReader(new InputStreamReader(this.socket.getInputStream()));
            out = new PrintWriter(this.socket.getOutputStream(), true);
            String body = null;
            while (true) {
                body = in.readLine();  // 阻塞
                if (body == null)
                    break;
                System.out.println("Server获取的请求: " + body);
                out.println("来自服务器的响应");
            }
        } catch (Exception e) {
            e.printStackTrace();
        } finally {
            try {
                out.close();
                in.close();
                socket.close();
            } catch (IOException e) {
                e.printStackTrace();
            }
        }
    }
}
(2) 线程池处理
public class Server {

    final static int PORT = 8765;

    public static void main(String[] args) throws IOException {
        ServerSocket server = null;
        try {
            server = new ServerSocket(PORT);
            System.out.println("server start");
            HandlerExecutorPool executorPool = new HandlerExecutorPool(50, 1000);
            while(true){
                Socket socket = server.accept();
                executorPool.execute(new ServerHandler(socket));
            }
        } catch (Exception e) {
            e.printStackTrace();
        } finally {
            server.close();
        }
    }
}

class HandlerExecutorPool {
    private ExecutorService executor;
    public HandlerExecutorPool(int maxPoolSize, int queueSize){
        this.executor = new ThreadPoolExecutor( // 带阻塞队列的线程池
                Runtime.getRuntime().availableProcessors(),  // 初始线程数
                maxPoolSize,        // 线程数上限   如果要处理请求的Runnable对象装满了队列, 则提高现有线程数
                120L,               // 如在120个时间颗粒内某线程是空闲的, 将被回收
                TimeUnit.SECONDS,
                new ArrayBlockingQueue<Runnable>(queueSize)  // 存放处理请求的Runnable对象
        );
    }
    public void execute(Runnable task){
        this.executor.execute(task);
    }
}

class ServerHandler implements Runnable {
    private Socket socket;
    public ServerHandler(Socket socket) {
        this.socket = socket;
    }
    @Override
    public void run() {
        BufferedReader in = null;
        PrintWriter out = null;
        try {
            in = new BufferedReader(new InputStreamReader(this.socket.getInputStream()));
            out = new PrintWriter(this.socket.getOutputStream(), true);
            String body = null;
            while (true) {
                body = in.readLine();
                if (body == null)
                    break;
                System.out.println("Server获取的请求: " + body);  // 阻塞
                out.println("来自服务器的响应");
            }
        } catch (Exception e) {
            e.printStackTrace();
        } finally {
            try {
                out.close();
                in.close();
                socket.close();
            } catch (IOException e) {
                e.printStackTrace();
            }
        }
    }
}
二、IO多路复用(NIO)
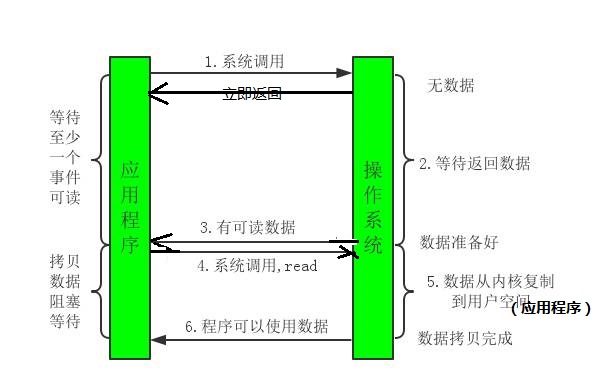
当用户线程发起io请求后,将socket连接及关注事件注册到selector(多路复用器,os级别线程)上,selector循环遍历socket连接,看是否有关注数据就绪,如果连接有数据就绪后,就通知应用程序,建立线程进行数据读写。同BIO对比,NIO中线程处理的都是有效连接(数据就绪),且一个线程可以分管处理多个连接上的就绪数据,节省线程资源开销。
JDK5以后引入了NIO1.0(多路复用机制)。
伴随多路复用在程序中引入了如下概念:
Channel(通道):TCP连接的抽象,一个TCP连接对应多个Channel,这样减少TCP的连接次数。
通道与BIO中socket类似
通道与BIO中的流类似, 不过channel是双向的而流是单向的
channel有多种状态位, 能被selector识别
Buffer(缓冲区):
缓冲区是一块内存区域(数组), 在NIO中被包装成Buffer对象. Buffer提供方法用来访问该内存。
BIO中,数据存储在流中,而NIO中,数据存储在缓冲区中。
除了boolean的其他java七种基本类型都有相应的Buffer类. 最常使用的是ByteBuffer
Selector(多路复用器):负责轮询所有注册通道,根据通道状态执行相关操作。状态包括:Connect,Accept,Read,Write。
在"四种常用IO模型"里提过用select系统调用实现IO多路复用. 除select外Linux还提供了poll/epoll函数, 其中select/poll函数按顺序扫描文件句柄是否就绪,支持的文件句柄数有限; 而epoll使用基于事件驱动方式替代顺序扫描,性能更高, 对文件句柄数没有数量限制. JDK的Selector使用了epoll, 只需要一个线程轮询, 就可以接入大量的客户端。
1. 客户端
public class Client {

    public static void main(String[] args) throws IOException {
        SocketChannel sc = null;
        ByteBuffer writeBuf = ByteBuffer.allocate(1024);
        ByteBuffer readBuf = ByteBuffer.allocate(1024);
        try {
            //创建通道
            sc = SocketChannel.open();
            //进行连接
            sc.connect(new InetSocketAddress("127.0.0.1", 8765));
            // 下面步骤可以用selector轮询代替
            while(true){
                //定义一个字节数组,然后使用系统录入功能:
                byte[] bytes1 = new byte[1024];
                System.in.read(bytes1);  //阻塞
                //把数据放到缓冲区中
                writeBuf.put(bytes1);
                //对缓冲区进行复位
                writeBuf.flip();
                //写出数据
                sc.write(writeBuf);
                //清空缓冲区
                writeBuf.clear();

                // 接收服务端响应
                sc.read(readBuf);
                readBuf.flip();
                byte[] bytes2 = new byte[readBuf.remaining()];
                readBuf.get(bytes2);
                readBuf.clear();
                String body = new String(bytes2);
                System.out.println("Client获取数据: " + body);
            }
        } catch (IOException e) {
            e.printStackTrace();
        } finally {
            sc.close();
        }
    }
}
2. 服务端
通过改变Selector监听Channel的状态位, 控制与客户端读写的先后顺序
public class Server implements Runnable{
    private Selector seletor;
    private ByteBuffer readBuf = ByteBuffer.allocate(1024);
    private ByteBuffer writeBuf = ByteBuffer.allocate(1024);

    public Server(int port){
        try {
            //1 创建多路复用器selector
            this.seletor = Selector.open();
            //2 创建ServerSocket通道
            ServerSocketChannel ssc = ServerSocketChannel.open();
            //3 设置通道是否阻塞, 决定了通道了read/write/accept/connect方法是否阻塞
            ssc.configureBlocking(false);
            //4 设置通道地址
            ssc.bind(new InetSocketAddress(port));
            //5 将ServerSocket通道注册到selector上, 指定监听其accept事件
            ssc.register(this.seletor, SelectionKey.OP_ACCEPT);
            System.out.println("Server start");
        } catch (IOException e) {
            e.printStackTrace();
        }
    }

    @Override
    public void run() {
        while(true){
            try {
                // select阻塞, 监听相关事件
                this.seletor.select();
                // 解除阻塞, 返回选择key, key含有通道, 状态等信息
                Iterator<SelectionKey> keysIter = this.seletor.selectedKeys().iterator();
                // 进行遍历
                while(keysIter.hasNext()){
                    SelectionKey key = keysIter.next();
                    keysIter.remove();
                    if (key.isValid()) {
                        // 等待接收连接状态
                        if (key.isAcceptable()) {
                            accept(key);
                        }
                        // 可读状态
                        if (key.isReadable()) {
                            read(key);
                        }
                        if (key.isWritable()) {
                            write(key);
                        }
                    }
                }
            } catch (IOException e) {
                e.printStackTrace();
            }
        }
    }


    private void write(SelectionKey key) {
        try {
            // 获取通道
            SocketChannel sc = (SocketChannel) key.channel();
            // 写回给客户端数据
            writeBuf.put("来自服务器的响应".getBytes());
            writeBuf.flip();
            sc.write(writeBuf);
            writeBuf.clear();
            // 修改监听的状态位, 如果保持OP_WRITE会导致重复写
            key.interestOps(SelectionKey.OP_READ);
        } catch (IOException e) {
            e.printStackTrace();
        }
    }

    private void read(SelectionKey key) {
        try {
            // 获取通道
            SocketChannel sc = (SocketChannel) key.channel();
            // 读取数据, 读到buffer. 按程序运行顺序, 这里sc是否设置为阻塞效果都一样
            int count = sc.read(this.readBuf);  // readBuf写时会改变position的值
            if (count == -1) {
                key.channel().close();
                key.cancel();  //取消该通道在selector的注册, 之后不会被select轮询到
                return;
            }
            // 有数据则进行读取. 读取前需要将position和limit进行复位
            readBuf.flip();
            // 根据缓冲区的数据长度创建相应大小的byte数组, 接收缓冲区的数据
            byte[] bytes = new byte[this.readBuf.remaining()];
            // 接收缓冲区数据
            readBuf.get(bytes);
            readBuf.clear();
            String body = new String(bytes).trim();
            System.out.println("Server获取的请求: " + body);
            // 如果保持OP_READ会导致重复读
            sc.register(this.seletor, SelectionKey.OP_WRITE);
        } catch (IOException e) {
            e.printStackTrace();
        }
    }

    private void accept(SelectionKey key) {
        try {
            // 获取服务通道
            ServerSocketChannel ssc =  (ServerSocketChannel) key.channel();
            // 获取客户端通道.
            SocketChannel sc = ssc.accept();
            // 设置非阻塞模式
            sc.configureBlocking(false);
            // 将客户端通道注册到多路复用器上,指定监听事件
            sc.register(this.seletor, SelectionKey.OP_READ | SelectionKey.OP_WRITE);
        } catch (IOException e) {
            e.printStackTrace();
        }
    }

    public static void main(String[] args) {
        new Thread(new Server(8765)).start();;
    }
}
BIO客户端与NIO服务端通信需注意的:
BIO服务端, 一次IO有明确的结束点, 客户端再次read会返回-1
NIO服务端一次IO结束后, 没有关闭通道, 它可能把通道从读状态转为写状态. 于是selector不监听读了, 客户端再次read什么都没返回, 就会阻塞.
三、AIO(JDK7引入了NIO2.0)
线程发起io请求后,立即返回(非阻塞io),当数据读写完成后,OS通知用户线程(异步)。这里数据写入socket空间,或从socket空间读取数据到用户空间由OS完成,用户线程无需介入,所以也就不会阻塞用户线程,即异步。
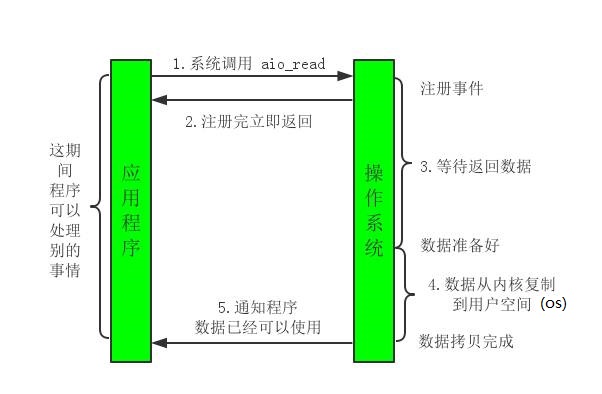
AIO基于时间驱动思想,采用proactor模式。数据完成后,由os主动通知应用程序,通过epoll实现,节省了NIO中selector循环遍历检测数据就绪的资源开销。同时,数据copy操作(用户空间<->socket空间)是由os完成的,无需应用程序参与,大大提高应用程序效率。
NIO1.0中, IO过程没有阻塞, 阻塞被转移到了Selector轮询上. Selector管理所有的Channel, 因此能把总阻塞时间缩到最短。
NIO2.0中, 供我们调用的IO API都是非阻塞的, 背后复杂的实现过程(肯定有阻塞)被转移到了JDK底层和操作系统上. 我们的程序的IO调用可以做到立即返回。
AIO同样有Channel和Buffer, 但没有Selector
1. 客户端
public class Client {

    private AsynchronousSocketChannel asc ;
    public Client() throws Exception {
        asc = AsynchronousSocketChannel.open();
    }

    public void connect() throws InterruptedException, ExecutionException{
        // get()阻塞
        asc.connect(new InetSocketAddress("127.0.0.1", 8765)).get();
    }

    public void write(String request){
        try {
            // get()阻塞
            asc.write(ByteBuffer.wrap(request.getBytes())).get();
            read();
        } catch (Exception e) {
            e.printStackTrace();
        }
    }

    private void read() throws IOException {
        ByteBuffer buf = ByteBuffer.allocate(1024);
        try {
            // get()阻塞
            asc.read(buf).get();
            buf.flip();
            byte[] respByte = new byte[buf.remaining()];
            buf.get(respByte);
            System.out.println(new String(respByte,"utf-8").trim());
            // 关闭
            asc.close();
        } catch (InterruptedException e) {
            e.printStackTrace();
        } catch (ExecutionException e) {
            e.printStackTrace();
        } catch (UnsupportedEncodingException e) {
            e.printStackTrace();
        }
    }

    public static void main(String[] args) throws Exception {
        Client c1 = new Client();
        Client c2 = new Client();
        c1.connect();
        c2.connect();

        c1.write("aa");
        c2.write("bbb");
    }
}
2. 服务端
public class Server {
    //线程池
    private ExecutorService executorService;
    //异步通道线程组
    private AsynchronousChannelGroup threadGroup;
    //服务器通道
    public AsynchronousServerSocketChannel assc;

    public Server(int port){
        try {
            //创建一个线程池
            executorService = Executors.newCachedThreadPool();
            //使用线程池创建异步通道线程组, 该线程组在底层支持着我们的异步操作
            threadGroup = AsynchronousChannelGroup.withCachedThreadPool(executorService, 1);
            //使用 异步通道线程组 创建服务器通道
            assc = AsynchronousServerSocketChannel.open(threadGroup);
            //给通道绑定端口
            assc.bind(new InetSocketAddress(port));
            System.out.println("server start");
            // 下面的accept不会阻塞 , 一个accept只能接收一个连接请求
            // accept第一个参数: 被绑定到IO操作的关联对象(子类), 第二个参数 CompletionHandler<AsynchronousSocketChannel, 关联对象(父类)>, 操作成功后执行的回调句柄
            // 如果接受了一个新的连接, 其结果AsynchronousSocketChannel会被绑定与assc通道到相同的AsynchronousChannelGroup
            assc.accept(this, new ServerCompletionHandler());
            // 这里为了避免程序结束, 异步通道线程组结束就不会执行回调了
            Thread.sleep(Integer.MAX_VALUE);
        } catch (Exception e) {
            e.printStackTrace();
        }
    }
    public static void main(String[] args) {
        new Server(8765);
    }

}
//第一个参数: IO操作结果; 第二个参数: 被绑定到IO操作的关联对象
public class ServerCompletionHandler implements CompletionHandler<AsynchronousSocketChannel, Server> {

    // 以下两个重载参数与CompletionHander的模板参数一致, 回调时被传入IO结果和IO操作时设置的关联对象
    @Override
    public void completed(AsynchronousSocketChannel asc, Server attachment) {
        // 完成当前连接时, 首先, 为下一个客户端能接入再次调用accept异步方法
        attachment.assc.accept(attachment, this);
        // 其次, 执行下一步的读操作
        read(asc);
    }
    @Override
    public void failed(Throwable exc, Server attachment) {
        exc.printStackTrace();
    }

    private void read(final AsynchronousSocketChannel asc) {
        //读取数据
        ByteBuffer buf = ByteBuffer.allocate(1024);
        // 第一个参数: 读操作的Buffer, 第二个参数: IO关联对象, 第三个参数:CompletionHandler<Integer, IO管理对象父类>
        asc.read(buf, buf, new CompletionHandler<Integer, ByteBuffer>() {
            @Override
            public void completed(Integer resultSize, ByteBuffer attachment) {
                //进行读取之后,重置标识位
                attachment.flip();
                //获得读取的字节数
                System.out.println("Server端" + "收到客户端的数据长度为:" + resultSize);
                //获取读取的数据
                String resultData = new String(attachment.array()).trim();
                System.out.println("Server端" + "收到客户端的数据信息为:" + resultData);
                String response = "From服务端To客户端: 于" + new Date() + "收到了请求数据"+ resultData;
                write(asc, response);
            }
            @Override
            public void failed(Throwable exc, ByteBuffer attachment) {
                exc.printStackTrace();
            }
        });
    }

    private void write(AsynchronousSocketChannel asc, String response) {
        try {
            ByteBuffer buf = ByteBuffer.allocate(1024);
            buf.put(response.getBytes());
            buf.flip();
            // 写操作, 异步
            Future<Integer> future = asc.write(buf);
            // 阻塞等待结果
            future.get();
        } catch (InterruptedException e) {
            e.printStackTrace();
        } catch (ExecutionException e) {
            e.printStackTrace();
        }
    }
}