1. 为什么要用线程池
- 减少资源的开销
- 减少了每次创建线程、销毁线程的开销。
- 提高响应速度 ,每次请求到来时,由于线程的创建已经完成,故可以直接执行任务,因此提高了响应速度。
- 提高线程的可管理性 ,线程是一种稀缺资源,若不加以限制,不仅会占用大量资源,而且会影响系统的稳定性。 因此,线程池可以对线程的创建与停止、线程数量等等因素加以控制,使得线程在一种可控的范围内运行,不仅能保证系统稳定运行,而且方便性能调优。
2. 类图
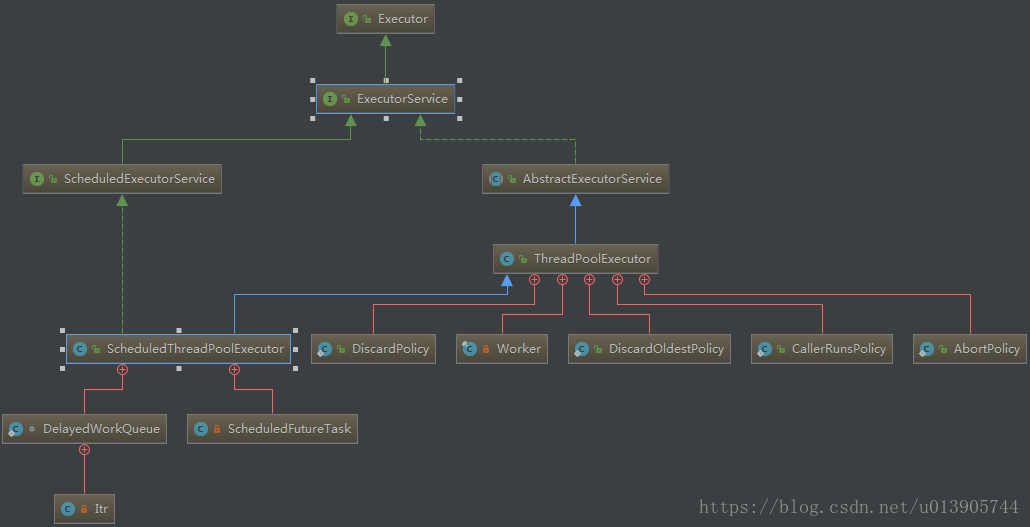
ExecutorService提供了两种基础线程池的选择,ScheduledThreadPoolExecutor(定时任务的)和ThreadPoolExecutor(普通的),本文主要介绍ThreadPoolExecutor。
《阿里巴巴java编程手册》并发处理部分,讲了两个原则:
1. 线程资源必须通过线程池提供,不允许在应用中自行显式创建线程。
使用线程池的好处是减少在创建和销毁线程上所消耗的时间及系统资源,解决资源不足的问题。如果不使用线程池,有可能造成系统创建大量同类线程而导致消耗完内存或者“过度切换”的问题。
我们知道,有继承Thread,implements Runnable, implements Callable<T>这些种方法创建线程,但推荐使用线程池来创建线程。
2. 线程池不允许使用Executors创建,而是通过ThreadPoolExecutor的方式创建,这样的处理方式能让编写代码的工程师更加明确线程池的运行规则,规避资源耗尽的风险。
Executors返回的线程池对象的弊端如下:
1)FixedThreadPool和SingleThreadPool:允许的请求队列长度为Integer.MAX_VALUE,可能会堆积大量的请求,从而导致OOM(无参的LinkedBlockingQueue的长度默认是Integer.MAX_VALUE)
public static ExecutorService newFixedThreadPool(int nThreads) {
    return new ThreadPoolExecutor(nThreads, nThreads,
                                  0L, TimeUnit.MILLISECONDS,
                                  new LinkedBlockingQueue<Runnable>());
}
public static ExecutorService newSingleThreadExecutor() {
    return new FinalizableDelegatedExecutorService
        (new ThreadPoolExecutor(1, 1,
                                0L, TimeUnit.MILLISECONDS,
                                new LinkedBlockingQueue<Runnable>()));
}
2)CachedThreadPool和ScheduledThreadPool:允许的创建线程数量为Integer.MAX_VALUE,可能会堆积大量的请求,从而导致OOM
public static ExecutorService newCachedThreadPool() {
    return new ThreadPoolExecutor(0, Integer.MAX_VALUE,
                                  60L, TimeUnit.SECONDS,
                                  new SynchronousQueue<Runnable>());
}
public ScheduledThreadPoolExecutor(int corePoolSize) {
    super(corePoolSize, Integer.MAX_VALUE, 0, NANOSECONDS,
          new DelayedWorkQueue());
}
ThreadPoolExecutor类介绍
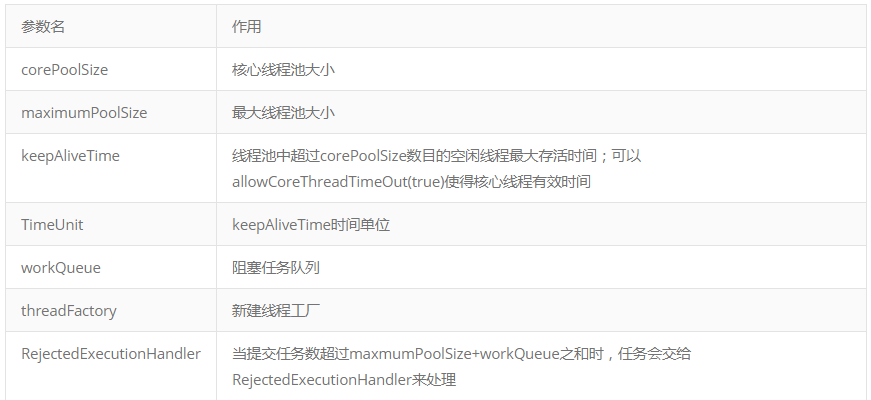
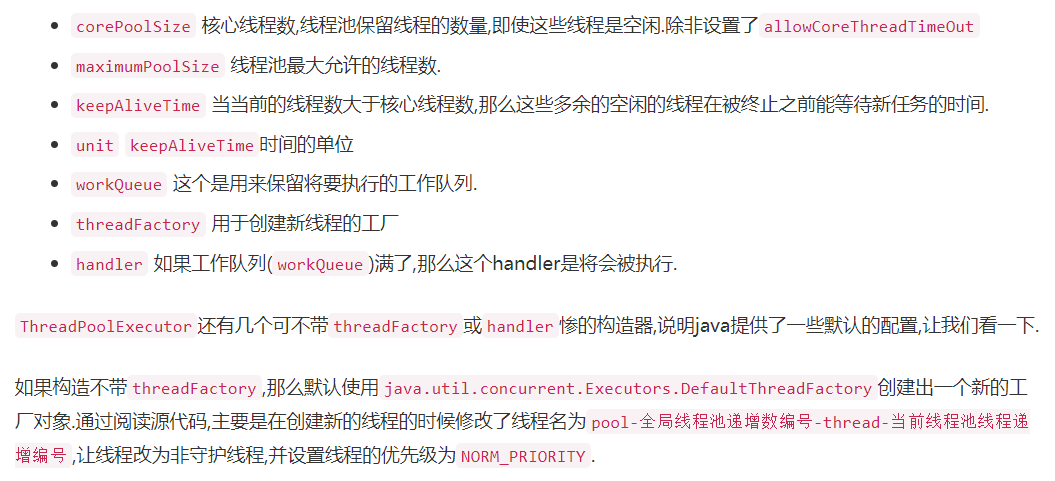
ThreadPoolExecutor.class构造方法
//这个是ThreadPoolExecutor完整的构造器,其他的构造器其实也是在内部调用这个.
ThreadPoolExecutor(    int corePoolSize,
                    int maximumPoolSize,
                    long keepAliveTime,
                    TimeUnit unit,
                    BlockingQueue<Runnable> workQueue,
                    ThreadFactory threadFactory,
                    RejectedExecutionHandler handler)
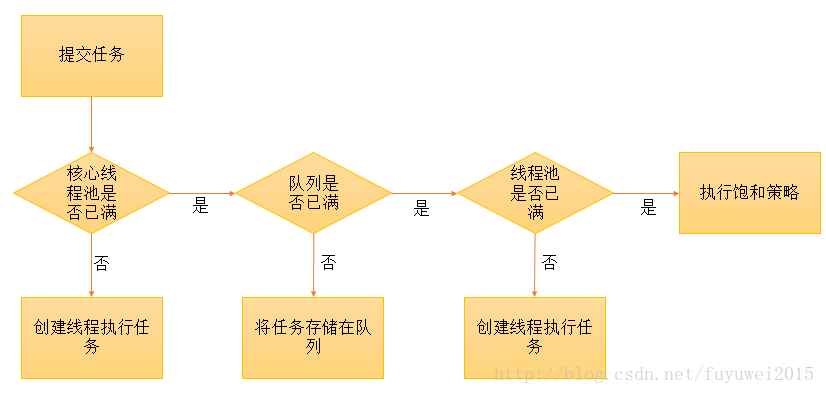
下我们以ThreadPoolExecutor为例展示下线程池的工作流程图


例子 使用默认的拒绝策略AbortPolicy
public class Demo1 {
    public static void main(String[] args) {
        BlockingQueue<Runnable> queue = new ArrayBlockingQueue<Runnable>(10);
        RejectedExecutionHandler handler = new ThreadPoolExecutor.AbortPolicy();
        ThreadPoolExecutor pool = new ThreadPoolExecutor(3, 3, 0, TimeUnit.SECONDS, queue, handler);
        for (int i = 0; i < 20; i ++){
            final int temp = i;
            pool.execute(() -> {
                System.out.println("客户" + temp + "来了.......");
                try {
                    Thread.sleep(10);
                } catch (InterruptedException e) {
                    e.printStackTrace();
                }
            });
        }
        pool.shutdown();
    }
}
Exception in thread "main" java.util.concurrent.RejectedExecutionException: Task com.kco.test17.demo1.Demo1$$Lambda$1/15497079@ca494b rejected from java.util.concurrent.ThreadPoolExecutor@1a4f24f[Running, pool size = 5, active threads = 5, queued tasks = 10, completed tasks = 0]
at java.util.concurrent.ThreadPoolExecutor$AbortPolicy.rejectedExecution(ThreadPoolExecutor.java:2047)
at java.util.concurrent.ThreadPoolExecutor.reject(ThreadPoolExecutor.java:823)
at java.util.concurrent.ThreadPoolExecutor.execute(ThreadPoolExecutor.java:1369)
at com.kco.test17.demo1.Demo1.main(Demo1.java:16)
at sun.reflect.NativeMethodAccessorImpl.invoke0(Native Method)
at sun.reflect.NativeMethodAccessorImpl.invoke(NativeMethodAccessorImpl.java:62)
at sun.reflect.DelegatingMethodAccessorImpl.invoke(DelegatingMethodAccessorImpl.java:43)
at java.lang.reflect.Method.invoke(Method.java:497)
at com.intellij.rt.execution.application.AppMain.main(AppMain.java:140)
pool-1-thread-1客户0来了.......
pool-1-thread-2客户1来了.......
pool-1-thread-3客户2来了.......
pool-1-thread-5客户14来了.......
pool-1-thread-4客户13来了.......
pool-1-thread-2客户3来了.......
pool-1-thread-1客户4来了.......
pool-1-thread-5客户5来了.......
pool-1-thread-3客户6来了.......
pool-1-thread-4客户7来了.......
pool-1-thread-2客户9来了.......
pool-1-thread-1客户8来了.......
pool-1-thread-3客户10来了.......
pool-1-thread-5客户11来了.......
pool-1-thread-4客户12来了.......
从结果看出来,可以看出线程是重复被使用的,而且当执行的任务超过工作队列的容量时,线程确实抛出了异常.
例子2 使用忽略策略 DiscardPolicy
将 RejectedExecutionHandler handler = new ThreadPoolExecutor.AbortPolicy();改为
RejectedExecutionHandler handler = new ThreadPoolExecutor.DiscardPolicy();
运行结果如下:
pool-1-thread-1客户0来了.......
pool-1-thread-3客户2来了.......
pool-1-thread-4客户13来了.......
pool-1-thread-5客户14来了.......
pool-1-thread-3客户3来了.......
pool-1-thread-4客户4来了.......
pool-1-thread-1客户5来了.......
pool-1-thread-5客户6来了.......
pool-1-thread-2客户1来了.......
pool-1-thread-3客户7来了.......
pool-1-thread-4客户8来了.......
pool-1-thread-5客户9来了.......
pool-1-thread-1客户10来了.......
pool-1-thread-2客户11来了.......
pool-1-thread-4客户12来了.......
现在线程池正确退出了,而且也不抛出异常了,但是超过工作队列容量的任务全部被忽略了.
例子3 使用忽略最早任务策略 DiscardOldestPolicy
RejectedExecutionHandler 改为 RejectedExecutionHandler handler = new ThreadPoolExecutor.DiscardOldestPolicy();
pool-1-thread-1客户0来了.......
pool-1-thread-2客户1来了.......
pool-1-thread-3客户2来了.......
pool-1-thread-5客户14来了.......
pool-1-thread-4客户13来了.......
pool-1-thread-4客户8来了.......
pool-1-thread-1客户11来了.......
pool-1-thread-5客户10来了.......
pool-1-thread-3客户9来了.......
pool-1-thread-2客户12来了.......
pool-1-thread-1客户15来了.......
pool-1-thread-4客户16来了.......
pool-1-thread-5客户17来了.......
pool-1-thread-2客户19来了.......
pool-1-thread-3客户18来了.......
从以上结果,我们可以看出除了客户0到客户2刚好是3个核心线程被执行后,客户3到客户7直接被忽略掉了.
例子4 使用来着不拒策略 CallerRunsPolicy
同样讲拒绝策略改为RejectedExecutionHandler handler = new ThreadPoolExecutor.CallerRunsPolicy();
运行程序,结果如下:
pool-1-thread-1客户0来了.......
pool-1-thread-2客户1来了.......
pool-1-thread-3客户2来了.......
pool-1-thread-4客户13来了.......
main客户15来了.......
pool-1-thread-5客户14来了.......
pool-1-thread-2客户3来了.......
pool-1-thread-1客户4来了.......
main客户18来了.......
pool-1-thread-3客户5来了.......
pool-1-thread-4客户7来了.......
pool-1-thread-5客户6来了.......
pool-1-thread-5客户8来了.......
pool-1-thread-1客户9来了.......
pool-1-thread-4客户10来了.......
pool-1-thread-3客户12来了.......
pool-1-thread-2客户11来了.......
pool-1-thread-1客户16来了.......
pool-1-thread-5客户19来了.......
pool-1-thread-3客户17来了.......
结果,我们可以发现所有的任务都被执行,而且竟然还有两个是在主线程执行的.现在明白我之前说的则直接运行任务的run方法的意思了吧,没错是直接调用run方法,而不是开启线程去执行任务.
例子5 使用自定义的拒绝策略
现在我们自己写一个拒绝策略,要求所有的任务都必须被线程池执行,而且都要在线程池中执行.
public class Demo5 {
    public static void main(String[] args) {
        BlockingQueue<Runnable> queue = new ArrayBlockingQueue<Runnable>(10);
        RejectedExecutionHandler handler = new RejectedExecutionHandler() {
            @Override
            public void rejectedExecution(Runnable r, ThreadPoolExecutor executor) {
                if (!executor.isShutdown()){
                    try {
                        executor.getQueue().put(r);
                    } catch (InterruptedException e) {
                        e.printStackTrace();
                    }
                }
            }
        };
        ThreadPoolExecutor pool = new ThreadPoolExecutor(3, 5, 0, TimeUnit.SECONDS, queue, handler);
        for (int i = 0; i < 20; i ++){
            final int temp = i;
            pool.execute(() -> {
                String name = Thread.currentThread().getName();
                System.out.println(name + "客户" + temp + "来了.......");
                try {
                    Thread.sleep(2000);
                } catch (InterruptedException e) {
                    e.printStackTrace();
                }
            });
        }
        pool.shutdown();
    }
}
运行结果:
pool-1-thread-1客户0来了.......
pool-1-thread-3客户2来了.......
pool-1-thread-5客户14来了.......
pool-1-thread-4客户13来了.......
pool-1-thread-2客户1来了.......
pool-1-thread-1客户3来了.......
pool-1-thread-3客户4来了.......
pool-1-thread-5客户5来了.......
pool-1-thread-2客户6来了.......
pool-1-thread-4客户7来了.......
pool-1-thread-1客户8来了.......
pool-1-thread-3客户9来了.......
pool-1-thread-5客户10来了.......
pool-1-thread-4客户11来了.......
pool-1-thread-2客户12来了.......
pool-1-thread-1客户15来了.......
pool-1-thread-3客户16来了.......
pool-1-thread-5客户17来了.......
pool-1-thread-4客户19来了.......
pool-1-thread-2客户18来了.......
ok.所有任务都被线程池执行了.而且我们自定义的拒绝策略也很简单,就是让工作队列调用put让其一直等待,直到有可用的容量存放任务.
动手自己写一个线程池:
import java.util.ArrayList;
import java.util.concurrent.ArrayBlockingQueue;
import java.util.concurrent.locks.ReentrantLock;

public class MyThreadPool {
    /**存放线程的集合*/
    private ArrayList<MyThread> threads;
    /**任务队列*/
    private ArrayBlockingQueue<Runnable> taskQueue;
    /**线程池初始限定大小*/
    private int threadNum;
    /**已经工作的线程数目*/
    private int workThreadNum;

    private final ReentrantLock mianLock = new ReentrantLock();

    public MyThreadPool(int initPoolNum) {
        this.threadNum = initPoolNum;
        this.threads = new ArrayList<>(initPoolNum);
        //任务队列初始化为线程池线程数的四倍
        this.taskQueue = new ArrayBlockingQueue<>(initPoolNum*4);
        this.workThreadNum = 0;
    }

    public void execute(Runnable runnable) {
        try {
            mianLock.lock();
            //线程池未满,每加入一个任务则开启一个线程
            if (this.workThreadNum < this.threadNum) {
                MyThread myThread = new MyThread(runnable);
                myThread.start();
                threads.add(myThread);
                this.workThreadNum++;
            } else { //线程池已满,放入任务队列,等待有空闲线程时执行
                //队列已满,无法添加时,拒绝任务
                if (!taskQueue.offer(runnable)) {
                    rejectTask();
                }
            }
        } finally {
            mianLock.unlock();
        }
    }

    private void rejectTask() {
        System.out.println("任务队列已满,无法继续添加,请扩大您的初始化线程池!");
    }

    public static void main(String[] args) {
        MyThreadPool myThreadPool = new MyThreadPool(5);
        Runnable task = new Runnable() {
            @Override
            public void run() {
                System.out.println(Thread.currentThread().getName()+"执行中");
            }
        };
        for (int i = 0; i < 20; i++) {
            myThreadPool.execute(task);
        }
    }

    class MyThread extends Thread {
        private Runnable task;

        public MyThread(Runnable runnable) {
            this.task = runnable;
        }

        @Override
        public void run() {
            //该线程一直启动着,不断从任务队列取出任务执行
            while(true) {
                //如果初始化任务不为空,则执行初始化任务
                if(task != null) {
                    task.run();
                    task = null;
                }else { //否则去任务队列取任务并执行
                    Runnable queueTask = taskQueue.poll();
                    if(queueTask != null)
                        queueTask.run();
                }
            }
        }
    }
}