介绍SpringBoot项目中使用缓存,之前先介绍一下Spring的缓存抽象和JSR107,本博客是我在学习尚硅谷视频和参考其它博客之后做的笔记,仅供学习参考
@
一、Spring的缓存抽象
1.1、缓存抽象定义
Spring从3.1开始定义了org.springframework.cache.Cache
和org.springframework.cache.CacheManager接口来统一不同的缓存技术;并支持使用Java Caching(JSR-107)注解简化我们进行缓存开发。Spring Cache 只负责维护抽象层,具体的实现由你的技术选型来决定。将缓存处理和缓存技术解除耦合。
1.2、重要接口
- Cache:缓存抽象的规范接口,缓存实现有:RedisCache、EhCacheCache、ConcurrentMapCache等
- CacheManager:缓存管理器,管理Cache的生命周期
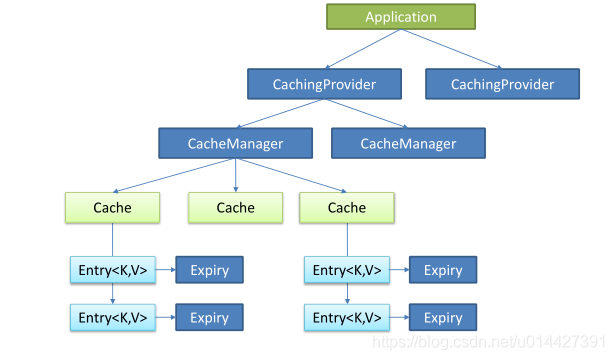
二、JSR107
2.1、JSR107核心接口
Java Caching(JSR-107)定义了5个核心接口,分别是CachingProvider, CacheManager, Cache, Entry和 Expiry。
- CachingProvider:创建、配置、获取、管理和控制多个CacheManager
- CacheManager:创建、配置、获取、管理和控制多个唯一命名的Cache,Cache存在于CacheManager的上下文中。一个CacheManager仅对应一个CachingProvider
- Cache:是由CacheManager管理的,CacheManager管理Cache的生命周期,Cache存在于CacheManager的上下文中,是一个类似map的数据结构,并临时存储以key为索引的值。一个Cache仅被一个CacheManager所拥有
- Entry:是一个存储在Cache中的key-value对
- Expiry:每一个存储在Cache中的条目都有一个定义的有效期。一旦超过这个时间,条目就自动过期,过期后,条目将不可以访问、更新和删除操作。缓存有效期可以通过ExpiryPolicy设置
2.2、JSR107图示
引用尚硅谷视频课件中的图示:
三、Spring缓存使用
3.1、重要注解简介
例子实践之前,先简单介绍Spring提供的重要缓存注解
- @Cacheable:针对方法配置,能够根据方法的请求参数对其结果进行缓存
- @CacheEvict:清空缓存
- @CachePut:既调用方法,又更新缓存数据
- @EnableCaching:开启基于注解的缓存
- @Caching:定义复杂的缓存规则
3.2、环境准备
ok,本博客以尚硅谷视频例子进行改写,用这个比较经典的例子进行说明
环境准备:
- maven环境
- IntelliJ IDEA
新建两张表:
DROP TABLE IF EXISTS `employee`;
CREATE TABLE `employee` (
  `id` int(11) NOT NULL AUTO_INCREMENT,
  `lastName` varchar(255) DEFAULT NULL,
  `email` varchar(255) DEFAULT NULL,
  `gender` int(2) DEFAULT NULL,
  `d_id` int(11) DEFAULT NULL,
  PRIMARY KEY (`id`)
) ENGINE=InnoDB DEFAULT CHARSET=utf8;
DROP TABLE IF EXISTS `department`;
CREATE TABLE `department` (
  `id` int(11) NOT NULL AUTO_INCREMENT,
  `departmentName` varchar(255) DEFAULT NULL,
  PRIMARY KEY (`id`)
) ENGINE=InnoDB DEFAULT CHARSET=utf8;
3.3、引入spring-boot-starter-cache模块
<dependency>
            <groupId>org.springframework.boot</groupId>
            <artifactId>spring-boot-starter-cache</artifactId>
        </dependency>
3.4、主要注解例子实践
3.4.1、@EnableCaching
@EnableCaching开启基于注解的缓存
import org.springframework.boot.SpringApplication;
import org.springframework.boot.autoconfigure.SpringBootApplication;
import org.springframework.cache.annotation.EnableCaching;

@SpringBootApplication
@EnableCaching
public class SpringbootCacheApplication {

    public static void main(String[] args) {
        SpringApplication.run(SpringbootCacheApplication.class, args);
    }

}
3.4.2、@Cacheable注解
@Cacheable注解的作用,前面也简介了,主要是针对方法配置,能够根据方法的请求参数对其结果进行缓存,介绍一下注解的主要属性
- cacheNames/value:指定缓存组件的名字,数组形式
- key:缓存数据使用的key,确定缓存可以用唯一key进行指定;eg:编写SpEL; #id,参数id的值 ,,#a0(第一个参数), #p0(和a0的一样的意义) ,#root.args[0]
- keyGenerator:key的生成器;可以自己指定key的生成器的组件id(注意: key/keyGenerator:二选一使用;不能同时使用)
- cacheManager:指定缓存管理器;或者cacheResolver指定获取解析器
- condition:指定符合条件的情况下才缓存;使用SpEl表达式,eg:condition = "#a0>1":第一个参数的值>1的时候才进行缓存
- unless:否定缓存;当unless指定的条件为true,方法的返回值就不会被缓存;eg:unless = "#a0!=2":如果第一个参数的值不是2,结果不缓存;
- sync:是否使用异步模式
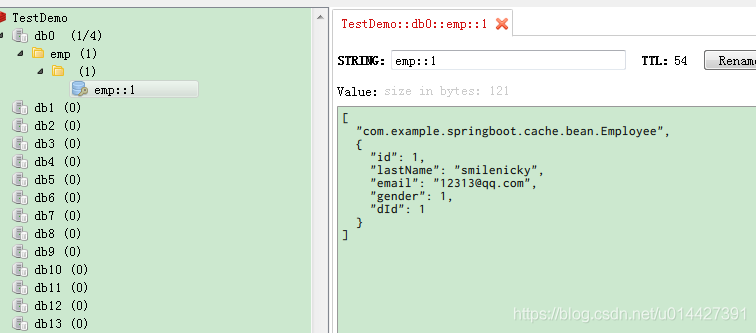
    @Cacheable(value = {"emp"}, /*keyGenerator = "myKeyGenerator",*/key = "#id",condition = "#a0>=1",unless = "#a0!=2")
    public Employee getEmp(Integer id) {
        Employee employee = this.employeeMapper.getEmpById(id);
        LOG.info("查询{}号员工数据",id);
        return employee;
    }
这里也可以使用自定义的keyGenerator,使用属性keyGenerator = "myKeyGenerator
定义一个@Bean类,将KeyGenerator添加到Spring容器
@Configuration
public class CacheConfig {

    @Bean(value = {"myKeyGenerator"})
    public KeyGenerator keyGenerator(){
        return new KeyGenerator() {
            @Override
            public Object generate(Object target, Method method, Object... params) {
                return method.getName()+"["+ Arrays.asList(params).toString()+"]";
            }
        };
    }
}
3.4.3、@CachePut注解
@CachePut注解也是一个用来缓存的注解,不过缓存和@Cacheable有明显的区别是即调用方法,又更新缓存数据,也就是执行方法操作之后再来同步更新缓存,所以这个主键常用于更新操作,也可以用于查询,主键属性和@Cacheable有很多类似的,详情参看@link @CachePut源码
 /**
     *  @CachePut:既调用方法,又更新缓存数据;同步更新缓存
     *  修改了数据,同时更新缓存
     */
    @CachePut(value = {"emp"}, key = "#result.id")
    public Employee updateEmp(Employee employee){
        employeeMapper.updateEmp(employee);
        LOG.info("更新{}号员工数据",employee.getId());
        return employee;
    }
3.4.4、 @CacheEvic注解
主要属性:
- key:指定要清除的数据
- allEntries = true:指定清除这个缓存中所有的数据
- beforeInvocation = false:默认代表缓存清除操作是在方法执行之后执行
- beforeInvocation = true:代表清除缓存操作是在方法运行之前执行
    @CacheEvict(value = {"emp"}, beforeInvocation = true,key="#id")
    public void deleteEmp(Integer id){
        employeeMapper.deleteEmpById(id);
        //int i = 10/0;
    }
3.4.5、@Caching注解
@Caching 用于定义复杂的缓存规则,可以集成@Cacheable和 @CachePut
 // @Caching 定义复杂的缓存规则
    @Caching(
            cacheable = {
                    @Cacheable(/*value={"emp"},*/key = "#lastName")
            },
            put = {
                    @CachePut(/*value={"emp"},*/key = "#result.id"),
                    @CachePut(/*value={"emp"},*/key = "#result.email")
            }
    )
    public Employee getEmpByLastName(String lastName){
        return employeeMapper.getEmpByLastName(lastName);
    }
3.4.6、 @CacheConfig注解
@CacheConfig注解可以用于抽取缓存的公共配置,然后在类加上就可以,eg:@CacheConfig(cacheNames = {"emp"},cacheManager = "employeeCacheManager")
附录拓展:SpEL表达式用法
Cache SpEL available metadata
| 名称 | 位置 | 描述 | 示例 |
|---|---|---|---|
| methodName | root对象 | 当前被调用的方法名 | #root.methodname |
| method | root对象 | 当前被调用的方法 | #root.method.name |
| target | root对象 | 当前被调用的目标对象实例 | #root.target |
| targetClass | root对象 | 当前被调用的目标对象的类 | #root.targetClass |
| args | root对象 | 当前被调用的方法的参数列表 | #root.args[0] |
| caches | root对象 | 当前方法调用使用的缓存列表 | #root.caches[0].name |
| argument Name | 执行上下文(avaluation context) | 当前被调用的方法的参数,如findArtisan(Artisan artisan),可以通过#artsian.id获得参数 | #artsian.id |
| result | 执行上下文(evaluation context) | 方法执行后的返回值(仅当方法执行后的判断有效,如 unless cacheEvict的beforeInvocation=false) | #result |
四、集成Redis缓存
4.1、环境准备
基于前面的Spring缓存环境,集成redis要引入相关配置:
<dependency>
            <groupId>org.springframework.boot</groupId>
            <artifactId>spring-boot-starter-data-redis</artifactId>
        </dependency>
<dependency>
            <groupId>org.apache.commons</groupId>
            <artifactId>commons-pool2</artifactId>
        </dependency>
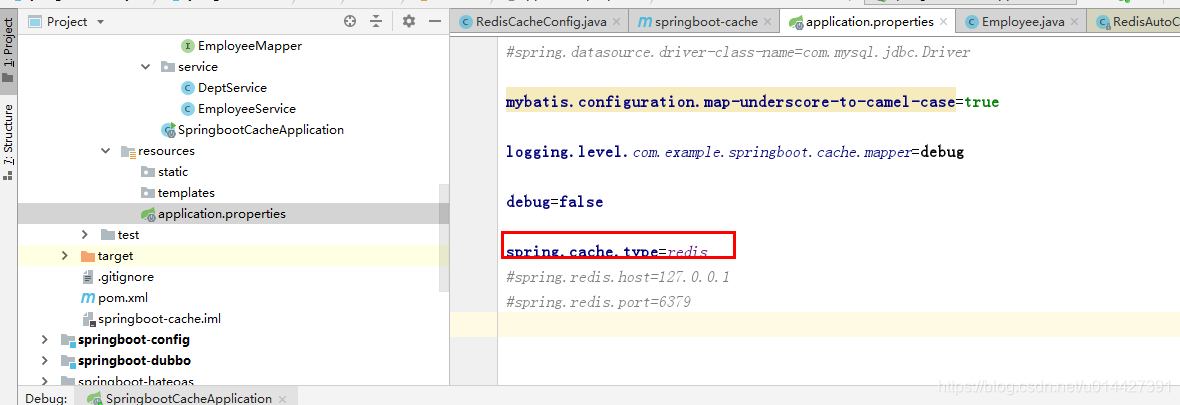
切换缓存方式为Redis:spring.cache.type=redis
4.2、Redis配置类实现
RedisTemplate配置
@Resource
    private LettuceConnectionFactory lettuceConnectionFactory;

    @Bean
    @Primary
    public RedisTemplate<Object,Object> redisTemplate(){
        RedisTemplate<Object,Object> redisTemplate = new RedisTemplate<Object, Object>();
        redisTemplate.setConnectionFactory(lettuceConnectionFactory);
        Jackson2JsonRedisSerializer<Object> jackson2JsonRedisSerializer = this.initJacksonSerializer();
        // 设置value的序列化规则和 key的序列化规则
        redisTemplate.setValueSerializer(jackson2JsonRedisSerializer);
        redisTemplate.setKeySerializer(new StringRedisSerializer());
        redisTemplate.afterPropertiesSet();
        return redisTemplate;
    }
RedisCacheManager相关代码可以参考博文,该博主已经对代码做了比较好的封装,所以本文不复制代码
4.3、RestTemplate相关操作
使用RestTemplate操作redis
- 1、 redisTemplate.opsForValue();//操作字符串
- 2、redisTemplate.opsForHash();//操作hash
- 3、redisTemplate.opsForList();//操作list
- 4、redisTemplate.opsForSet();//操作set
- 5、redisTemplate.opsForZSet();//操作有序set
4.4、缓存业务测试
@Autowired
    DepartmentMapper departmentMapper;

    @Qualifier("redisCacheManager")
    @Autowired
    RedisCacheManager redisCacheManager;

//      @Cacheable(cacheNames = "dept",cacheManager = "redisCacheManager")
//    public Department getDeptById(Integer id){
//        System.out.println("查询部门"+id);
//        Department department = departmentMapper.getDeptById(id);
//        return department;
//    }

    // 使用缓存管理器得到缓存,进行api调用
   public Department getDeptById(Integer id){
        LOG.info("查询id为{}的员工信息",id);

        //获取某个缓存
        Cache deptCache = redisCacheManager.getCache("dept");
        Department department = null;
        if(deptCache.get(id)==null){
            department = departmentMapper.getDeptById(id);
            deptCache.put(id,department);
        } else {
            SimpleValueWrapper valueWrapper = (SimpleValueWrapper) deptCache.get(id);
            department = (Department)valueWrapper.get();
        }

        return department;
    }

当然使用前面的Spring主键也是可以缓存的,
参考博文:
缓存抽象层Spring cache实战操作
代码例子下载:github链接