9、JdbcTemplate[会用]
9.1 JdbcTemplate 概述
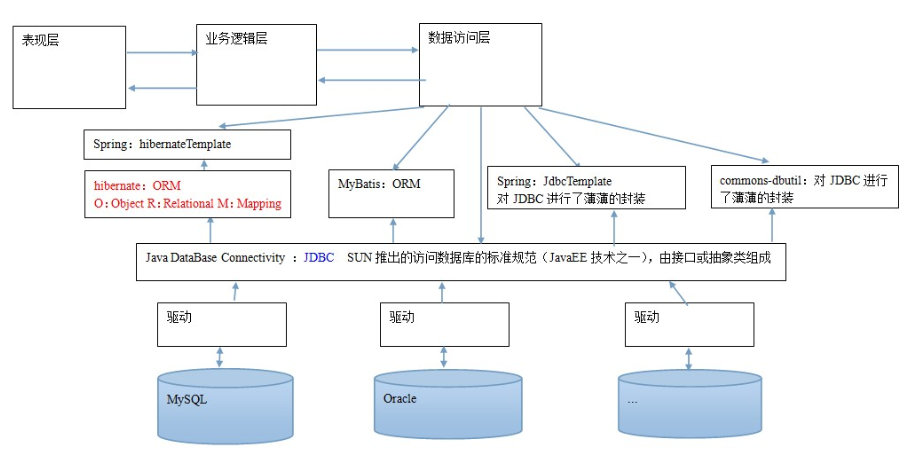
它是 spring 框架中提供的一个对象,是对原始 Jdbc API 对象的简单封装。spring 框架为我们提供了很多的操作模板类。
- 操作关系型数据的:
- JdbcTemplate
- HibernateTemplate
- 操作 nosql 数据库的:
- RedisTemplate
- 操作消息队列的:
- JmsTemplate
9.2 JdbcTemplate 对象的创建
我们可以参考它的源码,来一探究竟:
复制代码
public JdbcTemplate() {
}
public JdbcTemplate(DataSource dataSource) {
	setDataSource(dataSource);
	afterPropertiesSet();
}
public JdbcTemplate(DataSource dataSource, boolean lazyInit) {
	setDataSource(dataSource);
	setLazyInit(lazyInit);
	afterPropertiesSet();
}
除了默认构造函数之外,都需要提供一个数据源。既然有set方法,依据我们之前学过的依赖注入,我们可以在配置文件中配置这些对象。
9.3 spring 中配置数据源
9.3.1 环境搭建
pom.xml中添加以下依赖
复制代码
    <properties>
        <project.lombok>1.18.12</project.lombok>
        <project.fastjson>1.2.70</project.fastjson>
        <project.spring>5.2.8.RELEASE</project.spring>
    </properties>
<dependencies>
    <dependency>
        <groupId>org.springframework</groupId>
        <artifactId>spring-context</artifactId>
        <version>${project.spring}</version>
    </dependency>

    <dependency>
        <groupId>org.springframework</groupId>
        <artifactId>spring-jdbc</artifactId>
        <version>${project.spring}E</version>
    </dependency>

    <dependency>
        <groupId>org.springframework</groupId>
        <artifactId>spring-tx</artifactId>
        <version>${project.spring}</version>
    </dependency>

    <dependency>
        <groupId>mysql</groupId>
        <artifactId>mysql-connector-java</artifactId>
        <version>5.1.6</version>
    </dependency>
</dependencies>
9.3.2 编写spring的配置文件
复制代码
<?xml version="1.0" encoding="UTF-8"?>
<beans xmlns="http://www.springframework.org/schema/beans"
       xmlns:xsi="http://www.w3.org/2001/XMLSchema-instance"
       xsi:schemaLocation="http://www.springframework.org/schema/beans
        http://www.springframework.org/schema/beans/spring-beans.xsd">
</beans>
9.3.3 配置数据源
可以使用C3P0和DBCP,当然spring 框架也提供了一个内置数据源,此处我们使用 spring 的内置数据源。
复制代码
<!-- 配置数据源-->
<bean id="dataSource" class="org.springframework.jdbc.datasource.DriverManagerDataSource">
    <property name="driverClassName" value="com.mysql.jdbc.Driver"></property>
    <property name="url" value="jdbc:mysql://localhost:3306/eesy"></property>
    <property name="username" value="root"></property>
    <property name="password" value="root"></property>
</bean>
9.3.4 将数据库连接的信息配置到属性文件中
【定义属性文件】jdbc.properties
复制代码
jdbc.driverClass=com.mysql.jdbc.Driver
jdbc.url=jdbc:mysql://localhost:3306/eesy
jdbc.username=root
jdbc.password=root
【引入外部的属性文件】
一种方式:
复制代码
<!-- 引入外部属性文件: -->
<bean class="org.springframework.beans.factory.config.PropertyPlaceholderConfigurer">
	<property name="location" value="classpath:jdbc.properties"/>
</bean>
另一种方式:
复制代码
<context:property-placeholder location="classpath:jdbc.properties"/>
9.4 JdbcTemplate 的增删查改操作
数据库仍用eesy中的account表
9.4.1 在 spring 配置文件中配置 JdbcTemplate
复制代码
<?xml version="1.0" encoding="UTF-8"?>
<beans xmlns="http://www.springframework.org/schema/beans"
       xmlns:xsi="http://www.w3.org/2001/XMLSchema-instance"
       xsi:schemaLocation="http://www.springframework.org/schema/beans
        http://www.springframework.org/schema/beans/spring-beans.xsd">

	<!-- 配置一个数据库的操作模板:JdbcTemplate -->
	<bean id="jdbcTemplate" class="org.springframework.jdbc.core.JdbcTemplate">
        <property name="dataSource" ref="dataSource"></property>
    </bean>

    <!-- 配置数据源-->
    <bean id="dataSource" class="org.springframework.jdbc.datasource.DriverManagerDataSource">
        <property name="driverClassName" value="com.mysql.jdbc.Driver"></property>
        <property name="url" value="jdbc:mysql://localhost:3306/eesy"></property>
        <property name="username" value="root"></property>
        <property name="password" value="root"></property>
    </bean>
</beans>
9.4.2 基本的增删查改
复制代码
public class JdbcTemplateDemo {
	public static void main(String[] args) {
		//1.获取Spring容器
		ApplicationContext ac = new ClassPathXmlApplicationContext("bean.xml");
		//2.根据id获取bean对象
		JdbcTemplate jt = (JdbcTemplate) ac.getBean("jdbcTemplate");
		//3.执行操作
		//插入
		jt.exeute("insert into account(name,money)values('eee',500)");
		//保存
		jt.update("insert into account(name,money)values(?,?)","fff",5000);
		//修改
		jt.update("update account set money = money-? where id = ?",300,6)
		//删除
		jt.update("delete from account where id = ?",6);
		//查询所有
		List<Account> accounts = jt.query("select * from account where money > ? ",new AccountRowMapper(), 500);
		for(Account o : accounts){
			System.out.println(o);
		}
		//使用 RowMapper 的方式查询一个(常用的方式)
		List<Account> as = jt.query("select * from account where id = ? ",new AccountRowMapper(), 55);
		System.out.println(as.isEmpty()?"没有结果":as.get(0));
		//使用 ResultSetExtractor 的方式查询一个(不常用的方式)
		Account account = jt.query("select * from account where id = ?",new AccountResultSetExtractor(),3);
		System.out.println(account);
		//查询返回一行一列:使用聚合函数,在不使用 group by 字句时,都是返回一行一列。最常用的就是分页中获取总记录条数
		Integer total = jt.queryForObject("select count(*) from account where money > ?",Integer.class,500);
 		System.out.println(total);
	}
}

/**
 * 定义Account的封装策略
 */
class AccountRowMapper implements RowMapper<Account>{
    /**
     * 把结果集中的数据封装到Account中,然后由spring把每个Account加到集合中
     * @param rs
     * @param rowNum
     * @return
     * @throws SQLException
     */
    @Override
    public Account mapRow(ResultSet rs, int rowNum) throws SQLException {
        Account account = new Account();
        account.setId(rs.getInt("id"));
        account.setName(rs.getString("name"));
        account.setMoney(rs.getFloat("money"));
        return account;
    }
}
9.5 在 Dao 中使用 JdbcTemplate
9.5.1 准备实体类
复制代码
//账户的实体
@Data
public class Account implements Serializable {
    private Integer id;
    private String name;
    private Float money;
}
9.5.2 第一种方式:在 dao 中定义 JdbcTemplate
复制代码
/**
 * 账户的持久层接口
 */
public interface IAccountDao {

    /**
     * 根据Id查询账户
     * @param accountId
     * @return
     */
    Account findAccountById(Integer accountId);

    /**
     * 根据名称查询账户
     * @param accountName
     * @return
     */
    Account findAccountByName(String accountName);

    /**
     * 更新账户
     * @param account
     */
    void updateAccount(Account account);
}

/**
 * 账户的持久层实现类
 * 此版本的 dao ,需要给 dao  注入 JdbcTemplate
 */
public class AccountDaoImpl2 implements IAccountDao {

    private JdbcTemplate jdbcTemplate;

	public void setJdbcTemplate(JdbcTemplate jdbcTemplate) {
		this.jdbcTemplate = jdbcTemplate;
	}

    @Override
    public Account findAccountById(Integer accountId) {
        List<Account> accounts = jdbcTemplate.query("select * from account where id = ?",new BeanPropertyRowMapper<Account>(Account.class),accountId);
        return accounts.isEmpty()?null:accounts.get(0);
    }

    @Override
    public Account findAccountByName(String accountName) {
        List<Account> accounts = jdbcTemplate.query("select * from account where name = ?",new BeanPropertyRowMapper<Account>(Account.class),accountName);
        if(accounts.isEmpty()){
            return null;
        }
        if(accounts.size()>1){
            throw new RuntimeException("结果集不唯一");
        }
        return accounts.get(0);
    }

    @Override
    public void updateAccount(Account account) {
        jdbcTemplate.update("update account set name=?,money=? where id=?",account.getName(),account.getMoney(),account.getId());
    }
}
bean.xml
复制代码
<?xml version="1.0" encoding="UTF-8"?>
<beans xmlns="http://www.springframework.org/schema/beans"
       xmlns:xsi="http://www.w3.org/2001/XMLSchema-instance"
       xmlns:context="http://www.springframework.org/schema/context"
       xsi:schemaLocation="http://www.springframework.org/schema/beans
        http://www.springframework.org/schema/beans/spring-beans.xsd http://www.springframework.org/schema/context https://www.springframework.org/schema/context/spring-context.xsd">


    <!-- 配置账户的持久层-->
    <bean id="accountDao" class="cn.fage.spring.impl.AccountDaoImpl2">
        <!-- 注入jdbcTemplate -->
        <property name="jdbcTemplate" ref="jdbcTemplate"/>
    </bean>

    <!-- 配置一个数据库的操作模板:JdbcTemplate -->
    <bean id="jdbcTemplate" class="org.springframework.jdbc.core.JdbcTemplate">
        <property name="dataSource" ref="dataSource"/>
    </bean>

    <!-- 配置数据源-->
    <bean id="dataSource" class="org.springframework.jdbc.datasource.DriverManagerDataSource">
        <property name="driverClassName" value="com.mysql.jdbc.Driver"/>
        <property name="url" value="jdbc:mysql://localhost:3306/test1"/>
        <property name="username" value="root"/>
        <property name="password" value="root"/>
    </bean>

    <!-- 引入外部属性文件: 方式1 -->
    <bean class="org.springframework.beans.factory.config.PropertyPlaceholderConfigurer">
        <property name="location" value="classpath:db/jdbc.properties"/>
    </bean>
    <!-- 引入外部属性文件: 方式2 -->
    <context:property-placeholder location="classpath:db/jdbc.properties"/>
</beans>
这种方式有一个小问题,当我们的dao有很多时,每个 dao 都有一些重复性的代码。下面就是重复代码:
复制代码
	private JdbcTemplate jdbcTemplate;
	public void setJdbcTemplate(JdbcTemplate jdbcTemplate) {
		this.jdbcTemplate = jdbcTemplate;
	}
能不能把它抽取出来呢?请看下一小节。
9.5.3 第二种方式:让 dao 继承 JdbcDaoSupport
JdbcDaoSupport 是spring 框架为我们提供的一个类,该类中定义了一个 JdbcTemplate 对象,我们可以直接获取使用,但是要想创建该对象,需要为其提供一个数据源:具体源码如下:
复制代码
package cn.fage.spring;

import org.springframework.dao.support.DaoSupport;
import org.springframework.jdbc.core.JdbcTemplate;

import javax.sql.DataSource;

/**
 * @author lin
 * @version 1.0
 * @date 2020-08-11 16:03
 * @Description TODO
 */
public abstract class JdbcDaoSupport extends DaoSupport {
    //定义对象
    private JdbcTemplate jdbcTemplate;
    //set方法注入数据源,判断是否注入了,注入了就创建JdbcTemplate
    public final void setDateSource(DataSource dataSource) {
        if(this.jdbcTemplate == null || dataSource != this.jdbcTemplate.getDataSource()){
            //如果提供了数据源就创建JdbcTemplate
            this.jdbcTemplate = createJdbcTemplate(dataSource);
            initTemplateConfig();
        }
    }

    protected abstract void initTemplateConfig();

    //使用数据源创建JdbcTemplate
    protected JdbcTemplate createJdbcTemplate(DataSource dataSource) {
        return new JdbcTemplate(dataSource);
    }
    //当然我们也可以通过注入JdbcTemplate对象
    public final void setJdbcTemplate(JdbcTemplate jdbcTemplate) {
        this.jdbcTemplate = jdbcTemplate;
        initTemplateConfig();
    }
    //使用getJdbcTemplate方法获取操作模板对象
    public final JdbcTemplate getJdbcTemplate() {
        return this.jdbcTemplate;
    }
}

/**
 * 账户的持久层实现类
 * 此版本dao,只需要给它的父类注入一个数据源
 */
package cn.fage.spring.impl;

import cn.fage.pojo.Account;
import cn.fage.spring.IAccountDao;
import cn.fage.spring.JdbcDaoSupport;
import org.springframework.jdbc.core.BeanPropertyRowMapper;

import java.util.List;

/**
 * @author lin
 * @version 1.0
 * @date 2020-08-11 16:04
 * @Description TODO
 */
public class AccountDaoImpl  extends JdbcDaoSupport implements IAccountDao {

    @Override
    public Account findAccountById(Integer accountId) {
        List<Account> accounts = super.getJdbcTemplate().query("select * from account where id = ?",new BeanPropertyRowMapper<Account>(Account.class),accountId);
        //super.getJdbcTemplate()方法是从父类上继承下来的,直接使用getJdbcTemplate()也一样。
        return accounts.isEmpty()?null:accounts.get(0);
    }

    @Override
    public Account findAccountByName(String accountName) {
        List<Account> accounts = super.getJdbcTemplate().query("select * from account where name = ?",new BeanPropertyRowMapper<Account>(Account.class),accountName);
        if(accounts.isEmpty()){
            return null;
        }
        if(accounts.size()>1){
            throw new RuntimeException("结果集不唯一");
        }
        return accounts.get(0);
    }

    @Override
    public void updateAccount(Account account) {
        super.getJdbcTemplate().update("update account set name=?,money=? where id=?",account.getName(),account.getMoney(),account.getId());
    }

    @Override
    protected void checkDaoConfig() throws IllegalArgumentException {

    }

    @Override
    protected void initTemplateConfig() {

    }
}
bean.xml
复制代码
<?xml version="1.0" encoding="UTF-8"?>
<beans xmlns="http://www.springframework.org/schema/beans"
       xmlns:xsi="http://www.w3.org/2001/XMLSchema-instance"
       xsi:schemaLocation="http://www.springframework.org/schema/beans
        http://www.springframework.org/schema/beans/spring-beans.xsd">

    <!-- 配置账户的持久层-->
    <bean id="accountDao" class="cn.fage.spring.impl.AccountDaoImpl">
        <property name="dataSource" ref="dataSource"></property>
    </bean>

    <!-- 配置数据源-->
    <bean id="dataSource" class="org.springframework.jdbc.datasource.DriverManagerDataSource">
        <property name="driverClassName" value="com.mysql.jdbc.Driver"></property>
        <property name="url" value="jdbc:mysql://localhost:3306/test"></property>
        <property name="username" value="root"></property>
        <property name="password" value="root"></property>
    </bean>
</beans>
两种Dao的区别:
- 第一种在 Dao 类中定义 JdbcTemplate 的方式,适用于所有配置方式(xml和注解都可以)。
- 第二种让 Dao 继承 JdbcDaoSupport 的方式,只能用于基于 XML 的方式,注解用不了。
10、Spring中的事务控制
10.1 Spring事务控制我们要明确的
第一:JavaEE 体系进行分层开发,事务处理位于业务层,Spring 提供了分层设计业务层的事务处理解决方案。
第二:spring 框架为我们提供了一组事务控制的接口。具体在后面的第二小节介绍。这组接口是在 spring-tx-5.0.2.RELEASE.jar 中。
第三:spring 的事务控制都是基于 AOP 的,它既可以使用编程的方式实现,也可以使用配置的方式实现。 我们学习的重点是使用配置的方式实现。
10.2 Spring 中事务控制的API介绍
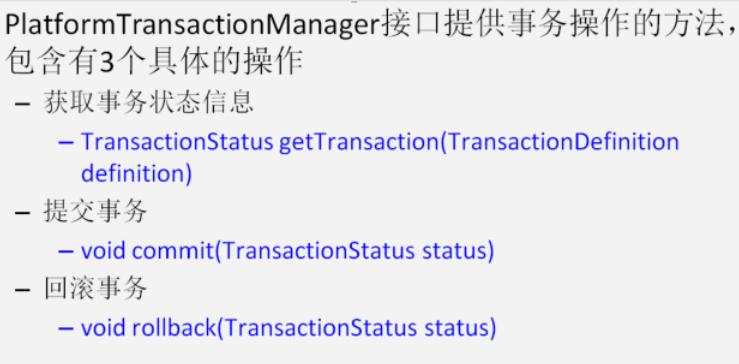
10.2.1 PlatformTransactionManager
此接口是 spring 的事务管理器,它里面提供了我们常用的操作事务的方法,如下图:
我们在开发中都是使用它的实现类
真正管理事务的对象
- org.springframework.jdbc.datasource.DataSourceTransactionManager
- 使用 SpringJDBC 或 iBatis 进行持久化数据时使用
- org.springframework.orm.hibernate5.HibernateTransactionManager
- 使用Hibernate 版本进行持久化数据时使用
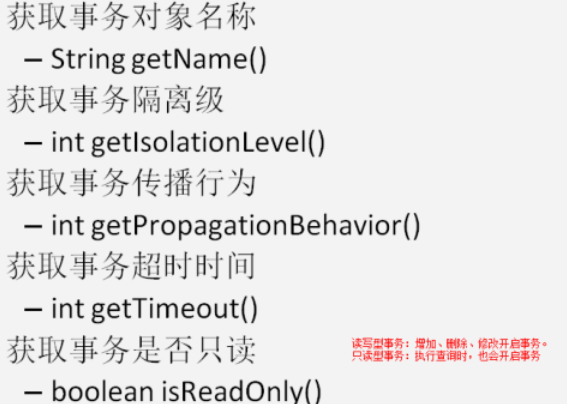
10.2.2 TransactionDefinition
它是事务的定义信息对象,里面有如下方法:
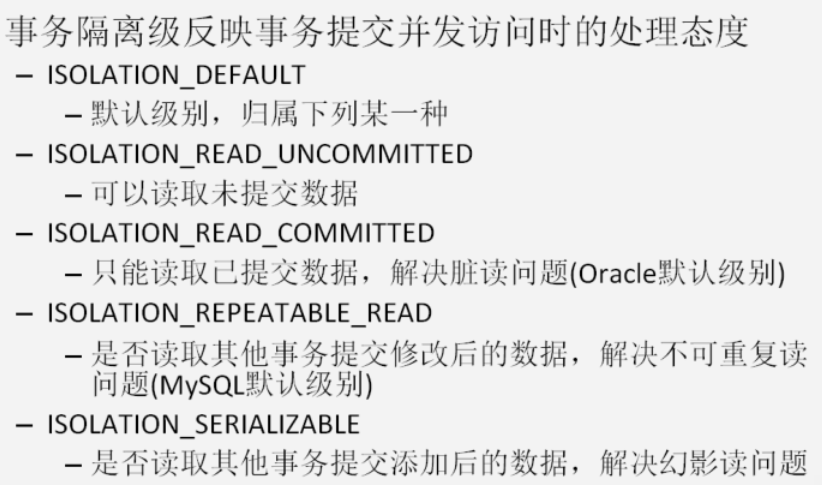
10.2.2.1 事务的隔离级别
10.2.2.2 事务的传播行为
- REQUIRED:如果当前没有事务,就新建一个事务,如果已经存在一个事务中,加入到这个事务中。一般的选择(默认值)
- SUPPORTS:支持当前事务,如果当前没有事务,就以非事务方式执行(没有事务)
- MANDATORY:使用当前的事务,如果当前没有事务,就抛出异常
- REQUERS_NEW:新建事务,如果当前在事务中,把当前事务挂起
- NOT_SUPPORTED:以非事务方式执行操作,如果当前存在事务,就把当前事务挂起
- NEVER:以非事务方式运行,如果当前存在事务,抛出异常
- NESTED:如果当前存在事务,则在嵌套事务内执行。如果当前没有事务,则执行 REQUIRED 类似的操作
10.2.2.3 超时时间
默认值是-1,没有超时限制。如果有,以秒为单位进行设置。
10.2.2.4 是否是只读事务
建议查询时设置为只读。
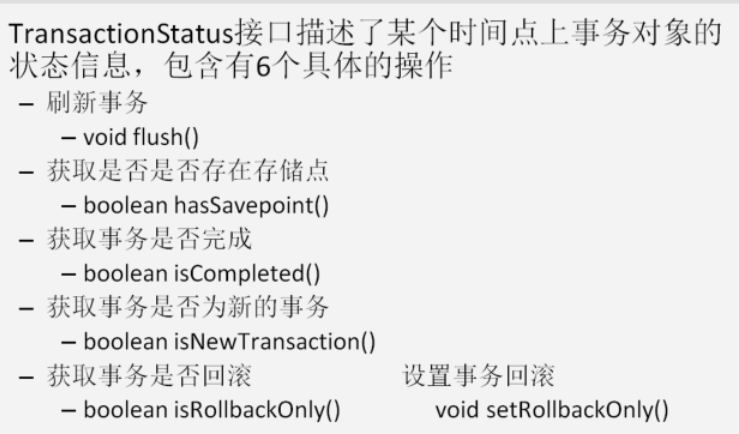
10.2.3 TransactionStatus
此接口提供的是事务具体的运行状态,方法介绍如下图:
10.3 基于 XML 的声明式事务控制(配置方式)[重点]
10.3.1 环境搭建
10.3.1.1 第一步:向pom.xml中添加依赖
复制代码
<?xml version="1.0" encoding="UTF-8"?>
<project xmlns="http://maven.apache.org/POM/4.0.0"
         xmlns:xsi="http://www.w3.org/2001/XMLSchema-instance"
         xsi:schemaLocation="http://maven.apache.org/POM/4.0.0 http://maven.apache.org/xsd/maven-4.0.0.xsd">
    <modelVersion>4.0.0</modelVersion>

    <groupId>cn.fage</groupId>
    <artifactId>java11demo</artifactId>
    <version>1.0-SNAPSHOT</version>

    <properties>
        <project.lombok>1.18.12</project.lombok>
        <project.fastjson>1.2.70</project.fastjson>
        <project.spring>5.2.8.RELEASE</project.spring>
        <project.spring.test>5.2.8.RELEASE</project.spring.test>
    </properties>

    <dependencies>
        <dependency>
            <groupId>org.projectlombok</groupId>
            <artifactId>lombok</artifactId>
            <version>${project.lombok}</version>
        </dependency>
        <dependency>
            <groupId>com.alibaba</groupId>
            <artifactId>fastjson</artifactId>
            <version>${project.fastjson}</version>
        </dependency>
        <dependency>
            <groupId>org.springframework</groupId>
            <artifactId>spring-beans</artifactId>
            <version>${project.spring}</version>
        </dependency>
        <dependency>
            <groupId>org.springframework</groupId>
            <artifactId>spring-context</artifactId>
            <version>${project.spring}</version>
        </dependency>
        <dependency>
            <groupId>org.springframework</groupId>
            <artifactId>spring-tx</artifactId>
            <version>${project.spring}</version>
        </dependency>

        <dependency>
            <groupId>org.aspectj</groupId>
            <artifactId>aspectjweaver</artifactId>
            <version>1.8.7</version>
        </dependency>

        <dependency>
            <groupId>junit</groupId>
            <artifactId>junit</artifactId>
            <version>4.12</version>
            <scope>test</scope>
        </dependency>
        <dependency>
            <groupId>org.springframework</groupId>
            <artifactId>spring-jdbc</artifactId>
            <version>${project.spring}</version>
        </dependency>
        <dependency>
            <groupId>mysql</groupId>
            <artifactId>mysql-connector-java</artifactId>
            <version>5.1.47</version>
        </dependency>
        <dependency>
            <groupId>org.springframework</groupId>
            <artifactId>spring-test</artifactId>
            <version>${project.spring}</version>
            <scope>test</scope>
        </dependency>
    </dependencies>
    <build>
        <plugins>
            <plugin>
                <groupId>org.apache.maven.plugins</groupId>
                <artifactId>maven-compiler-plugin</artifactId>
                <configuration>
                    <source>11</source>
                    <target>11</target>
                    <encoding>UTF-8</encoding>
                </configuration>
            </plugin>
        </plugins>
    </build>
</project>
10.3.1.2 第二步:创建 spring 的配置文件并导入约束
此处需要导入aop和tx两个名称空间
复制代码
<?xml version="1.0" encoding="UTF-8"?>
<beans xmlns="http://www.springframework.org/schema/beans"
       xmlns:xsi="http://www.w3.org/2001/XMLSchema-instance"
       xmlns:aop="http://www.springframework.org/schema/aop"
       xmlns:tx="http://www.springframework.org/schema/tx"
       xsi:schemaLocation="
        http://www.springframework.org/schema/beans
        http://www.springframework.org/schema/beans/spring-beans.xsd
        http://www.springframework.org/schema/tx
        http://www.springframework.org/schema/tx/spring-tx.xsd
        http://www.springframework.org/schema/aop
        http://www.springframework.org/schema/aop/spring-aop.xsd">
</beans>
10.3.1.3 第三步:准备数据库表和实体类
继续沿用前面章节使用的eesy数据库的account表以及Account实体类。
10.3.1.4 第四步:编写业务层接口和实现类
复制代码
/**
 * 账户的业务层接口
 */
public interface IAccountService {
    /**
     * 根据id查询账户信息
     * @param accountId
     * @return
     */
    Account findAccountById(Integer accountId);

    /**
     * 转账
     * @param sourceName    转成账户名称
     * @param targetName    转入账户名称
     * @param money         转账金额
     */
    void transfer(String sourceName,String targetName,Float money);
}

/**
 * 账户的业务层实现类
 *
 * 事务控制应该都是在业务层
 */
public class AccountServiceImpl implements IAccountService{

    private IAccountDao accountDao;

    public void setAccountDao(IAccountDao accountDao) {
        this.accountDao = accountDao;
    }

    @Override
    public Account findAccountById(Integer accountId) {
        return accountDao.findAccountById(accountId);

    }

    @Override
    public void transfer(String sourceName, String targetName, Float money) {
        System.out.println("transfer....");
            //2.1根据名称查询转出账户
            Account source = accountDao.findAccountByName(sourceName);
            //2.2根据名称查询转入账户
            Account target = accountDao.findAccountByName(targetName);
            //2.3转出账户减钱
            source.setMoney(source.getMoney()-money);
            //2.4转入账户加钱
            target.setMoney(target.getMoney()+money);
            //2.5更新转出账户
            accountDao.updateAccount(source);
            int i=1/0;
            //2.6更新转入账户
            accountDao.updateAccount(target);
    }
}
10.3.1.5 第五步:编写 Dao 接口和实现类
复制代码
/**
 * 账户的持久层接口
 */
public interface IAccountDao {

    /**
     * 根据Id查询账户
     * @param accountId
     * @return
     */
    Account findAccountById(Integer accountId);

    /**
     * 根据名称查询账户
     * @param accountName
     * @return
     */
    Account findAccountByName(String accountName);

    /**
     * 更新账户
     * @param account
     */
    void updateAccount(Account account);
}

/**
 * 账户的持久层实现类
 * 此版本dao,只需要给它的父类注入一个数据源
 */
public class AccountDaoImpl extends JdbcDaoSupport implements IAccountDao {

    @Override
    public Account findAccountById(Integer accountId) {
        List<Account> accounts = super.getJdbcTemplate().query("select * from account where id = ?",new BeanPropertyRowMapper<Account>(Account.class),accountId);
        return accounts.isEmpty()?null:accounts.get(0);
    }

    @Override
    public Account findAccountByName(String accountName) {
        List<Account> accounts = super.getJdbcTemplate().query("select * from account where name = ?",new BeanPropertyRowMapper<Account>(Account.class),accountName);
        if(accounts.isEmpty()){
            return null;
        }
        if(accounts.size()>1){
            throw new RuntimeException("结果集不唯一");
        }
        return accounts.get(0);
    }

    @Override
    public void updateAccount(Account account) {
        super.getJdbcTemplate().update("update account set name=?,money=? where id=?",account.getName(),account.getMoney(),account.getId());
    }
}
这里没有自定义账户的封装类RowMapper而是使用了Spring提供的BeanPropertyRowMapper为Account封装。
10.3.1.6 第六步:在配置文件中配置业务层和持久层对
复制代码
<!-- 配置业务层-->
<bean id="accountService" class="cn.fage.spring.impl.AccountServiceImpl">
    <property name="accountDao" ref="accountDao"></property>
</bean>

<!-- 配置账户的持久层-->
<bean id="accountDao" class="cn.fage.spring.impl.AccountDaoImpl">
    <property name="dataSource" ref="dataSource"></property>
</bean>


<!-- 配置数据源-->
<bean id="dataSource" class="org.springframework.jdbc.datasource.DriverManagerDataSource">
    <property name="driverClassName" value="com.mysql.jdbc.Driver"></property>
    <property name="url" value="jdbc:mysql://localhost:3306/test"></property>
    <property name="username" value="root"></property>
    <property name="password" value="root></property>
</bean>
10.3.2 配置步骤
复制代码
spring中基于XML的声明式事务控制配置步骤
    1、配置事务管理器
    2、配置事务的通知
            此时我们需要导入事务的约束 tx名称空间和约束,同时也需要aop的
            使用tx:advice标签配置事务通知
                属性:
                    id:给事务通知起一个唯一标识
                    transaction-manager:给事务通知提供一个事务管理器引用
    3、配置AOP中的通用切入点表达式
    4、建立事务通知和切入点表达式的对应关系
    5、配置事务的属性
           是在事务的通知tx:advice标签的内部
10.3.2.1 第一步: 配置事务管理器
复制代码
<bean id="transactionManager" class="org.springframework.jdbc.datasource.DataSourceTransactionManager">
	<!-- 注入DataSource -->
    <property name="dataSource" ref="dataSource"></property>
</bean>
10.3.2.2 第二步:配置事务的通知引用事务管理器
复制代码
<!-- 配置事务的通知-->
<tx:advice id="txAdvice" transaction-manager="transactionManager">
</tx:advice>
10.3.2.3 第三步:配置事务的属性
复制代码
    <!-- 配置事务的属性
            isolation:用于指定事务的隔离级别。默认值是DEFAULT,表示使用数据库的默认隔离级别。
            propagation:用于指定事务的传播行为。默认值是REQUIRED,表示一定会有事务,增删改的选择。查询方法可以选择SUPPORTS。
            read-only:用于指定事务是否只读。只有查询方法才能设置为true。默认值是false,表示读写。
            timeout:用于指定事务的超时时间,默认值是-1,表示永不超时。如果指定了数值,以秒为单位。
            rollback-for:用于指定一个异常,当产生该异常时,事务回滚,产生其他异常时,事务不回滚。没有默认值。表示任何异常都回滚。
            no-rollback-for:用于指定一个异常,当产生该异常时,事务不回滚,产生其他异常时事务回滚。没有默认值。表示任何异常都回滚。
    -->
    <tx:attributes>
        <tx:method name="*" propagation="REQUIRED" read-only="false"/>
        <tx:method name="find*" propagation="SUPPORTS" read-only="true"></tx:method>
    </tx:attributes>
10.3.2.4 第四步:配置 AOP 切入点表达式
复制代码
<!-- 配置aop-->
<aop:config>
    <!-- 配置切入点表达式-->
    <aop:pointcut id="pt1" expression="execution(* cn.fage.spring.impl.*.*(..))"></aop:pointcut>
</aop:config>
10.3.2.5 第五步:配置切入点表达式和事务通知的对应关系
复制代码
<!-- 在 在 aop:config  标签内部:建立事务的通知和切入点表达式的关系 -->
<aop:advisor advice-ref="txAdvice" pointcut-ref="pt1"></aop:advisor>
10.4 基于注解的配置方式
10.4.1 环境搭建
10.4.1.1 第一步:配置pom.xml
和基于XML配置相同,略
10.4.1.2 第二步:创建 spring 的配置文件导入约束并配置扫描的包
复制代码
<?xml version="1.0" encoding="UTF-8"?>
<beans xmlns="http://www.springframework.org/schema/beans"
       xmlns:xsi="http://www.w3.org/2001/XMLSchema-instance"
       xmlns:aop="http://www.springframework.org/schema/aop"
       xmlns:tx="http://www.springframework.org/schema/tx"
       xmlns:context="http://www.springframework.org/schema/context"
       xsi:schemaLocation="
        http://www.springframework.org/schema/beans
        http://www.springframework.org/schema/beans/spring-beans.xsd
        http://www.springframework.org/schema/tx
        http://www.springframework.org/schema/tx/spring-tx.xsd
        http://www.springframework.org/schema/aop
        http://www.springframework.org/schema/aop/spring-aop.xsd
        http://www.springframework.org/schema/context
        http://www.springframework.org/schema/context/spring-context.xsd">

    <!-- 配置spring创建容器时要扫描的包-->
    <context:component-scan base-package="cn.fage"></context:component-scan>

    <!-- 配置JdbcTemplate-->
    <bean id="jdbcTemplate" class="org.springframework.jdbc.core.JdbcTemplate">
        <property name="dataSource" ref="dataSource"></property>
    </bean>

    <!-- 配置spring提供的内置数据源-->
    <bean id="dataSource" class="org.springframework.jdbc.datasource.DriverManagerDataSource">
        <property name="driverClassName" value="com.mysql.jdbc.Driver"></property>
        <property name="url" value="jdbc:mysql://localhost:3306/test"></property>
        <property name="username" value="root"></property>
        <property name="password" value="root"></property>
    </bean>
</beans>
10.4.1.3 第三步:创建数据库表和实体类
和基于 xml 的配置相同,略
10.4.1.4 第四步:创建业务层接口和实现类让 并使用注解让 spring 管
复制代码
/**
 * 账户的业务层实现类
 *
 * 事务控制应该都是在业务层
 */
@Service("accountService")
public class AccountServiceImpl implements IAccountService{

    @Autowired
    private IAccountDao accountDao;
	//其余代码和基于XML的配置相同
}
10.4.1.5 第五步:创建 Dao 接口和实现类并使用注解让 spring 管理
复制代码
/**
 * 账户的持久层实现类
 */
@Repository("accountDao")
public class AccountDaoImpl implements IAccountDao {

    @Autowired
    private JdbcTemplate jdbcTemplate;
	//其余代码和基于XML的配置相同
}
10.4.2 配置步骤
10.4.2.1 第一步:配置事务管理器并注入数据源
复制代码
<bean id="transactionManager" class="org.springframework.jdbc.datasource.DataSourceTransactionManager">
    <property name="dataSource" ref="dataSource"></property>
</bean>
注解方式
package cn.fage.configuration;

import cn.fage.pojo.User;
import org.springframework.beans.factory.annotation.Value;
import org.springframework.context.annotation.Bean;
import org.springframework.context.annotation.Configuration;
import org.springframework.context.annotation.PropertySource;
import org.springframework.jdbc.core.JdbcTemplate;
import org.springframework.jdbc.datasource.DriverManagerDataSource;

import javax.sql.DataSource;

/**
 * @author lin
 * @version 1.0
 * @date 2020-08-10 17:16
 * @Description TODO
 */
@Configuration
@PropertySource(value = {"classpath:db/jdbc.properties"})
public class DataSourceConfigs {
    @Value("${url1}")
    String url1;
    @Value("${name1}")
    String name1;
    @Value("${password1}")
    String password1;
    @Value(("${driver1}"))
    String driver1;

    @Bean(value = "dataSource1")
    public DataSource createDataSource1() {
        DriverManagerDataSource source = new DriverManagerDataSource(url1, name1, password1);
        source.setDriverClassName(driver1);
        return source;
    }


    @Value("${driver2}")
    String url2;
    @Value("${driver2}")
    String name2;
    @Value("${driver2}")
    String password2;
    @Value(("${driver2}"))
    String driver2;

    @Bean(value = "dataSource2")
    public DataSource createDataSource2() {
        DriverManagerDataSource source = new DriverManagerDataSource(url2, name2, password2);
        source.setDriverClassName(driver2);
        return source;
    }

    @Bean(value = "jdbcTemplate")
    public JdbcTemplate createJdbcTemplate() {
        return new JdbcTemplate(createDataSource2());
    }

}
配置文件
##数据源1 test
url1=jdbc:mysql://127.0.0.1:3306/test?characterEncoding=UTF-8
name1=root
password1=root
driver1=com.mysql.jdbc.Driver
##数据源2 table1
url2=jdbc:mysql://127.0.0.1:3306/table1?characterEncoding=UTF-8
name2=root
password2=root
driver2=com.mysql.jdbc.Driver
### spring jdbcTemplate
jdbc.driverClass=com.mysql.jdbc.Driver
jdbc.url=jdbc:mysql://localhost:3306/eesy
jdbc.username=root
jdbc.password=root
10.4.2.2 第二步:在业务层使用@Transactional 注解
复制代码
@Service("accountService")
@Transactional(propagation= Propagation.SUPPORTS,readOnly=true)//只读型事务的配置
public class AccountServiceImpl implements IAccountService{

    @Autowired
    private IAccountDao accountDao;

    @Override
    public Account findAccountById(Integer accountId) {
        return accountDao.findAccountById(accountId);

    }

    //需要的是读写型事务配置
    @Transactional(propagation= Propagation.REQUIRED,readOnly=false)
    @Override
    public void transfer(String sourceName, String targetName, Float money) {
        System.out.println("transfer....");
            //2.1根据名称查询转出账户
            Account source = accountDao.findAccountByName(sourceName);
            //2.2根据名称查询转入账户
            Account target = accountDao.findAccountByName(targetName);
            //2.3转出账户减钱
            source.setMoney(source.getMoney()-money);
            //2.4转入账户加钱
            target.setMoney(target.getMoney()+money);
            //2.5更新转出账户
            accountDao.updateAccount(source);
            int i=1/0;
            //2.6更新转入账户
            accountDao.updateAccount(target);
    }
}
该注解的属性和 xml 中的属性含义一致。该注解可以出现在接口上,类上和方法上。
出现接口上,表示该接口的所有实现类都有事务支持。
出现在类上,表示类中所有方法有事务支持
出现在方法上,表示方法有事务支持。
以上三个位置的优先级:方法>类>接口
10.4.2.3 第三步:在配置文件中开启 spring 对注解事务的支持
复制代码
<!-- 开启spring对注解事务的支持-->
<tx:annotation-driven transaction-manager="transactionManager"></tx:annotation-driven>
10.4.3 不使用 xml 的配置方式
复制代码
/**
 * spring的配置类,相当于bean.xml
 */
@Configuration
//无需引入
@Import(value = {UserConfigs.class})
@ComponentScan(value = "cn.fage")
//开启 spring 对注解 AOP 的支持
@EnableAspectJAutoProxy
//开启事务支持
@EnableTransactionManagement
public class SpringConfiguration {
}
- @ComponentScan:扫描的包
- @PropertySource:导入属性资源
- @EnableTransactionManagement:开启事务支持
11、Spring5 的新特性[了解]
11.1 与JDK相关的升级
11.1.1 jdk版本要求
spring5.0 在 2017 年 9 月发布了它的 GA(通用)版本。该版本是基于 jdk8 编写的,所以 jdk8 以下版本将无法使用。同时,可以兼容 jdk9 版本。
tomcat 版本要求 8.5 及以上。
11.1.2 利用jdk8版本更新的内容
- 基于JDK8的反射增强
- 在反射创建对象上,jdk8比以前的版本要快很多。
- @NonNull 注解和@Nullable 注解的使用
- 用 @Nullable 和 @NotNull 注解来显示表明可为空的参数和以及返回值。这样就够在编译的时候处理空值而不是在运行时抛出
NullPointerExceptions。
- 用 @Nullable 和 @NotNull 注解来显示表明可为空的参数和以及返回值。这样就够在编译的时候处理空值而不是在运行时抛出
- 日志记录方面
- Spring Framework 5.0 带来了 Commons Logging 桥接模块的封装, 它被叫做 spring-jcl 而不是标准的 Commons Logging。当然,无需任何额外的桥接,新版本也会对 Log4j 2.x, SLF4J, JUL(java.util.logging) 进行自动检测。
11.2 核心容器的更新
Spring Framework 5.0 现在支持候选组件索引作为类路径扫描的替代方案。该功能已经在类路径扫描器中添加,以简化添加候选组件标识的步骤。
应用程序构建任务可以定义当前项目自己的 META-INF/spring.components 文件。在编译时,源模型是自包含的,JPA 实体和 Spring 组件是已被标记的。
从索引读取实体而不是扫描类路径对于小于 200 个类的小型项目是没有明显差异。但对大型项目影响较大。加载组件索引开销更低。因此,随着类数的增加,索引读取的启动时间将保持不变。
加载组件索引的耗费是廉价的。因此当类的数量不断增长,加上构建索引的启动时间仍然可以维持一个常数,不过对于组件扫描而言,启动时间则会有明显的增长。
这个对于我们处于大型 Spring 项目的开发者所意味着的,是应用程序的启动时间将被大大缩减。虽然 20或者 30 秒钟看似没什么,但如果每天要这样登上好几百次,加起来就够你受的了。使用了组件索引的话,就能帮
助你每天过的更加高效。
你可以在 Spring 的 Jira 上了解更多关于组件索引的相关信息。
11.3 JetBrains Kotlin 语言支持
Kolin概述:是一种支持函数式编程编程风格的面向对象语言。Kotlin 运行在 JVM 之上,但运行环境并不限于 JVM。
11.4 响应式编程风格
此次 Spring 发行版本的一个激动人心的特性就是新的响应式堆栈 WEB 框架。这个堆栈完全的响应式且非阻塞,适合于事件循环风格的处理,可以进行少量线程的扩展。
Reactive Streams 是来自于 Netflix, Pivotal, Typesafe, Red Hat, Oracle, Twitter 以及Spray.io 的工程师特地开发的一个 API。它为响应式编程实现的实现提供一个公共的 API,好实现Hibernate 的 JPA。这里 JPA 就是这个 API, 而 Hibernate 就是实现。
Reactive Streams API 是 Java 9 的官方版本的一部分。在 Java 8 中, 你会需要专门引入依赖来使用 Reactive Streams API。
Spring Framework 5.0 对于流式处理的支持依赖于 Project Reactor 来构建, 其专门实现了Reactive Streams API。
Spring Framework 5.0 拥有一个新的 spring-webflux 模块,支持响应式 HTTP 和 WebSocket 客户端。Spring Framework 5.0 还提供了对于运行于服务器之上,包含了 REST, HTML, 以及 WebSocket 风格交互的响应式网页应用程序的支持。
在 spring-webflux 中包含了两种独立的服务端编程模型:
基于注解:使用到了@Controller 以及 Spring MVC 的其它一些注解;
使用 Java 8 lambda 表达式的函数式风格的路由和处理。
有 了 Spring Webflux, 你 现 在 可 以创建出 WebClient, 它是响应式且非阻塞的,可以 作为RestTemplate 的一个替代方案。
这里有一个使用 Spring 5.0 的 REST 端点的 WebClient 实现:
复制代码
WebClient webClient = WebClient.create();
Mono person = webClient.get().uri("http://localhost:8080/movie/42").accept(MediaType.APPLICATION_JSON).exchange().then(response -> response.bodyToMono(Movie.class));
11.5 Junit5支持
完全支持 JUnit 5 Jupiter,所以可以使用 JUnit 5 来编写测试以及扩展。此外还提供了一个编程以及扩展模型,Jupiter 子项目提供了一个测试引擎来在 Spring 上运行基于 Jupiter 的测试。
另外,Spring Framework 5 还提供了在 Spring TestContext Framework 中进行并行测试的扩展。
针对响应式编程模型, spring-test 现在还引入了支持 Spring WebFlux 的 WebTestClient 集成测试的支持,类似于 MockMvc,并不需要一个运行着的服务端。使用一个模拟的请求或者响应, WebTestClient就可以直接绑定到 WebFlux 服务端设施。
你可以在这里找到这个激动人心的 TestContext 框架所带来的增强功能的完整列表。
当然, Spring Framework 5.0 仍然支持我们的老朋友 JUnit! 在我写这篇文章的时候, JUnit 5 还只是发展到了 GA 版本。对于 JUnit4, Spring Framework 在未来还是要支持一段时间的。
公众号:发哥讲
这是一个稍偏基础和偏技术的公众号,甚至其中包括一些可能阅读量很低的包含代码的技术文,不知道你是不是喜欢,期待你的关注。
代码分享
https://gitee.com/naimaohome/springclouddemo.git
微信公众号 点击关于我,加入QQ群,即可获取到代码以及高级进阶视频和电子书!!
如果你觉得文章还不错,就请点击右上角选择发送给朋友或者转发到朋友圈~
● 扫码关注我们
据说看到好文章不推荐的人,服务器容易宕机!