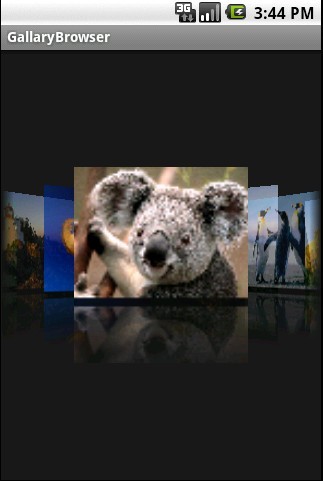
(一)截图

(二)实现关键:
1、改写Gallery,实现图片的层叠和透明度渐变。 主要是改写getChildStaticTransformation方法
2、对图片进行加工处理,实现透明倒影。
3、对于超大图片,先进行缩小。防止图片过大,超出屏幕范围报错。
(三)代码
1、Activity类代码:GallaryBrowser.java
package com.myandroid.test;
import android.app.Activity;
import android.os.Bundle;
import android.view.View;
import android.widget.ImageSwitcher;
import android.widget.ImageView;
import android.widget.Gallery.LayoutParams;
import android.widget.ViewSwitcher.ViewFactory;
public class GallaryBrowser extends Activity {
private Integer[] imageIds = new Integer[] {
R.drawable.a, R.drawable.desert,
R.drawable.hydrangeas, R.drawable.lighthouse,
R.drawable.jellyfish, R.drawable.koala,
R.drawable.lighthouse, R.drawable.penguins,
R.drawable.tulips
};
/** Called when the activity is first created. */
@Override
public void onCreate(Bundle savedInstanceState) {
super.onCreate(savedInstanceState);
final CoverFlow cf = new CoverFlow(this);
cf.setAdapter(new ImageAdapter(this, imageIds));
cf.setAnimationDuration(1500);
setContentView(cf);
}
}
2、图片处理代码,主要是实现旋转和倒影: MyImgView.java
///******************************************************************************//
///**************************请尊重tank的成果毕竟这也是花了笔者很多时间和心思*****//
/************************* 为了让大家容易懂tank特地详细的写了很多的解释*********************************************////
///**************************欢迎访问我的博客http://www.cnblogs.com/tankaixiong/********************************************//
///***************************里面文章将持续更新!***************************************************//
package com.myandroid.test;
import android.graphics.Bitmap;
import android.graphics.Canvas;
import android.graphics.LinearGradient;
import android.graphics.Matrix;
import android.graphics.Paint;
import android.graphics.PixelFormat;
import android.graphics.PorterDuffXfermode;
import android.graphics.Bitmap.Config;
import android.graphics.PorterDuff.Mode;
import android.graphics.Shader.TileMode;
import android.graphics.drawable.Drawable;
public class MyImgView {
/**
* 添加倒影,原理,先翻转图片,由上到下放大透明度
*
* @param originalImage
* @return
*/
public static Bitmap createReflectedImage(Bitmap originalImage) {
// The gap we want between the reflection and the original image
final int reflectionGap = 4;
int width = originalImage.getWidth();
int height = originalImage.getHeight();
// This will not scale but will flip on the Y axis
Matrix matrix = new Matrix();
matrix.preScale(1, -1);
// Create a Bitmap with the flip matrix applied to it.
// We only want the bottom half of the image
Bitmap reflectionImage = Bitmap.createBitmap(originalImage, 0,
height / 2, width, height / 2, matrix, false);
// Create a new bitmap with same width but taller to fit reflection
Bitmap bitmapWithReflection = Bitmap.createBitmap(width,
(height + height / 2), Config.ARGB_8888);
// Create a new Canvas with the bitmap that's big enough for
// the image plus gap plus reflection
Canvas canvas = new Canvas(bitmapWithReflection);
// Draw in the original image
canvas.drawBitmap(originalImage, 0, 0, null);
// Draw in the gap
Paint defaultPaint = new Paint();
canvas.drawRect(0, height, width, height + reflectionGap, defaultPaint);
// Draw in the reflection
canvas.drawBitmap(reflectionImage, 0, height + reflectionGap, null);
// Create a shader that is a linear gradient that covers the reflection
Paint paint = new Paint();
LinearGradient shader = new LinearGradient(0,
originalImage.getHeight(), 0, bitmapWithReflection.getHeight()
+ reflectionGap, 0x70ffffff, 0x00ffffff, TileMode.CLAMP);
// Set the paint to use this shader (linear gradient)
paint.setShader(shader);
// Set the Transfer mode to be porter duff and destination in
paint.setXfermode(new PorterDuffXfermode(Mode.DST_IN));
// Draw a rectangle using the paint with our linear gradient
canvas.drawRect(0, height, width, bitmapWithReflection.getHeight()
+ reflectionGap, paint);
return bitmapWithReflection;
}
//drawable 类型转化为bitmap
public static Bitmap drawableToBitmap(Drawable drawable) {
Bitmap bitmap = Bitmap
.createBitmap(
drawable.getIntrinsicWidth(),
drawable.getIntrinsicHeight(),
drawable.getOpacity() != PixelFormat.OPAQUE ? Bitmap.Config.ARGB_8888
: Bitmap.Config.RGB_565);
Canvas canvas = new Canvas(bitmap);
// canvas.setBitmap(bitmap);
drawable.setBounds(0, 0, drawable.getIntrinsicWidth(), drawable
.getIntrinsicHeight());
drawable.draw(canvas);
return bitmap;
}
}
3、自定义的Gallery,继承Gallery类,重写getChildStaticTransformation方法,实现图片的重叠和透明度渐变:CoverFlow.java
///******************************************************************************//
///**************************请尊重tank的成果毕竟这也是花了笔者很多时间和心思*****//
/************************* 为了让大家容易懂tank特地详细的写了很多的解释*********************************************////
///**************************欢迎访问我的博客http://www.cnblogs.com/tankaixiong/********************************************//
///***************************里面文章将持续更新!***************************************************//
package com.myandroid.test;
import android.content.Context;
import android.graphics.Camera;
import android.graphics.Matrix;
import android.util.AttributeSet;
import android.util.Log;
import android.view.View;
import android.view.animation.Transformation;
import android.widget.Gallery;
import android.widget.ImageView;
//自己定义的Gallery
public class CoverFlow extends Gallery {
private Camera mCamera = new Camera();
private int mMaxRotationAngle = 50;
private int mMaxZoom = -500;
private int mCoveflowCenter;
private boolean mAlphaMode = true;
private boolean mCircleMode = false;
public CoverFlow(Context context) {
super(context);
this.setStaticTransformationsEnabled(true);
Log.e("sequence", "CoverFlow2");
}
public CoverFlow(Context context, AttributeSet attrs) {
super(context, attrs);
this.setStaticTransformationsEnabled(true);
}
public CoverFlow(Context context, AttributeSet attrs, int defStyle) {
super(context, attrs, defStyle);
this.setStaticTransformationsEnabled(true);
}
public int getMaxRotationAngle() {
return mMaxRotationAngle;
}
public void setMaxRotationAngle(int maxRotationAngle) {
mMaxRotationAngle = maxRotationAngle;
}
public boolean getCircleMode() {
return mCircleMode;
}
public void setCircleMode(boolean isCircle) {
mCircleMode = isCircle;
}
public boolean getAlphaMode() {
return mAlphaMode;
}
public void setAlphaMode(boolean isAlpha) {
mAlphaMode = isAlpha;
}
public int getMaxZoom() {
return mMaxZoom;
}
public void setMaxZoom(int maxZoom) {
mMaxZoom = maxZoom;
}
private int getCenterOfCoverflow() {
return (getWidth() - getPaddingLeft() - getPaddingRight()) / 2
+ getPaddingLeft();
}
private static int getCenterOfView(View view) {
return view.getLeft() + view.getWidth() / 2;
}
//重写Garray方法 ,产生层叠和放大效果
@Override
protected boolean getChildStaticTransformation(View child, Transformation t) {
final int childCenter = getCenterOfView(child);
final int childWidth = child.getWidth();
int rotationAngle = 0;
t.clear();
t.setTransformationType(Transformation.TYPE_MATRIX);
if (childCenter == mCoveflowCenter) {
transformImageBitmap((ImageView) child, t, 0, 0);
} else {
rotationAngle = (int) (((float) (mCoveflowCenter - childCenter) / childWidth) * mMaxRotationAngle);
// Log.d("test", "recanglenum:"+Math.floor ((mCoveflowCenter -
// childCenter) / childWidth));
if (Math.abs(rotationAngle) > mMaxRotationAngle) {
rotationAngle = (rotationAngle < 0) ? -mMaxRotationAngle
: mMaxRotationAngle;
}
transformImageBitmap((ImageView) child, t, rotationAngle,
(int) Math.floor((mCoveflowCenter - childCenter)/ (childWidth==0?1:childWidth)));
}
Log.e("sequence", "getChildStaticTransformation");
return true;
}
/**
* This is called during layout when the size of this view has changed. If
* you were just added to the view hierarchy, you're called with the old
* values of 0.
*
* @param w
* Current width of this view.
* @param h
* Current height of this view.
* @param oldw
* Old width of this view.
* @param oldh
* Old height of this view.
*/
protected void onSizeChanged(int w, int h, int oldw, int oldh) {
mCoveflowCenter = getCenterOfCoverflow();
super.onSizeChanged(w, h, oldw, oldh);
Log.e("sequence", "onSizeChanged");
}
/**
* Transform the Image Bitmap by the Angle passed
*
* @param imageView
* ImageView the ImageView whose bitmap we want to rotate
* @param t
* transformation
* @param rotationAngle
* the Angle by which to rotate the Bitmap
*/
private void transformImageBitmap(ImageView child, Transformation t,
int rotationAngle, int d) {
mCamera.save();
final Matrix imageMatrix = t.getMatrix();
final int imageHeight = child.getLayoutParams().height;
final int imageWidth = child.getLayoutParams().width;
final int rotation = Math.abs(rotationAngle);
mCamera.translate(0.0f, 0.0f, 100.0f);
// As the angle of the view gets less, zoom in
if (rotation <= mMaxRotationAngle) {
float zoomAmount = (float) (mMaxZoom + (rotation * 1.5));
mCamera.translate(0.0f, 0.0f, zoomAmount);
if (mCircleMode) {
if (rotation < 40)
mCamera.translate(0.0f, 155, 0.0f);
else
mCamera.translate(0.0f, (255 - rotation * 2.5f), 0.0f);
}
if (mAlphaMode) {
((ImageView) (child)).setAlpha((int) (255 - rotation * 2.5));
}
}
mCamera.rotateY(rotationAngle);
mCamera.getMatrix(imageMatrix);
imageMatrix.preTranslate(-(imageWidth / 2), -(imageHeight / 2));
imageMatrix.postTranslate((imageWidth / 2), (imageHeight / 2));
mCamera.restore();
Log.e("sequence", "transformImageBitmap");
}
}
4、图片适配器:ImageAdapter。这里,我改写了getView方法,把图片按照一定比例进行缩放,防止图片过大,超出屏幕而导致报错。
package com.myandroid.test;
import java.io.InputStream;
import android.content.Context;
import android.content.res.Resources;
import android.graphics.Bitmap;
import android.graphics.BitmapFactory;
import android.graphics.Matrix;
import android.graphics.drawable.BitmapDrawable;
import android.view.View;
import android.view.ViewGroup;
import android.widget.BaseAdapter;
import android.widget.Gallery;
import android.widget.ImageView;
public class ImageAdapter extends BaseAdapter {
private Context context;
private Integer[] images;
public ImageAdapter(Context context, Integer[] imageIds) {
this.context = context;
this.images = imageIds;
}
@Override
public int getCount() {
// TODO Auto-generated method stub
return images.length;
}
@Override
public Object getItem(int position) {
// TODO Auto-generated method stub
return position;
}
@Override
public long getItemId(int position) {
// TODO Auto-generated method stub
return position;
}
@Override
public View getView(int position, View convertView, ViewGroup parent) {
ImageView imageView = new ImageView(context);
//创建BitMap对象,用于显示图片
Bitmap bitmap = BitmapFactory.decodeResource(context.getResources(),
images[position]);
Matrix matrix = new Matrix(); //矩阵,用于图片比例缩放
matrix.postScale((float)80/bitmap.getWidth(),
(float)60/bitmap.getHeight()); //设置高宽比例(三维矩阵)
//图片不能超出屏幕范围,否则报错,这里进行缩小
Bitmap newBmp = Bitmap.createBitmap(bitmap, 0, 0, bitmap.getWidth(),
bitmap.getHeight(), matrix, true);
imageView.setImageBitmap(MyImgView.createReflectedImage(newBmp));
imageView.setLayoutParams(new Gallery.LayoutParams(80, 60));
return imageView;
}
}