项目设置
创建一个名为tutorial的新Django项目,然后开始一个名为quickstart的新应用程序。

 1 # Create the project directory
 2 mkdir tutorial
 3 cd tutorial
 4
 5 # Create a virtualenv to isolate our package dependencies locally
 6 virtualenv env
 7 source env/bin/activate  # On Windows use `envScriptsactivate`
 8
 9 # Install Django and Django REST framework into the virtualenv
10 pip install django
11 pip install djangorestframework
12
13 # Set up a new project with a single application
14 django-admin.py startproject tutorial .  # Note the trailing '.' character
15 cd tutorial
16 django-admin.py startapp quickstart
17 cd ..
项目布局应该如下所示:

$ pwd
<some path>/tutorial
$ find .
.
./manage.py
./tutorial
./tutorial/__init__.py
./tutorial/quickstart
./tutorial/quickstart/__init__.py
./tutorial/quickstart/admin.py
./tutorial/quickstart/apps.py
./tutorial/quickstart/migrations
./tutorial/quickstart/migrations/__init__.py
./tutorial/quickstart/models.py
./tutorial/quickstart/tests.py
./tutorial/quickstart/views.py
./tutorial/settings.py
./tutorial/urls.py
./tutorial/wsgi.py
在项目目录中创建应用程序可能看起来很不寻常。使用项目的名称空间避免了与外部模块的名称冲突(主题不在快速入门的范围内)。
现在第一次同步您的数据库:
python manage.py migrate
我们还将创建一个名为admin的初始用户,其密码为password123。稍后在我们的示例中,我们将以用户身份进行身份验证
python manage.py createsuperuser --email admin@example.com --username admin
一旦你建立了一个数据库并创建了初始用户并准备就绪,打开应用程序的目录,我们就会得到编码......
Serializers
首先我们要定义一些序列化器。我们来创建一个名为tutorial / quickstart / serializers.py的新模块,我们将用它来表示数据。

 1 from django.contrib.auth.models import User, Group
 2 from rest_framework import serializers
 3
 4
 5 class UserSerializer(serializers.HyperlinkedModelSerializer):
 6     class Meta:
 7         model = User
 8         fields = ('url', 'username', 'email', 'groups')
 9
10
11 class GroupSerializer(serializers.HyperlinkedModelSerializer):
12     class Meta:
13         model = Group
14         fields = ('url', 'name')
请注意,在这种情况下,我们使用超链接关系,使用HyperlinkedModelSerializer。您还可以使用主键和各种其他关系,但超链接是良好的RESTful设计。
Views
对,我们最好写一些意见。打开tutorial / quickstart / views.py并输入

 1 from django.contrib.auth.models import User, Group
 2 from rest_framework import viewsets
 3 from tutorial.quickstart.serializers import UserSerializer, GroupSerializer
 4
 5
 6 class UserViewSet(viewsets.ModelViewSet):
 7     """
 8     API endpoint that allows users to be viewed or edited.
 9     """
10     queryset = User.objects.all().order_by('-date_joined')
11     serializer_class = UserSerializer
12
13
14 class GroupViewSet(viewsets.ModelViewSet):
15     """
16     API endpoint that allows groups to be viewed or edited.
17     """
18     queryset = Group.objects.all()
19     serializer_class = GroupSerializer
我们不是编写多个视图,而是将所有常见行为归为一类,称为ViewSets。
如果需要,我们可以轻松地将这些视图分解为单个视图,但使用视图集可以使视图逻辑组织得非常好,并且非常简洁。
URLs
好的,现在让我们连线API网址。在tutorial / urls.py上...

 1 from django.conf.urls import url, include
 2 from rest_framework import routers
 3 from tutorial.quickstart import views
 4
 5 router = routers.DefaultRouter()
 6 router.register(r'users', views.UserViewSet)
 7 router.register(r'groups', views.GroupViewSet)
 8
 9 # Wire up our API using automatic URL routing.
10 # Additionally, we include login URLs for the browsable API.
11 urlpatterns = [
12     url(r'^', include(router.urls)),
13     url(r'^api-auth/', include('rest_framework.urls', namespace='rest_framework'))
14 ]
因为我们使用视图集而不是视图,所以我们可以自动为我们的API生成URL conf,只需向路由器类注册视图集。
同样,如果我们需要更多地控制API URL,我们可以简单地使用常规的基于类的视图,并明确写入URL conf。
最后,我们将包括默认的登录和注销视图,以用于可浏览的API。这是可选的,但如果您的API需要身份验证并且您想使用可浏览的API,则会很有用。
Settings
将'rest_framework'添加到INSTALLED_APPS。设置模块将位于tutorial / settings.py中

1 INSTALLED_APPS = (
2     ...
3     'rest_framework',
4 )
好的,我们完成了。
Testing our API
我们现在准备测试我们构建的API。让我们从命令行启动服务器。
python manage.py runserver
我们现在可以使用curl等工具从命令行访问我们的API

bash: curl -H 'Accept: application/json; indent=4' -u admin:password123 http://127.0.0.1:8000/users/
{
    "count": 2,
    "next": null,
    "previous": null,
    "results": [
        {
            "email": "admin@example.com",
            "groups": [],
            "url": "http://127.0.0.1:8000/users/1/",
            "username": "admin"
        },
        {
            "email": "tom@example.com",
            "groups": [                ],
            "url": "http://127.0.0.1:8000/users/2/",
            "username": "tom"
        }
    ]
}
或者使用httpie命令行工具

bash: http -a admin:password123 http://127.0.0.1:8000/users/

HTTP/1.1 200 OK
...
{
    "count": 2,
    "next": null,
    "previous": null,
    "results": [
        {
            "email": "admin@example.com",
            "groups": [],
            "url": "http://localhost:8000/users/1/",
            "username": "paul"
        },
        {
            "email": "tom@example.com",
            "groups": [                ],
            "url": "http://127.0.0.1:8000/users/2/",
            "username": "tom"
        }
    ]
}
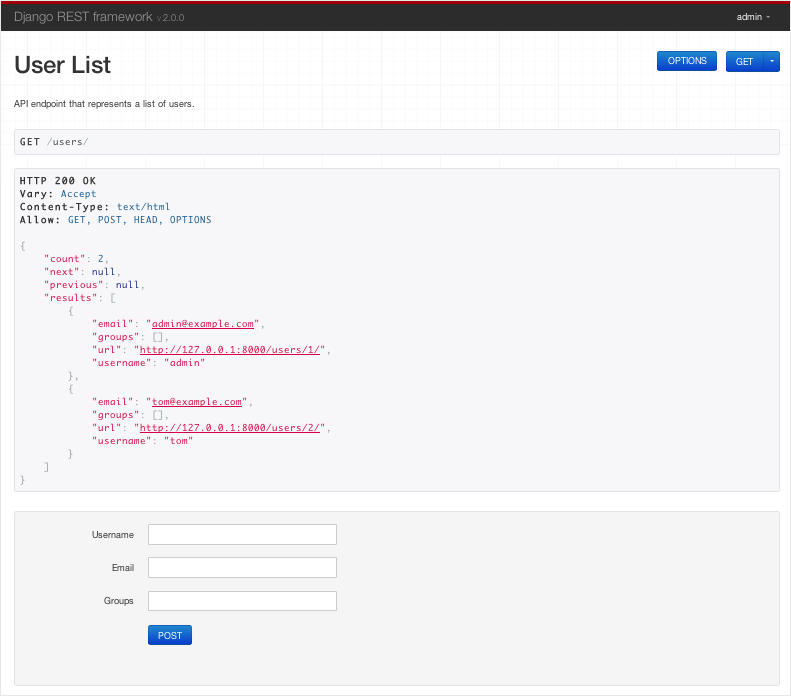
或者直接通过浏览器,转到URL http://127.0.0.1:8000/users/

如果您通过浏览器工作,请确保使用右上角的控件进行登录。
如果您想更深入地了解REST框架如何配合使用the tutorial 或者开始浏览 API guide.
