参考文档:
Kubernetes推荐采用Fluentd+Elasticsearch+Kibana对系统与容器日志进行采集,查询并展现。
一.环境
1. 基础环境
|
组件 |
版本 |
Remark |
|
kubernetes |
v1.9.2 |
|
|
fluentd-elasticsearch |
v2.0.4 |
|
|
elasticsearch |
v5.6.4 |
|
|
kibana |
5.6.4 |
2. 原理
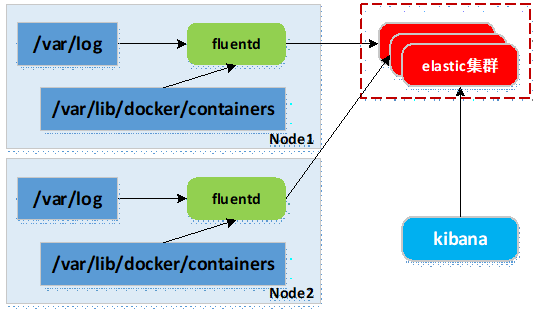
- 容器运行输出到控制台的日志,以*-json.log的命名方式存放到/var/lib/docker/containers目录;
- 在各Node上运行fluentd服务(同logstash),采集所在节点/var/log与/var/lib/docker/containers两个目录下的日志;
- fluentd采集的日志数据汇总到elasticsearch集群;
-
kibana展示与交互。
二.部署Kubernetes集群性能监控
1. 准备images
kubernetes部署服务时,为避免部署时发生pull镜像超时的问题,建议提前将相关镜像pull到相关所有节点(以下以kubenode1为例),或搭建本地镜像系统。
- 基础环境已做了镜像加速,可参考:http://www.cnblogs.com/netonline/p/7420188.html
- 需要从gcr.io pull的镜像,已利用Docker Hub的"Create Auto-Build GitHub"功能(Docker Hub利用GitHub上的Dockerfile文件build镜像),在个人的Docker Hub build成功,可直接pull到本地使用。
[root@kubenode1 ~]# docker pull netonline/fluentd-elasticsearch:v2.0.4
[root@kubenode1 ~]# docker pull netonline/elasticsearch:v5.6.4
[root@kubenode1 ~]# docker pull netonline/kibana:5.6.4

# elastic需要vm.max_map_count不低于262144,利于轻量级的alpine linux初始化1个基础容器保证需求
[root@kubenode1 ~]# docker pull alpine:3.6
2. 下载yaml范本
# release下载页:https://github.com/kubernetes/kubernetes/tree/master/cluster/addons/fluentd-elasticsearch
[root@kubenode1 ~]# mkdir -p /usr/local/src/yaml/efk
[root@kubenode1 ~]# cd /usr/local/src/yaml/efk

# fluentd-es-configmap.
[root@kubenode1 efk]# wget https://raw.githubusercontent.com/kubernetes/kubernetes/master/cluster/addons/fluentd-elasticsearch/fluentd-es-configmap.yaml

# fluentd-es-ds
[root@kubenode1 efk]# wget https://raw.githubusercontent.com/kubernetes/kubernetes/master/cluster/addons/fluentd-elasticsearch/fluentd-es-ds.yaml

# es-statefulset
[root@kubenode1 efk]# wget https://raw.githubusercontent.com/kubernetes/kubernetes/master/cluster/addons/fluentd-elasticsearch/es-statefulset.yaml

# es-service.
[root@kubenode1 efk]# wget https://raw.githubusercontent.com/kubernetes/kubernetes/master/cluster/addons/fluentd-elasticsearch/es-service.yaml

# kibana-deployment
[root@kubenode1 efk]# wget https://raw.githubusercontent.com/kubernetes/kubernetes/master/cluster/addons/fluentd-elasticsearch/kibana-deployment.yaml

# kibana-service
[root@kubenode1 efk]# wget https://raw.githubusercontent.com/kubernetes/kubernetes/master/cluster/addons/fluentd-elasticsearch/kibana-service.yaml

本实验使用yaml文件(修改版):https://github.com/Netonline2016/kubernetes/tree/master/addons/efk
3. es-statefulset.yaml
es-statefulset.yaml由4个模块组成:ServiceAccout,ClusterRole,ClusterRoleBinding,StatefulSet。
其中ServiceAccout,ClusterRole,ClusterRoleBinding等3个模块定义了1个新的ClusterRole权限,并完成ClusterRoleBinding,授权到ServiceAccout。这3个模块默认不修改。
1)StatefulSet
默认不需要修改ServiceAccount部分,设置ServiceAccount资源,获取rbac中定义的权限。
StatefulSet是Deployment/RC的一个特殊变种,主要面向有状态的服务,特性如下:
- StatefulSet中每个Pod都有稳定的,唯一的网络标识,可以用来发现集群内的其他成员;如StatefulSet的名字为elasticsearch,则第一个Pod为elasticsearch-0,第二个Pod为elasticsearch-1,依次类推;
- StatefulSet控制的Pod副本的启停顺序是受控的,操作第n个Pod时,前n-1个Pod已运行且状态ready;
- StatefulSet里的Pod采用稳定的持久化的存储卷,通过PV/PVC实现,删除Pod时默认不会删除与StatefulSet相关的存储卷,保证了数据安全。
# 修改处:第76行,变更镜像名;
# 设定为StatefulSet资源,副本数为2,采用持久化存储;
# 使用init Container在应用启动之前做初始化操作
[root@kubenode1 ~]# cd /usr/local/src/yaml/efk/
[root@kubenode1 efk]# sed -i 's|k8s.gcr.io/elasticsearch:v5.6.4|netonline/elasticsearch:v5.6.4|g' es-statefulset.yaml
[root@kubenode1 efk]# cat es-statefulset.yaml
# Elasticsearch deployment itself
apiVersion: apps/v1
kind: StatefulSet
metadata:
  name: elasticsearch-logging
  namespace: kube-system
  labels:
    k8s-app: elasticsearch-logging
    version: v5.6.4
    kubernetes.io/cluster-service: "true"
    addonmanager.kubernetes.io/mode: Reconcile
spec:
  serviceName: elasticsearch-logging
  replicas: 2
  selector:
    matchLabels:
      k8s-app: elasticsearch-logging
      version: v5.6.4
  template:
    metadata:
      labels:
        k8s-app: elasticsearch-logging
        version: v5.6.4
        kubernetes.io/cluster-service: "true"
    spec:
      serviceAccountName: elasticsearch-logging
      containers:
      - image: netonline/elasticsearch:v5.6.4
        name: elasticsearch-logging
        resources:
          # need more cpu upon initialization, therefore burstable class
          limits:
            cpu: 1000m
          requests:
            cpu: 100m
        ports:
        - containerPort: 9200
          name: db
          protocol: TCP
        - containerPort: 9300
          name: transport
          protocol: TCP
        volumeMounts:
        - name: elasticsearch-logging
          mountPath: /data
        env:
        - name: "NAMESPACE"
          valueFrom:
            fieldRef:
              fieldPath: metadata.namespace
      volumes:
      - name: elasticsearch-logging
        emptyDir: {}
      # Elasticsearch requires vm.max_map_count to be at least 262144.
      # If your OS already sets up this number to a higher value, feel free
      # to remove this init container.
      initContainers:
      - image: alpine:3.6
        command: ["/sbin/sysctl", "-w", "vm.max_map_count=262144"]
        name: elasticsearch-logging-init
        securityContext:
          privileged: true
4. es-service.yaml
es-service.yaml默认不需要修改。
5. fluentd-es-configmap.yaml
fluentd-es-configmap.yaml设定一个ConfigMap资源,以volume的形式挂载为fluentd服务内部的文件,默认不需要修改。
6. fluentd-es-ds.yaml
fluentd-es-ds.yaml由4个模块组成:ServiceAccout,ClusterRole,ClusterRoleBinding,StatefulSet。
其中ServiceAccout,ClusterRole,ClusterRoleBinding等3个模块定义了1个新的ClusterRole: fluentd-es权限,并完成ClusterRoleBinding: fluentd-es,授权到ServiceAccout: fluentd-es。这3个模块默认不修改。
1)DaemonSet
fluentd需要在每个Node上运行,有以下3种方式实现:
- 直接在Node上部署fluentd服务;
- 通过kubelet的--config参数,为每个Node加载fluentd Pod;
- 通过DaemonSet资源设定fluentd Pod在每个Node运行(官方推荐)。
# 修改处:第16行,变更镜像名;
# nodeSelector:标签设置为”true”,设定DaemonSet调度Pod只能调度到含有标签”beta.kubernetes.io/fluentd-ds-ready”的节点,需要在相应节点设置标签
[root@kubenode1 efk]# sed -i 's|k8s.gcr.io/fluentd-elasticsearch:v2.0.4|netonline/fluentd-elasticsearch:v2.0.4|g' fluentd-es-ds.yaml
[root@kubenode1 efk]# cat fluentd-es-ds.yaml
……
apiVersion: apps/v1
kind: DaemonSet
metadata:
  name: fluentd-es-v2.0.4
  namespace: kube-system
  labels:
    k8s-app: fluentd-es
    version: v2.0.4
    kubernetes.io/cluster-service: "true"
    addonmanager.kubernetes.io/mode: Reconcile
spec:
  selector:
    matchLabels:
      k8s-app: fluentd-es
      version: v2.0.4
  template:
    metadata:
      labels:
        k8s-app: fluentd-es
        kubernetes.io/cluster-service: "true"
        version: v2.0.4
      # This annotation ensures that fluentd does not get evicted if the node
      # supports critical pod annotation based priority scheme.
      # Note that this does not guarantee admission on the nodes (#40573).
      annotations:
        scheduler.alpha.kubernetes.io/critical-pod: ''
    spec:
      priorityClassName: system-node-critical
      serviceAccountName: fluentd-es
      containers:
      - name: fluentd-es
        image: netonline/fluentd-elasticsearch:v2.0.4
        env:
        - name: FLUENTD_ARGS
          value: --no-supervisor -q
        resources:
          limits:
            memory: 500Mi
          requests:
            cpu: 100m
            memory: 200Mi
        volumeMounts:
        - name: varlog
          mountPath: /var/log
        - name: varlibdockercontainers
          mountPath: /var/lib/docker/containers
          readOnly: true
        - name: libsystemddir
          mountPath: /host/lib
          readOnly: true
        - name: config-volume
          mountPath: /etc/fluent/config.d
      nodeSelector:
        beta.kubernetes.io/fluentd-ds-ready: "true"
      terminationGracePeriodSeconds: 30
      volumes:
      - name: varlog
        hostPath:
          path: /var/log
      - name: varlibdockercontainers
        hostPath:
          path: /var/lib/docker/containers
      # It is needed to copy systemd library to decompress journals
      - name: libsystemddir
        hostPath:
          path: /usr/lib64
      - name: config-volume
        configMap:
          name: fluentd-es-config-v0.1.4
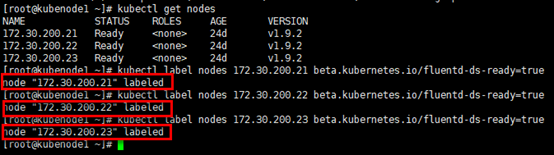
2)设置标签
# 所有期望运行fluentd Pod的节点都需要设置标签
[root@kubenode1 ~]# kubectl get nodes
[root@kubenode1 ~]# kubectl label nodes 172.30.200.21 beta.kubernetes.io/fluentd-ds-ready=true
[root@kubenode1 ~]# kubectl label nodes 172.30.200.22 beta.kubernetes.io/fluentd-ds-ready=true
[root@kubenode1 ~]# kubectl label nodes 172.30.200.23 beta.kubernetes.io/fluentd-ds-ready=true
7. kibana-deployment.yaml
# 修改处:第22行,变更镜像名;
[root@kubenode1 efk]# sed -i 's|docker.elastic.co/kibana/kibana:5.6.4|netonline/kibana:5.6.4|g' kibana-deployment.yaml
8. kibana-service.yaml
默认不需要修改Service部分。
三.验证
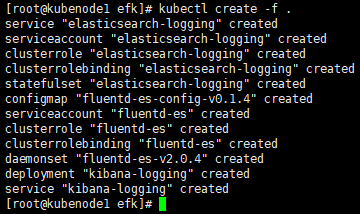
1. 启动服务
[root@kubenode1 ~]# cd /usr/local/src/yaml/efk/
[root@kubenode1 efk]# kubectl create -f .
2. 查看服务
# 查看statefulset,daemonset与deployment
[root@kubenode1 ~]# kubectl get statefulset -n kube-system
[root@kubenode1 ~]# kubectl get daemonset -n kube-system
[root@kubenode1 ~]# kubectl get deployment -n kube-system | grep kibana

# 查看elasticsearch与kibana的Pod运行状态;
# 有状态的Pod命名是有规律的
[root@kubenode1 ~]# kubectl get pods -n kube-system | grep -E 'elasticsearch|kibana'

# 查看fluentd的Pod运行状态,”-o wide”参数可显示Pod运行节点;
# 期望运行的节点都运行了fluentd Pod服务
[root@kubenode1 ~]# kubectl get pods -n kube-system -o wide | grep fluentd

# 查看service运行状态
[root@kubenode1 ~]# kubectl get svc -n kube-system | grep -E 'elasticsearch|kibana'

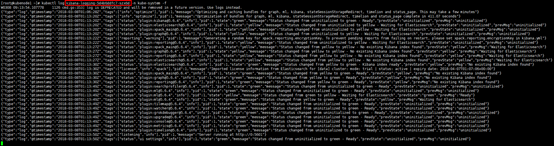
# kibana Pod第一次启动时有一定的初始化操作来优化并cache状态页面,时间一般在10~20分钟内;
# 通过日志查看,”-f”参数类似于“tailf”;
[root@kubenode1 ~]# kubectl log kibana-logging-5d4b6ddfc7-szx6d -n kube-system -f
3. 访问elasticsearch
# 访问elasticsearch,采用kube-apiserver方式,也可以使用kubecet proxy代理的方式(同dashboard方式)
[root@kubenode1 ~]# kubectl cluster-info
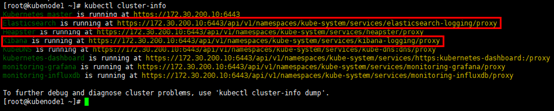
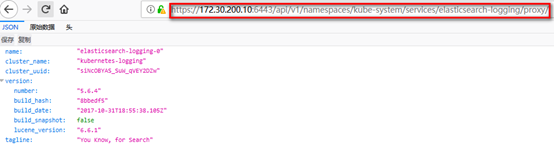
浏览器访问访问elasticsearch,返回json文档:https://172.30.200.10:6443/api/v1/namespaces/kube-system/services/elasticsearch-logging/proxy/
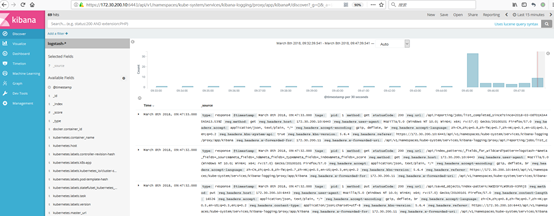
4. 访问kibana
访问kibana,同样采用kube-apiserver方式,也可以使用kubecet proxy代理的方式(同dashboard方式)
浏览器访问访问kibana:https://172.30.200.10:6443/api/v1/namespaces/kube-system/services/kibana-logging/proxy
同ELK,第一次进入kibana,需要进行初始化配置,默认"Create"即可;