1.背景
在前的学习中,我们几乎解决了springCloud的所有常规应用,但是大家有没有想过这样一个问题:
是使用微服务后,有非常多的application.yml文件,每个模块都有一个,实际开发中还有开发环境、测试环境、预发布环境、正式环境等,
可能经常修改配置文件,但是不能每次都到项目中去修改呀,这样得把人累死,于是springCloud config就挺身而出,解决了这个问题。
2.springCloud config简介
Spring Cloud Config为分布式系统中的外部配置提供服务器和客户端支持。
使用Config Server,您可以在所有环境中管理应用程序的外部属性。
客户端和服务器上的概念映射与Spring Environment和PropertySource抽象相同,因此它们与Spring应用程序非常契合,但可以与任何以任何语言运行的应用程序一起使用。
随着应用程序通过从开发人员到测试和生产的部署流程,您可以管理这些环境之间的配置,并确定应用程序具有迁移时需要运行的一切。
服务器存储后端的默认实现使用git,因此它轻松支持标签版本的配置环境,以及可以访问用于管理内容的各种工具。
可以轻松添加替代实现,并使用Spring配置将其插入。
来自:https://www.springcloud.cc/spring-cloud-config.html
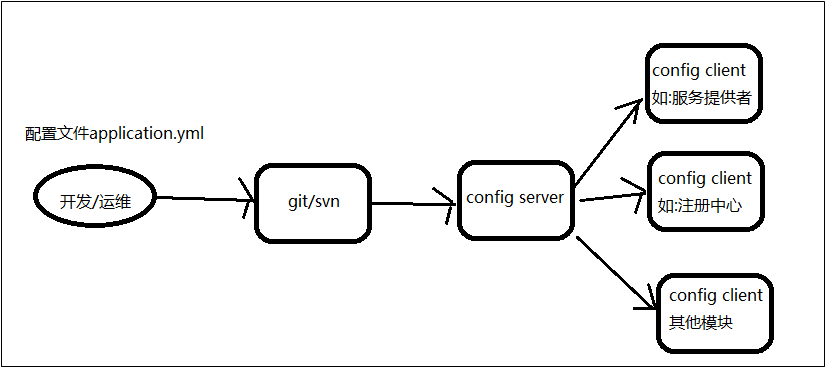
总结:就是将配置文件与代码分离,单独放在一个git库里面独立管理
实现原理图:
3.config server端简单使用
第一步:创建一个专门放配置文件的git仓库,如果还不会使用git仓库,可以学习<<git实战>>
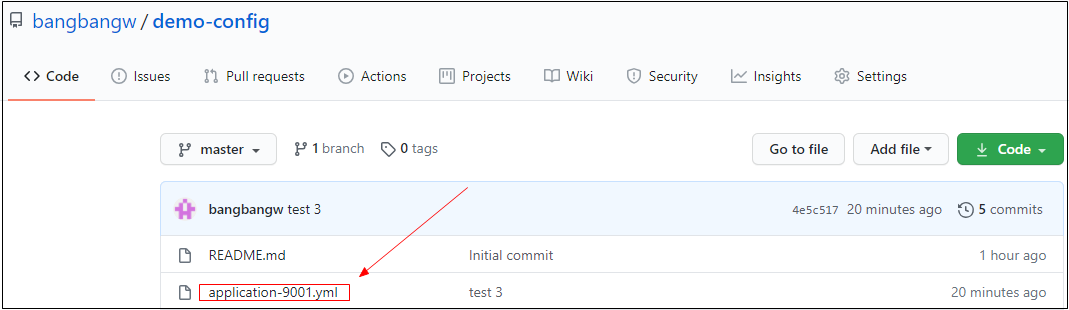
创建好的git仓库地址为:https://github.com/bangbangw/demo-config.git
随便上传一个application.yml文件到该仓库,为了便于理解,我这里直接拷贝之前项目里面的application.yml文件,然后按照对应的端口号命名,
例如上传9001的application.yml文件命名为:application-9001.yml
实际上传后的git仓库文件如下:
第二步:创建config服务端模块:config-server-5001
pom.xml文件 依赖
<dependency>
            <groupId>org.springframework.cloud</groupId>
            <artifactId>spring-cloud-config-server</artifactId>
        </dependency>
        <!-- 避免Config的Git插件报错:https://mvnrepository.com/artifact/org.eclipse.jgit/org.eclipse.jgit -->
        <dependency>
            <groupId>org.eclipse.jgit</groupId>
            <artifactId>org.eclipse.jgit</artifactId>
            <version>4.10.0.201712302008-r</version>
        </dependency>
application.yml文件


# 基本配置
server:
  port: 5001
  context-path: /

# 应用名称、git地址配置
spring:
  application:
    name: service-config
  cloud:
    config:
      server:
        git:
          skipSslValidation: true #是否跳过https检查
          uri: https://github.com/bangbangw/demo-config.git #git仓库地址,也可以不添加.git后缀
          search-paths:
            - path1 # 注意 - 与 path1 之间有空格,非根路径下得目录
            - path2
          #username: xxxx  git 登录名 (一般都是配置的秘钥登录,不是账号密码登录)
          #password: xxxx  git 登录密码
ConfigServerApplication_5001.java 启动文件
package com.wfd360;

import org.springframework.boot.SpringApplication;
import org.springframework.boot.autoconfigure.SpringBootApplication;
import org.springframework.boot.autoconfigure.jdbc.DataSourceAutoConfiguration;
import org.springframework.boot.autoconfigure.orm.jpa.HibernateJpaAutoConfiguration;
import org.springframework.cloud.config.server.EnableConfigServer;

/**
 * @author 姿势帝-博客园
 * @address https://www.cnblogs.com/newAndHui/
 * @WeChat 851298348
 * @create 07/25 4:57
 * @description
 */


@SpringBootApplication(exclude = {DataSourceAutoConfiguration.class, HibernateJpaAutoConfiguration.class})
@EnableConfigServer
public class ConfigServerApplication_5001 {

    public static void main(String[] args) {
        SpringApplication.run(ConfigServerApplication_5001.class, args);
    }
}
第三步:测试
启动5001
请求路径匹配规则:
/{application}/{profile}[/{label}]
/{application}-{profile}.yml
/{label}/{application}-{profile}.yml
/{application}-{profile}.properties
/{label}/{application}-{profile}.properties
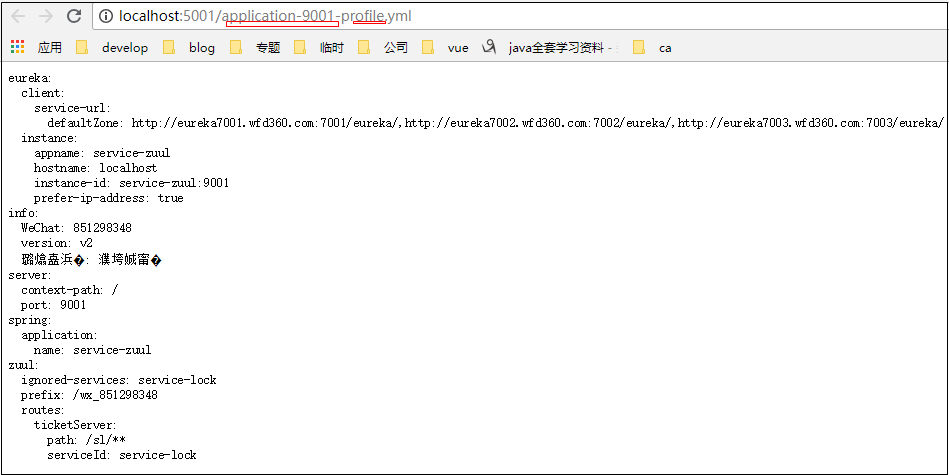
我们使用简单的第二条即:/{application}-{profile}.yml
实际访问路径:http://localhost:5001/application-9001-profile.yml ,结果如下:
4.config client基本使用
客户端其实就是指将之前我们的模块不读取本地文件,而是将配置文件放在git,然后使用git上的配置文件,
如果是实际生产很简单:1.上传配置文件到git; 2.填加一个 bootstrap.yml文件, 搞定!
案例中,我们以改造6001为例讲解
第一步:在6001中添加 bootstrap.yml,用于连接config server服务端
为了优先读取config server 中的配置文件,我们需要把读取config server相关的配置放入 bootstrap.yml,把其他配置放入 application.yml中
因此:
bootstrap.yml 文件为:
spring:
  application:
    name: config-client-dev
  cloud:
    config:
      uri: http://localhost:5001  # config server 服务端地址
      label: master  # git中的分支 默认master
      name: application6001 # 文件名称
      profile: dev2  # 文件名, 最终生效文件名称是git上的:name + dev = application6001-dev.yml
      fail-fast: true
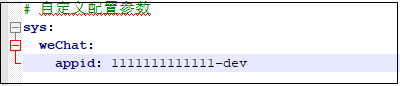
为了便于区分到底读取的是git上的配置文件还是本地的 application.yml 文件,我们在application.yml 文件中添加一个参数
# 自定义配置参数,假设是实际生产中的微信openid
sys:
  weChat:
    appid: 1111111111111-default
为了便于测试,写一个测试用的controller为:TestController ,只是为了测试
package com.wfd360.controller;

import org.springframework.beans.factory.annotation.Value;
import org.springframework.web.bind.annotation.GetMapping;
import org.springframework.web.bind.annotation.RestController;

/**
 * @author 姿势帝-博客园
 * @address https://www.cnblogs.com/newAndHui/
 * @WeChat 851298348
 * @create 07/25 6:42
 * @description
 */
@RestController
public class TestController {
    @Value(value = "${sys.weChat.appid}")
    private String appId;

    /**
     * 模拟测试:config client 是否生效
     * 测试逻辑:如果生效,获取到的appid将不一样
     */
    @GetMapping("/api/appid")
    public Object getAppId() {
        System.out.println("appid=" + appId);
        return appId;
    }
}
第二步:上传测试用的application.yml文件,这里以上传6001模块的application为例

application6001-dev.yml配置文件
server:
  port: 6001
  context-path: /
# 数据源配置
spring:
  application:
    name: service-ticket
  datasource:
    type: com.alibaba.druid.pool.DruidDataSource
    driver-class-name: com.mysql.jdbc.Driver
    url: jdbc:mysql://localhost:3306/db_station
    username: root
    password: admin
  jpa:
    hibernate:
      ddl-auto: update
    show-sql: true
  thymeleaf:
    cache: false
# eureka 注册中心配置
eureka:
  instance:
    hostname: localhost #eureka客户端主机实例名称
    appname: service-ticket #客户端服务名称(可以随意取)
    instance-id: service-ticket:6001 #客户端实例名称(可以随意取)
    prefer-ip-address: true #显示ip地址
  client:
    service-url:
      #defaultZone: http://localhost:7001/eureka #eureka的服务器地址(单机)
      defaultZone: http://eureka7001.wfd360.com:7001/eureka/,http://eureka7002.wfd360.com:7002/eureka/,http://eureka7003.wfd360.com:7003/eureka/ # 集群

# 服务提供者信息
info:
  version: v2
  WeChat: 851298348
  负责人: 姿势帝

# 自定义配置参数
sys:
  weChat:
    appid: 1111111111111-dev
为了便于验证测试结果,我在文件末尾添加了不同的微信openid,若果是dev文件为.....11-dev,如果是prd文件为.....11-prd,如果是test文件为.....11-test
第三步:测试
启动config server 服务5001,在启动config client 客户端 6001,
测试服务端是否能正常访问:http://localhost:5001/application6001-dev-profile.yml
测试服务端是否能正常访问:http://localhost:5001/application6001-prd-profile.yml
测试服务端是否能正常访问:http://localhost:5001/application6001-test-profile.yml
通过如下修改
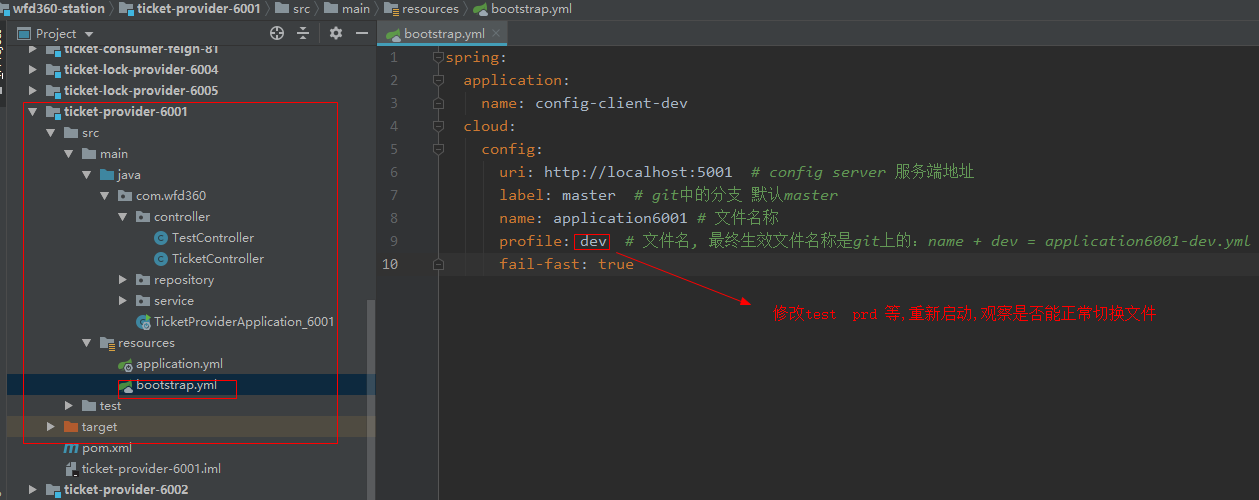
然后访问:http://localhost:6001/api/appid 观察结果.
到此,我们已经完成了如何将application.yml文件存放在git,然后项目获取并生效,达到了常规微服务项目对配置文件的管理需求.
当然,大家在测试的过程分钟发现,虽然配置文件确实生效了,但是每次修改都需要重启项目,感觉还是有点不完美,
其实要完成这个,也是很简单的,只是需要涉及到消息队列,但是我们还没有详细讲解消息队列相关的知识......因此感兴趣的同学可以先自己查资料完成这个,获取期待我们下次的课程补充上这个.
完美!
springCloud课程与代码下载:https://www.cnblogs.com/newAndHui/p/13210228.html