一、SSM框架配置多数据源的原理
原理:MyBatis在创建SqlSession时,动态的使用不同的dataSource,就可以动态的使用不同的数据源。
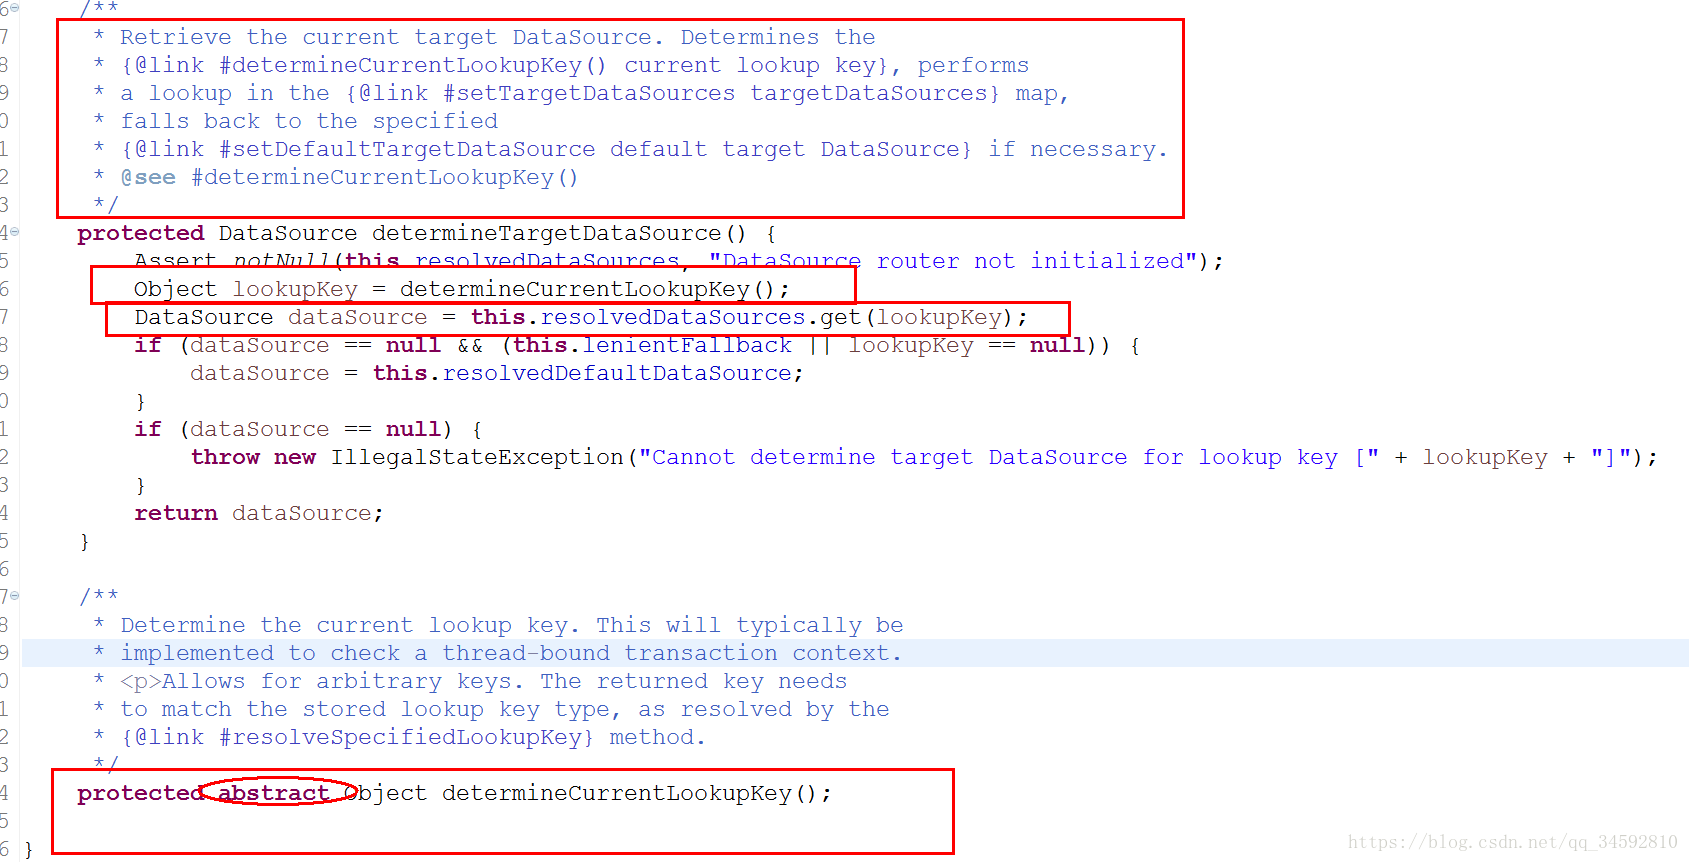
那么,怎样才能动态的使用不同的dataSource呢? 在Spring框架中,提供了一个类AbstractRoutingDataSource,顾名思义叫做路由选择。该类AbstractRoutingDataSource继承AbstractDataSource,AbstractDataSource又实现了DataSource,因此,可以使用AbstractRoutingDataSource来完成我们的需求。AbstractRoutingDataSource中有一个determineTargetDataSource()方法,该方法是用来决定目标数据源的;而determineTargetDataSource()方法中通过determineCurrentLookupKey()方法来决定lookupKey;然后使用封装好了的map集合resolvedDataSources,通过lookupKey为key值取得dataSource。因此这里面最重要的就是determineCurrentLookupKey()方法获取key值,在这里Spring把这个方法抽象出来,交给用户来实现。
二、实践:在SSM框架中,实现多数据源访问(目录结构如下图)

1、第一步:搭建SSM项目
搭建步骤参考:SSM框架(1):使用Maven搭建SSM项目实践
2、创建动态数据源代理类:DynamicDataSource 和 DynamicDataSourceHolder
- DynamicDataSource:实现Spring定义的路由选择抽象类AbstractRoutingDataSource,用来创建动态的数据源。
- DynamicDataSourceHolder:用来保存数据源标识,从而在实例化DynamicDataSource时,来指定要使用的数据源实例
package com.newbie.util;

import org.springframework.jdbc.datasource.lookup.AbstractRoutingDataSource;

/**
 * DynamicDataSource由自己实现,实现AbstractRoutingDataSource,数据源由自己指定。
 */
public class DynamicDataSource extends AbstractRoutingDataSource {
    @Override
    protected Object determineCurrentLookupKey() {
        // 从自定义的位置获取数据源标识
        return DynamicDataSourceHolder.getDataSourceKey();
    }
}
package com.newbie.util;

/**
 * 自定义类:用来保存数据源标识,从而在实例化DynamicDataSource时来指定要使用的数据源实例
 */
public class DynamicDataSourceHolder {

    /**
     * 注意:数据源标识保存在线程变量中,避免多线程操作数据源时互相干扰
     */
    private static final ThreadLocal<String> DATA_SOURCE_KEY = new ThreadLocal<String>();

    public static String getDataSourceKey(){
        return DATA_SOURCE_KEY.get();
    }

    public static void setDataSourceKey(String dataSourceKey){
        DATA_SOURCE_KEY.set(dataSourceKey);
    }

    public static void clearDataSourceKey(){
        DATA_SOURCE_KEY.remove();
    }

}
3、自定义多数据源注解@AnnotationDBSourceKey 以及 解析数据源注解的切面类DynamicDBSourceAspect
- AnnotationDBSourceKey:自定义注解类。在要动态设置数据源的方法上,使用注解来标识数据源。
- DynamicDBSourceAspect:切面类。在执行横切的方法前,获取方法的@AnnotationDBSourceKey注解,解析注解的值来设置DynamicDataSourceHolder类中的数据源标识,进而达到动态设置数据源的目的。
package com.newbie.util.annotation;

import java.lang.annotation.ElementType;
import java.lang.annotation.Retention;
import java.lang.annotation.RetentionPolicy;
import java.lang.annotation.Target;

/**
 * 自定义注解类型:使用注解来标识数据源
 */
@Target({ElementType.TYPE,ElementType.METHOD})
@Retention(RetentionPolicy.RUNTIME)
public @interface AnnotationDBSourceKey {
    /**
     * value的值:来标识数据源
     * @return
     */
    String value();
}
package com.newbie.util.annotation;

import com.newbie.util.DynamicDataSourceHolder;
import org.aspectj.lang.JoinPoint;
import org.aspectj.lang.annotation.Aspect;
import org.aspectj.lang.annotation.Before;
import org.aspectj.lang.reflect.MethodSignature;
import org.springframework.stereotype.Component;

import java.lang.reflect.Method;

/**
 * 定义切面类:在执行DAO接口的方法前,获取方法的@AnnotationDBSourceKey注解,根据注解的值来动态设置数据源
 */
@Component
@Aspect
public class DynamicDBSourceAspect {
    /**
     * 拦截目标方法,获取由@DataSource指定的数据源标识,设置到线程存储中以便切换数据源
     *
     * @param point
     * @throws Exception
     */
    @Before("execution(* com.newbie.service.*.*(..))")
    public void intercept(JoinPoint point) throws Exception {
        Class<?> target = point.getTarget().getClass();
        MethodSignature signature = (MethodSignature) point.getSignature();
        System.out.println("intercept()----,target:"+target+",signature:"+signature+",signature.getMethod():"+signature.getMethod());

        // 默认使用目标类型的注解,如果没有则使用其实现接口的注解
        for (Class<?> clazz : target.getInterfaces()) {
            resolveDataSource(clazz, signature.getMethod());
        }
        resolveDataSource(target, signature.getMethod());
    }

    /**
     * 提取目标对象方法注解和类型注解中的数据源标识
     *
     * @param clazz
     * @param method
     */
    private void resolveDataSource(Class<?> clazz, Method method) {
        try {
            Class<?>[] types = method.getParameterTypes();
            // 默认使用类型注解
            if (clazz.isAnnotationPresent(AnnotationDBSourceKey.class)) {
                AnnotationDBSourceKey source = clazz.getAnnotation(AnnotationDBSourceKey.class);
                DynamicDataSourceHolder.setDataSourceKey(source.value());
            }
            // 方法注解可以覆盖类型注解
            Method m = clazz.getMethod(method.getName(), types);
            if (m != null && m.isAnnotationPresent(AnnotationDBSourceKey.class)) {
                AnnotationDBSourceKey source = m.getAnnotation(AnnotationDBSourceKey.class);
                DynamicDataSourceHolder.setDataSourceKey(source.value());
            }
        } catch (Exception e) {
            System.out.println(clazz + ":" + e.getMessage());
        }
    }
}
4、修改数据源配置:将单数据源配置改为多数据源配置
-
db.properties : 数据源静态参数配置文件,增加主从数据源的配置信息 -
spring-mybatis.xml : 增加主从数据源的实例(masterslave1slave2);增加DynamicDataSource的动态代理类的实例,并将DynamicDataSource实例的参数targetDataSources,设置为主从数据源的实例集合。
#db.properties配置文件内容
#配置主从数据库的链接地址
#主库
master.jdbc.url=jdbc:mysql://localhost:3306/nb_master?useUnicode=true&characterEncoding=utf8
#从库1
slave1.jdbc.url=jdbc:mysql://localhost:3306/nb_slave1?useUnicode=true&characterEncoding=utf8
#从库2
slave2.jdbc.url=jdbc:mysql://www.newbie.com:10127/nb_slave2?useUnicode=true&characterEncoding=utf8

#配置其他信息
jdbc.driver=com.mysql.jdbc.Driver
jdbc.username=root
jdbc.password=xxxxxx
#最大连接数
c3p0.maxPoolSize=30
#最小连接数
c3p0.minPoolSize=10
#关闭连接后不自动commit
c3p0.autoCommitOnClose=false
#获取连接超时时间
c3p0.checkoutTimeout=10000
#当获取连接失败重试次数
c3p0.acquireRetryAttempts=2
##### spring-mybatis.xml配置文件内容 #####
<?xml version="1.0" encoding="UTF-8"?>
<beans xmlns="http://www.springframework.org/schema/beans"
       xmlns:xsi="http://www.w3.org/2001/XMLSchema-instance"
       xmlns:context="http://www.springframework.org/schema/context" xmlns:tx="http://www.springframework.org/schema/tx"
       xsi:schemaLocation="http://www.springframework.org/schema/beans
       http://www.springframework.org/schema/beans/spring-beans.xsd
       http://www.springframework.org/schema/context
       http://www.springframework.org/schema/context/spring-context.xsd http://www.springframework.org/schema/tx http://www.springframework.org/schema/tx/spring-tx.xsd">

    <!--读取静态配置文件,获取相关数据库连接参数 -->
    <context:property-placeholder location="classpath:db.properties"/>
    <!-- 配置数据源 -->
    <bean id="abstractDataSource" class="com.mchange.v2.c3p0.ComboPooledDataSource" abstract="true" destroy-method="close">
        <property name="driverClass" value="${jdbc.driver}"/>
        <property name="user" value="${jdbc.username}"/>
        <property name="password" value="${jdbc.password}"/>
        <property name="maxPoolSize" value="${c3p0.maxPoolSize}"/>
        <property name="minPoolSize" value="${c3p0.minPoolSize}"/>
        <property name="autoCommitOnClose" value="${c3p0.autoCommitOnClose}"/>
        <property name="checkoutTimeout" value="${c3p0.checkoutTimeout}"/>
        <property name="acquireRetryAttempts" value="${c3p0.acquireRetryAttempts}"/>
    </bean>
    <!-- 配置数据源:主库 -->
    <bean id="master" parent="abstractDataSource">
        <property name="jdbcUrl" value="${master.jdbc.url}"/>
    </bean>
    <!-- 配置数据源:从库1 -->
    <bean id="slave1" parent="abstractDataSource">
        <property name="jdbcUrl" value="${slave1.jdbc.url}"/>
    </bean>
    <!-- 配置数据源:从库2 -->
    <bean id="slave2" parent="abstractDataSource">
        <property name="jdbcUrl" value="${slave2.jdbc.url}"/>
    </bean>

    <!-- 动态数据源配置,这个class要完成实例化 -->
    <bean id="dynamicDataSource" class="com.newbie.util.DynamicDataSource">
        <property name="targetDataSources">
            <!-- 指定lookupKey和与之对应的数据源,切换时使用的为key -->
            <map key-type="java.lang.String">
                <entry key="master" value-ref="master"/>
                <entry key="slave1" value-ref="slave1"/>
                <entry key="slave2" value-ref="slave2"/>
            </map>
        </property>
        <!-- 这里可以指定默认的数据源 -->
        <property name="defaultTargetDataSource" ref="master"/>
    </bean>

    <!-- 配置MyBatis创建数据库连接的工厂类(此处配置和单数据源相同,不需改变) -->
    <bean id="sqlSessionFactory" class="org.mybatis.spring.SqlSessionFactoryBean">
        <!--数据源指定为:动态数据源DynamicDataSource -->
        <property name="dataSource" ref="dynamicDataSource"/>
        <!-- mapper配置文件 -->
        <property name="mapperLocations" value="classpath:mapper/*.xml"/>
    </bean>

    <!-- 配置自动扫描DAO接口包,动态实现DAO接口实例,注入到Spring容器中进行管理(此处配置和单数据源相同,不需改变) -->
    <bean class="org.mybatis.spring.mapper.MapperScannerConfigurer">
        <!-- 注入SqlSession工厂对象:SqlSessionFactoryBean -->
        <property name="sqlSessionFactoryBeanName" value="sqlSessionFactory"/>
        <!-- 指定要扫描的DAO接口所在包 -->
        <property name="basePackage" value="com.newbie.dao"/>
    </bean>

</beans>
5、创建 UserController、UserService,在UserService中动态设置数据源
- UserService : 调用DynamicDataSourceHolder.setDataSourceKey(dataSourceKey)来动态设置数据源,实现多数据源的动态访问。
- UserController : 接收客户端请求,调用UserService的方法处理请求,然后将结果响应给客户。
package com.newbie.service.impl;

import com.newbie.dao.UserDAO;
import com.newbie.domain.User;
import com.newbie.service.IUserService;
import com.newbie.util.DynamicDataSourceHolder;
import com.newbie.util.annotation.AnnotationDBSourceKey;
import org.springframework.stereotype.Service;

import javax.annotation.Resource;
import java.util.List;
@Service
public class UserService implements IUserService {
    @Resource
    private UserDAO userDAO;

    /**
     * 通过设置:DynamicDataSourceHolder.setDataSourceKey(dataSourceKey);的方式,来动态设置数据源
     */
    public List<User> searchAllUser(String dataSourceKey) {
        if(dataSourceKey == null){
            dataSourceKey = "master";
        }
        DynamicDataSourceHolder.setDataSourceKey(dataSourceKey);
        return userDAO.selectAll();
    }

    /*
     * 以下三个方法:searchMaster()、searchSlave1()、searchSlave2()
     * 使用自定义注解的方式,来动态设置数据源
     */
    @AnnotationDBSourceKey("master")
    public List<User> searchMaster() {
        return userDAO.selectAll();
    }
    @AnnotationDBSourceKey("slave1")
    public List<User> searchSlave1() {
        return userDAO.selectAll();
    }
    @AnnotationDBSourceKey("slave2")
    public List<User> searchSlave2() {
        return userDAO.selectAll();
    }
}
package com.newbie.controller;

import com.newbie.domain.User;
import com.newbie.service.IUserService;
import org.springframework.stereotype.Controller;
import org.springframework.ui.Model;
import org.springframework.web.bind.annotation.RequestMapping;

import javax.annotation.Resource;
import java.util.List;

/**
 * 控制器:接收客户端请求,处理后将结果响应给客户
 */
@Controller
public class UserController {
    @Resource
    private IUserService userService;

    /**
     * 通过设置:DynamicDataSourceHolder.setDataSourceKey(dataSourceKey);的方式,来动态设置数据源
     */
    @RequestMapping("/searchAllUser")
    public String searchAllUser(Model model, String dataSourceKey){
        List<User> users = userService.searchAllUser(dataSourceKey);
        model.addAttribute("message","dataSourceKey = "+dataSourceKey);
        model.addAttribute("user",users.get(0));
        return "showInfo";
    }

    /*
     * 以下三个方法:searchMaster()、searchSlave1()、searchSlave2()
     * 使用自定义注解的方式,来动态设置数据源
     */
    @RequestMapping("/searchMaster")
    public String searchMaster(Model model){
        List<User> users = userService.searchMaster();
        model.addAttribute("message","dataSourceKey = master , method : searchMaster()");
        model.addAttribute("user",users.get(0));
        return "showInfo";
    }
    @RequestMapping("/searchSlave1")
    public String searchSlave1(Model model){
        List<User> users = userService.searchSlave1();
        model.addAttribute("message","dataSourceKey = slave1 , method : searchSlave1()");
        model.addAttribute("user",users.get(0));
        return "showInfo";
    }
    @RequestMapping("/searchSlave2")
    public String searchSlave2(Model model){
        List<User> users = userService.searchSlave2();
        model.addAttribute("message","dataSourceKey = slave2 , method : searchSlave2()");
        model.addAttribute("user",users.get(0));
        return "showInfo";
    }
}
6、UserDAO、UserMapper.xml保持不变(和单数据源中的配置相同)
package com.newbie.dao;

import com.newbie.domain.User;
import java.util.List;

/**
 * 数据库操作对象:用户类
 */
public interface UserDAO {
    List<User> selectAll();
}
<?xml version="1.0" encoding="UTF-8"?>
<!DOCTYPE mapper PUBLIC "-//mybatis.org//DTD Mapper 3.0//EN" "http://mybatis.org/dtd/mybatis-3-mapper.dtd">

<!-- mapper配置文件,其中namespace指定要动态实例的DAO接口全局类名称 -->
<mapper namespace="com.newbie.dao.UserDAO">
    <!-- 查询所有用户 -->
    <select id="selectAll" resultType="com.newbie.domain.User">
        select id,username,title from user
    </select>

</mapper>
-- DROP TABLE user;
CREATE TABLE user(
    id VARCHAR(25),
    username VARCHAR(50),
    title VARCHAR(255)
    );
insert into user(id,username,title) values('123','简小六','主库master');
insert into user(id,username,title) values('123','简小六','从库slave1');
insert into user(id,username,title) values('123','简小六','从库slave2');
7、创建前端jsp页面,测试多数据源访问结果(首先访问index.jsp页面,点击<a>标签跳转后,在showInfo.jsp页面中显示结果)
#### index.jsp页面内容 ####
<%@ page contentType="text/html;charset=UTF-8" language="java" %>
<html>
<head>
    <title>测试多数据源模式</title>
</head>
<body>
<h2> 通过设置:DynamicDataSourceHolder.setDataSourceKey(dataSourceKey);的方式,来动态设置数据源</h2>
<a href="searchAllUser?dataSourceKey=master">查询主库:用户信息</a><br/><br/>
<a href="searchAllUser?dataSourceKey=slave1">查询从库1:用户信息</a><br/><br/>
<a href="searchAllUser?dataSourceKey=slave2">查询从库2:用户信息</a><br/><br/>
<br/><hr/><hr/><br/>
<h2> 使用自定义注解的方式,来动态设置数据源</h2>
<a href="searchMaster">查询主库:用户信息</a><br/><br/>
<a href="searchSlave1">查询从库1:用户信息</a><br/><br/>
<a href="searchSlave2">查询从库2:用户信息</a><br/><br/>

</body>
</html>
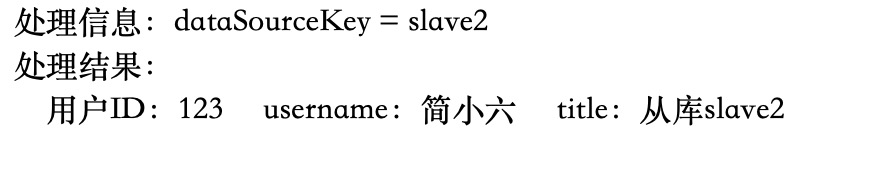
#### showInfo.jsp页面内容 #### <%@ page contentType="text/html;charset=UTF-8" language="java" %> <html> <head> <title>显示结果信息</title> </head> <body> 处理信息:${message}<br/> 处理结果:<br/> 用户ID:${user.id} username:${user.username} title:${user.title} </body> </html>
8、程序运行结果
(1)发布项目,请求以下地址:http://localhost:8080/ssm-multi-DBSource/index.jsp
(2)index.jsp页面显示如下:

(3)以上六个<a>标签,点击后程序运行的结果分别如下图:


参考资料:
欢迎转载,转载请注明出处!