1.启动zk
cd /opt/fordubbo/zk/apache-zookeeper-3.7.0-bin/bin

./zkServer.sh start启动
./zkServer.sh status查看状态
我们使用axios则是从我们客户端角度发送的!
dubbo的监控中心是内部访问,因此在监控中心dubbo.registry.address=zookeeper://nxj:2181 其中nxj可以写成localhost,这是通过服务器内部发送的
【zk启动时默认有jetty会占用8080端口!,如果不想占,则百度(启动参数我不知道咋加....)】
zookeeper启动占用8080端口

GE12 2016-11-09 13:30:14  13445  收藏 8
分类专栏: zookeeper
版权
zookeeper最近的版本中有个内嵌的管理控制台是通过jetty启动,也会占用8080 端口。
通过查看zookeeper的官方文档,发现有3种解决途径:

(1).删除jetty。
(2)修改端口。
修改方法的方法有两种,一种是在启动脚本中增加 -Dzookeeper.admin.serverPort=你的端口号.一种是在zoo.cfg中增加admin.serverPort=没有被占用的端口号
(3)停用这个服务,在启动脚本中增加"-Dzookeeper.admin.enableServer=false"
————————————————
版权声明:本文为CSDN博主「GE12」的原创文章,遵循CC 4.0 BY-SA版权协议,转载请附上原文出处链接及本声明。
原文链接:https://blog.csdn.net/ZhongGuoZhiChuang/article/details/53098795
2.设置监控中心
cd /opt/fordubbo/zk
java -jar ...jar
从git上拉 master分支
然后修改配置文件dubbo.registry.address=zookeeper://nxj:2181
mvn clean package
打包完成后,java -jar启动jar包,访问nxj:7001 用户名与密码都是root
3.设置管理中心
同样的我们下载的压缩包中有三个maven项目,这个是dubbo-monitor-simple,同样打开它,cmd输入mvn clean package
打包失败原因是jdk版本,找到它父项目,搜索source将其改为1.8也就是本机 jdk版本,打包即可成功!
打包完成该,不要直接使用jar包,因为我们啥都没配置,我们使用将dubbo-monitor-simple-2.0.0-assembly.tar.gz解压
找到conf下dubbo.properties修改dubbo.registry.address=zookeeper://nxj:2181
这里的nxj指的是dubbo所在机器自己访问,因此需要在虚拟机内部配置nxj为本机ip【这是需要dubbo主机需要配置的,而不是我的主机需要配置的,因为这里跟我主机没有关系,完全是他们内部调用!】
修改完后,将其传入linux中,启动
提示权限不够,没关系,在bin下我们输入如下命令
chmod u+x *.sh

在./start.sh,成功了
将配置文件中的如下,改为8080,如果zk没有配置其内部jetty指向的端口的话,默认是8080,这样导致该服务不可用,因此我们这里改一下它的端口!
dubbo.jetty.port=8081
直接浏览器http://nxj:8081/ 即可访问(这个nxj代表dubbo所在机器的ip)
4.与Springboot整合
provider:
<!--dubbo-->
<dependency>
    <groupId>com.alibaba.boot</groupId>
    <artifactId>dubbo-spring-boot-starter</artifactId>
    <version>0.2.0</version>
</dependency>
<!--公共接口-->
<dependency>
    <groupId>com.nxj.dubbo</groupId>
    <artifactId>common-api</artifactId>
    <version>1.0-SNAPSHOT</version>
</dependency>
yml:
dubbo:
  application:
    name: boot-provider
  registry:
    protocol: zookeeper
    address: nxj:2181
  protocol:
    name: dubbo
    port: 20880
  monitor:
    protocol: registry
service.impl
@com.alibaba.dubbo.config.annotation.Service
@Service
public class UserServiceImpl implements UserService {
    @Override
    public List<User> getUser() {
        List<User> list = new ArrayList<>();
        list.add(new User(1L, "boot的张安", 23));
        list.add(new User(2L, "boot的李复", 28));
        return list;
    }
}
启动类上标注@EnableDubbo注解
consumer:
        <!--web模块-->
        <dependency>
            <groupId>org.springframework.boot</groupId>
            <artifactId>spring-boot-starter-web</artifactId>
        </dependency>
        <!--公共接口-->
        <dependency>
            <groupId>com.nxj.dubbo</groupId>
            <artifactId>common-api</artifactId>
            <version>1.0-SNAPSHOT</version>
        </dependency>
        <!--dubbo-->
        <dependency>
            <groupId>com.alibaba.boot</groupId>
            <artifactId>dubbo-spring-boot-starter</artifactId>
            <version>0.2.0</version>
        </dependency>
yml:
dubbo:
  application:
    name: boot-consumer
  registry:
    protocol: zookeeper
    address: nxj:2181
  monitor:
    protocol: registry
service:
@Controller
public class OrderController {

    // 从远程地址中查找服务!
    @Reference
    UserService userService;

    @ResponseBody
    @RequestMapping("/au")
    public List<User> getAllUser(){
        List<User> user = userService.getUser();
        return user;
    }
}
启动类上标注@EnableDubbo注解
总之就是provider通过dubbo的@Service暴露接口,consumer通过dubbo的@Reference查找服务
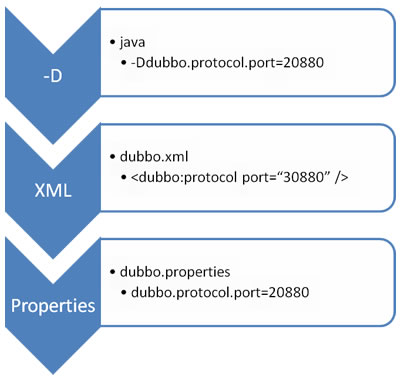
5.配置优先顺序
https://dubbo.apache.org/zh/docs/v2.7/user/configuration/properties/
在vm参数中添加:-Ddubbo.protocol.port=20880
在application.properties
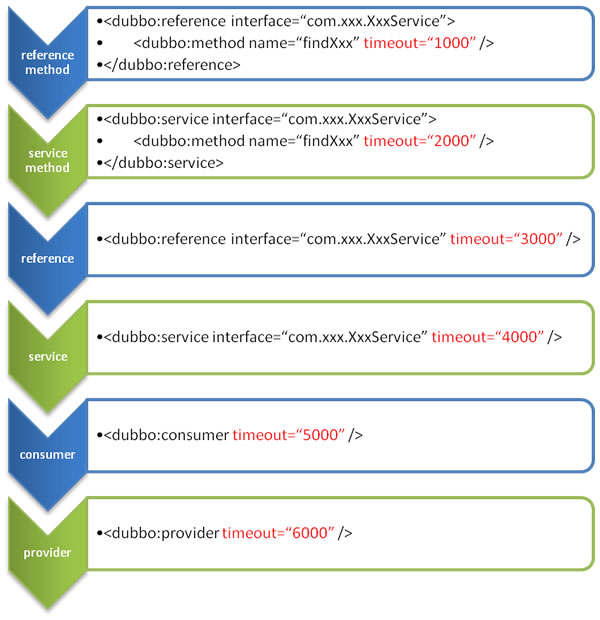
6.超时设置:
timeout,目的是为了防止调用返回时长过长,导致大量线程阻塞,一旦超过这个时间没有返回结果则直接停止该线程
<!--设置当前consumer的模式属性配置-->
<dubbo:consumer timeout="2000"/>
retries 次数,设置重试的次数,第一次调用不算
7.version
provider:
@com.alibaba.dubbo.config.annotation.Service(version="1.0.0")
@Service
public class UserServiceImpl implements UserService {
    @Override
    public List<User> getUser() {
        List<User> list = new ArrayList<>();
        list.add(new User(1L, "boot的张安v1", 23));
        list.add(new User(2L, "boot的李复v1", 28));
        return list;
    }
}
@com.alibaba.dubbo.config.annotation.Service(version="2.0.0") @Service public class UserServiceImpl2 implements UserService { @Override public List<User> getUser() { List<User> list = new ArrayList<>(); list.add(new User(1L, "boot的张安v1", 23)); list.add(new User(2L, "boot的李复v1", 28)); return list; } }consumer:
// 从远程地址中查找服务!
// *就是随便找一个版本,如果指定则按照指定的找(如果提供方指定版本,这里必须指定,否则找不到无法发现服务)
@Reference(version = "*")
UserService userService;
8.SpringBoot与Dubbo整合3种方式
其一就是上方,引入stater,使用@Service暴露服务,使用@Reference引入服务,在启动类上标注@EnableDubbo开启包扫描即可
其二是编写dubbo的配置文件如,provider.xml,在启动类上标注@ImportResource引入
@ImportResource(locations:"classpath:provider.xml")
其三是使用注解API的方式
https://dubbo.apache.org/zh/docs/v2.7/user/configuration/configuration-load-process/#spring-xml
https://dubbo.apache.org/zh/docs/v2.7/user/configuration/api/
但是我们使用配置类去写
@Configuration
public class MyDubboConfig {

    @Bean
    public ApplicationConfig applicationConfig(){
        ApplicationConfig applicationConfig = new ApplicationConfig();
        applicationConfig.setName("boot-consumer");
        return applicationConfig;
    }

    @Bean
    public RegistryConfig registryConfig(){
        RegistryConfig registryConfig = new RegistryConfig();
        registryConfig.setProtocol("zookeeper");
        registryConfig.setAddress("nxj:2181");
        return registryConfig;
    }

    @Bean
    public ServiceConfig<UserService> userServiceService(@Autowired UserService userService){
        ServiceConfig<UserService> serviceService = new ServiceConfig<>();
        serviceService.setInterface(UserService.class);
        serviceService.setRef(userService);
        serviceService.setVersion("1.0.0");

        MethodConfig methodConfig = new MethodConfig();
        methodConfig.setName("getUser");
        methodConfig.setTimeout(1000);
        serviceService.setMethods(Arrays.asList(methodConfig));
        return serviceService;
    }
}
在主配置类上写 @EnableDubbo(scanBasePackages="扫描包的路径")就是对应每个dubbo的标签,都有相应的XXXconfig,
这样对于更加细致的,如某个标签里面如service嵌套method更详情规则的指定是可以实现的,属性可以@EnableProperties来拿
9.高可用
当调用一次后注册中心挂掉了,仍然可以调用成功,因为有本地缓存保证了高可用(注册中心的集群也是保证高可用!)
我们也可以通过直连的方式,这样就不经过注册中心了(这个测试阶段会用吧,正常现场应该还是走注册中心)
// 从远程地址中查找服务!
// *就是随便找一个版本,如果指定则按照指定的找(如果提供方指定版本,这里必须指定,否则找不到无法发现服务)
// 使用url就不能写version="*"了,意思是找版本为*的,但是我们没有!
@Reference(version = "1.0.0", stub = "com.codejiejie.service.impl.UserServiceStub", url = "169.254.104.165:20880")
UserService userService;
10.集群下dubbo负载均衡机制
https://dubbo.apache.org/zh/docs/v2.7/user/examples/loadbalance/
4种负载均衡策略
我们搭建3个provider进行测试!
分别端口20880 20881 20882
发现默认dubbo是有随机的负载均衡策略的!
// loadbalance设置负载均衡机制,默认是随机的,通过LoadBalance可以发现它的实现由有【random(随机),leastactive(最少活跃调用数),roundrobin(轮询)】
@Reference(version = "1.0.0", stub = "com.codejiejie.service.impl.UserServiceStub"/*, url = "169.254.104.165:20880"*/, loadbalance = "roundrobin")
UserService userService;
相应权重可以在暴露服务的@Service中(weight指定)
也可以在Dubbo Admin中动态指定,可以倍权,半权这样
11.服务降级
这些也可以在控制台来做(控制台指的就是Dubbo Admin)
在消费端,那边有屏蔽 和 容错
屏蔽:不发起远程调用,直接本地返回null;
容错:发起远程调用,但在发生错误时,返回null
12.集群容错
https://dubbo.apache.org/zh/docs/v2.7/user/examples/fault-tolerent-strategy/
Failover Cluster
失败自动切换,当出现失败,重试其它服务器。通常用于读操作,但重试会带来更长延迟。可通过
retries="2"来设置重试次数(不含第一次)。重试次数配置如下:
<dubbo:service retries="2" />或
<dubbo:reference retries="2" />或
<dubbo:reference>
    <dubbo:method name="findFoo" retries="2" />
</dubbo:reference>
提示
该配置为缺省配置
Failfast Cluster
快速失败,只发起一次调用,失败立即报错。通常用于非幂等性的写操作,比如新增记录。
Failsafe Cluster
失败安全,出现异常时,直接忽略。通常用于写入审计日志等操作。
Failback Cluster
失败自动恢复,后台记录失败请求,定时重发。通常用于消息通知操作。
Forking Cluster
并行调用多个服务器,只要一个成功即返回。通常用于实时性要求较高的读操作,但需要浪费更多服务资源。可通过
forks="2"来设置最大并行数。Broadcast Cluster
广播调用所有提供者,逐个调用,任意一台报错则报错。通常用于通知所有提供者更新缓存或日志等本地资源信息。
现在广播调用中,可以通过 broadcast.fail.percent 配置节点调用失败的比例,当达到这个比例后,BroadcastClusterInvoker 将不再调用其他节点,直接抛出异常。 broadcast.fail.percent 取值在 0~100 范围内。默认情况下当全部调用失败后,才会抛出异常。 broadcast.fail.percent 只是控制的当失败后是否继续调用其他节点,并不改变结果(任意一台报错则报错)。broadcast.fail.percent 参数 在 dubbo2.7.10 及以上版本生效。
Broadcast Cluster 配置 broadcast.fail.percent。
broadcast.fail.percent=20 代表了当 20% 的节点调用失败就抛出异常,不再调用其他节点。
@reference(cluster = "broadcast", parameters = {"broadcast.fail.percent", "20"})
使用Hystrix来做容错!
导入pom后启动,报错,原因未知,网上查说是版本原因,我换了几个也不行,先这样吧,后面cloud阶段学一学
provider:
<!--集群容错:hystrix-->
<dependency>
    <groupId>org.springframework.cloud</groupId>
    <artifactId>spring-cloud-starter-netflix-hystrix</artifactId>
    <version>2.2.2.RELEASE</version>
</dependency>
启动类上标注@EnableHystrix // 开启服务容错
调用的方法上标注:@HystrixCommand,示例如下:
@HystrixCommand
@Override
public List<User> getUser() {
    List<User> list = new ArrayList<>();
    list.add(new User(1L, "boot的张安v1-我是u1", 23));
    list.add(new User(2L, "boot的李复v1-我是u1", 28));
    if (Math.random() > 0.5) throw new RuntimeException("nxj模拟出了个异常");
    return list;
}
consumer:
<!--集群容错:hystrix-->
<dependency>
    <groupId>org.springframework.cloud</groupId>
    <artifactId>spring-cloud-starter-netflix-hystrix</artifactId>
    <version>2.2.2.RELEASE</version>
</dependency>
启动类上标注@EnableHystrix // 开启服务容错
方法上标注:@HystrixCommand(fallbackMethod = "ouHouError")
ouHouError就是在出错时,调用哪个方法进行返回

