
在日常使用Spring框架的业务开发中,利用框架提供的扩展点完成某些功能的设计是很常见的,了解这些扩展点的原理也对理解框架非常有帮助。这里做一个简单的整理、总结。
1. BeanPostProcessor
BeanPostProcessor 接口定义了基本的Bean初始化回调方法,可以实现对应的回调方法来在Spring容器完成Bean的实例化、初始化前后实现某些自定义逻辑。
一段来自注释中的翻译:
ApplicationContext可以在其 beanDefinitions 中自动检测框架中预置和我们自行扩展的BeanPostProcessor,并将这些后处理器应用于随后创建的任何 bean。
在ApplicationContext中自动检测的BeanPostProcessor bean 将根据PriorityOrdered和Ordered语义进行排序。 相比之下,以编程方式注册到BeanFactory BeanPostProcessor bean 将按注册顺序应用; 对于以编程方式注册的后处理器,通过实现PriorityOrdered或Ordered接口表达的任何排序语义都将被忽略。
所谓的编程方式就是说通过手动调用BeanFactory的addBeanPostProcessor方法进行添加BeanPostProcessor。
下面是BeanPostProcessor的接口定义。
public interface BeanPostProcessor {

	@Nullable
	default Object postProcessBeforeInitialization(Object bean, String beanName) throws BeansException {
		return bean;
	}

	@Nullable
	default Object postProcessAfterInitialization(Object bean, String beanName) throws BeansException {
		return bean;
	}

}
1.1 BeanPostProcessor 基本示例:
下面这个PersonBeanPostProcessor 对于每一个完成实例化的Bean判断其 BeanName ,如果与 person相等就打印一行日志
@Component
public class Person {
    private Integer id;
    private String name;
	//省略 Getter、Setter
}

@Component
public class PersonBeanPostProcessor implements BeanPostProcessor {
    private final Logger logger = LoggerFactory.getLogger(PersonBeanPostProcessor.class);

    @Override
    public Object postProcessAfterInitialization(Object bean, String beanName) throws BeansException {
        if ("person".equals(beanName)) {
            logger.info("person完成实例化");
        }
        return null;
    }
}

//启动应用:
  .   ____          _            __ _ _
 /\ / ___'_ __ _ _(_)_ __  __ _
( ( )\___ | '_ | '_| | '_ / _` |
 \/  ___)| |_)| | | | | || (_| |  ) ) ) )
  '  |____| .__|_| |_|_| |_\__, | / / / /
 =========|_|==============|___/=/_/_/_/
 :: Spring Boot ::        (v2.3.8.RELEASE)

2021-06-24 07:40:41.126  INFO 27308 --- [           main] com.landscape.spring.Application         : No active profile set, falling back to default profiles: default
2021-06-24 07:40:41.508  INFO 27308 --- [           main] c.l.spring.bean.PersonBeanPostProcessor  : person完成实例化
2021-06-24 07:40:41.592  INFO 27308 --- [           main] com.landscape.spring.Application         : Started Application in 0.939 seconds (JVM running for 2.145)
可以看到,第二行日志中自定义的 BeanPostProcessor 生效并按照预期的打印出了日志。
1.2 BeanPostProcessor 实际使用
从一个简单的示例可能无法感受到它能在实际的开发中做什么,现在找一点实际的例子来看BeanPostProcessor的用处。一个非常简单且有效的例子是Spring Validation包下的 BeanValidationPostProcessor,它负责对Spring中的实例化的Bean做JSR-303的注解校验,如果违反了校验规则就抛出异常。
public class BeanValidationPostProcessor implements BeanPostProcessor, InitializingBean {

	@Nullable
	private Validator validator;
    //省略主题无关的代码

    //通过一个变量 afterInitialization 来判断是在初始化前还是在初始化后做判断
	@Override
	public Object postProcessBeforeInitialization(Object bean, String beanName) throws BeansException {
		if (!this.afterInitialization) {
			doValidate(bean);
		}
		return bean;
	}

	@Override
	public Object postProcessAfterInitialization(Object bean, String beanName) throws BeansException {
		if (this.afterInitialization) {
			doValidate(bean);
		}
		return bean;
	}

	/**
	 * Perform validation of the given bean.
	 * @param bean the bean instance to validate
	 * @see javax.validation.Validator#validate
	 */
	protected void doValidate(Object bean) {
		//省略主题无关的代码
	}

}
不过这个处理器并不是默认注入到容器的,所以需要我们手动配置:
@Configuration
public class BeanValidationConfiguration {

    @Bean
    public BeanValidationPostProcessor beanValidationPostProcessor() {
        return new BeanValidationPostProcessor();
    }
}
现在写一个带有JSR-303注解的实体类:
@Component
@Scope(BeanDefinition.SCOPE_PROTOTYPE)
public class Person {
    @Min(1)
    @NotNull
    private Integer id;
    @NotBlank
    private String name;
    @NotBlank
    private String address;

    private LocalDateTime birthday;

    public Person() {
    }
}

//由于这个Bean的作用域被设置为 prototype ,所以必须要手动获取才会触发实例化:
public static void main(String[] args) {
    ConfigurableApplicationContext context = SpringApplication.run(SpringBootContainer.class, args);
    System.out.println(context.getBean(Person.class));
}

//运行后抛出异常:
	at org.springframework.beans.factory.support.AbstractAutowireCapableBeanFactory.doCreateBean(AbstractAutowireCapableBeanFactory.java:602)
	at org.springframework.beans.factory.support.AbstractAutowireCapableBeanFactory.createBean(AbstractAutowireCapableBeanFactory.java:516)
	at org.springframework.beans.factory.support.AbstractBeanFactory.doGetBean(AbstractBeanFactory.java:342)
	at org.springframework.beans.factory.support.AbstractBeanFactory.getBean(AbstractBeanFactory.java:227)
	at org.springframework.beans.factory.support.DefaultListableBeanFactory.resolveNamedBean(DefaultListableBeanFactory.java:1175)
	at org.springframework.beans.factory.support.DefaultListableBeanFactory.resolveBean(DefaultListableBeanFactory.java:420)
	at org.springframework.beans.factory.support.DefaultListableBeanFactory.getBean(DefaultListableBeanFactory.java:349)
	at org.springframework.beans.factory.support.DefaultListableBeanFactory.getBean(DefaultListableBeanFactory.java:342)
	at org.springframework.context.support.AbstractApplicationContext.getBean(AbstractApplicationContext.java:1127)
	at com.landscape.demo.SpringBootContainer.main(SpringBootContainer.java:19)
Caused by: org.springframework.beans.factory.BeanInitializationException: Bean state is invalid: Bean state is invalid: address - 不能为空; name - 不能为空; id - 不能为null
	at org.springframework.validation.beanvalidation.BeanValidationPostProcessor.doValidate(BeanValidationPostProcessor.java:127)
	at
如果稍微改变一下代码,给实体类属性加上默认值即可通过校验。同理,在实际的开发中,也可以使用BeanPostProcessor类似的进行Bean校验、设值、扫包等操作。
1.3 BeanPostProcessor 的调用时机
1.3.1 BeanPostProcessor
现在来看一些原理上的细节。首先,BeanPostProcessor 的实现方法是在什么时候进行回调的?下图是整体Spring Bean的实例化过程,而红框标注的部分就是 BeanPostProcessor 的调用
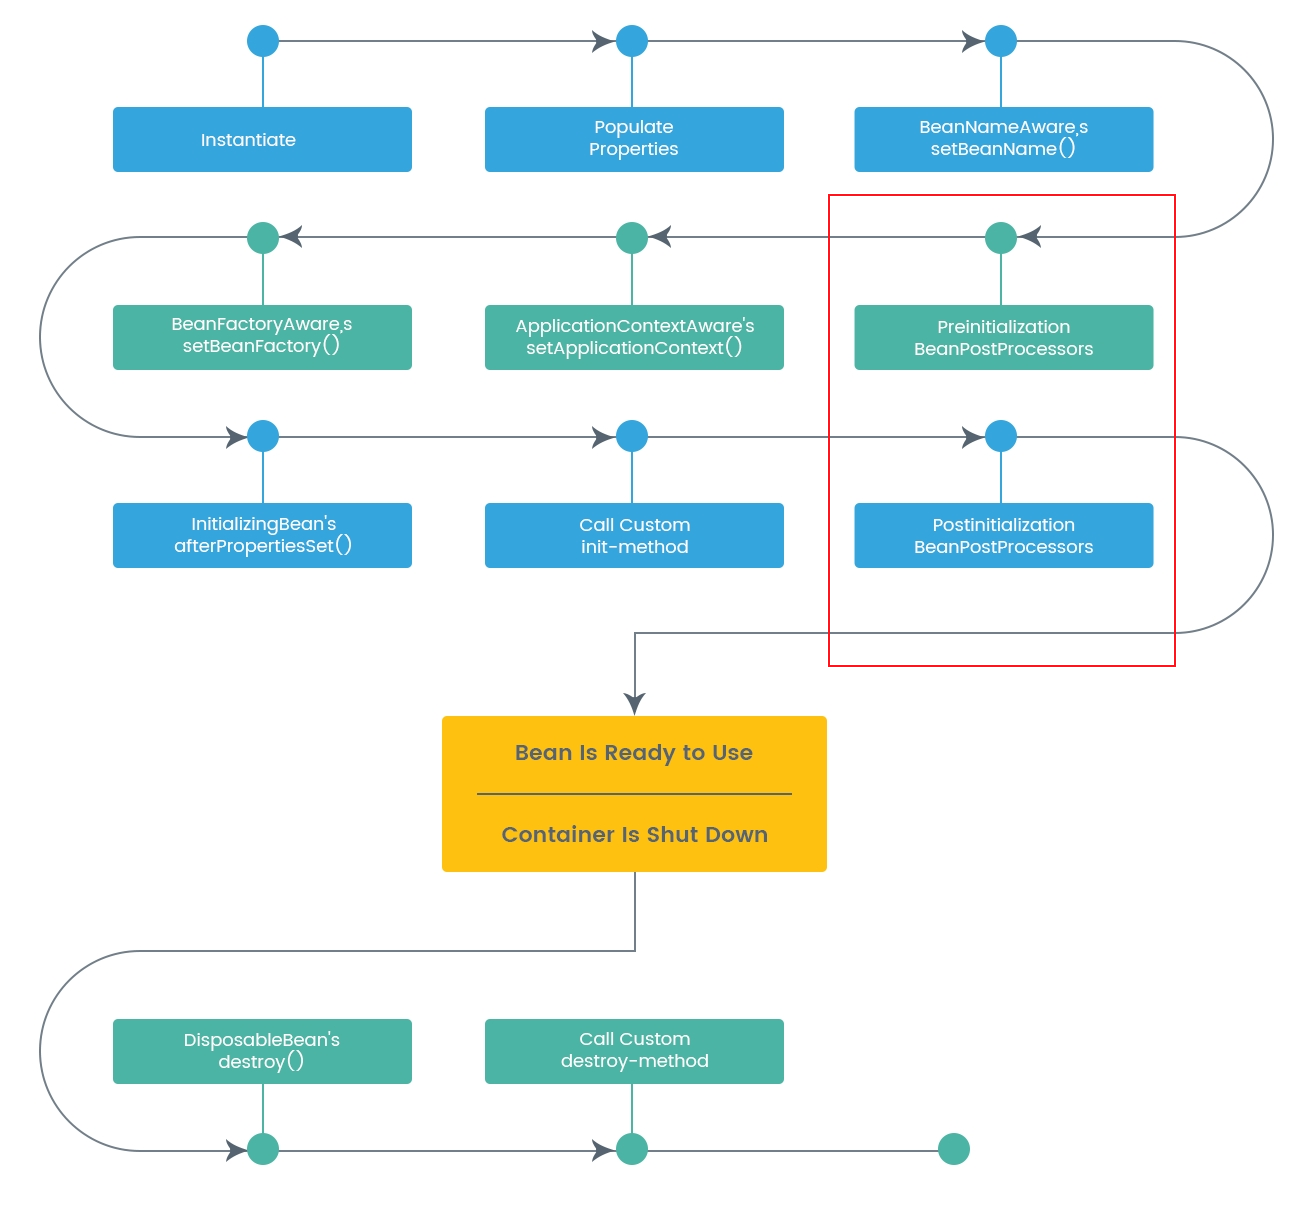
图片来源:Hands-On High Performance with Spring 5
结合着Spring源码来看:
//org.springframework.beans.factory.support.AbstractAutowireCapableBeanFactory#doCreateBean
//这里是Spring框架运行过程中创建Bean的方法
protected Object doCreateBean(String beanName, RootBeanDefinition mbd, @Nullable Object[] args)
    throws BeanCreationException {

    // Instantiate the bean.
    //省略前面创建Bean的过程

    // Initialize the bean instance.
    Object exposedObject = bean;
    try {
        //这里是填充Bean的属性
        populateBean(beanName, mbd, instanceWrapper);
        //执行Bean的初始化过程,BeanPostProcessor在这里被调用
        exposedObject = initializeBean(beanName, exposedObject, mbd);
    }
    //省略主题无关的代码

    return exposedObject;
}

//下面是initializeBean方法内部的逻辑
protected Object initializeBean(String beanName, Object bean, @Nullable RootBeanDefinition mbd) {
    if (System.getSecurityManager() != null) {
        AccessController.doPrivileged((PrivilegedAction<Object>) () -> {
            invokeAwareMethods(beanName, bean);
            return null;
        }, getAccessControlContext());
    }
    else {
        invokeAwareMethods(beanName, bean);
    }

    Object wrappedBean = bean;
    if (mbd == null || !mbd.isSynthetic()) {
        //这里执行了BeanPostProcessor的 postProcessBeforeInitialization方法
        wrappedBean = applyBeanPostProcessorsBeforeInitialization(wrappedBean, beanName);
    }

    try {
        invokeInitMethods(beanName, wrappedBean, mbd);
    }
    catch (Throwable ex) {
        throw new BeanCreationException(
            (mbd != null ? mbd.getResourceDescription() : null),
            beanName, "Invocation of init method failed", ex);
    }
    if (mbd == null || !mbd.isSynthetic()) {
        //这里执行了BeanPostProcessor的 postProcessAfterInitialization方法
        wrappedBean = applyBeanPostProcessorsAfterInitialization(wrappedBean, beanName);
    }

    return wrappedBean;
}
另外 BeanPostProcessor 还有一些比较重要的子接口,Spring官方并不推荐我们使用这些子接口,因为大多属于内置功能,不过了解一下也对理解框架原理很有帮助。来看一下各自的作用和源码中的调用位置:
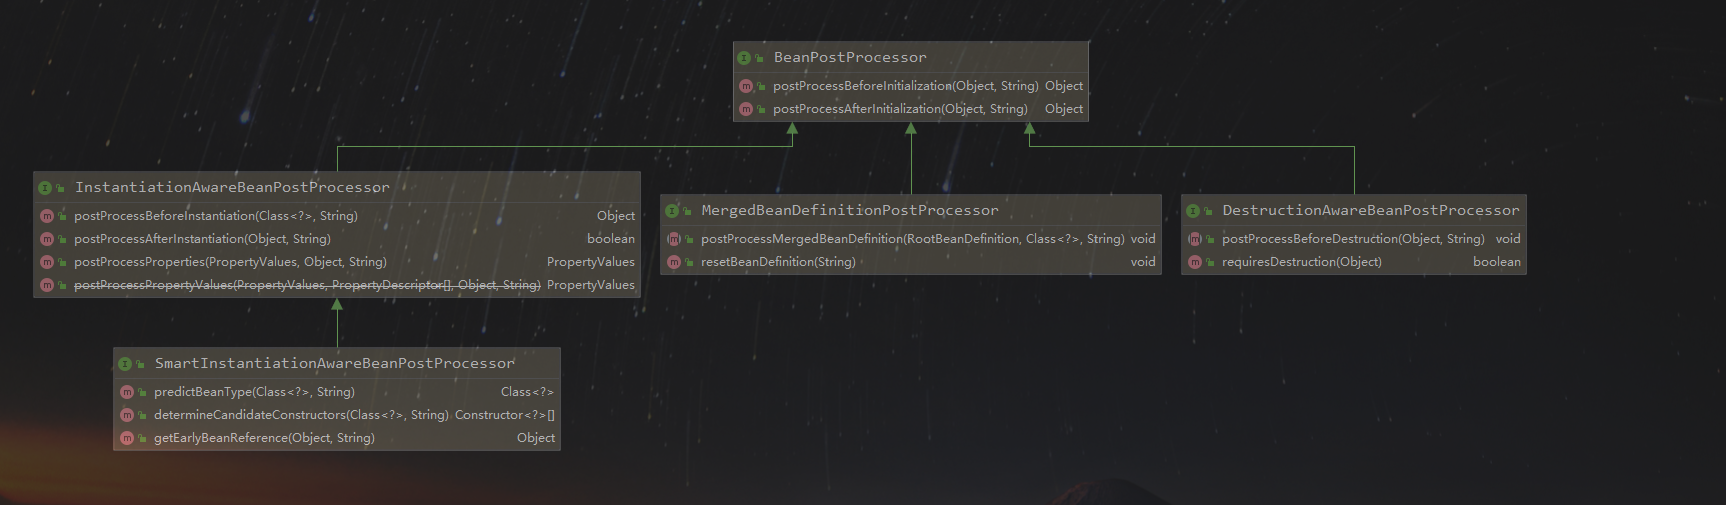
1.3.2 InstantiationAwareBeanPostProcessor
BeanPostProcessor子接口,用于添加实例化前回调,以及实例化后但在设置显式属性或自动装配之前的回调。从名字上就能看出来是与Bean的实例化相关的处理器。之所以这里重点介绍这个接口是因为AOP不少相关的类都是这个通过这个接口来返回代理对象的。
通常用于抑制特定目标 bean 的默认实例化,例如创建具有特殊 TargetSource 的代理(池化目标、延迟初始化目标等),或实现额外的注入策略,例如字段注入。Spring文档中并没有提到这个接口,因为该接口是一个特殊用途的接口,主要供框架内部使用。
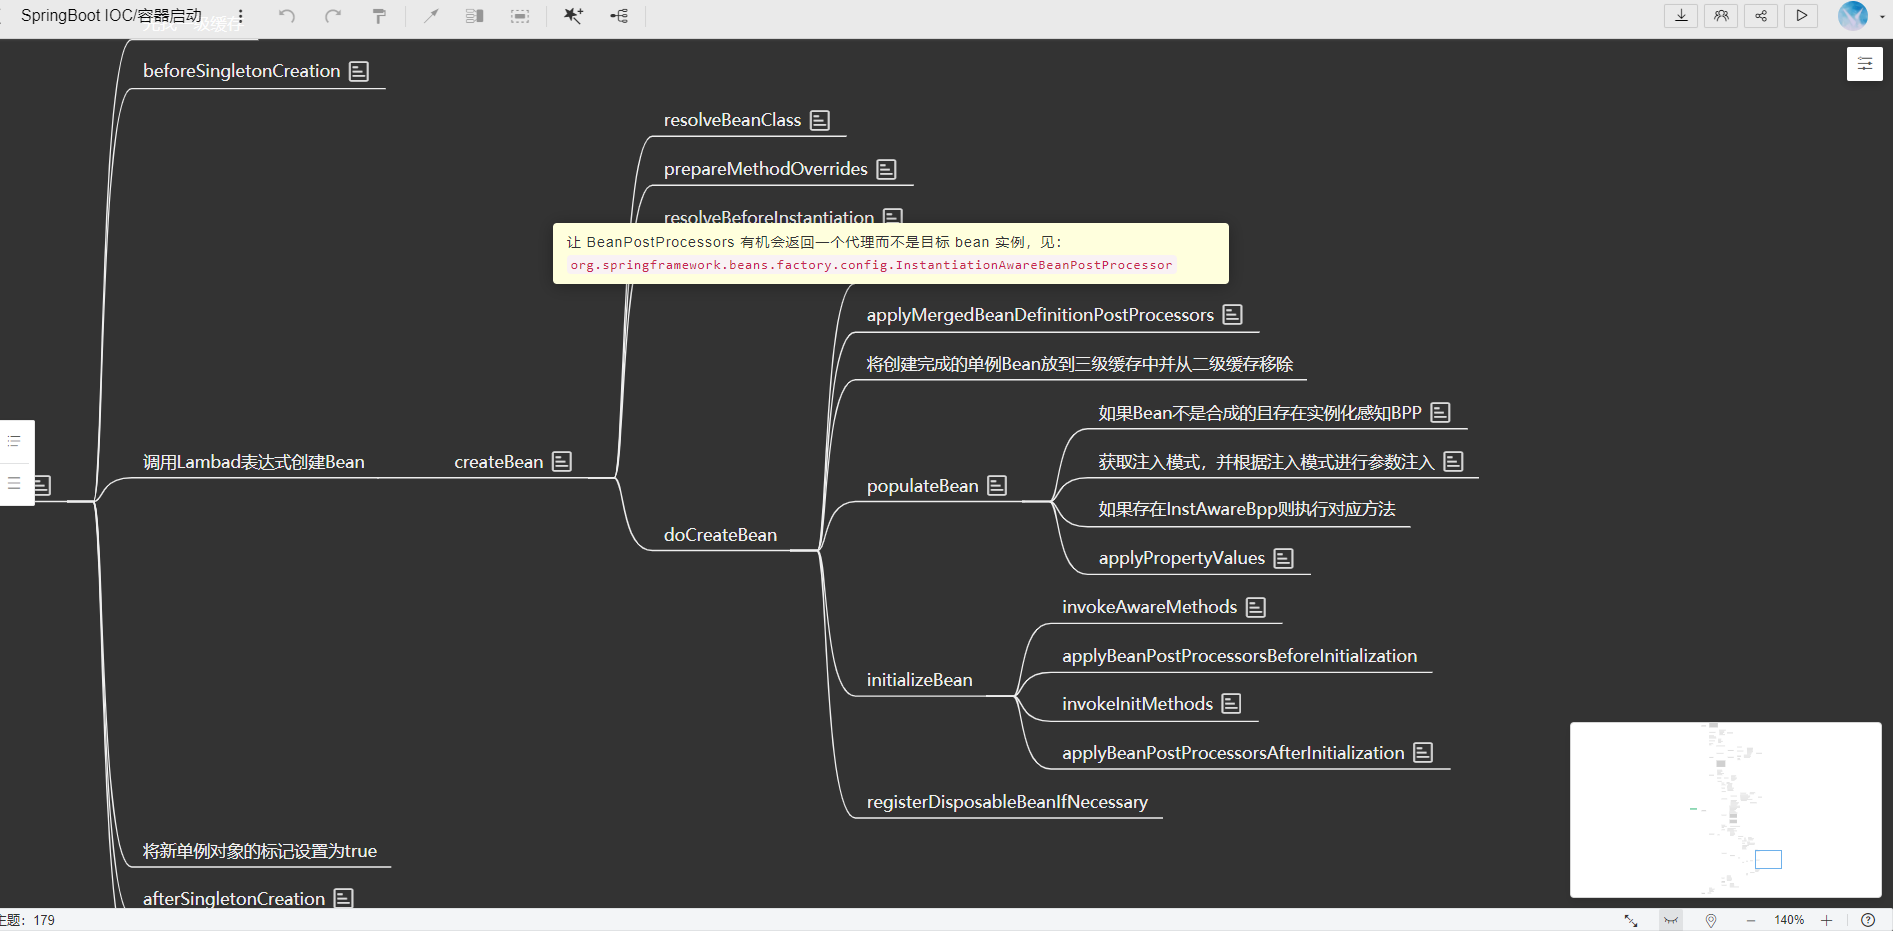
逻辑上该接口的postProcessBeforeInstantiation方法调用处于下图位置(真正实例化Bean之前)(自己整理的思维导图,截了一小部分,可能不是很全面= =)
从代码中看则位于:
//org.springframework.beans.factory.support.AbstractAutowireCapableBeanFactory#createBean()
protected Object createBean(String beanName, RootBeanDefinition mbd, @Nullable Object[] args)
    throws BeanCreationException {

    //省略主题无关代码
    //resolveBeanClass
    //prepareMethodOverrides

    try {
        // InstantiationAwareBeanPostProcessor 接口的调用在这里,下面这行注释也解释的很清楚了
        // 给BeanPostProcessors一个返回代理而不是目标bean实例的机会。
        // Give BeanPostProcessors a chance to return a proxy instead of the target bean instance.
        Object bean = resolveBeforeInstantiation(beanName, mbdToUse);
        if (bean != null) {
            return bean;
        }
    }

    //如果没有相关的InstantiationAwareBeanPostProcessor返回作为替代的Bean则立即进入实际的创建Bean过程
    try {
        Object beanInstance = doCreateBean(beanName, mbdToUse, args);
        if (logger.isTraceEnabled()) {
            logger.trace("Finished creating instance of bean '" + beanName + "'");
        }
        return beanInstance;
    }
    //省略异常处理

}

//进入到resolveBeforeInstantiation方法体中:
//org.springframework.beans.factory.support.AbstractAutowireCapableBeanFactory#resolveBeforeInstantiation
protected Object resolveBeforeInstantiation(String beanName, RootBeanDefinition mbd) {
    Object bean = null;
    if (!Boolean.FALSE.equals(mbd.beforeInstantiationResolved)) {
        // Make sure bean class is actually resolved at this point.
        if (!mbd.isSynthetic() && hasInstantiationAwareBeanPostProcessors()) {
            Class<?> targetType = determineTargetType(beanName, mbd);
            if (targetType != null) {
                //可以看到如果Bean在这一步如果被代理对象替代则立即进入到 AfterInitialization 的后处理中
                //因为不会继续标准化的实例化流程了
                bean = applyBeanPostProcessorsBeforeInstantiation(targetType, beanName);
                if (bean != null) {
                    bean = applyBeanPostProcessorsAfterInitialization(bean, beanName);
                }
            }
        }
        mbd.beforeInstantiationResolved = (bean != null);
    }
    return bean;
}
而 postProcessAfterInstantiation 方法的调用则处于属性填充之前,这是在Spring的自动装配开始之前,在给定的bean实例上执行自定义字段注入的理想回调。(这个方法的返回值是 boolean类型,用于告诉Spring是否应该继续后续的属性填充过程)
//org.springframework.beans.factory.config.InstantiationAwareBeanPostProcessor#postProcessAfterInstantiation
default boolean postProcessAfterInstantiation(Object bean, String beanName) throws BeansException {
    return true;
}
逻辑视图处于属性填充方法的开始部分,如果返回值为false 则不会进行后面的属性注入
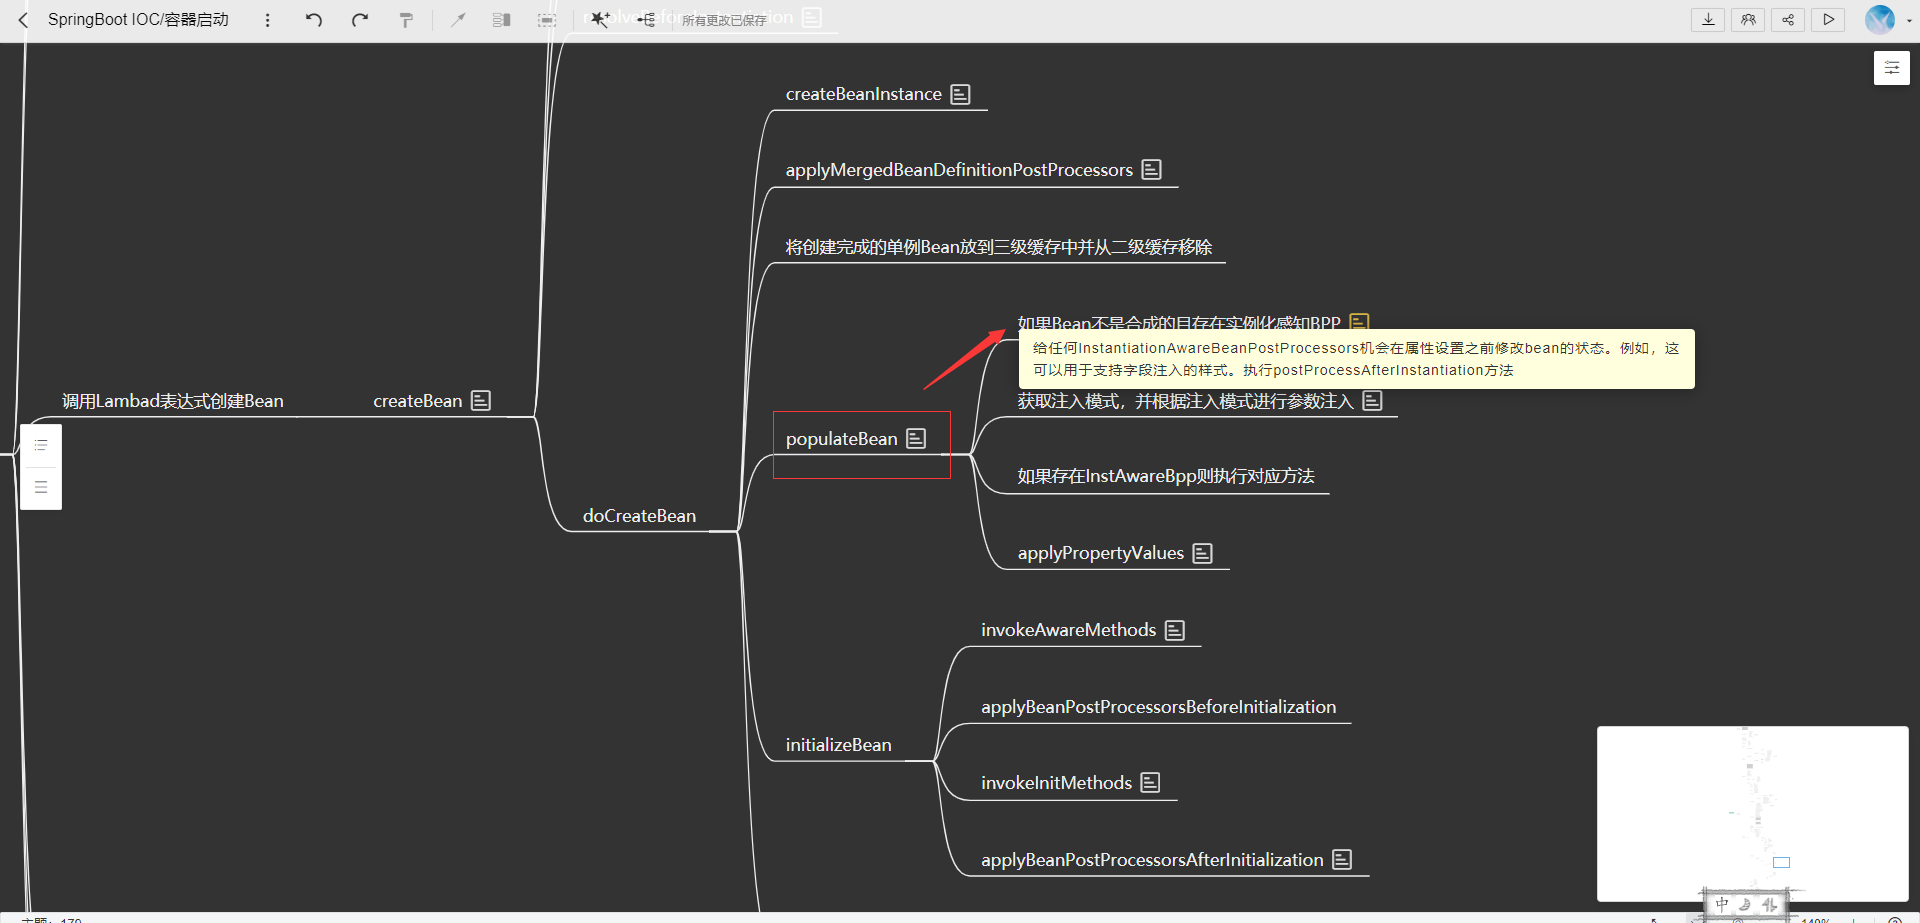
代码视图如下:
//org.springframework.beans.factory.support.AbstractAutowireCapableBeanFactory#populateBean
protected void populateBean(String beanName, RootBeanDefinition mbd, @Nullable BeanWrapper bw) {

    // 给任何InstantiationAwareBeanPostProcessors 一个机会在属性设置之前修改bean的状态。
    // 例如,这可以用于支持字段注入的样式。
    // Give any InstantiationAwareBeanPostProcessors the opportunity to modify the
    // state of the bean before properties are set. This can be used, for example,
    // to support styles of field injection.
    if (!mbd.isSynthetic() && hasInstantiationAwareBeanPostProcessors()) {
        for (BeanPostProcessor bp : getBeanPostProcessors()) {
            if (bp instanceof InstantiationAwareBeanPostProcessor) {
                InstantiationAwareBeanPostProcessor ibp = (InstantiationAwareBeanPostProcessor) bp;
                //在这里进行 postProcessAfterInstantiation 方法的调用
                if (!ibp.postProcessAfterInstantiation(bw.getWrappedInstance(), beanName)) {
                    return;
                }
            }
        }
    }
    //这里省略了一段属性填充的过程
    PropertyDescriptor[] filteredPds = null;
    if (hasInstAwareBpps) {
        if (pvs == null) {
            pvs = mbd.getPropertyValues();
        }
        //下面这一部分分别调用了 postProcessProperties 和 postProcessPropertyValues 方法
        for (BeanPostProcessor bp : getBeanPostProcessors()) {
            if (bp instanceof InstantiationAwareBeanPostProcessor) {
                InstantiationAwareBeanPostProcessor ibp = (InstantiationAwareBeanPostProcessor) bp;
                PropertyValues pvsToUse = ibp.postProcessProperties(pvs, bw.getWrappedInstance(), beanName);
                if (pvsToUse == null) {
                    if (filteredPds == null) {
                        filteredPds = filterPropertyDescriptorsForDependencyCheck(bw, mbd.allowCaching);
                    }
                    pvsToUse = ibp.postProcessPropertyValues(pvs, filteredPds, bw.getWrappedInstance(), beanName);
                    if (pvsToUse == null) {
                        return;
                    }
                }
                pvs = pvsToUse;
            }
        }
    }
    if (needsDepCheck) {
        if (filteredPds == null) {
            filteredPds = filterPropertyDescriptorsForDependencyCheck(bw, mbd.allowCaching);
        }
        checkDependencies(beanName, mbd, filteredPds, pvs);
    }

    if (pvs != null) {
        applyPropertyValues(beanName, mbd, bw, pvs);
    }
}
1.3.3 其他子接口
-
DestructionAwareBeanPostProcessor 用于添加销毁前回调的BeanPostProcessor子接口。典型的用法是在特定的 bean 类型上调用自定义销毁回调,匹配相应的初始化回调。实现方法将在Bean的destroy方法之前被调用。
-
MergedBeanDefinitionPostProcessor 运行时合并bean 定义的后处理器回调接口。 BeanPostProcessor实现可以实现这个子接口,以便对 Spring BeanFactory用来创建 bean 实例的合并 bean 定义(原始 bean 定义的处理副本)进行后处理。
1.4 BeanPostProcessor本身的实例化时机
同样是被标记 @Component 注解或者以其他方式被声明为一个Bean,Spring如何保证 BeanPostProcessor 的实现能处理到每一个Bean?
首先,BeanPostProcessor 本身是在容器刷新时被初始化:
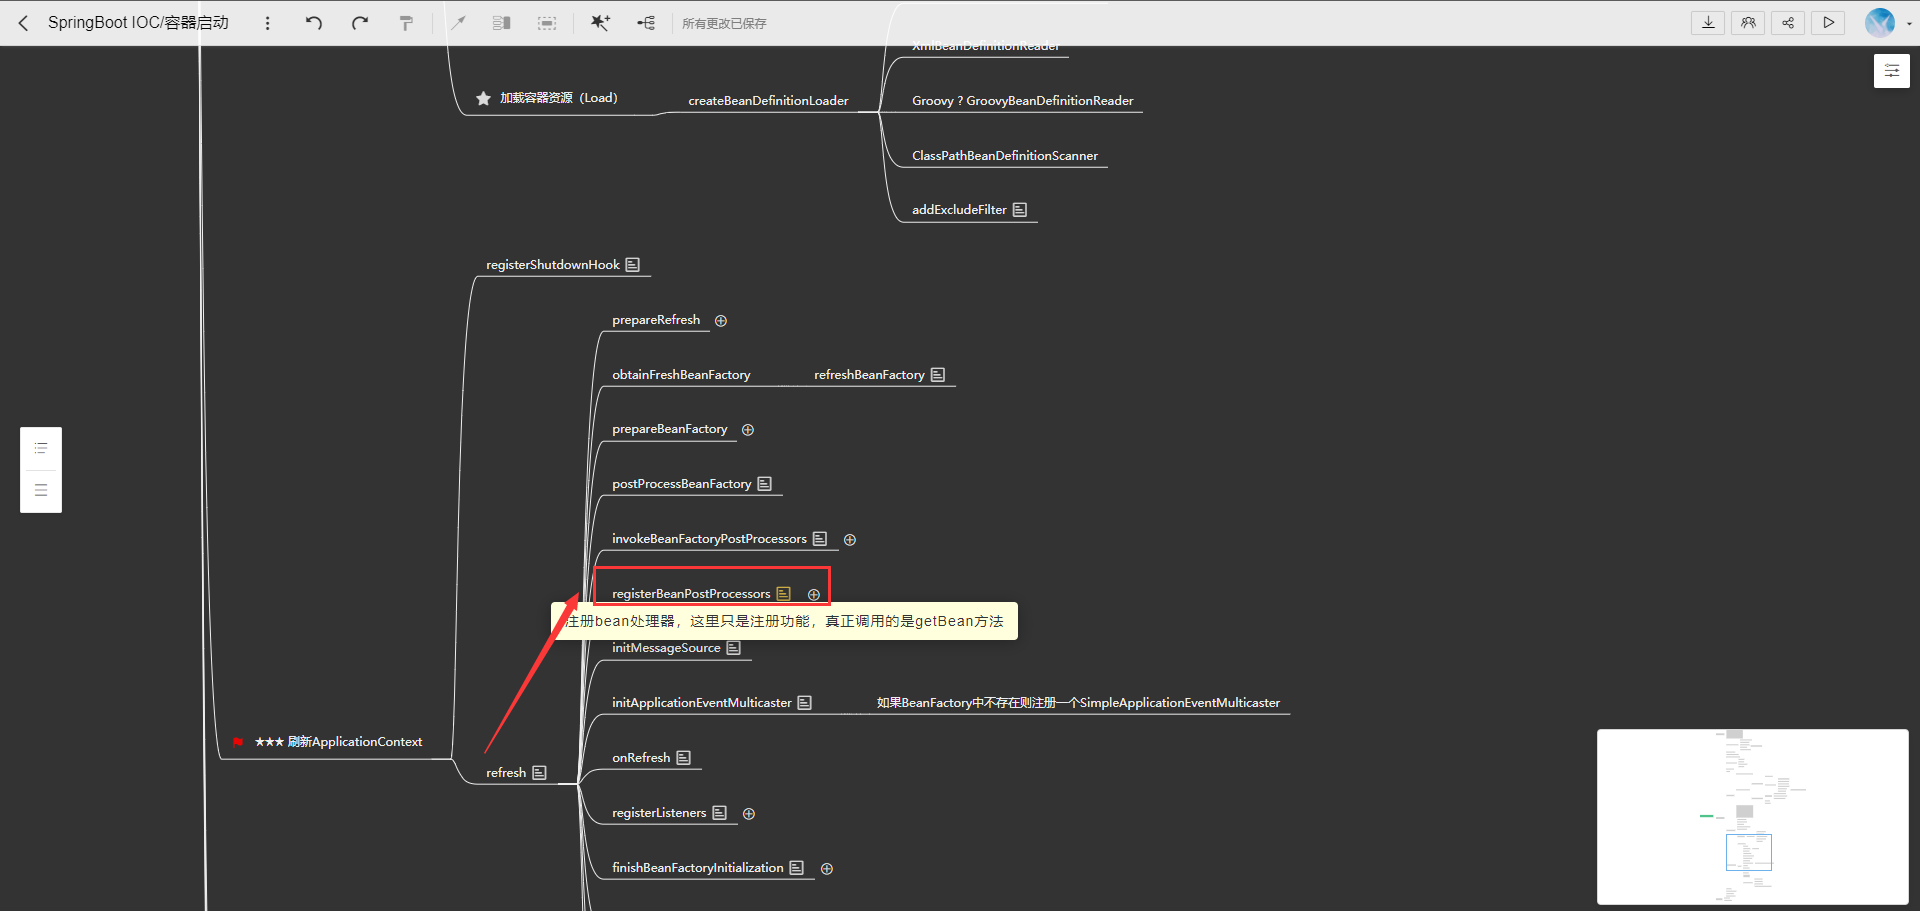
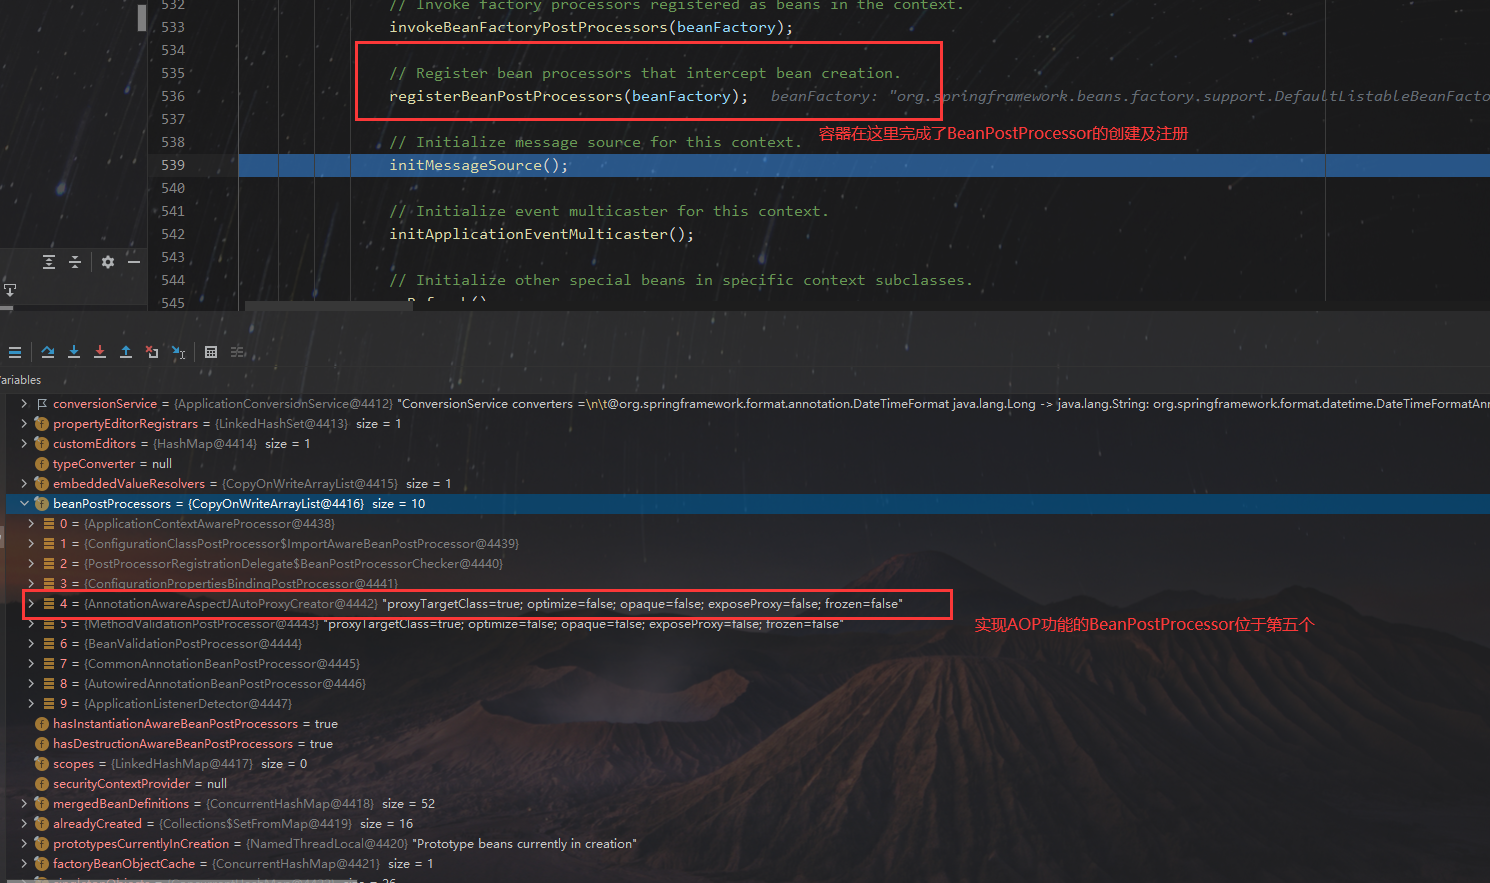
而在代码中实际调用的是 PostProcessorRegistrationDelegate 的 registerBeanPostProcessors 的方法:
public static void registerBeanPostProcessors(
      ConfigurableListableBeanFactory beanFactory, AbstractApplicationContext applicationContext) {

   String[] postProcessorNames = beanFactory.getBeanNamesForType(BeanPostProcessor.class, true, false);

   // Register BeanPostProcessorChecker that logs an info message when
   // a bean is created during BeanPostProcessor instantiation, i.e. when
   // a bean is not eligible for getting processed by all BeanPostProcessors.
   int beanProcessorTargetCount = beanFactory.getBeanPostProcessorCount() + 1 + postProcessorNames.length;
   beanFactory.addBeanPostProcessor(new BeanPostProcessorChecker(beanFactory, beanProcessorTargetCount));

	//篇幅问题,省略下面的方法
}
这个方法内看着步骤挺多的,事实上只是对BeanPostProcessor进行有序注册,步骤为:
- 获取所有BeanPostProcessor的Name
- 将内建的BeanPostProcessor和应用程序的BeanPostProcessor进行计数+1(计数+1是因为紧接着添加了一个BeanPostProcessorChecker,这个类本身也是一个BeanPostProcessor)
- 注册所有实现了PriorityOrdered 的BeanPostProcessor
- 注册所有实现了Ordered 的BeanPostProcessor
- 注册所有其他的BeanPostProcessor
- 重新注册所有内部的BeanPostProcessor(这里的“内建”指的是实现了MergedBeanDefinitionPostProcessor的BeanPostProcessor,将他们重新注册到列表的末尾)
- 重新注册一个ApplicationListenerDetector到列表末尾(这里的重新注册内建BeanPostProcessor和ListenerDetector都是为了内建的组件能够获取到被代理取代后的对象)
对于使用Spring进行业务开发的我们来说,上述步骤里我们需要关心的只有BeanPostProcessor 的接口排序而已,也就是:
- 优先注册所有实现了PriorityOrdered 的BeanPostProcessor
- 其次是实现了Ordered 的BeanPostProcessor
- 最后是没有实现任何接口的BeanPostProcessor
其他的步骤都属于Spring框架内建代码使用的功能,除非需要对Spring框架做深度扩展,否则无需关心。
1.5 BeanPostProcessor并不能处理所有Bean
这个很好理解,首先BeanPostProcessor本身就是被声明的Bean,那么就一定有先后顺序,优先实例化的BeanPostProcessor可以处理后面实例化的BeanPostProcessor,这没什么问题。
一个很好的例子是Spring文档中关于AOP的说明:
因为 AOP 自动代理被实现为
BeanPostProcessor本身,不是BeanPostProcessor实例或它们直接引用的bean都符合自动代理的条件,反之则不包含切面。
也就是说我们在实际的开发中需要避免在BeanPostProcessor内嵌入业务或者让BeanPostProcessor依赖业务组件。
来一个例子演示一下。第一步,找到实现AOP功能的BeanPostProcessor,在容器完成BeanPostProcessor的创建后观察它的位置:
这个类的继承关系中存在Ordered接口,也就是说我们也实现一个Ordered,并且优先级比它高,或者直接实现 PriorityOrdered 就好了。
准备以下代码:
/**
 * 这个注解只是标注一下要切入的类,接口或注解都可以
 * @author landscape
 * @date 2021-06-26
 */
public @interface BusinessAnnotation {
}

/**
 * @author landscape
 * @date 2021-06-26
 */
@Aspect
@Component
public class BusinessAspect {

    @Around("@within(com.landscape.demo.component.BusinessAnnotation)")
    public Object monitor(ProceedingJoinPoint joinPoint) {
        System.out.println("
————————————————————————————————————————————————————");
        System.out.println(joinPoint.getTarget().getClass().getSimpleName() + ": 打工人开始工作");
        try {
            Object proceed = joinPoint.proceed();
            System.out.println(joinPoint.getTarget().getClass().getSimpleName() + ": 打工人结束工作");
            System.out.println("————————————————————————————————————————————————————");
            return proceed;
        } catch (Throwable throwable) {
            throwable.printStackTrace();
        }
        return null;
    }

}
//准备两个打工人:
@Component
@BusinessAnnotation
public class Worker1 {

    public void work() {
        System.out.println("Worker1 working...");
    }
}

@Component
@BusinessAnnotation
public class Worker2 {

    public void work() {
        System.out.println("Worker2 working...");
    }
}

//准备两个资本家:
@Component
public class Manager1 implements BeanPostProcessor, Ordered {
    @Autowired
    private Worker1 worker1;

    @Override
    public int getOrder() {
        //只要排在 AspectJAwareAdvisorAutoProxyCreator 之前就好了,设多少无所谓
        return Ordered.LOWEST_PRECEDENCE - 1;
    }
}

@Component
public class Manager2 implements BeanPostProcessor {

    @Autowired
    private Worker2 worker2;

}


//代码部分就完成啦!:-D
画图解释一下上面的代码:
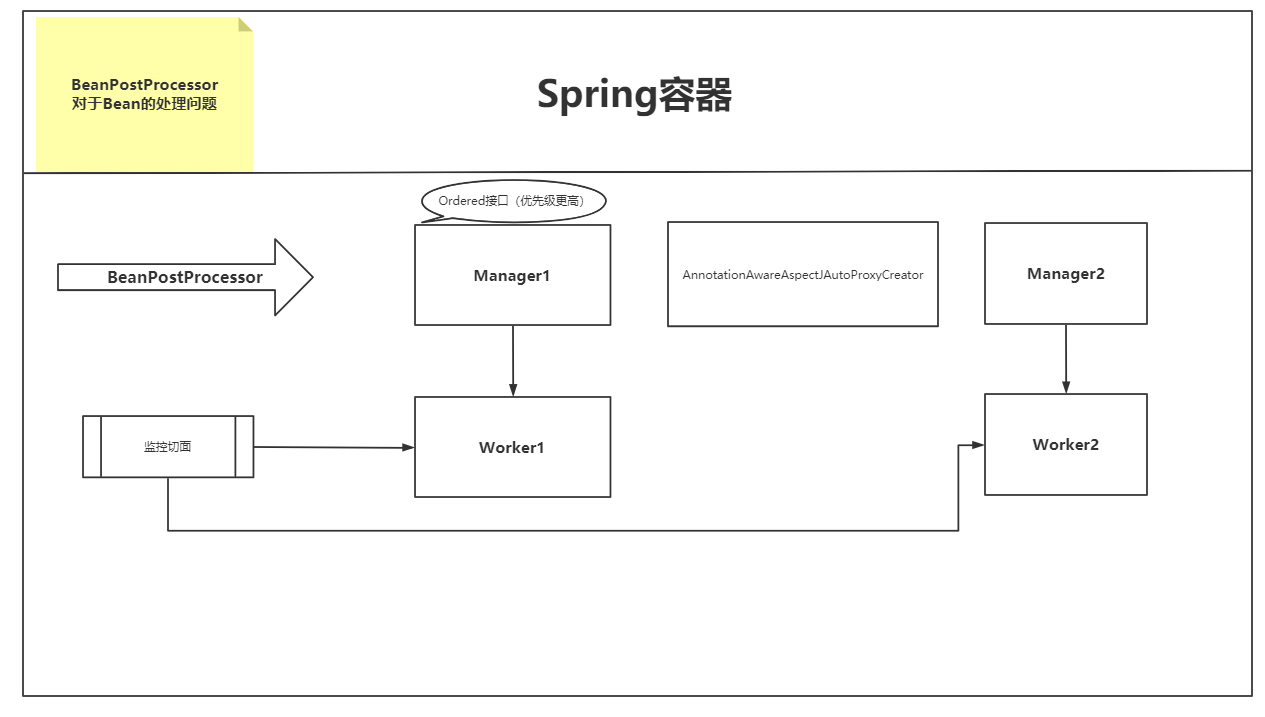
上面的代码共有三种角色:
- Aspect,监视者切面
- Manager,实现了BeanPostProcessor,内部依赖Worker
- Worker,被切面增强
但是应该很快就能发现,图中Manager1的优先级比 AOP实现类的优先级更高,而Manager1的初始化将导致 Worker1的实例化(原本Worker不应该在这个阶段实例化),所以Worker1根本就不可能被切面监控。相对后面的Manager2和Worker2,他们实例化的时候已经存在AOP处理类了,所以可以被AOP切面监控。
运行容器代码:
@SpringBootApplication
public class SpringBootContainer {

    public static void main(String[] args) {
        ConfigurableApplicationContext context = SpringApplication.run(SpringBootContainer.class, args);
        context.getBean(Worker1.class).work();
        context.getBean(Worker2.class).work();
    }

}


  .   ____          _            __ _ _
 /\ / ___'_ __ _ _(_)_ __  __ _
( ( )\___ | '_ | '_| | '_ / _` |
 \/  ___)| |_)| | | | | || (_| |  ) ) ) )
  '  |____| .__|_| |_|_| |_\__, | / / / /
 =========|_|==============|___/=/_/_/_/
 :: Spring Boot ::       (v2.3.10.RELEASE)

2021-06-26 15:30:29.750  INFO 13764 --- [           main] com.landscape.demo.SpringBootContainer   : No active profile set, falling back to default profiles: default
2021-06-26 15:30:30.164  INFO 13764 --- [           main] trationDelegate$BeanPostProcessorChecker : Bean 'worker1' of type [com.landscape.demo.component.Worker1] is not eligible for getting processed by all BeanPostProcessors (for example: not eligible for auto-proxying)
2021-06-26 15:30:30.225  INFO 13764 --- [           main] trationDelegate$BeanPostProcessorChecker : Bean 'worker2' of type [com.landscape.demo.component.Worker2] is not eligible for getting processed by all BeanPostProcessors (for example: not eligible for auto-proxying)
2021-06-26 15:30:30.647  INFO 13764 --- [           main] com.landscape.demo.SpringBootContainer   : Started SpringBootContainer in 1.14 seconds (JVM running for 2.145)
Worker1 working...

————————————————————————————————————————————————————
Worker2: 打工人开始工作
Worker2 working...
Worker2: 打工人结束工作
————————————————————————————————————————————————————

Process finished with exit code 0
Bean 'worker1' of type [com.landscape.demo.component.Worker1] is not eligible for getting processed by all BeanPostProcessors (for example: not eligible for auto-proxying)
可以看到Worker1并没有被切面切入,而Worker2的执行方法则成功的被切面增强。日志中的这两行也很好的说明了这种情况。
2. BeanFactoryPostProcessor
上一章的BeanPostProcessor是针对容器运行过程中实例化的Bean进行处理操作的扩展组件,而本章的BeanFactoryPostProcessor顾名思义,是对BeanFactory进行处理操作的组件。
BeanFactoryPostProcessor操作bean配置元数据。也就是说,SpringIoC容器允许BeanFactoryPostProcessor读取配置元数据并可能对其进行更改以前容器实例化除BeanFactoryPostProcessor实例。
BeanFactoryPostProcessor实例的作用域为每个容器。这只有在使用容器层次结构时才相关。如果您在一个容器中定义了BeanFactoryPostProcessor,那么它只应用于该容器中的bean定义。一个容器中的Bean定义不会被另一个容器中的BeanFactoryPostProcessor实例进行后处理,即使两个容器都属于相同的层次结构。
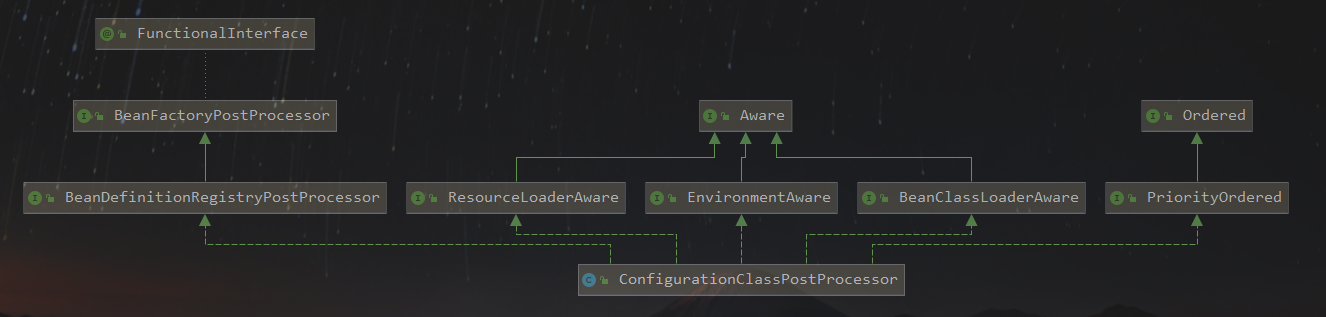
在Spring框架中BeanFactoryPostProcessor的子接口只有一个(这里不包含其他扩展框架,只针对Spring Framework 源码):

这里以 ConfigurationClassPostProcessor为例子来帮助理解BeanFactoryPostProcessor接口。从它的实现关系上大致上就可以推测出它的特性、实例化时机、调用时机等信息:
- 实现了 BeanFactoryPostProcessor,所以它可以对BeanFactory进行元数据配置
- 实现了 BeanDefinitionRegistryPostProcessor,用来对BeanDefinitionRegistry 做配置。
- 实现了 PriorityOrdered,在处理顺序上较为优先。
按照执行顺序来看,先看 ConfigurationClassPostProcessor 这个类对于 BeanDefinitionRegistryPostProcessor 接口的实现:
//org.springframework.context.annotation.ConfigurationClassPostProcessor#postProcessBeanDefinitionRegistry
/**
 * 从注册中心中的配置类派生进一步的bean定义。
 * Derive further bean definitions from the configuration classes in the registry.
 */
@Override
public void postProcessBeanDefinitionRegistry(BeanDefinitionRegistry registry) {
    int registryId = System.identityHashCode(registry);
    if (this.registriesPostProcessed.contains(registryId)) {
        throw new IllegalStateException(
            "postProcessBeanDefinitionRegistry already called on this post-processor against " + registry);
    }
    if (this.factoriesPostProcessed.contains(registryId)) {
        throw new IllegalStateException(
            "postProcessBeanFactory already called on this post-processor against " + registry);
    }
    this.registriesPostProcessed.add(registryId);
	//对于 BeanDefinitionRegistryPostProcessor 接口的实现其实重点是下面调用的方法
    processConfigBeanDefinitions(registry);
}

//org.springframework.context.annotation.ConfigurationClassPostProcessor#processConfigBeanDefinitions
/**
 * Build and validate a configuration model based on the registry of
 * {@link Configuration} classes.
 */
public void processConfigBeanDefinitions(BeanDefinitionRegistry registry) {
	//省略一段寻找候选的配置类、校验、排序的过程

    // Parse each @Configuration class
    ConfigurationClassParser parser = new ConfigurationClassParser(
        this.metadataReaderFactory, this.problemReporter, this.environment,
        this.resourceLoader, this.componentScanBeanNameGenerator, registry);

    Set<BeanDefinitionHolder> candidates = new LinkedHashSet<>(configCandidates);
    Set<ConfigurationClass> alreadyParsed = new HashSet<>(configCandidates.size());

    do {
        //这里的parse步骤做的事情非常多,处理了一个配置类中可能出现的配置元数据,例如@Import、@ComponentScan、内部配置类等很多事情
    	//但主题是BeanFactoryPostProcessor,这里不做过多解释
        parser.parse(candidates);
        parser.validate();

        Set<ConfigurationClass> configClasses = new LinkedHashSet<>(parser.getConfigurationClasses());
        configClasses.removeAll(alreadyParsed);

        // Read the model and create bean definitions based on its content
        if (this.reader == null) {
            this.reader = new ConfigurationClassBeanDefinitionReader(
                registry, this.sourceExtractor, this.resourceLoader, this.environment,
                this.importBeanNameGenerator, parser.getImportRegistry());
        }
        //这一步也非常重要,以众多配置类为起点,加载路径中所有的BeanDefinition。所以如果直接走过这一步会发现
        //BeanFactory中的 BeanDefinitionMap 中多了很多Bean,是 SpringBoot 非常重要的加载步骤
        this.reader.loadBeanDefinitions(configClasses);
        alreadyParsed.addAll(configClasses);

        candidates.clear();
        if (registry.getBeanDefinitionCount() > candidateNames.length) {
            String[] newCandidateNames = registry.getBeanDefinitionNames();
            Set<String> oldCandidateNames = new HashSet<>(Arrays.asList(candidateNames));
            Set<String> alreadyParsedClasses = new HashSet<>();
            for (ConfigurationClass configurationClass : alreadyParsed) {
                alreadyParsedClasses.add(configurationClass.getMetadata().getClassName());
            }
            for (String candidateName : newCandidateNames) {
                if (!oldCandidateNames.contains(candidateName)) {
                    BeanDefinition bd = registry.getBeanDefinition(candidateName);
                    if (ConfigurationClassUtils.checkConfigurationClassCandidate(bd, this.metadataReaderFactory) &&
                        !alreadyParsedClasses.contains(bd.getBeanClassName())) {
                        candidates.add(new BeanDefinitionHolder(bd, candidateName));
                    }
                }
            }
            candidateNames = newCandidateNames;
        }
    }
    while (!candidates.isEmpty());
	// 将ImportRegistry注册为bean,以支持ImportAware @Configuration类
    // Register the ImportRegistry as a bean in order to support ImportAware @Configuration classes
    if (sbr != null && !sbr.containsSingleton(IMPORT_REGISTRY_BEAN_NAME)) {
        sbr.registerSingleton(IMPORT_REGISTRY_BEAN_NAME, parser.getImportRegistry());
    }

    if (this.metadataReaderFactory instanceof CachingMetadataReaderFactory) {
        // Clear cache in externally provided MetadataReaderFactory; this is a no-op
        // for a shared cache since it'll be cleared by the ApplicationContext.
        ((CachingMetadataReaderFactory) this.metadataReaderFactory).clearCache();
    }
}
以上核心逻辑已经添加到代码注释中,省略了很多细节,从对BeanDefinitionRegistryPostProcessor实现的角度来看,只需要感受到它对BeanDefinitionRegistry的改动即可,也就是我们通过@Component、@Bean等方式定义的Bean都已经被读入到容器中。
下面再来看ConfigurationClassPostProcessor 对于BeanFactoryPostProcessor 的实现部分:
//org.springframework.context.annotation.ConfigurationClassPostProcessor#postProcessBeanFactory
/**
 * 用cglib增强的子类替换Configuration类,以便在运行时为bean请求提供服务。
 * Prepare the Configuration classes for servicing bean requests at runtime
 * by replacing them with CGLIB-enhanced subclasses.
 */
@Override
public void postProcessBeanFactory(ConfigurableListableBeanFactory beanFactory) {
    int factoryId = System.identityHashCode(beanFactory);
    if (this.factoriesPostProcessed.contains(factoryId)) {
        throw new IllegalStateException(
            "postProcessBeanFactory already called on this post-processor against " + beanFactory);
    }
    this.factoriesPostProcessed.add(factoryId);
    if (!this.registriesPostProcessed.contains(factoryId)) {
        // BeanDefinitionRegistryPostProcessor hook apparently not supported...
        // Simply call processConfigurationClasses lazily at this point then.
        processConfigBeanDefinitions((BeanDefinitionRegistry) beanFactory);
    }
    //这个实现里最重要的部分在下面这行方法调用,也就是增强配置类
    enhanceConfigurationClasses(beanFactory);
    beanFactory.addBeanPostProcessor(new ImportAwareBeanPostProcessor(beanFactory));
}
增强的逻辑这里就不贴代码了(数量很多),简单的概括就是将@Bean注解标注的方法进行一次代理,只有真正需要构造Bean的时候才实际的调用方法,而后面的调用都将通过BeanName从BeanFactory中获取。
由于主题是 BeanFactoryPostProcessor 而不是增强的逻辑所以不做过多解析,后面可能专门加一篇文章来解析这方面的逻辑,大致的内容可参考ConfigurationClassEnhancer 及几个内部类的注释。
从对 BeanFactoryPostProcessor 的实现的角度来看,只需要注意到相关的配置类成功的被修改了元数据,实例换成了被 CGLIB 增强的子类即可。
3. FactoryBean
摘抄一下来自Spring文档的翻译:
FactoryBean接口是一个可插入到Spring IoC容器的实例化逻辑的点。如果您有复杂的初始化代码,可以用Java更好地表达,而不是(可能)冗长的XML,那么您可以创建自己的FactoryBean,在该类中编写复杂的初始化,然后将自定义的FactoryBean插入到容器中。
- T getObject(): 返回该工厂创建的对象的一个实例。该实例可能被共享,这取决于该工厂返回的是单例还是原型。
- boolean isSingleton(): 如果FactoryBean返回单例,则返回true,否则返回false。该方法的默认实现返回true。
- Class <?> getObjectType() : 返回getObject()方法返回的对象类型,如果事先不知道该类型,则返回null。
另外,如果想要获取FactoryBean本身,则需要在BeanName前面加上“&”,来自文档的翻译:
当您需要向容器请求一个实际的FactoryBean实例本身,而不是它生成的bean时,在调用ApplicationContext的getBean()方法时,在bean的id前面加上&符号。因此,对于一个id为myBean的给定FactoryBean,在容器上调用getBean("myBean")将返回FactoryBean的产品,而调用getBean("&myBean")将返回FactoryBean实例本身。
在Spring的扩展点中,FactoryBean是一个相对简单的概念,下面是一个简单的小Demo,同时跟进源码加深理解:
public class Person {
    @Min(1)
    @NotNull
    private Integer id = 1;

    private String name ;

    private String address ;

    private LocalDateTime birthday;
    //省略GetterSetter等方法
}

@Component
public class PersonFactory implements FactoryBean<Person> {
    @Override
    public boolean isSingleton() {
        return true;
    }

    @Override
    public Person getObject() throws Exception {
        Person person = new Person();
        person.setId(1)
                .setName("abc")
                .setAddress("南京")
                .setBirthday(LocalDateTime.now())
        ;
        return person;
    }

    @Override
    public Class<?> getObjectType() {
        return Person.class;
    }
}
运行启动代码:
@SpringBootApplication
public class SpringBootContainer {

    public static void main(String[] args) {
        ConfigurableApplicationContext context = SpringApplication.run(SpringBootContainer.class, args);
        context.getBean(Person.class);
    }

}
Debug断点打到Spring开始初始化Bean的时候,流程看代码注释:
	@Override
	public void preInstantiateSingletons() throws BeansException {
		if (logger.isTraceEnabled()) {
			logger.trace("Pre-instantiating singletons in " + this);
		}

		// Iterate over a copy to allow for init methods which in turn register new bean definitions.
		// While this may not be part of the regular factory bootstrap, it does otherwise work fine.
		List<String> beanNames = new ArrayList<>(this.beanDefinitionNames);

		// Trigger initialization of all non-lazy singleton beans...
		for (String beanName : beanNames) {
			RootBeanDefinition bd = getMergedLocalBeanDefinition(beanName);
			if (!bd.isAbstract() && bd.isSingleton() && !bd.isLazyInit()) {
                //1. 因为我们定义的是FactoryBean,所以会进入到这个分支
				if (isFactoryBean(beanName)) {
                    //2. 这里的getBean实例化的是工厂本身,也就是 PersonFactory,而不是目标对象Person
					Object bean = getBean(FACTORY_BEAN_PREFIX + beanName);
					if (bean instanceof FactoryBean) {
						FactoryBean<?> factory = (FactoryBean<?>) bean;
						boolean isEagerInit;
						if (System.getSecurityManager() != null && factory instanceof SmartFactoryBean) {
							isEagerInit = AccessController.doPrivileged(
									(PrivilegedAction<Boolean>) ((SmartFactoryBean<?>) factory)::isEagerInit,
									getAccessControlContext());
						}
						else {
							isEagerInit = (factory instanceof SmartFactoryBean &&
									((SmartFactoryBean<?>) factory).isEagerInit());
						}
                        //3. 这里如果实现的是 SmartFactoryBean 且需要提前初始化目标对象才会进入分支
						if (isEagerInit) {
							getBean(beanName);
						}
					}
				}
				else {
					getBean(beanName);
				}
			}
		}

		// Trigger post-initialization callback for all applicable beans...
		//省略了一些后置处理器的触发代码
	}
到容器初始化完成,进行实例化的也只是PersonFactory而已,而真正使FactoryBean开始实例化目标对象则是实际需要目标对象时,跟着源码可以走到下面这段核心代码:
//org.springframework.beans.factory.support.FactoryBeanRegistrySupport#getObjectFromFactoryBean
protected Object getObjectFromFactoryBean(FactoryBean<?> factory, String beanName, boolean shouldPostProcess) {
    //如果factory管理的对象是单例且beanName已经在该BeanFactory的单例对象的缓存Map集合DefaultListableBeanFactory.singletonObjects中
    if (factory.isSingleton() && containsSingleton(beanName)) {
		//获取线程互斥锁定对象
        synchronized (getSingletonMutex()) {
            //如果是被创建过的对象则不会重复创建而是从缓存中获取
            Object object = this.factoryBeanObjectCache.get(beanName);
            if (object == null) {
                //这里调用了实际的getObject方法,里面的逻辑很简单,除了一些权限验证和异常处理就是实际调用getObject
                //所以不贴跟进代码了
                object = doGetObjectFromFactoryBean(factory, beanName);
                // Only post-process and store if not put there already during getObject() call above
                // (e.g. because of circular reference processing triggered by custom getBean calls)
                Object alreadyThere = this.factoryBeanObjectCache.get(beanName);
                if (alreadyThere != null) {
                    object = alreadyThere;
                }
                else {
                    if (shouldPostProcess) {
                        if (isSingletonCurrentlyInCreation(beanName)) {
                            // Temporarily return non-post-processed object, not storing it yet..
                            return object;
                        }
                        //模版回调方法
                        beforeSingletonCreation(beanName);
                        try {
                            //这里调用了BeanPostProcessor对目标对象进行处理
                            object = postProcessObjectFromFactoryBean(object, beanName);
                        }
                        catch (Throwable ex) {
                            throw new BeanCreationException(beanName,
                                                            "Post-processing of FactoryBean's singleton object failed", ex);
                        }
                        finally {
                            //模版回调方法
                            afterSingletonCreation(beanName);
                        }
                    }
                    if (containsSingleton(beanName)) {
                        //单例对象放到缓存里去
                        this.factoryBeanObjectCache.put(beanName, object);
                    }
                }
            }
            return object;
        }
    }
    else {
        Object object = doGetObjectFromFactoryBean(factory, beanName);
        if (shouldPostProcess) {
            try {
                object = postProcessObjectFromFactoryBean(object, beanName);
            }
            catch (Throwable ex) {
                throw new BeanCreationException(beanName, "Post-processing of FactoryBean's object failed", ex);
            }
        }
        return object;
    }
}
到此为止,FactoryBean本身的实例化、目标对象的实例化流程就走完了。
希望这次对Spring知识点中扩展点的整理可以对自己和读到这里的同学有一点帮助。