java对自然语言的处理。上手实践,跑的通是关键。只需三步即可。代码地址:https://gitee.com/huqianming/java-nlp.git 注意:中文模型包有点大,maven可以配置从阿里私服仓库读取。第一次请求要初始化稍微慢一下
1、所需依赖的包,这里用到中文的包
        <dependency>
            <groupId>edu.stanford.nlp</groupId>
            <artifactId>stanford-corenlp</artifactId>
            <version>4.2.0</version>
        </dependency>

        <dependency>
            <groupId>edu.stanford.nlp</groupId>
            <artifactId>stanford-corenlp</artifactId>
            <version>4.2.0</version>
            <classifier>models</classifier>
        </dependency>

        <dependency>
            <groupId>edu.stanford.nlp</groupId>
            <artifactId>stanford-corenlp</artifactId>
            <version>4.2.0</version>
            <classifier>models-chinese</classifier>
        </dependency>
2、创建好Spring boot项目,创建类使用如下代码
package com.nunu.ai.nlp.controller;

import edu.stanford.nlp.coref.CorefCoreAnnotations;
import edu.stanford.nlp.coref.data.CorefChain;
import edu.stanford.nlp.ling.CoreAnnotations;
import edu.stanford.nlp.ling.CoreLabel;
import edu.stanford.nlp.pipeline.Annotation;
import edu.stanford.nlp.pipeline.StanfordCoreNLP;
import edu.stanford.nlp.semgraph.SemanticGraph;
import edu.stanford.nlp.semgraph.SemanticGraphCoreAnnotations;
import edu.stanford.nlp.trees.Tree;
import edu.stanford.nlp.trees.TreeCoreAnnotations;
import edu.stanford.nlp.util.CoreMap;
import edu.stanford.nlp.util.PropertiesUtils;
import edu.stanford.nlp.util.StringUtils;
import org.springframework.web.bind.annotation.RequestMapping;
import org.springframework.web.bind.annotation.RestController;

import java.util.ArrayList;
import java.util.List;
import java.util.Map;
import java.util.Properties;

/**
 * created with IDEA
 *
 * @author:huqm
 * @date:2020/12/7
 * @time:16:20 <p>
 *
 * </p>
 */
@RestController
@RequestMapping("/test")
public class TestController {


    @RequestMapping("getStr")
    public List<String> getStr(String text){

        return segInCh(text);
    }
    public List<String> segInCh(String text) {
        //载入properties 文件
//        StanfordCoreNLP pipline = new StanfordCoreNLP("StanfordCoreNLP-chinese.properties");

        //1.2 自定义功能 (1)
        //StanfordCoreNLP的各个组件(annotator)按“tokenize(分词), ssplit(断句), pos(词性标注), lemma(词元化),
        // ner(命名实体识别), parse(语法分析), dcoref(同义词分辨)”顺序进行处理。
//        Properties properties = new Properties();
//        properties.setProperty("annotators", "tokenize, ssplit, pos, lemma, ner, parse, dcoref");
//        StanfordCoreNLP pipline = new StanfordCoreNLP(properties);

        //自定义功能(2) 自己在项目中建一个properties 文件,然后在文件中设置模型属性,可以参考1中的配置文件
//        String[] args = new String[]{"-props", "properies/CoreNLP-Seg-CH.properties"};
//        Properties properties = StringUtils.argsToProperties(args);
//        StanfordCoreNLP pipline = new StanfordCoreNLP(properties);

        //自定义功能(3)
        StanfordCoreNLP pipline = new StanfordCoreNLP(PropertiesUtils.asProperties(
                "annotators", "tokenize,ssplit,pos,lemma,ner,parse,dcoref",
                "ssplit.isOneSentence", "true",
                "tokenize.language", "zh",
                "segment.model", "edu/stanford/nlp/models/segmenter/chinese/ctb.gz",
                "segment.sighanCorporaDict", "edu/stanford/nlp/models/segmenter/chinese",
                "segment.serDictionary", "edu/stanford/nlp/models/segmenter/chinese/dict-chris6.ser.gz",
                "segment.sighanPostProcessing", "true"
        ));
        //创建一个解析器,传入的是需要解析的文本
        Annotation annotation = new Annotation(text);
        //解析
        pipline.annotate(annotation);
        //根据标点符号,进行句子的切分,每一个句子被转化为一个CoreMap的数据结构,保存了句子的信息()
        List<CoreMap> sentences = annotation.get(CoreAnnotations.SentencesAnnotation.class);
        //从CoreMap 中取出CoreLabel List ,打印
        ArrayList<String> list = new ArrayList<>();
        for (CoreMap sentence : sentences) {
            for (CoreLabel token : sentence.get(CoreAnnotations.TokensAnnotation.class)) {
                String word = token.get(CoreAnnotations.TextAnnotation.class);
                 // this is the POS tag of the token
                String pos = token.get(CoreAnnotations.PartOfSpeechAnnotation.class);
                // this is the NER label of the token
                 String ne = token.get(CoreAnnotations.NamedEntityTagAnnotation.class);
                String lemma = token.get(CoreAnnotations.LemmaAnnotation.class);
                String result=word+"	"+pos+"	"+lemma+"	"+ne;
                list.add(result);
            }
        }
        return list;
    }

}
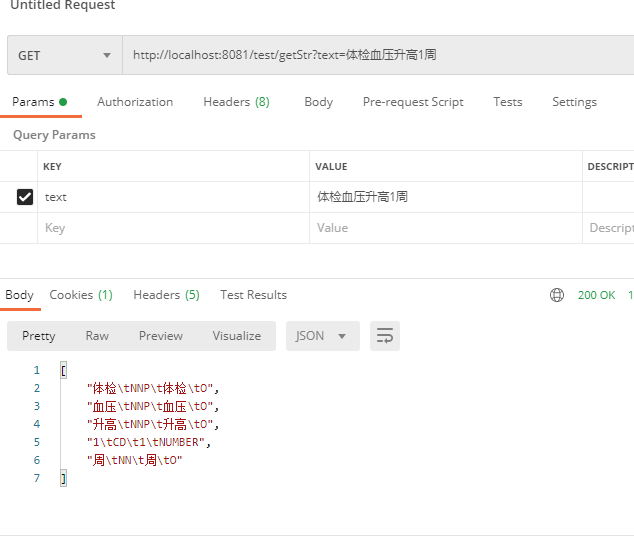
3、验证结果