本博客为学习使用,学习教程翟永超 spring cloud 微服务实战
搭建eureka server注册中心
spring initialize构建spring boot项目
版本与spring boot版本匹配

此处选择Brixton.SR5版本,spring boot选择1.3.7版本
maven dependencies
<dependency>
            <groupId>org.springframework.cloud</groupId>
            <artifactId>spring-cloud-starter-eureka-server</artifactId>
</dependency>

<dependencyManagement>
        <dependencies>
            <dependency>
                <groupId>org.springframework.cloud</groupId>
                <artifactId>spring-cloud-dependencies</artifactId>
                <version>Brixton.SR5</version>
                <type>pom</type>
                <scope>import</scope>
            </dependency>
        </dependencies>
    </dependencyManagement>
启动eureka服务注册中心
//启动eureka 服务
@EnableEurekaServer
@SpringBootApplication
public class EurekaServerApplication {

	public static void main(String[] args) {
		SpringApplication.run(EurekaServerApplication.class, args);
	}
}
eureka配置文件配置
spring.application.name=eureka-server
server.port=1111

eureka.instance.hostname=localhost
#禁用eureka的client功能,为false表示不向注册中心注册自己
eureka.client.register-with-eureka=false
#不检索服务
eureka.client.fetch-registry=false
#服务地址
eureka.client.serviceUrl.defaultZone=http://${eureka.instance.hostname}:${server.port}/eureka/
通过访问http://localhost:1111/可以查看Eureka的信息面板
注册服务提供者
maven dependencies
<dependency>
            <groupId>org.springf ramework.boot</groupId>
            <artifactId>spring-boot-starter-web</artifactId>
            <scope>test</scope>
        </dependency>
<dependency>
            <groupId>org.springframework.cloud</groupId>
            <artifactId>spring-cloud-starter-eureka</artifactId>
        </dependency>
启动项
//激活erueka中的DiscoveryClient实现
//自动化配置,创建DiscoveryClient接口针对Eureka客户端的EurekaDiscoveryClient实例
@EnableDiscoveryClient
@SpringBootApplication
public class EurekaServerApplication {

	public static void main(String[] args) {
		SpringApplication.run(EurekaServerApplication.class, args);
	}
}
提供的服务接口
@RestController
public class HelloController
{
    private final Logger logger = LoggerFactory.getLogger(HelloController.class);

    @Autowired
    private DiscoveryClient discoveryClient;

    @RequestMapping(value = "/hello", method = RequestMethod.GET)
    public String index()
    {
        ServiceInstance serviceInstance = discoveryClient.getLocalServiceInstance();
        logger.info("/hello, host: {}, service_id : {}.", serviceInstance.getHost(), serviceInstance.getServiceId());
        return "hello world!";
    }
}
配置文件
spring.application.name=eureka-client
server.port=2001

eureka.instance.hostname=localhost
#eureka的client功能默认为true
#eureka.client.register-with-eureka=false
#eureka.client.fetch-registry=false
#注册服务的注册中心地址
eureka.client.serviceUrl.defaultZone=http://localhost:1111/eureka/
启动eureka-client,发现eureka-server注册中心页面出现了一个服务实例,说明注册成功
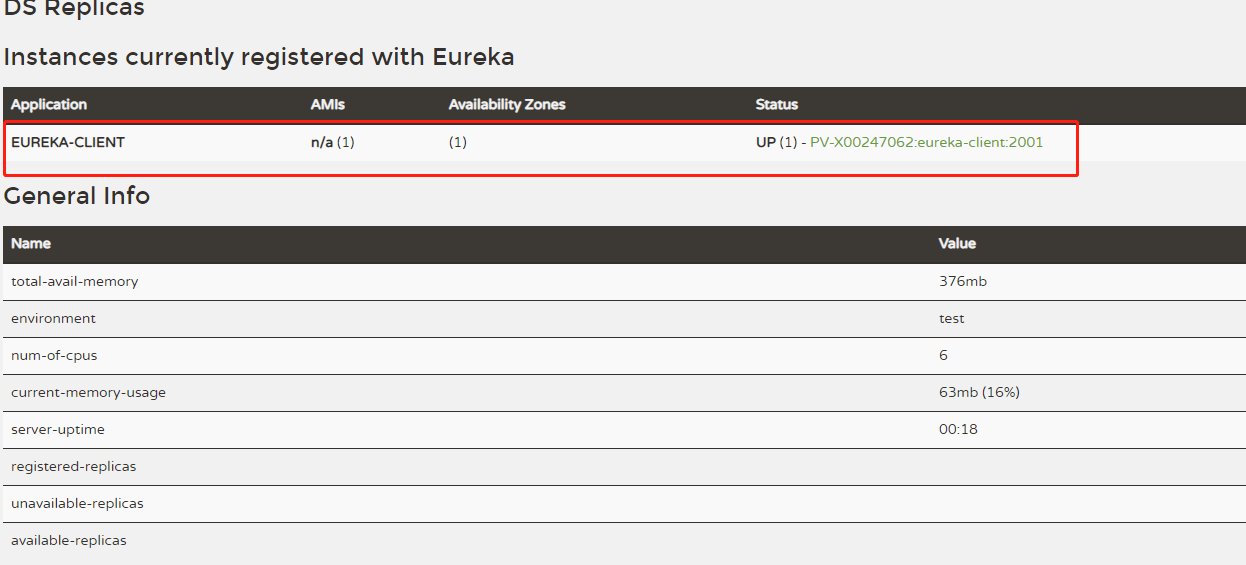
然后访问eureka-client服务接口http://localhost:2001/hello,打印出hello world!,说明服务调用成功
服务高可用
注册中心服务高可用是建立在注册中心即使注册中心,本身也是服务,也可以注册到其他的注册中心
修改eureka-server服务配置文件
- 复制application.properties两份,命名为application-peer1.properties,application-peer2.properties。清空application.peroperties
- 修改applicaton-peer1.properties内容为
spring.application.name=eureka-server
server.port=1111

eureka.instance.hostname=peer1
#禁用eureka的client功能
#eureka.client.register-with-eureka=false
#eureka.client.fetch-registry=false
eureka.client.serviceUrl.defaultZone=http://peer2:1112/eureka/
- 修改application-peer2.properties内容为
spring.application.name=eureka-server
server.port=1112

eureka.instance.hostname=peer2
#禁用eureka的client功能
#eureka.client.register-with-eureka=false
#eureka.client.fetch-registry=false
eureka.client.serviceUrl.defaultZone=http://peer2:1111/eureka/
-
在/etc/hosts文件下加入127.0.0.1 peer1 127.0.0.1 peer2。
如果不在此处用peer1和peer2,而是在两个properties中都使用localhost,则会出问题 -
修改eureka-client的application.properties配置文件为
spring.application.name=eureka-client
server.port=2001

eureka.instance.hostname=localhost
#eureka的client功能默认为true
#eureka.client.register-with-eureka=false
#获取服务清单,默认为true
#eureka.client.fetch-registry=false
#修改缓存清单的更新时间
eureka.client.registry-fetch-interval-seconds=30

#服务续约
#服务续约调用的时间间隔,默认是30秒
eureka.instance.lease-renewal-interval-in-seconds=30
#服务失效时间
eureka.instance.lease-expiration-duration-in-seconds=90


#注册服务的注册中心地址
eureka.client.serviceUrl.defaultZone=http://localhost:1111/eureka/,http://localhost:1112/eureka/
启动两个eureka-server注册中心和eureka-client
java -jar eureka-server-001.jar --spring.profiles.active=peer1
java -jar eureka-server-001.jar --spring.profiles.active=peer2
在peer1的服务页面会看到的内容为

在peer2的服务页看到的内容为
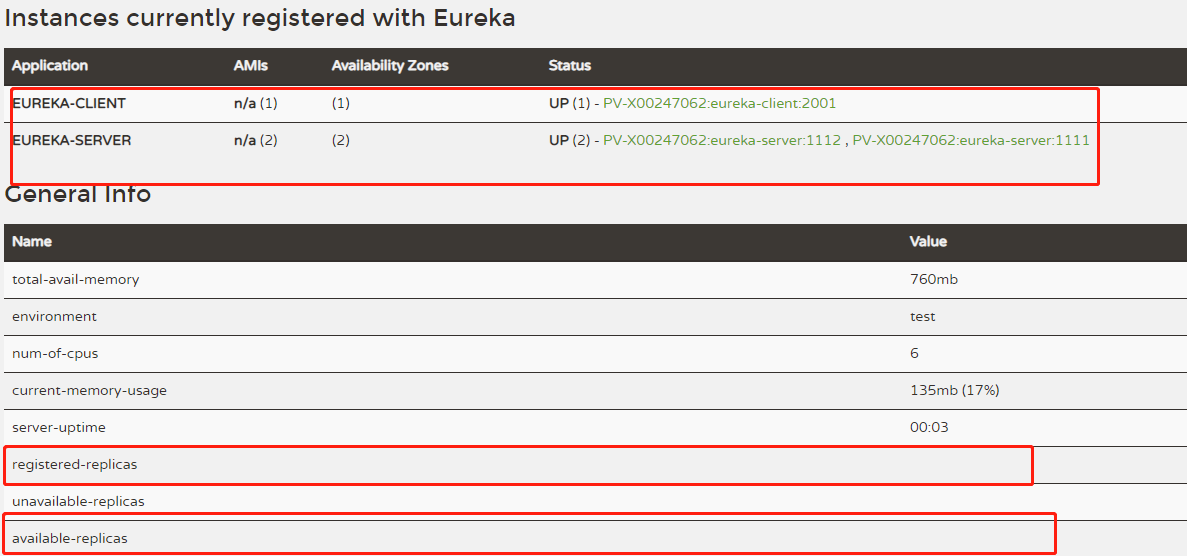
当关闭peer1注册中心,调用eureka-client服务接口,仍然能够获得hello world!,说明注册中心高可用配置成功
ribbon服务消费者
在eureka-client基础上加入ribbonmaven依赖
<dependency>
            <groupId>org.springframework.cloud</groupId>
            <artifactId>spring-cloud-starter-ribbon</artifactId>
        </dependency>
配置application.properties
spring.application.name=ribbon-consumer
server.port=9000

eureka.instance.hostname=localhost
#eureka的client功能默认为true
#eureka.client.register-with-eureka=false
#获取服务清单,默认为true
#eureka.client.fetch-registry=false
#修改缓存清单的更新时间
eureka.client.registry-fetch-interval-seconds=30

#服务续约
#服务续约调用的时间间隔,默认是30秒
eureka.instance.lease-renewal-interval-in-seconds=30
#服务失效时间
eureka.instance.lease-expiration-duration-in-seconds=90


#注册服务的注册中心地址
eureka.client.serviceUrl.defaultZone=http://localhost:1111/eureka/
主类上增加代码
//激活erueka中的DiscoveryClient实现
//自动化配置,创建DiscoveryClient接口针对Eureka客户端的EurekaDiscoveryClient实例
@EnableDiscoveryClient
@SpringBootApplication
public class ConsumerApplication
{
	//注入RestTemplate
	@Bean
	//开启客户端负载均衡
	@LoadBalanced
	RestTemplate restTemplate()
	{
		return new RestTemplate();
	}


	public static void main(String[] args) {
		SpringApplication.run(ConsumerApplication.class, args);
	}
}
写一个消费类
@RestController
public class ConsumerController
{
    @Autowired
    RestTemplate restTemplate;

    @RequestMapping(value = "/ribbon-consumer", method = RequestMethod.GET)
    public String helloConsumer()
    {
        return restTemplate.getForEntity("http://EUREKA-CLIENT/hello", String.class).getBody();
    }
}