1、配置基本的springboot web项目,加入security5依赖,启动项目
浏览器访问,即可出现一个默认的登录页面

2、什么都没有配置 登录页面哪里来的
一般不知从何入手,就看官方文档里是如何做的,官方的文档和api 是最好最完整的介绍和参考,点击链接查看官方文档地址
(https://docs.spring.io/spring-security/site/docs/current/reference/htmlsingle/#jc-oauth2login),或者通过Google 搜索 spring security,
在结果中点击Spring Security Reference,点击进入页面,然后就可以看到关于Spring Security的文档;
通过查看文档发现,WebSecurityConfigurerAdapter 提供的默认的配置,config(HttpSecurty http)中的formLogin(),这个方法内容如下:
    public FormLoginConfigurer<HttpSecurity> formLogin() throws Exception {
        return (FormLoginConfigurer)this.getOrApply(new FormLoginConfigurer());
    }
查看formLogin()源码,跳转到HttpSecurity类中,这个方法返回一个FormLoginConfigurer<HttpSercurity>类型的数据。再继续来看看这
个FormLoginConfigurer,在FormLoginConfigurer中有个initDefaultLoginFilter()方法:
    private void initDefaultLoginFilter(H http) {
        DefaultLoginPageGeneratingFilter loginPageGeneratingFilter = (DefaultLoginPageGeneratingFilter)http.getSharedObject(DefaultLoginPageGeneratingFilter.class);
        if (loginPageGeneratingFilter != null && !this.isCustomLoginPage()) {
            loginPageGeneratingFilter.setFormLoginEnabled(true);
            loginPageGeneratingFilter.setUsernameParameter(this.getUsernameParameter());
            loginPageGeneratingFilter.setPasswordParameter(this.getPasswordParameter());
            loginPageGeneratingFilter.setLoginPageUrl(this.getLoginPage());
            loginPageGeneratingFilter.setFailureUrl(this.getFailureUrl());
            loginPageGeneratingFilter.setAuthenticationUrl(this.getLoginProcessingUrl());
        }

    }
这个方法,初始化一个默认登录页的过滤器,可以看到第一句代码,默认的过滤器是DefaultLoginPageGeneratingFilter,下面是设置一些必要的参数,进入到这个过滤器中:
在描述中可以看到,如果没有配置login页,这个过滤器会被创建,过滤器创建后再浏览器访问的时候回指定doFilter()方法:
    public void doFilter(ServletRequest req, ServletResponse res, FilterChain chain)
            throws IOException, ServletException {
        HttpServletRequest request = (HttpServletRequest) req;
        HttpServletResponse response = (HttpServletResponse) res;

        boolean loginError = isErrorPage(request);
        boolean logoutSuccess = isLogoutSuccess(request);
        if (isLoginUrlRequest(request) || loginError || logoutSuccess) {
            String loginPageHtml = generateLoginPageHtml(request, loginError,
                    logoutSuccess);
            response.setContentType("text/html;charset=UTF-8");
            response.setContentLength(loginPageHtml.getBytes(StandardCharsets.UTF_8).length);
            response.getWriter().write(loginPageHtml);

            return;
        }

        chain.doFilter(request, response);
    }
登录页面的配置是通过generateLoginPageHtml()方法创建的,再来看看这个方法内容:
private String generateLoginPageHtml(HttpServletRequest request, boolean loginError,
            boolean logoutSuccess) {
        String errorMsg = "Invalid credentials";

        if (loginError) {
            HttpSession session = request.getSession(false);

            if (session != null) {
                AuthenticationException ex = (AuthenticationException) session
                        .getAttribute(WebAttributes.AUTHENTICATION_EXCEPTION);
                errorMsg = ex != null ? ex.getMessage() : "Invalid credentials";
            }
        }

        StringBuilder sb = new StringBuilder();

        sb.append("<!DOCTYPE html>
"
                + "<html lang="en">
"
                + "  <head>
"
                + "    <meta charset="utf-8">
"
                + "    <meta name="viewport" content="width=device-width, initial-scale=1, shrink-to-fit=no">
"
                + "    <meta name="description" content="">
"
                + "    <meta name="author" content="">
"
                + "    <title>Please sign in</title>
"
                + "    <link href="https://maxcdn.bootstrapcdn.com/bootstrap/4.0.0-beta/css/bootstrap.min.css" rel="stylesheet" integrity="sha384-/Y6pD6FV/Vv2HJnA6t+vslU6fwYXjCFtcEpHbNJ0lyAFsXTsjBbfaDjzALeQsN6M" crossorigin="anonymous">
"
                + "    <link href="https://getbootstrap.com/docs/4.0/examples/signin/signin.css" rel="stylesheet" crossorigin="anonymous"/>
"
                + "  </head>
"
                + "  <body>
"
                + "     <div class="container">
");

        String contextPath = request.getContextPath();
        if (this.formLoginEnabled) {
            sb.append("      <form class="form-signin" method="post" action="" + contextPath + this.authenticationUrl + "">
"
                    + "        <h2 class="form-signin-heading">Please sign in</h2>
"
                    + createError(loginError, errorMsg)
                    + createLogoutSuccess(logoutSuccess)
                    + "        <p>
"
                    + "          <label for="username" class="sr-only">Username</label>
"
                    + "          <input type="text" id="username" name="" + this.usernameParameter + "" class="form-control" placeholder="Username" required autofocus>
"
                    + "        </p>
"
                    + "        <p>
"
                    + "          <label for="password" class="sr-only">Password</label>
"
                    + "          <input type="password" id="password" name="" + this.passwordParameter + "" class="form-control" placeholder="Password" required>
"
                    + "        </p>
"
                    + createRememberMe(this.rememberMeParameter)
                    + renderHiddenInputs(request)
                    + "        <button class="btn btn-lg btn-primary btn-block" type="submit">Sign in</button>
"
                    + "      </form>
");
        }

        if (openIdEnabled) {
            sb.append("      <form name="oidf" class="form-signin" method="post" action="" + contextPath + this.openIDauthenticationUrl + "">
"
                    + "        <h2 class="form-signin-heading">Login with OpenID Identity</h2>
"
                    + createError(loginError, errorMsg)
                    + createLogoutSuccess(logoutSuccess)
                    + "        <p>
"
                    + "          <label for="username" class="sr-only">Identity</label>
"
                    + "          <input type="text" id="username" name="" + this.openIDusernameParameter + "" class="form-control" placeholder="Username" required autofocus>
"
                    + "        </p>
"
                    + createRememberMe(this.openIDrememberMeParameter)
                    + renderHiddenInputs(request)
                    + "        <button class="btn btn-lg btn-primary btn-block" type="submit">Sign in</button>
"
                    + "      </form>
");
        }

        if (oauth2LoginEnabled) {
            sb.append("<h2 class="form-signin-heading">Login with OAuth 2.0</h2>");
            sb.append(createError(loginError, errorMsg));
            sb.append(createLogoutSuccess(logoutSuccess));
            sb.append("<table class="table table-striped">
");
            for (Map.Entry<String, String> clientAuthenticationUrlToClientName : oauth2AuthenticationUrlToClientName.entrySet()) {
                sb.append(" <tr><td>");
                String url = clientAuthenticationUrlToClientName.getKey();
                sb.append("<a href="").append(contextPath).append(url).append("">");
                String clientName = HtmlUtils.htmlEscape(clientAuthenticationUrlToClientName.getValue());
                sb.append(clientName);
                sb.append("</a>");
                sb.append("</td></tr>
");
            }
            sb.append("</table>
");
        }
        sb.append("</div>
");
        sb.append("</body></html>");

        return sb.toString();
    }
3、去掉默认的登录页,修改application.yml,添加一下内容(在security5中不在支持以下配置,而是提供一个自定义的WebSecurityConfigurer文件)
The security auto-configuration is no longer customizable. Provide your own WebSecurityConfigurer bean instead.
security:
  basic:
    enabled: false
4、自定义WebSecurityConfigurer
以下配置是创建一个最简单的基于form表单认证的security
formLogin():指定认证为form表单
authorizeRequests():授权
anyRequest():任何请求
authenticated():都需要认证
@Configuration
public class CusWebSecurityConfig extends WebSecurityConfigurerAdapter {

    @Override
    protected void configure(HttpSecurity http) throws Exception {

        http.formLogin()//指定是表单登录
                .and().authorizeRequests()//授权
                .anyRequest()//任何请求
                .authenticated();//都需要身份认证
    }
}
5、基本流程

过滤器链有以下:
①UsernamePasswordAuthenticationFilter
在过滤器容器中判断请求中是否有用户名和密码,如果有用户名和密码就会使用UsernamePasswordAuthenticationFilter这个过滤器,如果没有就会走下一个过滤器
②BasicAuthenticationFilter
在这个过滤器中回尝试获取请求头中是否有basic开头的Authentication信息,如果有
就会尝试解码,处理完成之后会走下一个filter
③ExceptionTranslationFilter
这个过滤器的作用是用来捕获下边这个FilterSecurityInterceptor抛出的异常
④FilterSecurityInterceptor
这个拦截器是过滤器链中的最后一环,在这个里边会判断当前请求能否访问controller,
能否访问是根据securityconfig配置来判断的
即:

6、源码学习
FilterSecurityInterceptor关键源码
在invoke方法中有一个super.beforeInvocation方法,如上图,绿色的过滤器链都是在这个方法中进行处理的
public void invoke(FilterInvocation fi) throws IOException, ServletException {
        if ((fi.getRequest() != null)
                && (fi.getRequest().getAttribute(FILTER_APPLIED) != null)
                && observeOncePerRequest) {
            // filter already applied to this request and user wants us to observe
            // once-per-request handling, so don't re-do security checking
            fi.getChain().doFilter(fi.getRequest(), fi.getResponse());
        }
        else {
            // first time this request being called, so perform security checking
            if (fi.getRequest() != null && observeOncePerRequest) {
                fi.getRequest().setAttribute(FILTER_APPLIED, Boolean.TRUE);
            }

            InterceptorStatusToken token = super.beforeInvocation(fi);

            try {
                fi.getChain().doFilter(fi.getRequest(), fi.getResponse());
            }
            finally {
                super.finallyInvocation(token);
            }

            super.afterInvocation(token, null);
        }
    }
当访问api:localhost:9999/h 时,请求回走到FIlterSecurityInterceptor中的beforeInvocation处
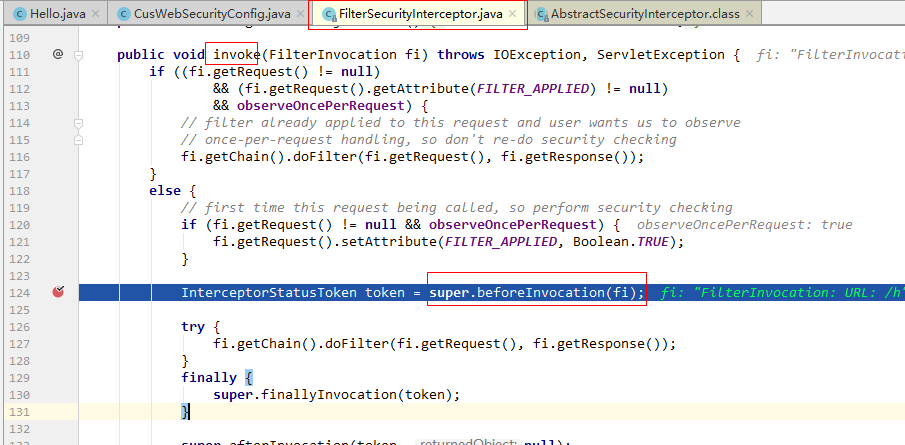
因为自己的securityConfig的是所有的请求都需要进行认证,因此在执行befoeInvocation的时候会抛出一个异常,也就是进入了ExceptionTranlationFilter中(因为没有经过认证,不能访问api)

在ExceptionTranlationFilter对异常进行处理,也就是把请求重定向到login页面上。

在登录页面填写登录名和密码(user/4ed8dccc-9425-4f92-8b12-0bac0d88793b,密码后台日志会2自动输出),填写完毕后点击登录,又因为使用的是form表单登录,所以会进入到UserNamePasswordAuthenticationFilter中,
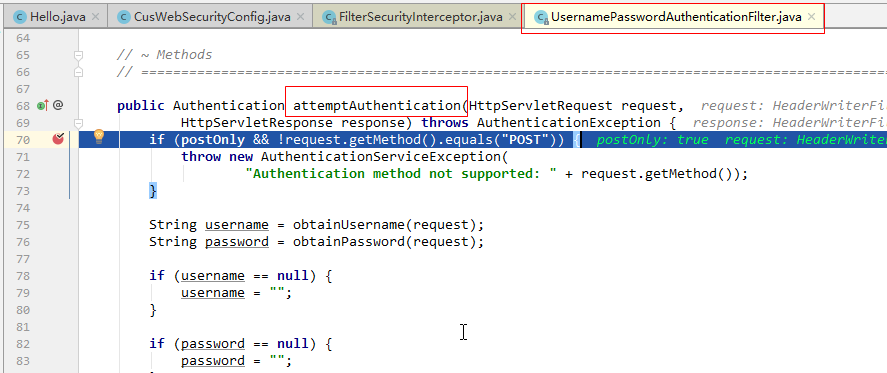
在UsernamepasswordAuthenticationFilter中执行完毕后,回再次进入到FilterSecurityInteceptor中的beforeInvocation处,此时执行到该处是不会报错,回向下继续进行。
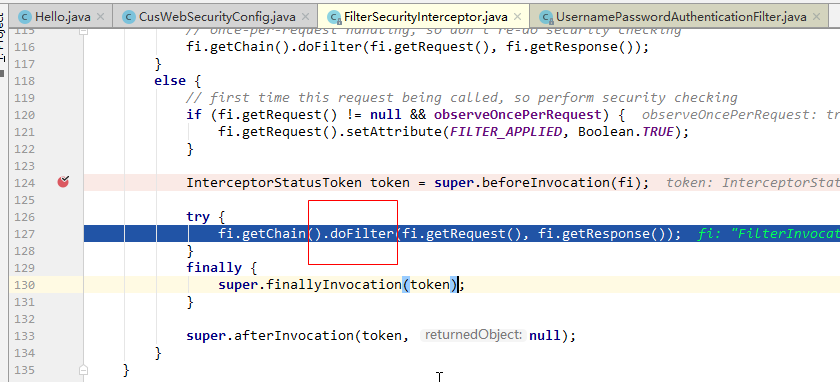
调用doFilter,也就是进入了自己写的api接口中(controller中)
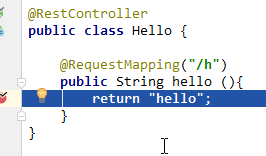
整个的流程:FilterSecurityInterceptor拦截请求,没有认证,重定向到默认的form认证页面(login),在登录页面输入用户名密码,点击登录后,会进入到UsernamePasswordAuthenticationFilter中(因为使用的form表单认证,如果使用其他认证的话,会进入到其他Filter中),在UsernamePasswordAuthenticationFilter中执行完毕后,回再次进入FIlterSecurityInterceptor中,执行没问题后,最终到controller层中的api处
自定义认证逻辑
一、处理用户信息获取逻辑
在security中用户信息的获取中,提供了一个接口UserDetailService,该接口中只有一个方法loadUserByUsername,返回参数是一个UserDetail
UserDetails loadUserByUsername(String username) throws UsernameNotFoundException;
在获取用户信息是,只需要关注一点即,获取UserDetail用户信息,之后的认证都是基于此对象的,
当查不到一个username是,会抛出一个UsernameNotFoundException异常,可以进行异常统一拦截
1、新建MyUserDetailsService(数据都是写死的)
(ps:security5好像不能只写一个userdetailservice就行运行,也得配一个PasswordEncoder,即在security配置文件中添加)
@Component
@Slf4j
public class MyUserDetailsService implements UserDetailsService {
    @Override
    public UserDetails loadUserByUsername(String s) throws UsernameNotFoundException {
        //根据username查找用户信息,在这,先手动写一个user信息
        log.info("查找用户信息{}", s);
//密码在security5中好像得加密 不加密的话会爆粗(不确定)
BCryptPasswordEncoder encoder = new BCryptPasswordEncoder();
String password = encoder.encode("password");
    //这个user对象使用的是security中的user对象,此对象已经实现了userDetail接口
        //user前两个参数是进行认证的,第三个参数是当前用户所拥有的权限,security回根据授权代码进行验证
        return new User(s, password, AuthorityUtils.commaSeparatedStringToAuthorityList("admin"));
//        AuthorityUtils.commaSeparatedStringToAuthorityList 这个方法是将一个字符一“,” 分割开
    }
}
//passwordEncoder
@Override
    protected void configure(AuthenticationManagerBuilder auth) throws Exception {

        auth.userDetailsService(myUserDetailsService)
                .passwordEncoder(new BCryptPasswordEncoder());
    }
添加w完毕后,访问localhost:9999/h api,先回跳转到默认登录页面:
随便输入username和password:会出现bad credentials信息

如果密码输入password(后台user自定义加密后的password):会登录成功,并会执行controller
二、处理用户校验逻辑
1、 用户的校验逻辑主要就是比较密码是否匹配,这一块有security自动匹配(即将user信息放到Userdetail解耦的实现类中即可)
2、账号是否过期、是否被锁定、是否可用,这几个校验都可以重新以下方法(如果没有对应的逻辑,永远返回true即可)
    boolean isAccountNonExpired();//账号没有过期   如果不需要的话,改为true,没有过期

    boolean isAccountNonLocked(); //账号没有锁定锁定

    boolean isCredentialsNonExpired();//密码是否过期了

    boolean isEnabled();//这个可以配到库中
3、自己测试
修改loadUserByUsername方法的返回参数
①accountNonLock设为false
@Component
@Slf4j
public class MyUserDetailsService implements UserDetailsService {
    @Override
    public UserDetails loadUserByUsername(String s) throws UsernameNotFoundException {
        //根据username查找用户信息,在这,先手动写一个user信息
        log.info("查找用户信息{}", s);

        BCryptPasswordEncoder encoder = new BCryptPasswordEncoder();
        String password = encoder.encode("password");

        //user前两个参数是进行认证的,第三个参数是当前用户所拥有的权限,security回根据授权代码进行验证
        return new User(s, password, true, true, true, false,
                AuthorityUtils.commaSeparatedStringToAuthorityList("admin"));
//        AuthorityUtils.commaSeparatedStringToAuthorityList 这个方法是将一个字符一“,” 分割开
    }
}
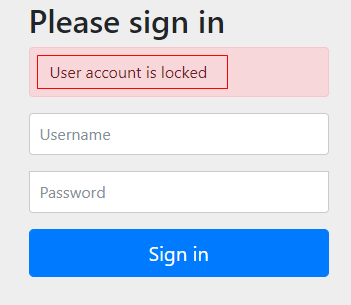
修改问之后,重启测试用的项目后,方法api,输入用户密码后,提示已被锁定(即accountNonLock属性被设为false)
三、处理密码加密解密
以下两种方式,都可以使用到加密
    @Override
    protected void configure(AuthenticationManagerBuilder auth) throws Exception {

        auth.userDetailsService(myUserDetailsService)
                .passwordEncoder(new BCryptPasswordEncoder());
    }
或:
   @Bean
    public PasswordEncoder passwordEncoder(){
        return new BCryptPasswordEncoder();
    }