一.IntentService的基本概念
IntentService是继承于Service并处理异步请求的一个类,在IntentService内有一个工作线程来处理耗时操作,启动IntentService的方式和启动传统Service一样,同时,当任务执行完后,IntentService会自动停止,而不需要我们去手动控制。另外,可以启动IntentService多次,而每一个耗时操作会以工作队列的方式在IntentService的onHandleIntent回调方法中执行,并且,每次只会执行一个工作线程,执行完第一个再执行第二个,以此类推。所有请求都在一个单线程中,不会阻塞应用程序的主线程(UI Thread),同一时间只处理一个请求。那么,用IntentService有什么好处呢?首先,我们省去了在Service中手动开线程的麻烦,第二,当操作完成时,我们不用手动停止Service,第三,it's so easy to use!
二.开启代码之旅
OK!接下看看如何去使用,新建工程,新建一个继承IntentService的类,代码如下:
package com.nyl.intentservicesummarize;

import android.app.IntentService;
import android.content.Intent;
import android.os.IBinder;
import android.util.Log;

/**
 * Created by Administrator on 2017/3/4 0004.
 */

public class ServiceTest extends IntentService{

    private static final String TAG = ServiceTest.class.getSimpleName();


    //必须实现父类的构造方法
    public ServiceTest() {
        super("aa");
    }

    /**
     * 必须重写的核心方法
     * @param intent
     */
    @Override
    protected void onHandleIntent(Intent intent) {
        //Intent是从Activity发过来的,携带识别参数,根据参数不同执行不同的任务
        String action = intent.getExtras().getString("param");
        if (action.equals("s1")) {
            Log.i(TAG,"启动第一个service");
        }else if (action.equals("s2")){
            Log.i(TAG,"启动第二个service");
        }else if (action.equals("s3")){
            Log.i(TAG,"启动第三个service");

            try {
                //让服务休眠2秒
                Thread.sleep(2000);
            } catch (InterruptedException e) {
                e.printStackTrace();
            }

        }

    }

    /**
     * 重写其他方法,用于查看方法的调用顺序
     * @param intent
     * @return
     */
    @Override
    public IBinder onBind(Intent intent) {
        Log.i(TAG,"onBind");
        return super.onBind(intent);
    }

    @Override
    public void onCreate() {
        super.onCreate();
    }

    @Override
    public int onStartCommand(Intent intent, int flags, int startId) {
        Log.i(TAG,"onStartCommand");
        return super.onStartCommand(intent, flags, startId);
    }

    @Override
    public void setIntentRedelivery(boolean enabled) {
        super.setIntentRedelivery(enabled);
        Log.i(TAG,"setIntentRedelivery");
    }

    @Override
    public void onDestroy() {
        Log.i(TAG,"onDestroy");
        super.onDestroy();
    }
}
AndroidManifest.xml注册下Service
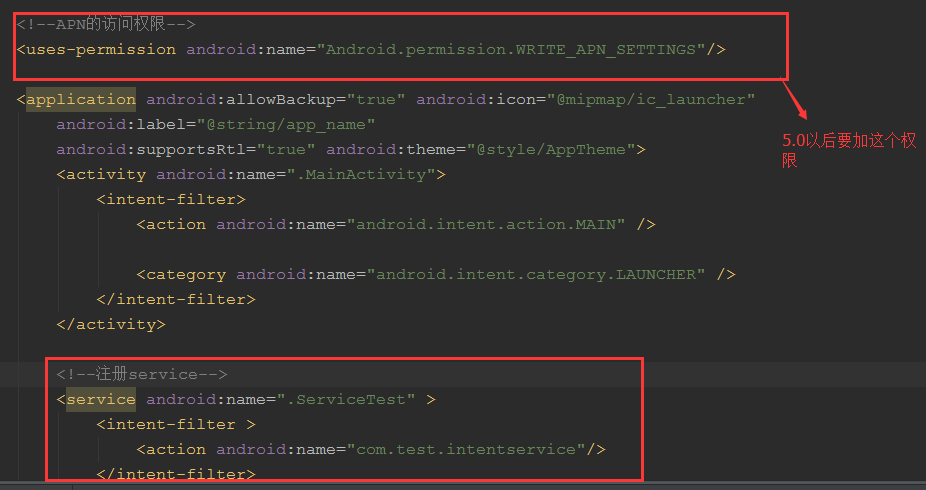
在MainActivity启动三次服务,代码如下:
package com.nyl.intentservicesummarize;

import android.app.Activity;
import android.content.Intent;
import android.os.Bundle;
import android.view.View;
import android.widget.Button;

public class MainActivity extends Activity implements View.OnClickListener {

    private Button btnStartIntentService;

    @Override
    protected void onCreate(Bundle savedInstanceState) {
        super.onCreate(savedInstanceState);
        setContentView(R.layout.activity_main);

        btnStartIntentService = (Button) findViewById(R.id.btnStartIntentService);
        btnStartIntentService.setOnClickListener(this);
    }


    @Override
    public void onClick(View view) {
        if (view.getId() == R.id.btnStartIntentService){

            /**
             * 有些时候我们使用Service的时需要采用隐私启动的方式,
             * 但是Android 5.0一出来后,其中有个特性就是Service Intent  must be explitict,
             * 也就是说从Lollipop开始,service服务必须采用显示方式启动。
             * 解决方法:

             设置Intent的Action和packageName
             */
            Intent it1 = new Intent();
            it1.setAction("com.test.intentservice");
            it1.setPackage(getPackageName());
            Bundle b1 = new Bundle();
            b1.putString("param", "s1");
            it1.putExtras(b1);

            Intent it2 = new Intent("com.test.intentservice");
            it2.setPackage(getPackageName());
            Bundle b2 = new Bundle();
            b2.putString("param", "s2");
            it2.putExtras(b2);

            Intent it3 = new Intent("com.test.intentservice");
            it3.setPackage(getPackageName());
            Bundle b3 = new Bundle();
            b3.putString("param", "s3");
            it3.putExtras(b3);

            //接着启动多次IntentService,每次启动,都会新建一个工作线程
            //但始终只有一个IntentService实例
            startService(it1);
            startService(it2);
            startService(it3);
        }
    }

}
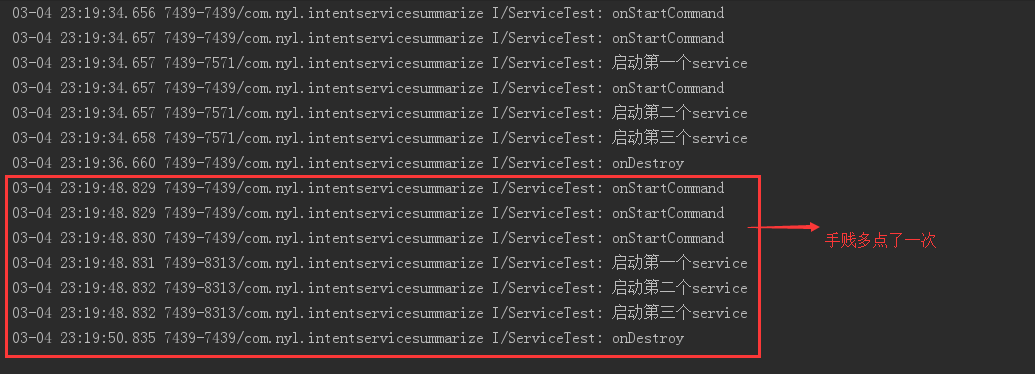
代码之路已经完成了,我们来看看打印的结果吧,如下图:
关于IntentService的内容总结暂时就这么多,文章如果有写得不对的地方,欢迎广大园友指正!