现在说到使用缓存中间件基本就是 Redis 了,通常开发环境或测试环境部署一个单机版就可以运行了,但要上生产环境还需要进行高可用的方式来部署,本文说说在 CentOS7 中 Redis 高可用的部署以及在 dotNetCore 中怎样调用。
环境
- CentOS:7.5
- Redis:5.0.7
- dotNetCore:3.0
- CSRedisCore:3.3.0
Redis部署的几种方式
- 单机版:用于开发或测试环境
- 主从模式:主从模式提供了一种备份的机制,主库可以进行读写操作,从库只能进行读操作,当主库挂了,需要手动将从库设置为主库,算不上真正的高可用
- 哨兵模式:哨兵模式基于主从模式,当主服务挂了后,哨兵服务可以从所有的从服务中选举一个升级为主,可以继续正常地对外提供服务
- 集群模式:主从(哨兵)模式的主库和所有的从库存储的数据是一样的,写数据依然是只能从主库写。集群模式主要解决的是高并发的问题,可以横向扩展,数据分摊在不同节点中。
CentOS 部署 Redis
单机部署
1、执行下面命令安装 wget ,用于后面下载 Redis 安装包
yum -y install wget
2、安装 gcc ,编译和安装 Redis 时需要
yum -y install gcc
3、下载 Redis 并安装
cd /usr/local  #进入到usr/local目录
tar xzf redis-5.0.7.tar.gz  #解压Redis
cd redis-5.0.7 #进入到解压到Redis目录
make MALLOC=libc #编译
make install #安装
4、修改 Redis 配置文件并启动
cd /usr/local/redis-5.0.7  #进入redis目录
vi redis.conf #编辑配置文件
编辑内容如下
daemonize yes #修改配置文件中的daemonize为yes,为后台启动
redis-server redis.conf #根据修改后到配置文件启动redis
5、检查并连接
ps -ef | grep redis #检查是否启动成功

redis-cli #连接到redis,默认会连接6379的默认端口
6、设置密码
vi redis.conf #编辑配置文件进行密码设置
修改文件内容,去掉requirepass前面的#号
requirepass Aa123456
redis-server redis.conf #修改完配置文件,重启redis
配置主从(哨兵模式)
正式的生产环境会使用多台服务器来配置主从,本文为了演示,在一台服务器上通过多端口的方式来配置主从,端口分配规则如下:
- master:6380
- slave1:6382
- slave2:6383
- slave3:6383
- sentinel1:26379
- sentinel2:26380
1、在 /usr/local/ 目录中创建 config 目录,在该目录中创建相应的目录存放配置文件和数据
cd /usr/local
mkdir config  #创建config目录
cd config
mkdir master-6380 #创建master-6380目录
cd master-6380
mkdir data #创建data目录用来存放数据
cp /usr/local/redis-5.0.7/redis.conf . #将配置文件复制到当前目录
cd .. #回退到config目录
cp -r master-6380/ slave-6381
cp -r master-6380/ slave-6382
cp -r master-6380/ slave-6383

mkdir sentinel-26379  #创建哨兵1配置目录
cp /usr/local/redis-5.0.7/sentinel.conf /usr/local/redis-5.0.7/config/sentinel-26379/
cp -r sentinel-26379/ sentinel-26380
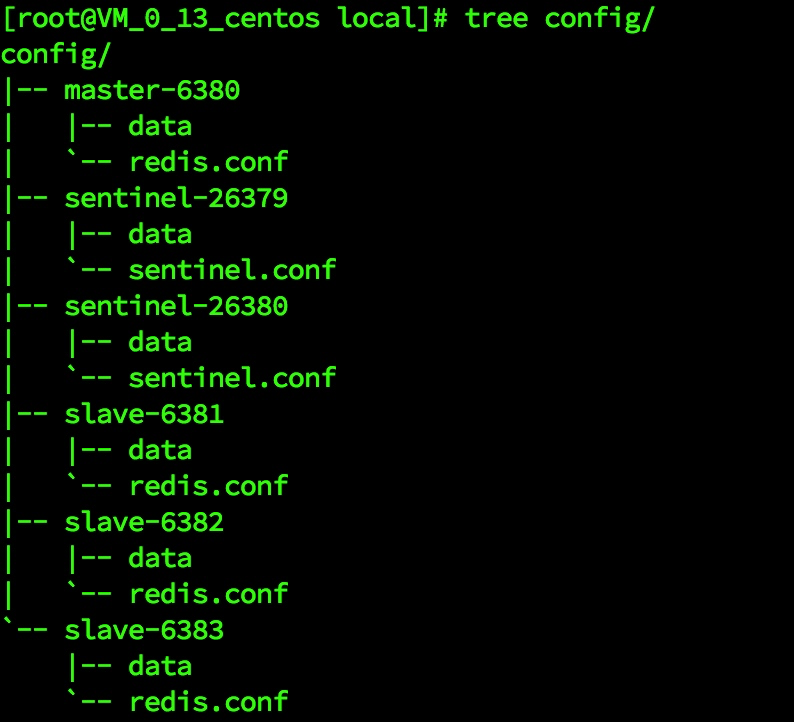
创建完成后目录结构如下:
2、配置 master 的 redis.conf 文件
bind 172.16.0.13 #修改成自己的IP地址
port 6380 #主服务器的端口号
daemonize yes #设置后台启动
pidfile /var/run/redis_6380.pid #redis 后台启动的时候会在/var/run/默认生成一个pid文件
protected-mode no #保护模式关闭
dir /usr/local/config/master-6380/data #数据保存目录
3、配置 slave 的 redis.conf 文件
bind 172.16.0.13 #修改成自己的IP地址
port 6381 #从服务器的端口号
daemonize yes #设置后台启动
pidfile /var/run/redis_6381.pid
protected-mode no #保护模式关闭
dir /usr/local/config/slave-6381/data #数据保存目录
slaveof 172.16.0.13 6380 #主服务器的IP 主服务器端口号
注意 :slaveof 默认再配置文件中是没有的,需要新添加
4、将端口 6382、6383 对应的从服务器的配置文件对照第三步进行修改
5、配置哨兵1的配置文件
port 26379  #指定哨兵1端口号
daemonize yes #设置后台启动
protected-mode no #关闭保护模式
sentinel monitor mymaster 172.16.0.13 6380 2 #监听主的端口,后面的数字2为哨兵的个数
logfile "/usr/local/config/sentinel-26379/sentinel-26379.log"
dir "/usr/local/config/sentinel-26379/data"
6、配置哨兵1的配置文件
port 26380  #指定哨兵2端口号
daemonize yes #设置后台启动
protected-mode no #关闭保护模式
sentinel monitor mymaster 172.16.0.13 6380 2 #监听主的端口,后面的数字2为哨兵的个数
logfile "/usr/local/config/sentinel-26380/sentinel-26380.log"
dir "/usr/local/config/sentinel-26380/data"
注意 :mymaster为主的名称,默认为mymaster,如果要修改,该配置文件中所有涉及的地方都需要调整。
7、启动服务
cd /usr/local/config #进入到config目录
redis-server ./master-6380/redis.conf
redis-server ./slave-6381/redis.conf
redis-server ./slave-6382/redis.conf
redis-server ./slave-6383/redis.conf
redis-sentinel ./sentinel-26379/sentinel.conf
redis-sentinel ./sentinel-26380/sentinel.conf
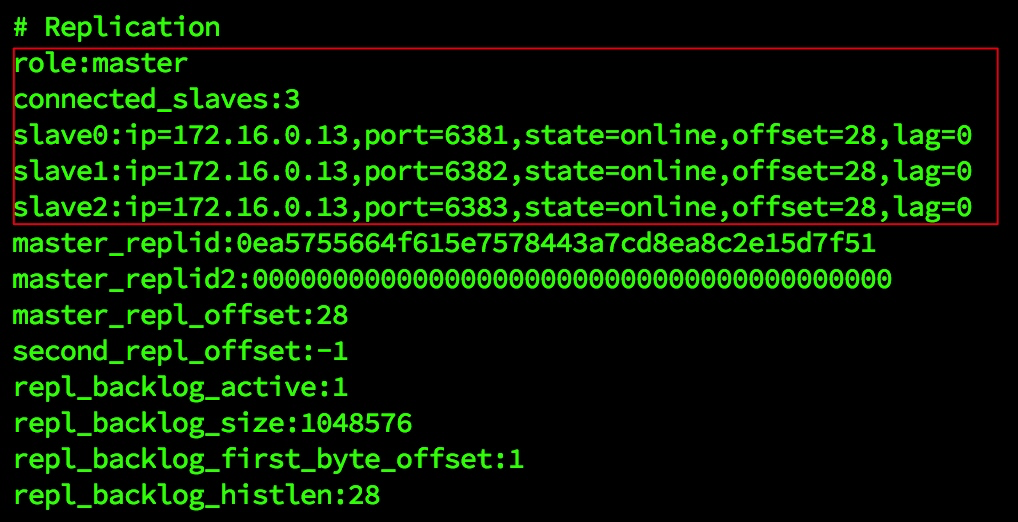
8、查看主从状态
redis-cli -h 172.16.0.13 -p 6380 #连接到主库
>info  #使用info命令查看信息,如下图
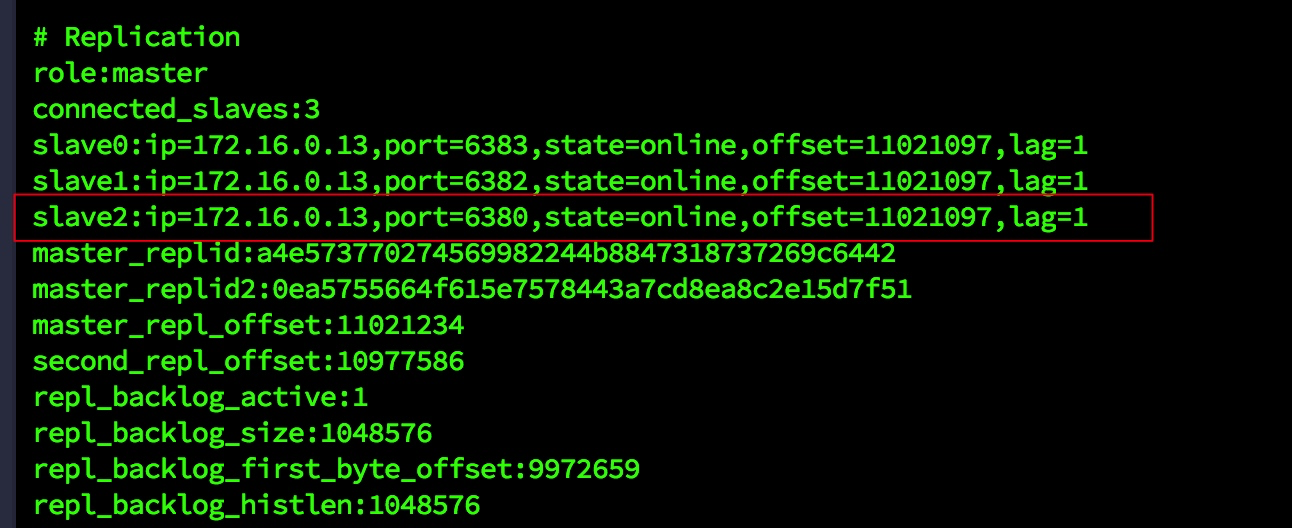
9、测试哨兵是否正常工作
redis-cli -h 172.16.0.13 -p 6380 #连接到主库
>shutdown  #停掉主库
>quit  #退出

redis-cli -h 172.16.0.13 -p 6381 #连接到其中一个从库
>info  #查看状态,如下图:

可以看出 6381 的从库已经升级为主库,这时将 6380 启动起来,查看服务器状态,可以发现 6380 已经变成从库,说明哨兵在正常工作。
dotNET Core 中连接 Redis
1、在 VS 中创建示例项目,引用 CSRedisCore 的 NuGet 包,如下图:

2、具体代码如下:
static void Main(string[] args)
{
    string redisServerIP = "172.16.0.13";
    string redisServerPort = "6380";
    string redisPassword = "";
    bool isSentinelMode = false;

    string connectionString = GetRedisConnectionString(redisServerIP, redisServerPort, redisPassword,0, "", isSentinelMode);
    //哨兵模式
    if (isSentinelMode)
    {
        redisServerIP = "172.16.0.13,172.16.0.13"; //哨兵IP列表
        redisServerPort = "26379,26380";
        List<string> connectionList = GetRedisConnectionList(redisServerIP, redisServerPort);
        CSRedisClient csredis = new CSRedisClient(connectionString, connectionList.ToArray());
        RedisHelper.Initialization(csredis);//初始化
    }
    else
    {
        //普通模式,连接主库
        CSRedisClient csredis = new CSRedisClient(connectionString);
        RedisHelper.Initialization(csredis);//初始化
    }
    Console.WriteLine("Hello World!");
}
完整示例代码请访问 https://github.com/oec2003/StudySamples/tree/master/DotNetCoreRedisDemo/DotNetCoreRedisDemo 下载。
希望本文对您有所帮助。