这里主要用来了解有关DBProxy方面的部署及基本的配置,以及模拟架构
1 DBProxy方面的安装部署
1)基础环境的部署
# yum install -y Percona-Server-devel-55.x86_64 Percona-Server-client-55.x86_64 Percona-Server-shared-55  jemalloc jemalloc-devel libevent
libevent-devel openssl openssl-devel lua lua-devel bison flex libtool.x86_64 libffi-devel libffi glib2.x86_64 glib2-devel.x86_64 glib2-fam.x86_64 git
2)由于需要使用到mysql_config,故此,需要下载mysql5.7的repos,然后将对应镜像源的5.6开启,5.7禁用,DBProxy只支持5.5 5.6的版本,故此,请勿在5.7上进行
测试
#rpm -ivh https://repo.mysql.com//mysql57-community-release-el7-9.noarch.rpm
#vim /etc/yum.repos.d/mysql-community.repo
[mysql56-community]
name=MySQL 5.6 Community Server
baseurl=http://repo.mysql.com/yum/mysql-5.6-community/el/7/$basearch/
enabled=1   #这里改成1
gpgcheck=1
gpgkey=file:///etc/pki/rpm-gpg/RPM-GPG-KEY-mysql

[mysql57-community]
name=MySQL 5.7 Community Server
baseurl=http://repo.mysql.com/yum/mysql-5.7-community/el/7/$basearch/
enabled=0  #这里改成0,禁用
gpgcheck=1
gpgkey=file:///etc/pki/rpm-gpg/RPM-GPG-KEY-mysql
3)部署安装DBProxy
#git clone https://github.com/Meituan-Dianping/DBProxy.git
#cd DBProxy/
#sh autogen.sh
#sh bootstrap.sh
#make && make install
# ll /usr/local/mysql-proxy/
total 0
drwxr-xr-x 2 root root 162 Mar 27 03:46 bin
drwxr-xr-x 4 root root  42 Mar 27 03:46 lib
2 架构设计
DBProxy可以配置一主多从的结构,也就是架构中必须有一台主库,0或多个从库,主库上可以进行读写操作,从库只能进行读操作,APP应用的流量可以通过DBProxy中设置规则,将流量路由到适合的数据库中,部署图如下
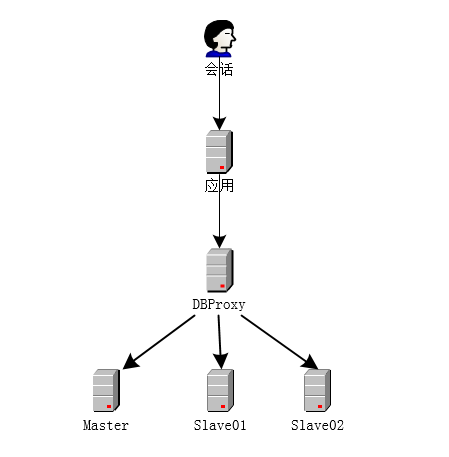
DBProxy 10.11.10.140
Master 10.11.10.141
Slave01 10.11.10.142
Slave02 10.11.10.143
主从配置此处略掉,配置DBProxy
[root@gzxsd ~]# mkdir /usr/local/mysql-proxy/conf
[root@gzxsd ~]# cd /usr/local/mysql-proxy/
[root@gzxsd mysql-proxy]# cp /data/download/DBProxy/script/source.cnf.samples /usr/local/mysql-proxy/conf/source.cnf
#配置conf文件
[root@gzxsd ~]# mkdir /var/log/dbproxy_log
[mysql-proxy]

#带#号的为非必需的配置项目

#管理接口的用户名
admin-username=guest

#管理接口的密码
admin-password=guest

#dbproxy后端连接的MySQL主库的IP和端口,可设置多项,用逗号分隔
proxy-backend-addresses=10.11.10.141:3306

#dbproxy后端连接的MySQL从库的IP和端口,@后面的数字代表权重,用来作负载均衡,若省略则默认为1,可设置多项,用逗号分隔
proxy-read-only-backend-addresses=10.11.10.142:3306,10.11.10.143:3306

#用户名与其对应的加密过的MySQL密码,密码使用PREFIX/bin目录下的加密程序encrypt加密,下行的user1和user2为示例,将其替换为你的MySQL的用户名和加密密码! #这个需要执行/data/download/DBProxy/script/encrypt guest
#需要在master上做一次grant all privileges on *.* to dbproxy@'10.11.10.140' identidified by 'xxxx';
pwds=dbproxy:uqmOY9A=

#设置dbproxy的运行方式,设为true时为守护进程方式,设为false时为前台方式,一般开发调试时设为false,线上运行时设为true
daemon=true

#设置dbproxy的运行方式,设为true时dbproxy会启动两个进程,一个为monitor,一个为worker,monitor在worker意外退出后会自动将其重启,设为false时只有worker,没有monitor,一般开发调试时设为false,线上运行时设为true
keepalive=true

#工作线程数,对dbproxy的性能有很大影响,可根据情况适当设置
event-threads=8


#日志级别,分为message、warning、critical、error、debug五个级别
log-level=message

#日志存放的路径
log-path=/var/log/dbproxy_log/

#SQL日志的开关,可设置为OFF、ON、REALTIME,OFF代表不记录SQL日志,ON代表记录SQL日志,REALTIME代表记录SQL日志且实时写入磁盘,默认为OFF
sql-log=ON

#SELECT无where条件的限制,分为ON,OFF
select-where-limit = OFF

#实例名称,用于同一台机器上多个dbproxy实例间的区分
instance=source

#dbproxy监听的工作接口IP和端口
proxy-address=0.0.0.0:3307

#dbproxy监听的管理接口IP和端口
admin-address=0.0.0.0:3308

#分表设置,此例中person为库名,mt为表名,id为分表字段,3为子表数量,可设置多项,以逗号分隔,若不分表则不需要设置该项
#tables = person.mt.id.3

#默认字符集,设置该项后客户端不再需要执行SET NAMES语句
#charset=utf8

#dbproxy前面挂接的LVS的物理网卡的IP(注意不是虚IP),若有LVS且设置了client-ips则此项必须设置,否则可以不设置
#lvs-ips = 192.168.1.1

max-connections=1000

#长时等待阈值,同步等待时间超过该阈值则认为是长时等待
long-wait-time=500

#慢查询阈值,查询执行时间超过该阈值则认为是慢查询
long-query-time=500

#0:不统计,1:仅统计总体的响应时间,其中包括慢查询,2:进行直方图统计;默认为1。
query-response-time-stats=2

#SQL日志文件最大大小,单位为字节,默认为1G
sql-log-file-size=1073741824

#保留的最大SQL日志文件个数,默认为0,不保留历史文件,仅保留当前文件
sql-log-file-num=500

#后台MySQL版本号,默认为5.5
mysql-version=5.5

#后台MySQL最大连接数,默认为0,表示不限制
backend-max-thread-running=64

#后台MySQL连接超过backend-max-thread-running后,每次sleep的时间,单位为ms
thread-running-sleep-delay=10

#SQL过滤统计缓存的SQL模板数,默认为0
lastest-query-num=100000

#SQL过滤的时间阈值
query-filter-time-threshold=500

#SQL过滤的频率阈值
query-filter-frequent-threshold=10

#SQL过滤频率统计时间窗口内的最小执行次数,根据频率和该参数计算时间窗口
access-num-per-time-window = 5

#手动过滤SQL是否生效,默认为OFF
manual-filter-flag=OFF

#自动过滤SQL是否生效,默认为OFF
auto-filter-flag=OFF
#启动DBProxy
[root@gzxsd conf]# /usr/local/mysql-proxy/bin/mysql-proxy --defaults-file=/usr/local/mysql-proxy/conf/source.cnf
[root@gzxsd conf]# ss -ant
State Recv-Q Send-Q Local Address:Port Peer Address:Port
LISTEN 0 128 *:3307 *:*
LISTEN 0 128 *:3308 *:*
LISTEN 0 128 *:22 *:*
LISTEN 0 100 127.0.0.1:25 *:*
ESTAB 0 52 10.11.10.140:22 10.11.20.31:49783
LISTEN 0 128 :::22 :::*
LISTEN 0 100 ::1:25 :::*
#连接测试
[root@gzxsd ~]# mysql -uguest -p -h10.11.10.140 -P3308
Enter password:
Welcome to the MySQL monitor.  Commands end with ; or g.
Your MySQL connection id is 1
Server version: 5.0.99-agent-admin

Copyright (c) 2000, 2016, Oracle and/or its affiliates. All rights reserved.

Oracle is a registered trademark of Oracle Corporation and/or its
affiliates. Other names may be trademarks of their respective
owners.

Type 'help;' or 'h' for help. Type 'c' to clear the current input statement.

[guest@10.11.10.140][(none)]> select * from help;
[root@gzxsd ~]# mysql -udbproxy -p -h10.11.10.140 -P3307
Enter password:
Welcome to the MySQL monitor.  Commands end with ; or g.
Your MySQL connection id is 2
Server version: 5.5.35-33.0-log MySQL Community Server (GPL)

Copyright (c) 2000, 2016, Oracle and/or its affiliates. All rights reserved.

Oracle is a registered trademark of Oracle Corporation and/or its
affiliates. Other names may be trademarks of their respective
owners.

Type 'help;' or 'h' for help. Type 'c' to clear the current input statement.

[dbproxy@10.11.10.140][(none)]> show databases;
+--------------------+
| Database           |
+--------------------+
| information_schema |
| mysql              |
| performance_schema |
+--------------------+
3 rows in set (0.01 sec)