背景:
初始Vue.js,了解组件时Vue的主要构成部分,但组件内部的作用域是相对独立的部分,组件之间的关系一般如下图:

组件A与组件B、C之间是父子组件,组件B、C之间是兄弟组件,而组件A、D之间是隔代的关系
那么对于这些不同的关系,本文主要分享了他们之间可以采用的几种数据通信方式。例如Props、$emit/$on、Vuex等。可以根据使用场景选择适合的使用方式。
一、Prop / $emit
1、Prop是你可以在组件上注册的一些自定义特性。当一个值传递给一个Prop特性的时候,它就变成了那个组件实例的一个属性。父组件向子组件传值,通过绑定属性来向子组件传入数据,子组件通过Props属性获取对应数据
//父组件
<template>
   <div>
         <child :title="title"></child>
    </div>
</template>
<script>
import Child from './child.vue'
  export defalut{
      name:'parent',
      data(){
          return{
                 title:'我是父组件给的'
               }
    },
       components:{
          Child
     }
  }
</script>


//子组件
<template>
   <div>
      <p>{{title}}</p>
   </div>
</template>
<script>
  export default{
    name:'child',
    data(){
         return{

          }
     },
     props:['title']
  }
</script>
2、$emit 子组件向父组件传值(通过事件形式),子组件通过 $emit 事件向父组件发送消息,将自己的数据传递给父组件。

 1 // 父组件
 2 <template>
 3   <div class="container">
 4     <div class="title">{{title}}</div>
 5     <child @changeTitle="parentTitle"></child>
 6   </div>
 7 </template>
 8
 9 <script>
10 import Child from "./component/child.vue";
11
12 export default {
13   name: "demo",
14   data: function() {
15     return {
16       title: null
17     };
18   },
19   components: {
20     Child
21   },
22   methods: {
23     parentTitle(e) {
24       this.title = e;
25     }
26   }
27 };
28 </script>
29
30
31 // 子组件
32 <template>
33   <div class="center">
34     <button @click="childTitle">我给父组件赋值</button>
35   </div>
36 </template>
37
38 <script>
39 export default {
40   name: 'demo',
41   data() {
42     return {
43       key: 1
44     };
45   },
46   methods: {
47     childTitle() {
48       this.$emit('changeTitle', `我给父组件的第${this.key}次`);
49       this.key++;
50     }
51   }
52 };
53 </script>
小总结:常用的数据传输方式,父子间传递。
二、 $emit / $on
这个方法是通过创建了一个空的 vue 实例,当做 $emit 事件的处理中心(事件总线),通过他来触发以及监听事件,方便的实现了任意组件间的通信,包含父子,兄弟,隔代组件。
  1 // 父组件
  2 <template>
  3   <div class="container">
  4     <child1 :Event="Event"></child1>
  5     <child2 :Event="Event"></child2>
  6     <child3 :Event="Event"></child3>
  7   </div>
  8 </template>
  9
 10 <script>
 11 import Vue from "vue";
 12
 13 import Child1 from "./component/child1.vue";
 14 import Child2 from "./component/child2.vue";
 15 import Child3 from "./component/child3.vue";
 16
 17 const Event = new Vue();
 18
 19 export default {
 20   name: "demo",
 21   data: function() {
 22     return {
 23       Event: Event
 24     };
 25   },
 26   components: {
 27     Child1,
 28     Child2,
 29     Child3
 30   },
 31 };
 32 </script>
 33
 34
 35 // 子组件1
 36 <template>
 37   <div class="center">
 38     1.我的名字是:{{name}}
 39     <button @click="send">我给3组件赋值</button>
 40   </div>
 41 </template>
 42
 43 <script>
 44 export default{
 45   name: "demo1",
 46   data() {
 47     return {
 48       name: "政采云"
 49     };
 50   },
 51   props: {
 52     Event
 53   },
 54   methods: {
 55     send() {
 56       this.Event.$emit("message-a", this.name);
 57     }
 58   }
 59 };
 60 </script>
 61
 62
 63 // 子组件2
 64 <template>
 65   <div class="center">
 66     2.我的年龄是:{{age}}岁
 67     <button @click="send">我给3组件赋值</button>
 68   </div>
 69 </template>
 70
 71 <script>
 72 /* eslint-disable */
 73 export default {
 74   name: "demo2",
 75   data() {
 76     return {
 77       age: "3"
 78     };
 79   },
 80   props: {
 81     Event
 82   },
 83   methods: {
 84     send() {
 85       this.Event.$emit("message-b", this.age);
 86     }
 87   }
 88 };
 89 </script>
 90
 91
 92 // 子组件3
 93 <template>
 94   <div class="center">我的名字是{{name}},今年{{age}}岁</div>
 95 </template>
 96
 97 <script>
 98 export default{
 99   name: 'demo3',
100   data() {
101     return {
102       name: '',
103       age: ''
104     };
105   },
106   props: {
107     Event
108   },
109   mounted() {
110     this.Event.$on('message-a', name => {
111       this.name = name;
112     });
113     this.Event.$on('message-b', age => {
114       this.age = age;
115     });
116   },
117 };
118 </script>
小总结:巧妙的在父子,兄弟,隔代组件中都可以互相数据通信。
三、 Vuex
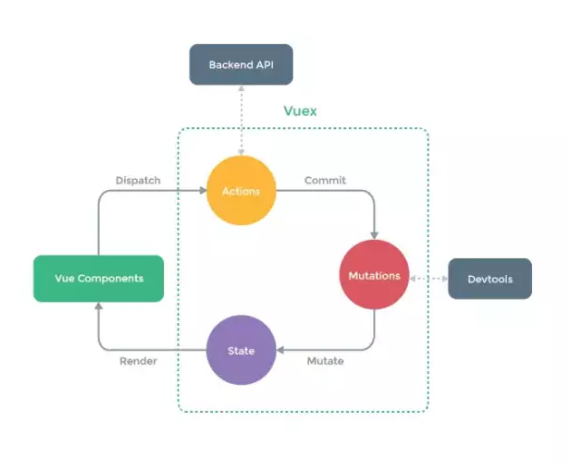
Vuex[1] 是一个专为 Vue.js 应用程序开发的状态管理模式。它采用集中式存储管理应用的所有组件的状态,并以相应的规则保证状态以一种可预测的方式发生变化。

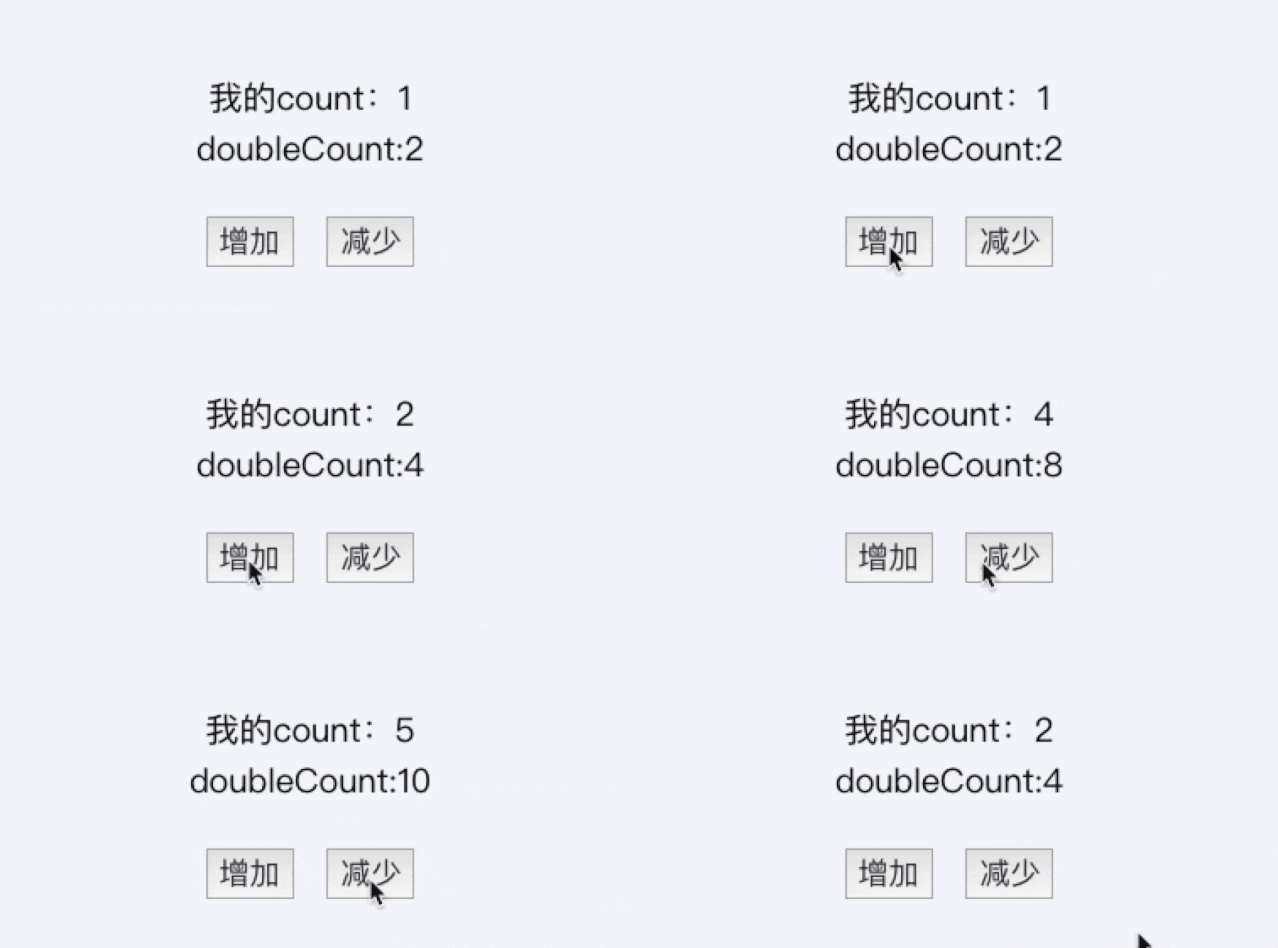
Vuex 实现了一个单项数据流,通过创建一个全局的 State 数据,组件想要修改 State 数据只能通过 Mutation 来进行,例如页面上的操作想要修改 State 数据时,需要通过 Dispatch (触发 Action ),而 Action 也不能直接操作数据,还需要通过 Mutation 来修改 State 中数据,最后根据 State 中数据的变化,来渲染页面。

 1 // index.js
 2 import Vue from 'vue';
 3 import Tpl from './index.vue';
 4 import store from './store';
 5
 6 new Vue({
 7   store,
 8   render: h => h(Tpl),
 9 }).$mount('#app');
10
11
12 // store
13 import Vue from 'vue';
14 import Vuex from 'vuex';
15
16 Vue.use(Vuex);
17
18 const store = new Vuex.Store({
19   state: {
20     count: 1
21   },
22   mutations: {
23     increment(state) {
24       state.count++;
25     },
26     reduce(state) {
27       state.count--;
28     }
29   },
30   actions: {
31     actIncrement({ commit }) {
32       commit('increment');
33     },
34     actReduce({ commit }) {
35       commit('reduce');
36     }
37   },
38   getters: {
39     doubleCount: state => state.count*2
40   }
41 });
42
43 export default store;
44
45
46 // vue文件
47 <template>
48   <div class="container">
49     <p>我的count:{{count}}</p>
50     <p>doubleCount:{{doubleCount}}</p>
51     <button @click="this.actIncrement">增加</button>
52     <button @click="this.actReduce">减少</button>
53   </div>
54 </template>
55
56 <script>
57 import { mapGetters, mapActions, mapState } from "vuex";
58
59 export default {
60   name: "demo",
61   data: function() {
62     return {};
63   },
64   components: {},
65   props: {},
66   computed: {
67     ...mapState(["count"]),
68     ...mapGetters(["doubleCount"])
69   },
70   methods: {
71     ...mapActions(["actIncrement", "actReduce"])
72   }
73 };
74 </script>
Vuex 中需要注意的点:
Mutation :是修改State数据的唯一推荐方法,且只能进行同步操作。
Getter :Vuex 允许在Store中定义 “ Getter”(类似于 Store 的计算属性)。Getter 的返回值会根据他的依赖进行缓存,只有依赖值发生了变化,才会重新计算。
本段只是简单介绍了一下 Vuex 的运行方式,更多功能例如 Module 模块请参考官网[2] 。
小总结:统一的维护了一份共同的 State 数据,方便组件间共同调用。
四、 $attrs / $listeners
Vue 组件间传输数据在 Vue 2.4 版本后有了新方法。除了 Props 外,还有了 $attrs / $listeners。
• $attrs: 包含了父作用域中不作为 Prop 被识别 (且获取) 的特性绑定(Class 和 Style 除外)。当一个组件没有声明任何 Prop 时,这里会包含所有父作用域的绑定 (Class 和 Style 除外),并且可以通过 v-bind="$attrs" 传入内部组件——在创建高级别的组件时非常有用。
• $listeners: 包含了父作用域中的 (不含 .native 修饰器的) v-on 事件监听器。它可以通过 v-on="$listeners" 传入内部组件
下面来看个例子
  1 // 父组件
  2 <template>
  3   <div class="container">
  4     <button style="backgroundColor:lightgray" @click="reduce">减dd</button>
  5     <child1 :aa="aa" :bb="bb" :cc="cc" :dd="dd" @reduce="reduce"></child1>
  6   </div>
  7 </template>
  8
  9 <script>
 10 import Child1 from './component/child1.vue';
 11 export default {
 12   name: 'demo',
 13   data: function() {
 14     return {
 15       aa: 1,
 16       bb: 2,
 17       cc: 3,
 18       dd: 100
 19     };
 20   },
 21   components: {
 22     Child1
 23   },
 24   methods: {
 25     reduce() {
 26       this.dd--;
 27     }
 28   }
 29 };
 30 </script>
 31
 32
 33 // 子组件1
 34 <template>
 35   <div>
 36     <div class="center">
 37       <p>aa:{{aa}}</p>
 38       <p>child1的$attrs:{{$attrs}}</p>
 39       <button @click="this.reduce1">组件1减dd</button>
 40     </div>
 41     <child2 v-bind="$attrs" v-on="$listeners"></child2>
 42   </div>
 43 </template>
 44
 45 <script>
 46 import child2 from './child2.vue';
 47 export default {
 48   name: 'demo1',
 49   data() {
 50     return {};
 51   },
 52   props: {
 53     aa: Number
 54   },
 55   components: {
 56     child2
 57   },
 58   methods: {
 59     reduce1() {
 60       this.$emit('reduce');
 61     }
 62   }
 63 };
 64 </script>
 65
 66
 67 // 子组件2
 68 <template>
 69   <div>
 70     <div class="center">
 71       <p>bb:{{bb}}</p>
 72       <p>child2的$attrs:{{$attrs}}</p>
 73       <button @click="this.reduce2">组件2减dd</button>
 74     </div>
 75     <child3 v-bind="$attrs"></child3>
 76   </div>
 77 </template>
 78
 79 <script>
 80 import child3 from './child3.vue';
 81 export default {
 82   name: 'demo1',
 83   data() {
 84     return {};
 85   },
 86   props: {
 87     bb: Number
 88   },
 89   components: {
 90     child3
 91   },
 92   methods: {
 93     reduce2() {
 94       this.$emit('reduce');
 95     }
 96   }
 97 };
 98 </script>
 99
100
101 // 子组件3
102 <template>
103   <div class="center">
104     <p>child3的$attrs:{{$attrs}}</p>
105   </div>
106 </template>
107
108 <script>
109 export default {
110   name: 'demo3',
111   data() {
112     return {};
113   },
114   props: {
115     dd: String
116   },
117 };
118 </script>
简单来说,$attrs 里存放的是父组件中绑定的非 props 属性,$listeners 里面存放的是父组件中绑定的非原生事件。
小总结:当传输数据、方法较多时,无需一一填写的小技巧。
五、 Provider / Inject
Vue 2.2 版本以后新增了这两个 API , 这对选项需要一起使用,以允许一个祖先组件向其所有子孙后代注入一个依赖,不论组件层次有多深,并在其上下游关系成立的时间里始终生效。 简单来说,就是父组件通过 Provider 传入变量,任意子孙组件通过 Inject 来拿到变量。
 1 // 父组件
 2 <template>
 3   <div class="container">
 4     <button @click="this.changeName">我要改名字了</button>
 5     <p>我的名字:{{name}}</p>
 6     <child1></child1>
 7   </div>
 8 </template>
 9
10 <script>
11 import Child1 from './component/child1.vue';
12 export default {
13   name: 'demo',
14   data: function() {
15     return {
16       name: '政采云'
17     };
18   },
19   // provide() {
20   //   return {
21   //     name: this.name //这种绑定方式是不可响应的
22   //   };
23   // },
24   provide() {
25     return {
26       obj: this
27     };
28   },
29   components: {
30     Child1
31   },
32   methods: {
33     changeName() {
34       this.name = '政采云前端';
35     }
36   }
37 };
38 </script>
39
40
41 // 子组件
42 <template>
43   <div>
44     <div class="center">
45       <!-- <p>子组件名字:{{name}}</p> -->
46       <p>子组件名字:{{this.obj.name}}</p>
47     </div>
48     <child2></child2>
49   </div>
50 </template>
51
52 <script>
53 import child2 from './child2.vue';
54
55 export default {
56   name: 'demo1',
57   data() {
58     return {};
59   },
60   props: {},
61   // inject: ["name"],
62   inject: {
63     obj: {
64       default: () => {
65         return {};
66       }
67     }
68   },
69   components: {
70     child2
71   },
72 };
73 </script>
需要注意的是: Provide 和 Inject 绑定并不是可响应的。这是刻意为之的。然而,如果你传入了一个可监听的对象,那么其对象的属性还是可响应的。
所以,如果采用的是我代码中注释的方式,父级的 name 如果改变了,子组件this.name 是不会改变的,仍然是 政采云 ,而当采用代码中传入一个监听对象,修改对象中属性值,是可以监听到修改的。
Provider / Inject 在项目中需要有较多公共传参时使用还是颇为方便的。
小总结:传输数据父级一次注入,子孙组件一起共享的方式。
六、 $parent / $children & $refs
• $parent / $children: 指定已创建的实例之父实例,在两者之间建立父子关系。子实例可以用 this.$parent 访问父实例,子实例被推入父实例的 $children 数组中。
• $refs: 一个对象,持有注册过 ref 特性[3] 的所有 DOM 元素和组件实例。ref 被用来给元素或子组件注册引用信息。引用信息将会注册在父组件的 $refs 对象上。如果在普通的 DOM 元素上使用,引用指向的就是 DOM 元素;如果用在子组件上,引用就指向组件。
 1 // 父组件
 2 <template>
 3   <div class="container">
 4     <p>我的title:{{title}}</p>
 5     <p>我的name:{{name}}</p>
 6     <child1 ref="comp1"></child1>
 7     <child2 ref="comp2"></child2>
 8   </div>
 9 </template>
10
11 <script>
12 import Child1 from './component/child1.vue';
13 import Child2 from './component/child2.vue';
14 export default {
15   name: 'demo',
16   data: function() {
17     return {
18       title: null,
19       name: null,
20       content: '就是我'
21     };
22   },
23   components: {
24     Child1,
25     Child2
26   },
27   mounted() {
28     const comp1 = this.$refs.comp1;
29     this.title = comp1.title;
30     comp1.sayHello();
31     this.name = this.$children[1].title;
32   },
33 };
34 </script>
35
36
37 // 子组件1-ref方式
38 <template>
39   <div>
40     <div class="center">我的父组件是谁:{{content}}</div>
41   </div>
42 </template>
43
44 <script>
45 export default {
46   name: 'demo1',
47   data() {
48     return {
49       title: '我是子组件',
50       content: null
51     };
52   },
53   mounted() {
54     this.content = this.$parent.content;
55   },
56   methods: {
57     sayHello() {
58       window.alert('Hello');
59     }
60   }
61 };
62 </script>
63
64
65 // 子组件2-children方式
66 <template>
67   <div>
68     <div class="center"></div>
69   </div>
70 </template>
71
72 <script>
73 export default{
74   name: 'demo1',
75   data() {
76     return {
77       title: '我是子组件2'
78     };
79   },
80 };
81 </script>
通过例子可以看到这两种方式都可以父子间通信,而缺点也很统一,就是都不能跨级以及兄弟间通信。
小总结:父子组件间共享数据以及方法的便捷实践之一。
总结
组件间不同的使用场景可以分为 3 类,对应的通信方式如下:
• 父子通信:Props / $emit,$emit / $on,Vuex,$attrs / $listeners,provide/inject,$parent / $children&$refs
• 兄弟通信:$emit / $on,Vuex
• 隔代(跨级)通信:$emit / $on,Vuex,provide / inject,$attrs / $listeners