kubernetes基本操作
执行两条命令,以支持kubectl命令tables补全
yum -y install bash-completion bash-completion-extras
kubectl completion bash >~/.kube/kubectl_autocompletion
echo 'source ~/.kube/kubectl_autocompletion' >>/etc/profile
source /etc/profile
kubectl命令行管理工具
用于连接kubernetes集群和管理资源的命令行工具

创建资源
kubectl run nginx --replicas=3 --image=nginx:latest --port=80
#参数
--replicas	---指定数量
--image		---指定镜像
--port		---指定端口

这个命令创建了一个控制器(deployment),这个控制器负责更高级的功能,譬如滚动更新,管理你的副本
kubectl get deployment
NAME    READY   UP-TO-DATE   AVAILABLE   AGE
nginx   3/3     3            3           3m24s
发布服务
#服务不是创建好了就可以访问到的,需要创建一个service把你的服务暴露出去
kubectl expose deployment nginx --port=80 --type=NodePort --target-port=80 --name=nginx-serivce
#参数
deployment		---指定deployment名字,也就是刚刚创建的nginx
--port			---service内部访问的端口
--type=NodePort	 ---类型为NodePort,代表node节点IP
--target-port	---容器端口
--name			---service名字

kubectl get svc
NAME            TYPE        CLUSTER-IP   EXTERNAL-IP   PORT(S)        AGE
kubernetes      ClusterIP   10.0.0.1     <none>        443/TCP        38h
nginx-serivce   NodePort    10.0.0.147   <none>        80:31493/TCP   20s

nginx已经发布出去了,随机的端口为31493,所以访问任意Node节点的31493
for i in `echo 192.168.10.{92,93,95}:31493`;do curl -I $i;done
HTTP/1.1 200 OK
Server: nginx/1.17.10
Date: Wed, 27 May 2020 01:52:44 GMT
Content-Type: text/html
Content-Length: 612
Last-Modified: Tue, 14 Apr 2020 14:19:26 GMT
Connection: keep-alive
ETag: "5e95c66e-264"
Accept-Ranges: bytes

HTTP/1.1 200 OK
Server: nginx/1.17.10
Date: Wed, 27 May 2020 01:52:44 GMT
Content-Type: text/html
Content-Length: 612
Last-Modified: Tue, 14 Apr 2020 14:19:26 GMT
Connection: keep-alive
ETag: "5e95c66e-264"
Accept-Ranges: bytes

HTTP/1.1 200 OK
Server: nginx/1.17.10
Date: Wed, 27 May 2020 01:52:44 GMT
Content-Type: text/html
Content-Length: 612
Last-Modified: Tue, 14 Apr 2020 14:19:26 GMT
Connection: keep-alive
ETag: "5e95c66e-264"
Accept-Ranges: bytes
更新服务
#把nginx版本更变为1.16.1
kubectl set image deployment/nginx nginx=nginx:1.16.1

#确认是否已经更新
for i in `echo 192.168.10.{92,93,95}:31493`;do curl -I $i;done
HTTP/1.1 200 OK
Server: nginx/1.16.1
Date: Wed, 27 May 2020 01:59:27 GMT
Content-Type: text/html
Content-Length: 612
Last-Modified: Tue, 13 Aug 2019 10:05:00 GMT
Connection: keep-alive
ETag: "5d528b4c-264"
Accept-Ranges: bytes

HTTP/1.1 200 OK
Server: nginx/1.16.1
Date: Wed, 27 May 2020 01:59:27 GMT
Content-Type: text/html
Content-Length: 612
Last-Modified: Tue, 13 Aug 2019 10:05:00 GMT
Connection: keep-alive
ETag: "5d528b4c-264"
Accept-Ranges: bytes

HTTP/1.1 200 OK
Server: nginx/1.16.1
Date: Wed, 27 May 2020 01:59:27 GMT
Content-Type: text/html
Content-Length: 612
Last-Modified: Tue, 13 Aug 2019 10:05:00 GMT
Connection: keep-alive
ETag: "5d528b4c-264"
Accept-Ranges: bytes
服务回滚
#查看一下发布过的历史版本
kubectl rollout history deployment nginx
deployment.apps/nginx
REVISION  CHANGE-CAUSE
1         <none>
2         <none>

#1就是第一次发布版本,2就是当前版本,要回滚一条命令就好了,指定回滚版本也可以
kubectl rollout undo deployment nginx

#确认是否已经更新
for i in `echo 192.168.10.{92,93,95}:31493`;do curl -I $i;done
HTTP/1.1 200 OK
Server: nginx/1.17.10
Date: Wed, 27 May 2020 02:10:57 GMT
Content-Type: text/html
Content-Length: 612
Last-Modified: Tue, 14 Apr 2020 14:19:26 GMT
Connection: keep-alive
ETag: "5e95c66e-264"
Accept-Ranges: bytes

HTTP/1.1 200 OK
Server: nginx/1.17.10
Date: Wed, 27 May 2020 02:10:57 GMT
Content-Type: text/html
Content-Length: 612
Last-Modified: Tue, 14 Apr 2020 14:19:26 GMT
Connection: keep-alive
ETag: "5e95c66e-264"
Accept-Ranges: bytes

HTTP/1.1 200 OK
Server: nginx/1.17.10
Date: Wed, 27 May 2020 02:10:57 GMT
Content-Type: text/html
Content-Length: 612
Last-Modified: Tue, 14 Apr 2020 14:19:26 GMT
Connection: keep-alive
ETag: "5e95c66e-264"
Accept-Ranges: bytes
删除服务
#在部署时部署了两套资源,一套是deployment,一套是service,所以直接把两个删掉就行了
kubectl delete deployment nginx
kubectl delete services nginx-serivce
kubectl远程连接K8S集群
现在所有的管理都是在Master上进行操作的,kubectl离开了Master他就不行了,因为Master跑了apiserver,而apiserver现在监听的地址是127.0.0.1:8080,kubectl默认连接的apiserver的地址就是127.0.0.1:8080
netstat -lntp | grep kube-apiserver
tcp        0      0 192.168.10.91:6443      0.0.0.0:*               LISTEN      1319/kube-apiserver
tcp        0      0 127.0.0.1:8080          0.0.0.0:*               LISTEN      1319/kube-apiserver

想在别的非Master节点连接K8S集群,具体的方法是生成一个名为kubectl config的配置文件,这个配置文件包含了连接apiserver的认证信息
复制文件
ansible nodes -m copy -a "src=/opt/kubernetes/bin/kubectl dest=/usr/local/bin/ mode=755"
生成配置文件
#在Master节点操作
cat kubectl_Connection.sh
#bin/bash
#生成管理员证书
cd /opt/ssl_config/kubernetes/
cat > admin-csr.json<<EOF
{
  "CN": "admin",
  "hosts": [],
  "key": {
    "algo": "rsa",
    "size": 2048
  },
  "names": [
    {
      "C": "CN",
      "L": "BeiJing",
      "ST": "BeiJing",
      "O": "system:masters",
      "OU": "System"
    }
  ]
}
EOF

cfssl gencert -ca=ca.pem -ca-key=ca-key.pem -config=ca-config.json -profile=kubernetes admin-csr.json | cfssljson -bare admin

#创建kubeconfig文件

# 设置集群参数
kubectl config set-cluster kubernetes
  --server=https://192.168.31.61:6443
  --certificate-authority=ca.pem
  --embed-certs=true
  --kubeconfig=config

# 设置客户端认证参数
kubectl config set-credentials cluster-admin
  --certificate-authority=ca.pem
  --embed-certs=true
  --client-key=admin-key.pem
  --client-certificate=admin.pem
  --kubeconfig=config

# 设置上下文参数
kubectl config set-context default
  --cluster=kubernetes
  --user=cluster-admin
  --kubeconfig=config

# 设置默认上下文
kubectl config use-context default --kubeconfig=config
执行脚本
#执行脚本
bash kubectl_Connection.sh
测试能否正常连接
ansible nodes -m file -a "path=/root/.kube state=directory"
ansible nodes -m copy -a "src=config dest=/root/.kube/"
[root@k8s01 kubernetes]# ssh k8s02
[root@k8s02 ~]# kubectl get nodes
NAME    STATUS   ROLES    AGE   VERSION
k8s02   Ready    <none>   37h   v1.16.10
k8s03   Ready    <none>   36h   v1.16.10
k8s05   Ready    <none>   17h   v1.16.10
[root@k8s02 ~]#
#如果你的配置文件没有传到~/.kube目录下,你需要使用--kubeconfig=指定文件位置
YAML配置文件资源管理
语法格式:
•缩进表示层级关系
•不支持制表符"tab"缩进,使用空格缩进
•通常开头缩进2 个空格
•字符后缩进1 个空格,如冒号、逗号等
•"---" 表示YAML格式,一个文件的开始
•"#"注释
使用YAML文件部署应用
[root@k8s01 yml]# cat deployment.yaml
apiVersion: apps/v1
kind: Deployment
metadata:
  name: nginx-deployment
spec:
  selector:
    matchLabels:
      app: nginx
  replicas: 3
  template:
    metadata:
      labels:
        app: nginx
    spec:
      containers:
      - name: nginx
        image: nginx:latest
        ports:
        - containerPort: 80
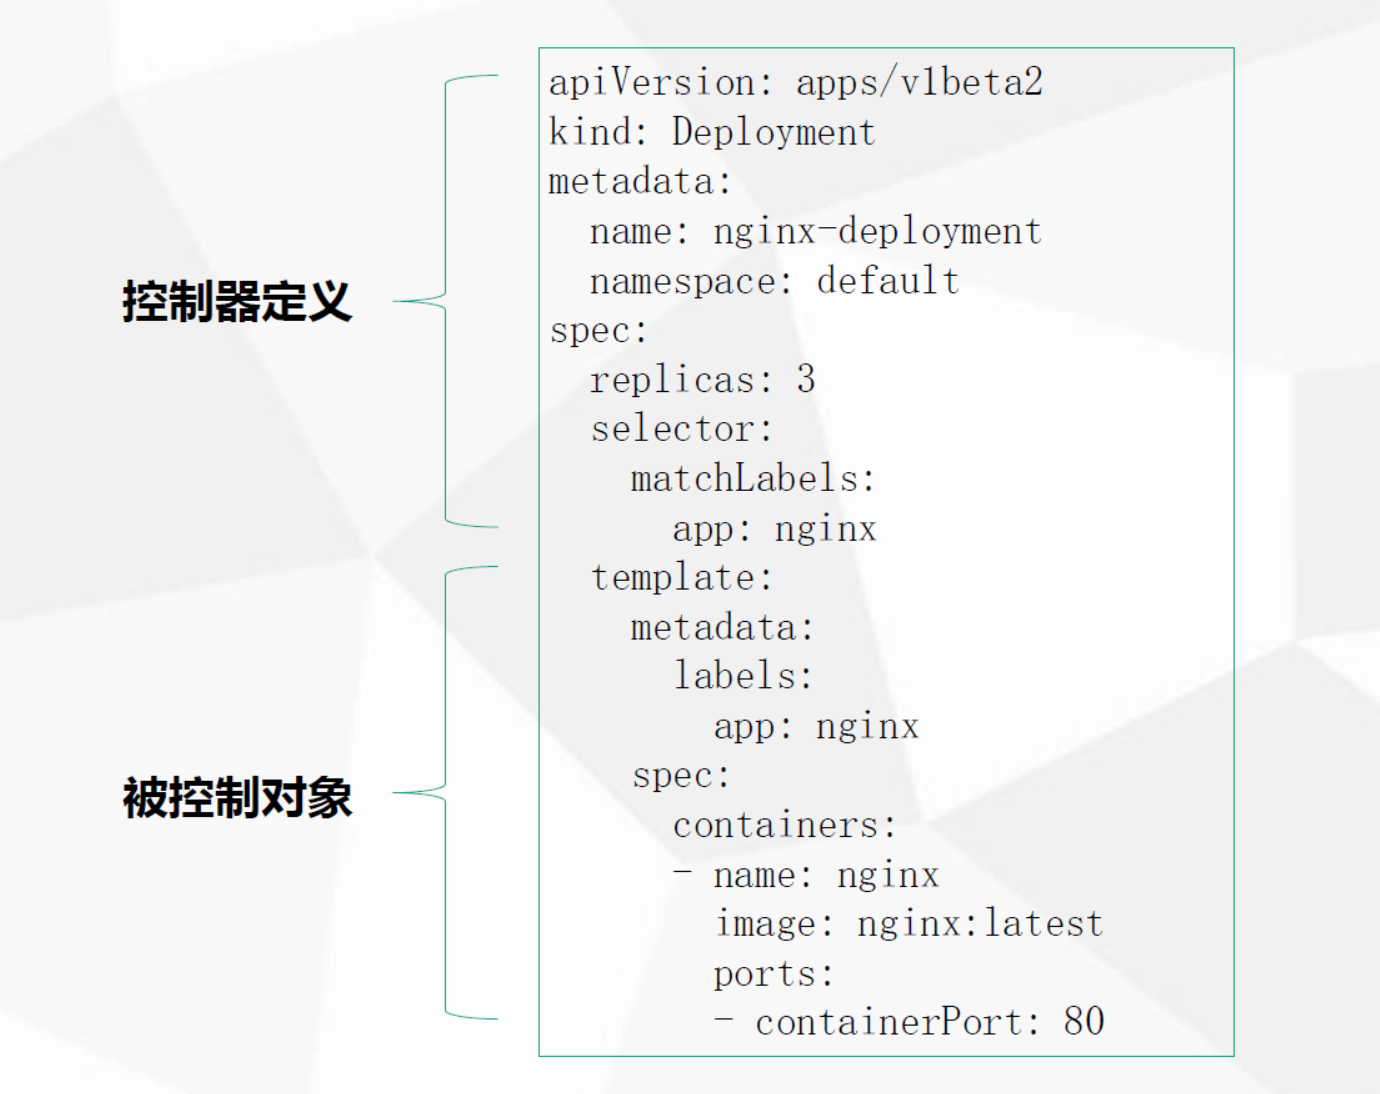
详解
#指定当前部署Deployment资源版本,在k8S中所有的资源对象都时通过api分组去实现的,这里指定的api版本
#v1表示这个资源组的稳定版本,beta为测试版,写YAML最好指定一个稳定版本。
apiVersion: apps/v1
#API版本很多的,可以通过如下命令查看
kubectl api-versions
#指定资源的名字,你要是用哪个资源
kind: Deployment
#指定控制器的一些属性,Deployment是一个控制器,是元数据信息,像是指定了Deployment的名字、标签、副本数,通过标签管理具体的pods
metadata:
  name: nginx-deployment
spec:
  selector:
    matchLabels:
      app: nginx
  replicas: 3
#被管理对象,就是pod了,定义了容器Pod标签,标记哪个控制器来控制他,标签为nginx,也定义了容器名称为nginx,镜像为nginx:latest,容器内部端口为80,控制器通过标签来匹配pod,通过这个文件描述出要创建一个怎样的资源对象
template:
    metadata:
      labels:
        app: nginx
    spec:
      containers:
      - name: nginx
        image: nginx:latest
        ports:
        - containerPort: 80
部署服务
[root@k8s01 yml]# kubectl create -f deployment.yaml
[root@k8s01 yml]# kubectl get pods
NAME                               READY   STATUS    RESTARTS   AGE
nginx-deployment-59c9f8dff-qx67z   1/1     Running   0          15s
nginx-deployment-59c9f8dff-tprf4   1/1     Running   0          15s
nginx-deployment-59c9f8dff-zrbf2   1/1     Running   0          15s

#已经创建好了,现在外部还无法访问,还需要创建一个service
发布服务
[root@k8s01 yml]# cat services.yaml
apiVersion: v1
kind: Service
metadata:
  name: nginx-service
  labels:
    app: nginx
spec:
  type: NodePort
  ports:
  - port: 80
    targetPort: 80
  selector:
    app: nginx
#这里配置的是pod的标签,也就是nginx,请确保有所标签都是能匹配的到的
[root@k8s01 yml]# kubectl create -f services.yaml
[root@k8s01 yml]# kubectl get svc
NAME            TYPE        CLUSTER-IP   EXTERNAL-IP   PORT(S)        AGE
kubernetes      ClusterIP   10.0.0.1     <none>        443/TCP        39h
nginx-service   NodePort    10.0.0.133   <none>        80:31915/TCP   13s
[root@k8s01 yml]#
访问节点
[root@k8s01 yml]# for i in `echo 192.168.10.{92,93,95}:31915`;do curl -I $i;done
HTTP/1.1 200 OK
Server: nginx/1.17.10
Date: Wed, 27 May 2020 03:11:07 GMT
Content-Type: text/html
Content-Length: 612
Last-Modified: Tue, 14 Apr 2020 14:19:26 GMT
Connection: keep-alive
ETag: "5e95c66e-264"
Accept-Ranges: bytes

HTTP/1.1 200 OK
Server: nginx/1.17.10
Date: Wed, 27 May 2020 03:11:07 GMT
Content-Type: text/html
Content-Length: 612
Last-Modified: Tue, 14 Apr 2020 14:19:26 GMT
Connection: keep-alive
ETag: "5e95c66e-264"
Accept-Ranges: bytes

HTTP/1.1 200 OK
Server: nginx/1.17.10
Date: Wed, 27 May 2020 03:11:07 GMT
Content-Type: text/html
Content-Length: 612
Last-Modified: Tue, 14 Apr 2020 14:19:26 GMT
Connection: keep-alive
ETag: "5e95c66e-264"
Accept-Ranges: bytes

#更新回滚之类的一般不会写配置文件,直接用kubectl命令去做了,其实Deployment和service的可以写到一个文件中,只需要使用---分隔就好了
生成YAML文件
其实YAML文件是可以生成的,使用kubectl就可以,现在把上面部署nginx的YAML文件转成命令
通过kubectl run
kubectl run nginx --image=nginx:latest --replicas=3 --port=80 --dry-run -o yaml > nginx.yaml
#加了--try-run只是测试命令是否能正常运行,而不会创建服务
[root@k8s01 yml]# cat nginx.yaml
apiVersion: apps/v1
kind: Deployment
metadata:
  creationTimestamp: null
  labels:
    run: nginx
  name: nginx
spec:
  replicas: 3
  selector:
    matchLabels:
      run: nginx
  strategy: {}
  template:
    metadata:
      creationTimestamp: null
      labels:
        run: nginx
    spec:
      containers:
      - image: nginx:latest
        name: nginx
        ports:
        - containerPort: 80
        resources: {}
status: {}
使用kubectl get
#现在有一个nginx的服务,现在把他Deployment的yaml导出来
[root@k8s01 yml]# kubectl get deployment nginx-deployment -o yaml >nginx.yaml
[root@k8s01 yml]# cat nginx.yaml
apiVersion: apps/v1
kind: Deployment
metadata:
  annotations:
    deployment.kubernetes.io/revision: "1"
  creationTimestamp: "2020-05-27T03:00:38Z"
  generation: 1
  name: nginx-deployment
  namespace: default
  resourceVersion: "69740"
  selfLink: /apis/apps/v1/namespaces/default/deployments/nginx-deployment
  uid: 863a3df1-c4d7-448b-92b8-786e38c4ecf5
spec:
  progressDeadlineSeconds: 600
  replicas: 3
  revisionHistoryLimit: 10
  selector:
    matchLabels:
      app: nginx
  strategy:
    rollingUpdate:
      maxSurge: 25%
      maxUnavailable: 25%
    type: RollingUpdate
  template:
    metadata:
      creationTimestamp: null
      labels:
        app: nginx
    spec:
      containers:
      - image: nginx:latest
        imagePullPolicy: Always
        name: nginx
        ports:
        - containerPort: 80
          protocol: TCP
        resources: {}
        terminationMessagePath: /dev/termination-log
        terminationMessagePolicy: File
      dnsPolicy: ClusterFirst
      restartPolicy: Always
      schedulerName: default-scheduler
      securityContext: {}
      terminationGracePeriodSeconds: 30
status:
  availableReplicas: 3
  conditions:
  - lastTransitionTime: "2020-05-27T03:00:52Z"
    lastUpdateTime: "2020-05-27T03:00:52Z"
    message: Deployment has minimum availability.
    reason: MinimumReplicasAvailable
    status: "True"
    type: Available
  - lastTransitionTime: "2020-05-27T03:00:38Z"
    lastUpdateTime: "2020-05-27T03:00:52Z"
    message: ReplicaSet "nginx-deployment-59c9f8dff" has successfully progressed.
    reason: NewReplicaSetAvailable
    status: "True"
    type: Progressing
  observedGeneration: 1
  readyReplicas: 3
  replicas: 3
  updatedReplicas: 3
Pod容器的字段拼写忘记
kubectl explain pods.spec.containers