Docker 进阶
环境准备
卸载旧版docker
参考官方文档,按步骤操作 https://docs.docker.com/engine/install/centos/
#官方文档命令
[root@node1 ~]# sudo yum remove docker
>                   docker-client
>                   docker-client-latest
>                   docker-common
>                   docker-latest
>                   docker-latest-logrotate
>                   docker-logrotate
>                   docker-engine
已加载插件:fastestmirror, langpacks
参数 docker 没有匹配
参数 docker-client 没有匹配
参数 docker-client-latest 没有匹配
参数 docker-common 没有匹配
参数 docker-latest 没有匹配
参数 docker-latest-logrotate 没有匹配
参数 docker-logrotate 没有匹配
参数 docker-engine 没有匹配
不删除任何软件包
#没有删除任何安装包,因为之前是通过rpm 包安装,所以需要使用别的方法
#使用rpm命令查看安装的docker
[root@node1 ~]# rpm -qa |grep docker
docker-ce-selinux-17.03.0.ce-1.el7.centos.noarch
docker-ce-17.03.0.ce-1.el7.centos.x86_64
#删除安装包
[root@node1 ~]# yum -y remove docker-ce-17.03.0.ce-1.el7.centos.x86_64
[root@node1 ~]# yum -y remove docker-ce-selinux-17.03.0.ce-1.el7.centos.noarch
#删除docker-compose
[root@node1 /]# rm -f /usr/local/bin/docker-compose
#删除docker镜像
[root@node1 /]# rm -rf /var/lib/docker
#到此,卸载完成
安装docker
#安装yum-utils,device-mapper-persistent-data lvm2
[root@node1 ~]# yum install -y yum-utils device-mapper-persistent-data lvm2
#安装docker-ce.repo, 这里选择国内的源,以后使用比较方便
[root@node1 ~]# yum-config-manager --add-repo http://mirrors.aliyun.com/docker-ce/linux/centos/docker-ce.repo
...
repo saved to /etc/yum.repos.d/docker-ce.repo
#更新yum 软件包索引,这一步可能因为网络问题而失败,失败之后导致下一步也无法成功.
[root@node1 ~]# yum makecache fast
https://download.docker.com/linux/centos/7/x86_64/stable/repodata/repomd.xml: [Errno 12] Timeout on https://download.docker.com/linux/centos/7/x86_64/stable/repodata/repomd.xml: (28, 'timed out before SSL handshake')
#出现这种情况,可能和家里的网络环境有关系,重启下路由获取新的公网IP,可能会解决这儿报错。

Install Docker Engine : 默认或指定版本安装
#安装docker engine 包含3个必备组件,不指定版本,默认安装最新版本
[root@node1 ~]# yum -y install docker-ce docker-ce-cli containerd.io
#指定版本安装
#查看可用版本信息
[root@node1 ~]# yum list docker-ce --showduplicates | sort -r
docker-ce.x86_64            3:20.10.4-3.el7                    docker-ce-stable
docker-ce.x86_64            3:20.10.4-3.el7                    @docker-ce-stable
docker-ce.x86_64            3:20.10.3-3.el7                    docker-ce-stable
docker-ce.x86_64            3:20.10.2-3.el7                    docker-ce-stable
docker-ce.x86_64            3:20.10.1-3.el7                    docker-ce-stable
docker-ce.x86_64            3:20.10.0-3.el7                    docker-ce-stable
docker-ce.x86_64            3:19.03.9-3.el7                    docker-ce-stable
docker-ce.x86_64            3:19.03.8-3.el7                    docker-ce-stable
docker-ce.x86_64            3:19.03.7-3.el7                    docker-ce-stable
docker-ce.x86_64            3:19.03.6-3.el7                    docker-ce-stable
#选择版本安装
[root@node1 ~]# yum -y install docker-ce-19.03.9 docker-ce-cli-19.03.9 containerd.io
#启动docker
[root@node1 docker]# systemctl start docker
#设置docker开机自启
[root@node1 docker]# systemctl enable docker
#验证docker正确安装,并拉取hello-world
[root@node1 docker]# docker run hello-world
Unable to find image 'hello-world:latest' locally
latest: Pulling from library/hello-world
0e03bdcc26d7: Pull complete
Digest: sha256:31b9c7d48790f0d8c50ab433d9c3b7e17666d6993084c002c2ff1ca09b96391d
Status: Downloaded newer image for hello-world:latest

Hello from Docker!
This message shows that your installation appears to be working correctly.
#查看运行容器
[root@node1 docker]# docker ps -a
CONTAINER ID   IMAGE         COMMAND    CREATED          STATUS                      PORTS     NAMES
4329b854c9ca   hello-world   "/hello"   14 seconds ago   Exited (0) 13 seconds ago             exciting_wilson
配置Docker加速
配置镜像加速的目的是使用国内的仓库,不然使用国外仓库会比较慢,甚至无法获取镜像。
[root@node1 docker]# cp /lib/systemd/system/docker.service /etc/systemd/system/docker.service
[root@node1 docker]# chmod a+x /etc/systemd/system/docker.service
#在内容种增加ExecStart=/usr/bin/dockerd --registry-mirror=https://dh0xuqe2.mirror.aliyuncs.com
[root@node1 docker]# vim /etc/systemd/system/docker.service

[Unit]
Description=Docker Application Container Engine
Documentation=https://docs.docker.com
After=network.target firewalld.service
[Service]
Type=notify
# the default is not to use systemd for cgroups because the delegate issues still
# exists and systemd currently does not support the cgroup feature set required
# for containers run by docker
ExecStart=/usr/bin/dockerd --registry-mirror=https://dh0xuqe2.mirror.aliyuncs.com
ExecReload=/bin/kill -s HUP $MAINPID
# Having non-zero Limit*s causes performance problems due to accounting overhead
# in the kernel. We recommend using cgroups to do container-local accounting.
LimitNOFILE=infinity
LimitNPROC=infinity
LimitCORE=infinity
# Uncomment TasksMax if your systemd version supports it.
# Only systemd 226 and above support this version.
#TasksMax=infinity
TimeoutStartSec=0
# set delegate yes so that systemd does not reset the cgroups of docker containers
Delegate=yes
# kill only the docker process, not all processes in the cgroup
KillMode=process
[Install]
WantedBy=multi-user.target
Aliyun镜像加速地址需要到aliyun官网进行申请,每个账号会得到唯一的id,也可以使用别人的,这个是免费申请使用,这是我申请的link:https://dh0xuqe2.mirror.aliyuncs.com, 检查是否配置成功
[root@node1 docker]# systemctl daemon-reload
[root@node1 docker]# systemctl restart docker
[root@node1 docker]# ps -ef |grep docker
root      11024      1  0 21:24 ?        00:00:02 /usr/bin/dockerd --registry-mirror=https://dh0xuqe2.mirror.aliyuncs.com
root      11030  11024  0 21:24 ?        00:00:07 containerd --config /var/run/docker/containerd/containerd.toml --log-level info
root      12856   9657  0 23:02 pts/4    00:00:00 grep --color=auto docker
出现mirror镜像地址,则表示加速配置成功。
docker-compose
compose介绍
从官方文档了解 docker-compose https://docs.docker.com/compose/
官方介绍:
Compose is a tool for defining and running multi-container Docker applications. With Compose, you use a YAML file to configure your application’s services. Then, with a single command, you create and start all the services from your configuration. To learn more about all the features of Compose, see the list of features.
容器编排工具,允许用户在一个模板(yaml文件)中定义一组相关联的容器,会根据—link参数,对启动的优先级进行排序
Compose works in all environments: production, staging, development, testing, as well as CI workflows. You can learn more about each case in Common Use Cases.
Using Compose is basically a three-step process:
-
Define your app’s environment with a
Dockerfileso it can be reproduced anywhere. -
Define the services that make up your app in
docker-compose.ymlso they can be run together in an isolated environment. -
Run
docker-compose upand Compose starts and runs your entire app.Compose 是docker官方开源的项目,需要安装
Dockfile让程序在任何地方运行,为应用打包镜像
在
docker-compose.yml中定义services,将其在单独的环境中运行。定义整个服务需要的环境启动compose项目:
docker-compose up一次启动所有程序
compose的重要概念:
服务services,容器container和应用applicaiton。(web、redis、mysql……)
项目project:一组关联的容器
A docker-compose.yml looks like this:
version: "3.9"  # optional since v1.27.0
services:
  web:
    build: .
    ports:
      - "5000:5000"
    volumes:
      - .:/code
      - logvolume01:/var/log
    links:
      - redis
  redis:
    image: redis
volumes:
  logvolume01: {}
yaml文件分为3个部分:version、services、other
Compose has commands for managing the whole lifecycle of your application:
- Start, stop, and rebuild services
- View the status of running services
- Stream the log output of running services
- Run a one-off command on a service
安装docker-compose
Prerequisites
Docker Compose relies on Docker Engine for any meaningful work, so make sure you have Docker Engine installed either locally or remote, depending on your setup.
- On Linux systems, first install the Docker Engine for your OS as described on the Get Docker page, then come back here for instructions on installing Compose on Linux systems.
- To run Compose as a non-root user, see Manage Docker as a non-root user.
docker-compose依赖与Docker Engine,因此安装前需要提前安装docker
Install Compose on Linux systems
docker官方提供的命令地址,但是由于下载较慢,建议使用国内的地址
curl -L "https://github.com/docker/compose/releases/download/1.28.5/docker-compose-$(uname -s)-$(uname -m)" -o /usr/local/bin/docker-compose
从国内的资源,下载较快1.28.5 是当期的最新版本。 2021-02-26 发布
curl -L https://get.daocloud.io/docker/compose/releases/download/1.28.5/docker-compose-`uname -s`-`uname -m` > /usr/local/bin/docker-compose
赋予执行权限
[root@node1 docker]# chmod +x /usr/local/bin/docker-compose
#查看版本
[root@node1 docker]# docker-compose --version
docker-compose version 1.28.5, build c4eb3a1f
If the command docker-compose fails after installation, check your path. You can also create a symbolic link to /usr/bin or any other directory in your path.
[root@node1 docker]#ln -s /usr/local/bin/docker-compose /usr/bin/docker-compose
卸载docker-compose,使用curl安装,直接使用如下命令卸载
sudo rm /usr/local/bin/docker-compose
开始使用docker-compose
Step 1: Setup
1、为项目创建目录
[root@node1 docker]# mkdir composetest
[root@node1 docker]# cd composetest/
2、创建app.py文件,并写入内容,保存退出
[root@node1 composetest]# vi app.py
import time

import redis
from flask import Flask

app = Flask(__name__)
cache = redis.Redis(host='redis', port=6379)

def get_hit_count():
    retries = 5
    while True:
        try:
            return cache.incr('hits')
        except redis.exceptions.ConnectionError as exc:
            if retries == 0:
                raise exc
            retries -= 1
            time.sleep(0.5)

@app.route('/')
def hello():
    count = get_hit_count()
    return 'Hello World! I have been seen {} times.
'.format(count)
示例中,redis就是redis容器在应用层网络的hostname,使用默认端口6379。 get_hit_count函数,增加了程序的可靠性,应用上线或连接掉线是,增加重试次数;
3、创建requirements.txt文件,并写入内容
[root@node1 composetest]# vi requirements.txt
flask
redis
Step 2: Create a Dockerfile
写dockerfile来build docker 镜像,该镜像包含所有python的依赖,包含python本身
[root@node1 composetest]# vi Dockerfile
FROM python:3.7-alpine
WORKDIR /code
ENV FLASK_APP=app.py
ENV FLASK_RUN_HOST=0.0.0.0
RUN apk add --no-cache gcc musl-dev linux-headers
COPY requirements.txt requirements.txt
RUN pip install -r requirements.txt
EXPOSE 5000
COPY . .
CMD ["flask", "run"]
此dockerfile做了以下工作:
build 镜像启动python3.7
设置工作目录为 /code
通过使用flask设置环境变量
安装gcc和其他依赖
复制requirements.txt并安装python依赖
增加元数据到镜像并监听5000端口
复制当前目录到镜像的工作目录
设置容器的默认运行命令为 flask run
Step 3: Define services in a Compose file
创建docker-compose.yml文件,写入内容
[root@node1 composetest]# vi docker-compose.yml
version: "3.9"
services:
  web:
    build: .
    ports:
      - "5000:5000"
  redis:
    image: "redis:alpine"
该compose file 定义了两个services : web 和 redis
web 服务使用了从dockerfile中build的镜像,然后绑定容器和主机到暴露的5000端口
redis服务从docker hub仓库拉取公共的redis镜像。
Step 4: Build and run your app with Compose
1、在当前目录下运行命令: docker-compose up
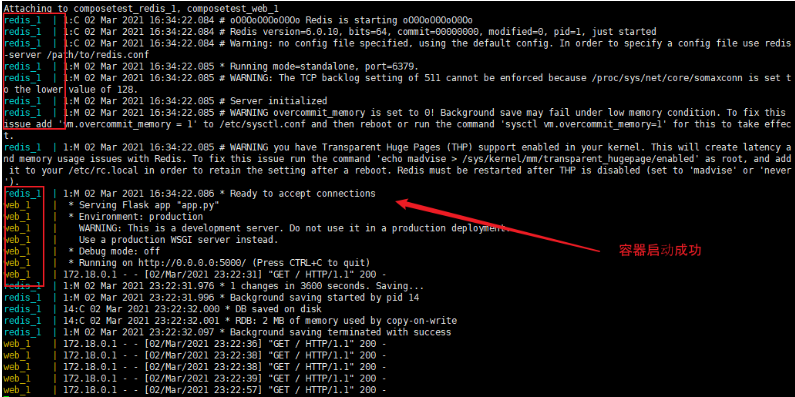
[root@node1 composetest]# docker-compose up
Creating network "composetest_default" with the default driver
Building web
Sending build context to Docker daemon  5.632kB

Step 1/10 : FROM python:3.7-alpine
3.7-alpine: Pulling from library/python
801bfaa63ef2: Pulling fs layer
...
3531f307fdb1: Pull complete
Digest: sha256:a73d0fdab3235920c0df44d55c420e2c3096f1b1a95e5f913a0287eee4192bdb
Status: Downloaded newer image for python:3.7-alpine
...
Step 5/10 : RUN apk add --no-cache gcc musl-dev linux-headers
 ...
(11/13) Installing gcc (9.3.0-r2)
Step 10/10 : CMD ["flask", "run"]
..
Creating composetest_redis_1 ... done
Creating composetest_web_1   ... done
Attaching to composetest_redis_1, composetest_web_1
redis_1  | 1:C 02 Mar 2021 16:34:22.084 # oO0OoO0OoO0Oo Redis is starting oO0OoO0OoO0Oo
redis_1  | 1:C 02 Mar 2021 16:34:22.084 # Redis version=6.0.10, bits=64, commit=00000000, ...
redis_1  | 1:M 02 Mar 2021 16:34:22.086 * Ready to accept connections
web_1    |  * Serving Flask app "app.py"
...
web_1    |  * Running on http://0.0.0.0:5000/ (Press CTRL+C to quit)
2、这个过程,由于网络原因,会比较慢。启动完成后,运行两个容器 redis 和web
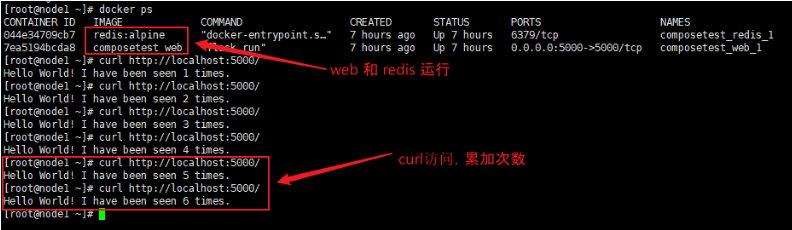
3、验证:使用宿主机本地curl命令访问localhost:5000,每次计数加一
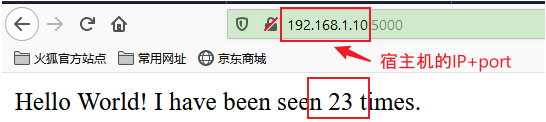
4、使用windows本地浏览器访问,这是需要使用宿主机IP+5000端口,每刷新一次页面,计数加1
5、查看本地镜像docker image ls
[root@node1 composetest]# docker image ls
REPOSITORY        TAG          IMAGE ID       CREATED         SIZE
composetest_web   latest       a00f4b729d93   21 hours ago    196MB
redis             alpine       933c79ea2511   7 weeks ago     31.6MB
python            3.7-alpine   72e4ef8abf8e   2 months ago    41.1MB
hello-world       latest       bf756fb1ae65   14 months ago   13.3kB
6、停止application
[root@node1 composetest]# docker-compose down
Stopping composetest_redis_1 ... done
Stopping composetest_web_1   ... done
Removing composetest_redis_1 ... done
Removing composetest_web_1   ... done
Removing network composetest_default
Step 5: Edit the Compose file to add a bind mount
在工程project 目录中编辑docker-compose.yml,为web服务器增加一个绑定挂载卷
version: "3.9"
services:
  web:
    build: .
    ports:
      - "5000:5000"
    volumes:
      - .:/code
    environment:
      FLASK_ENV: development
  redis:
    image: "redis:alpine"
这里增加volumes 和environment。new volumes键将主机上的项目目录(当前目录)挂载到容器内部的/code中,允许您动态修改代码,而不必重新构建映像。environment键设置FLASK_ENV环境变量,该变量告诉flask run以开发模式运行,并在更改时重新加载代码。这种模式应该只在开发中使用。
Step 6: Re-build and run the app with Compose
在你的项目目录中,输入docker-compose up,用更新后的Compose文件构建应用程序,并运行它。
[root@node1 composetest]# docker-compose up
Creating network "composetest_default" with the default driver
Creating composetest_redis_1 ... done
Creating composetest_web_1   ... done
Attaching to composetest_web_1, composetest_redis_1
redis_1  | 1:C 03 Mar 2021 13:16:23.958 # oO0OoO0OoO0Oo Redis is starting oO0OoO0OoO0Oo
....
redis_1  | 1:M 03 Mar 2021 13:16:23.967 * Ready to accept connections
web_1    |  * Serving Flask app "app.py" (lazy loading)
...
web_1    |  * Debugger is active!
web_1    |  * Debugger PIN: 209-047-431
Step 7: Update the application
由于应用程序代码现在使用一个卷挂载到容器中,所以您可以对其代码进行更改并立即看到更改,而无需重新构建映像。
更改app.py中的问候语并保存它。例如,更改Hello World!消息Hello from Docker!
[root@node1 composetest]# vi app.py
[root@node1 composetest]# curl localhost:5000
Hello from Docker! I have been seen 2 times.
Step 8: Experiment with some other commands
加入-d参数在后台运行服务docker-compose up -d,docker-compose ps 查看正在运行的服务
[root@node1 composetest]# docker-compose up -d
Starting composetest_redis_1 ... done
Starting composetest_web_1   ... done
[root@node1 composetest]# docker-compose ps
       Name                      Command               State           Ports
-------------------------------------------------------------------------------------
composetest_redis_1   docker-entrypoint.sh redis ...   Up      6379/tcp
composetest_web_1     flask run                        Up      0.0.0.0:5000->5000/tcp
[root@node1 composetest]#
docker-compose run命令允许你为你的服务运行一次性的命令。例如,要查看web服务有哪些环境变量可用:docker-compose run web env
[root@node1 composetest]# docker-compose run web env
Creating composetest_web_run ... done
PATH=/usr/local/bin:/usr/local/sbin:/usr/local/bin:/usr/sbin:/usr/bin:/sbin:/bin
HOSTNAME=58e60d696b0c
TERM=xterm
FLASK_ENV=development
LANG=C.UTF-8
GPG_KEY=0D96DF4D4110E5C43FBFB17F2D347EA6AA65421D
PYTHON_VERSION=3.7.9
PYTHON_PIP_VERSION=20.3.3
PYTHON_GET_PIP_URL=https://github.com/pypa/get-pip/raw/5f38681f7f5872e4032860b54e9cc11cf0374932/get-pip.py
PYTHON_GET_PIP_SHA256=6a0b13826862f33c13b614a921d36253bfa1ae779c5fbf569876f3585057e9d2
FLASK_APP=app.py
FLASK_RUN_HOST=0.0.0.0
HOME=/root
停止服务docker-compose stop, 可以使用down命令删除所有内容,完全删除容器。同时删除Redis容器使用的数据卷:docker-compose down --volumes
[root@node1 composetest]# docker-compose stop
Stopping composetest_web_1   ... done
Stopping composetest_redis_1 ... done
[root@node1 composetest]# docker-compose down --volumes
Removing composetest_web_run_ae9a383d78d6 ... done
Removing composetest_web_1                ... done
Removing composetest_redis_1              ... done
Removing network composetest_default
[root@node1 composetest]# docker-compose ps
Name   Command   State   Ports
------------------------------
yaml规则
docker-compose.yaml 是compose的核心!可以从官网了解更多规则。
https://docs.docker.com/compose/compose-file/compose-file-v3/
Compose file structure and examples
3层
version:'' #版本,与docker engine 对应,向下兼容

servives:  #服务
  服务1:web
  	#服务配置
  	images
  	build
  	network
  	...
  服务2:redis
  ....
  服务2:mysql
  ....
其他配置:网络/卷、全局规则
volumes:
network:
configs:
examples
version: "3.9"
services:
  web:
    build: .
    ports:
      - "5000:5000"
    volumes:
      - .:/code
    environment:
      FLASK_ENV: development
  redis:
    image: "redis:alpine"
example 2: depends_on
Express dependency between services. Service dependencies cause the following behaviors:
docker-compose upstarts services in dependency order. In the following example,dbandredisare started beforeweb.docker-compose up SERVICEautomatically includesSERVICE’s dependencies. In the example below,docker-compose up webalso creates and startsdbandredis.docker-compose stopstops services in dependency order. In the following example,webis stopped beforedbandredis.
version: "3.9"
services:
  web:
    build: .
    depends_on:
      - db
      - redis
  redis:
    image: redis
  db:
    image: postgres
There are several things to be aware of when using
depends_on:
depends_ondoes not wait fordbandredisto be “ready” before startingweb- only until they have been started. If you need to wait for a service to be ready, see Controlling startup order for more on this problem and strategies for solving it.- Version 3 no longer supports the
conditionform ofdepends_on.- The
depends_onoption is ignored when deploying a stack in swarm mode with a version 3 Compose file.
deploy
Added in version 3 file format.
Specify configuration related to the deployment and running of services. This only takes effect when deploying to a swarm with docker stack deploy, and is ignored by docker-compose up and docker-compose run.
version: "3.9"
services:
  redis:
    image: redis:alpine
    deploy:
      replicas: 6
      placement:
        max_replicas_per_node: 1
      update_config:
        parallelism: 2
        delay: 10s
      restart_policy:
        condition: on-failure
学习规律:
1、多看,多写compose.yaml文件,参考官方文档
https://docs.docker.com/compose/compose-file/
2、尝试开源项目。redis、mysql、mq。
开源项目启动WP
从docker 官方找到wordpress,然后按步骤操作在自己本地搭建wp环境。使用docker-compose将会使部署变得很简单。
https://docs.docker.com/compose/wordpress/
1、创建一个新的project 目录
[root@node1 docker]# mkdir my_wordpress
[root@node1 docker]# cd my_wordpress/
2、创建docker-compose.yml文件来启动wordpress和一个单独的mysql,以及一个挂在卷用于数据持久化
version: "3.9"

services:
  db:
    image: mysql:5.7
    volumes:
      - db_data:/var/lib/mysql
    restart: always
    environment:
      MYSQL_ROOT_PASSWORD: somewordpress
      MYSQL_DATABASE: wordpress
      MYSQL_USER: wordpress
      MYSQL_PASSWORD: wordpress

  wordpress:
    depends_on:
      - db
    image: wordpress:latest
    ports:
      - "8000:80"
    restart: always
    environment:
      WORDPRESS_DB_HOST: db:3306
      WORDPRESS_DB_USER: wordpress
      WORDPRESS_DB_PASSWORD: wordpress
      WORDPRESS_DB_NAME: wordpress
volumes:
  db_data: {}
这里映射的端口是8000
3、构建项目
在项目下运行:docker-compose up -d ,将会后台运行并下载对应的镜像。
[root@node1 my_wordpress]# docker-compose up -d
Pulling db (mysql:5.7)...
5.7: Pulling from library/mysql
a076a628af6f: Pull complete
...
7227baa8c445: Pull complete
Digest: sha256:b3d1eff023f698cd433695c9506171f0d08a8f92a0c8063c1a4d9db9a55808df
Status: Downloaded newer image for mysql:5.7
Pulling wordpress (wordpress:latest)...
latest: Pulling from library/wordpress
a076a628af6f: Already exists
02bab8795938: Pull complete
...
426d16d4eb4f: Pull complete
Digest: sha256:2d5f306e039a637bd86d9d1cfc1b465c987898e2784e4279754b9d3c2737121b
Status: Downloaded newer image for wordpress:latest
Creating my_wordpress_db_1 ... done
Creating my_wordpress_wordpress_1 ... done
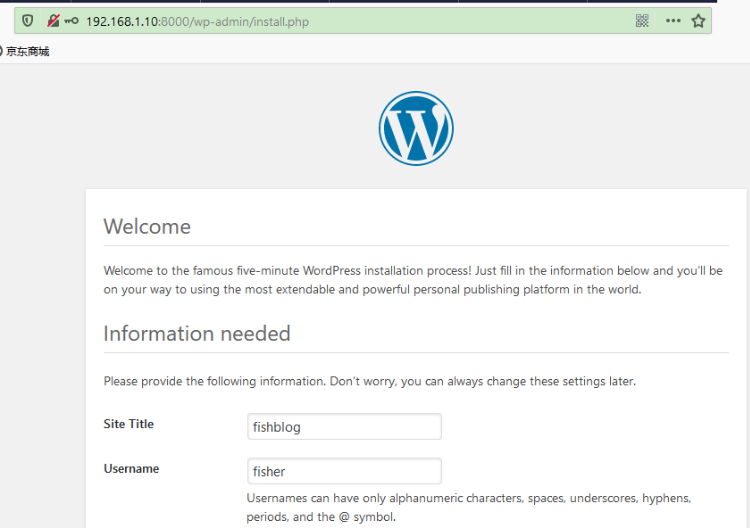
4、浏览器访问 http://192.168.1.10:8000/
至此,docker-compose体验完成。