话不多说,直接上代码:
注解是Spring的一个构建的一个重要手段,减少写配置文件,下面解释一下一些要用到的注解:
@Configuration 作用于类上面,声明当前类是一个配置类(相当于一个Spring的xml文件)
@ComponentScan(“xxx”) 作用于类上面,自动扫描xxx包名下所有使用@Service、@Component、@Repository和@Controller的类,并注册为Bean
@Bean 作用与类和方法上,相当于Spring配置文件bean节点
@EnableWebMvc 作用于类,开启一些默认配置,如一些ViewResolver或者MessageConverter
@RequestMapping 作用于类、方法,配置URL和方法之间的映射
@RequestBody 作用于参数前,允许request的参数在request体中,而不是在直接链接在地址后面
@ResponseBody 作用于返回值、方法上,支持将返回值放在response体中,而不是返回一个页面。
@RequestParam 作用于参数前,将form的对应name值映射到当前参数中。
项目的创建这里就省略啦........
pom.xml配置文件:


<?xml version="1.0" encoding="UTF-8" ?>
<project xmlns="http://maven.apache.org/POM/4.0.0" xmlns:xsi="http://www.w3.org/2001/XMLSchema-instance"
         xsi:schemaLocation="http://maven.apache.org/POM/4.0.0 http://maven.apache.org/xsd/maven-4.0.0.xsd">

    <modelVersion>4.0.0</modelVersion>
    <!--组织名-->
    <groupId>com.oukele.hellowrod</groupId>
    <!--项目名-->
    <artifactId>HelloWord</artifactId>
    <!--项目版本信息-->
    <version>1.0-SNAPSHOT</version>
    <!--项目类型-->
    <packaging>war</packaging>

    <!--依赖管理-->
    <dependencies>
        <!--spring 的依赖-->
        <dependency>
            <groupId>org.springframework</groupId>
            <artifactId>spring-context</artifactId>
            <version>5.1.3.RELEASE</version>
        </dependency>
        <dependency>
            <groupId>org.springframework</groupId>
            <artifactId>spring-core</artifactId>
            <version>5.1.3.RELEASE</version>
        </dependency>
        <dependency>
            <groupId>org.springframework</groupId>
            <artifactId>spring-beans</artifactId>
            <version>5.1.3.RELEASE</version>
        </dependency>
        <dependency>
            <groupId>org.springframework</groupId>
            <artifactId>spring-web</artifactId>
            <version>5.1.3.RELEASE</version>
        </dependency>
        <!--spring mvc -->
        <dependency>
            <groupId>org.springframework</groupId>
            <artifactId>spring-webmvc</artifactId>
            <version>5.1.3.RELEASE</version>
        </dependency>
        <!--java servlet -->
        <dependency>
            <groupId>javax.servlet</groupId>
            <artifactId>javax.servlet-api</artifactId>
            <version>4.0.1</version>
        </dependency>
        <dependency>
            <groupId>javax.servlet</groupId>
            <artifactId>jstl</artifactId>
            <version>1.2</version>
        </dependency>
    </dependencies>

</project>
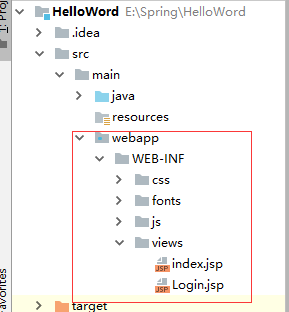
导入静态资源:
在WEB-INF中,直接粘贴boostrap的标准资源,并新建一个views文件夹,将index.jsp拉进去,将自己写的Login.jsp(想要示例的登陆页面的话在本文的最下面有个github地址可以去下载)复制进去,效果如下(顺便删了web.xml):
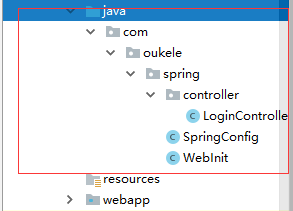
java文件夹下面的目录结构
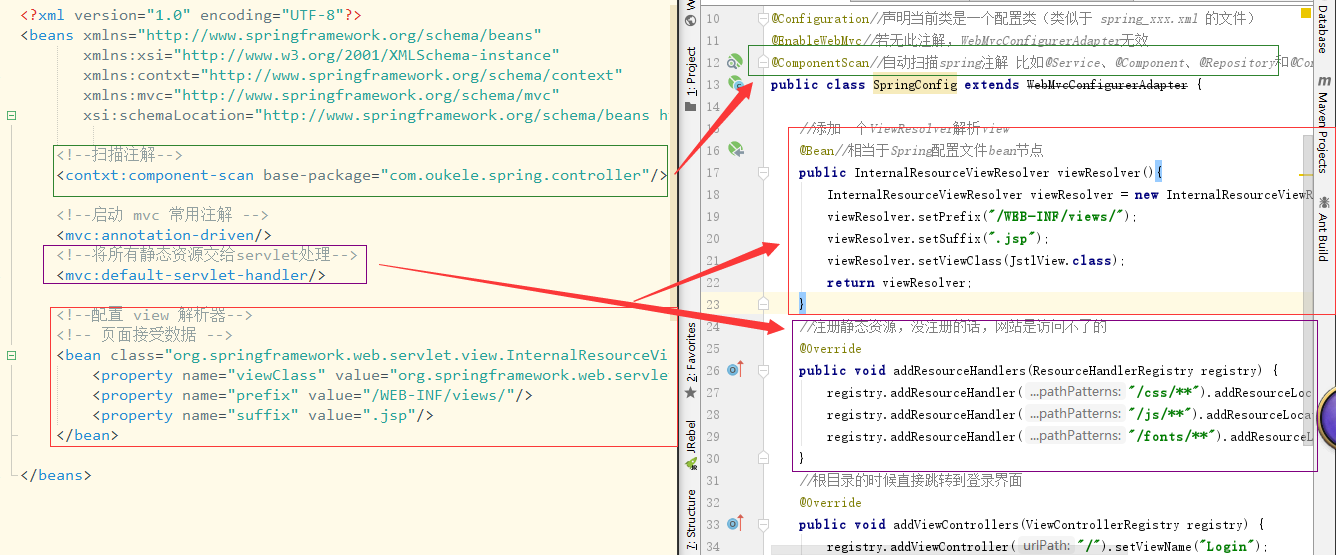
创建SpringConfig类(类似配置文件):
新建类SpringConfig类,继承WebMvcConfigurerAdapter,并配置一些必要的方法。
package com.oukele.spring;

import org.springframework.context.annotation.Bean;
import org.springframework.context.annotation.ComponentScan;
import org.springframework.context.annotation.Configuration;
import org.springframework.web.servlet.config.annotation.*;
import org.springframework.web.servlet.view.InternalResourceViewResolver;
import org.springframework.web.servlet.view.JstlView;

@Configuration//声明当前类是一个配置类(类似于 spring_xxx.xml 的文件)
@EnableWebMvc//若无此注解,WebMvcConfigurerAdapter无效
@ComponentScan//自动扫描spring注解 比如@Service、@Component、@Repository和@Controller的类,并注册为Bean
public class SpringConfig extends WebMvcConfigurerAdapter {

    //添加一个ViewResolver解析view
    @Bean//相当于Spring配置文件bean节点
    public InternalResourceViewResolver viewResolver(){
        InternalResourceViewResolver viewResolver = new InternalResourceViewResolver();
        viewResolver.setPrefix("/WEB-INF/views/");
        viewResolver.setSuffix(".jsp");
        viewResolver.setViewClass(JstlView.class);
        return viewResolver;
    }
    //注册静态资源,没注册的话,网站是访问不了的
    @Override
    public void addResourceHandlers(ResourceHandlerRegistry registry) {
        registry.addResourceHandler("/css/**").addResourceLocations("/WEB-INF/css/");
        registry.addResourceHandler("/js/**").addResourceLocations("/WEB-INF/js/");
        registry.addResourceHandler("/fonts/**").addResourceLocations("/WEB-INF/fonts/");
    }
    //根目录的时候直接跳转到登录界面
    @Override
    public void addViewControllers(ViewControllerRegistry registry) {
        registry.addViewController("/").setViewName("Login");
    }
}
与xml配置对比:
创建WebInit类(web.xml配置文件):
在 WebInit类中实现 WebApplicationInitializer接口 并实现方法,方法的内容如下:
package com.oukele.spring;

import org.springframework.web.WebApplicationInitializer;
import org.springframework.web.context.support.AnnotationConfigWebApplicationContext;
import org.springframework.web.servlet.DispatcherServlet;

import javax.servlet.ServletContext;
import javax.servlet.ServletException;
import javax.servlet.ServletRegistration;

public class WebInit implements WebApplicationInitializer {
    public void onStartup(ServletContext servletContext) throws ServletException {
        AnnotationConfigWebApplicationContext ctx = new AnnotationConfigWebApplicationContext();
        ctx.register(SpringConfig.class);
        ctx.setServletContext(servletContext);
        ServletRegistration.Dynamic dynamic = servletContext.addServlet("dispatcher",new DispatcherServlet(ctx));
        dynamic.addMapping("/");
        dynamic.setLoadOnStartup(1);
    }
}
web.xml文件 与 WebInit 类 的对比:
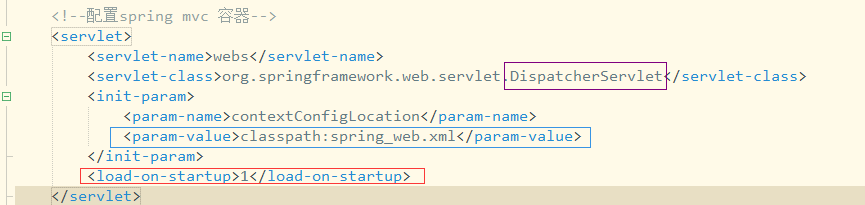
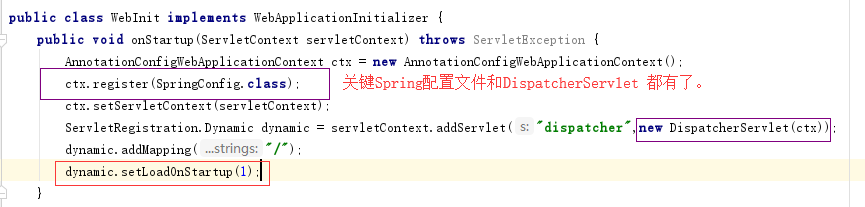
new DispatcherServlet(ctx); --> 在上写文中注册Spring配置文件,添加到DispatcherServlet上下文中。
添加Controller:
新建一个LoginController类。
package com.oukele.spring.controller;

import org.springframework.stereotype.Controller;
import org.springframework.web.bind.annotation.RequestMapping;
import org.springframework.web.bind.annotation.RequestParam;

@Controller
public class LoginController {
    @RequestMapping("/login")
    public String login(@RequestParam("username") String username, @RequestParam("pwd") String pwd) {
        String forword = null;
        if (username.equals("oukele") && pwd.equals("oukele")) {
            forword = "index";//登录成功跳转到index.jsp
        } else {
            System.out.println("no such user");
            forword = "Login";//登录失败跳转到Login.jsp继续登录操作
        }
        return forword;
    }

}
添加Tomcat,运行:
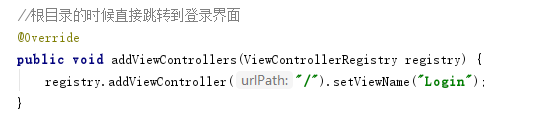
这里已经设置根目录是Login.jsp页面。
运行结果:

到这里就结束啦。
本次演示代码地址:https://github.com/oukele/spring-spring-mvc-web_demo