我们在Centos610FastDFS单机模式-FastDFS安装 中已经完成了FastDFS的安装,接下来我们进行FastDFS调度器的安装。
1.找到先前解压出来的fast/conf目录
拷贝 http.conf,mime.types,mod_fastdfs.conf anti-steal.jpg文件
cp http.conf meme.types mod_fastdfs.conf anti-steal.jpg /etc/fdfs/
2.找到解压出来fastdfs-nginx-module/src目录
拷贝 mod_fastdfs.conf文件
cp mod_fastdfs.conf /etc/fdfs/
3.修改mod_fastdfs.conf文件
# tracker路径
base_path=/opt/fastdfs/tracker

# tracker服务
tracker_server=192.168.125.139:22122

# storage服务端口号
storage_server_port=23000

# 分组名称
group_name=group1

# 地址中是否包含分组名
url_have_group_name = true

# 存储路径个数
store_path_count=1

# 存储路径
store_path0=/opt/fastdfs/data

# 分组个数
group_count = 1

# 分组配置
[group1]
group_name=group1
storage_server_port=23000
store_path_count=1
store_path0=/opt/fastdfs/data
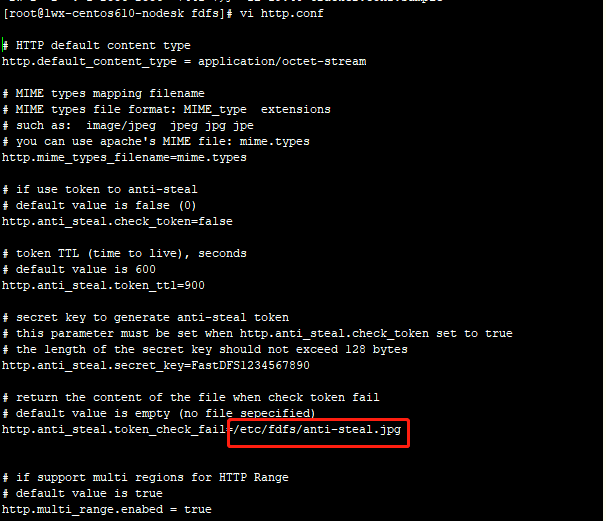
4.修改 http.conf
vi http.conf

修改为截图中的样子
5.创建软连接
创建M00至存储目录连接
ln -s /opt/fastdfs/data/M00
6.fastdfs-nginx-module,nginx下载
6.1.FastDFS-nginx-module安装
a.下载安装包
wget https://github.com/happyfish100/fastdfs-nginx-module/archive/master.zip
unzip master.zip
6.2Nginx下载
# wget https://nginx.org/download/nginx-1.9.9.zip
wget https://nginx.org/download/nginx-1.9.9.tar.gz

7.nginx安装
nginx安装过程 请点击连接 nginx安装
区别在于 :nginx需要添加fastdfs-nginx-module-master 安装模块,并启用https_ssl模块
./configure --add-module=../fastdfs-nginx-module-master/src/ --with-http_ssl_module
nginx安装好之后
8.nginx配置
cd /usr/local/nginx/conf
mkdir siteconf
vi nginx.conf
在 http节点 里面第一个server 配置之前 ,添加 include siteconf/*.conf
保存退出
cd siteconf
vi fastdfs.conf
# 新增一个服务,监听之前配置开放的端口号
server {
    listen    9100; #对应之前tracker.conf开放的端口号
    server_name    localhost;

    location / {
        root   html;
        index   index.html index.htm;
    }

    location ~/group([0-9])/M00 {
        ngx_fastdfs_module;
    }

    error_page 500 502 503 504 /50x.html;
    location = /50x.html {
        root   html;
    }
}
至此基于fastdfs-nginx-module的nginx安装完成
启动nginx
service nginx start
浏览器输入 http://192.168.125.139
如果页面正常显示说明nginx安装成功,反之需要检查配置