<div id="post_detail">
任务44:Identity MVC: EF + Identity实现
使用VSCode开发 Razer的智能感知不好。所以这里切换为VS2017进行开发:
新建一个Data的文件夹来存放我们的DBContext。在Data文件夹下新建:
ApplicationDbContext.cs
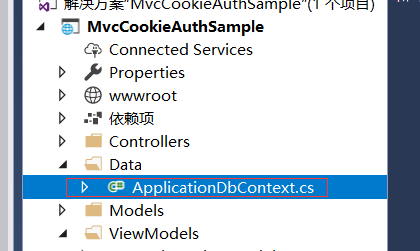
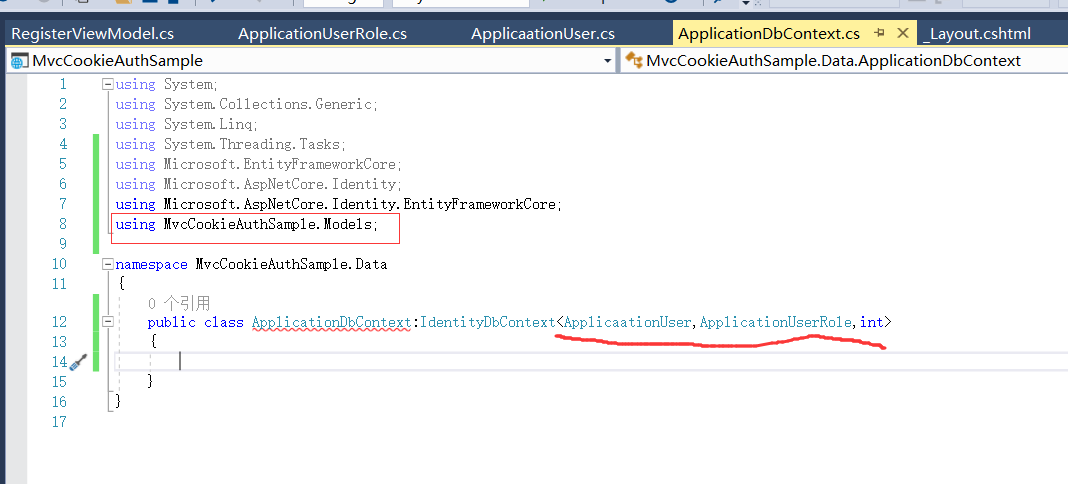
继承:IdentityDbContext在using Microsoft.AspNetCore.Identity.EntityFrameworkCore;的命名空间下面
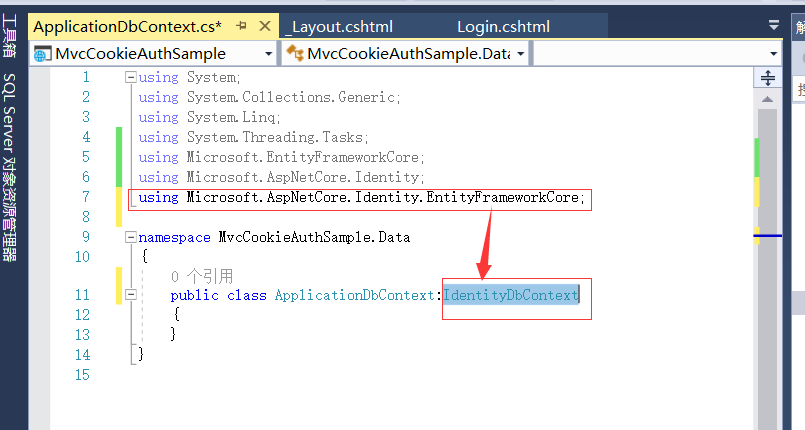
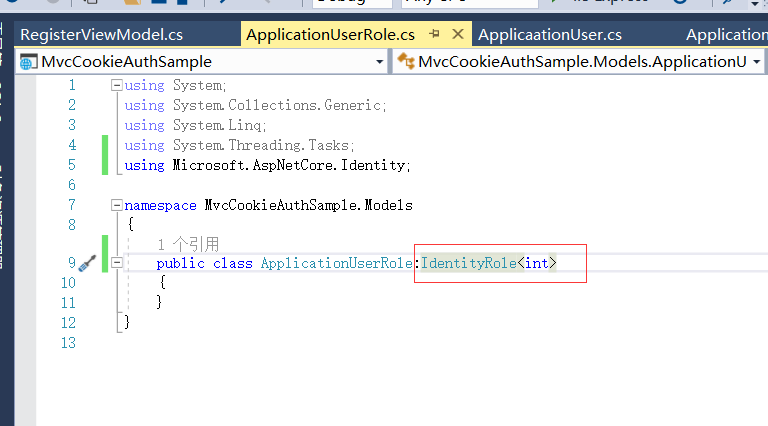
然后在Models里面创建两个实体类:
ApplicaationUser和ApplicationUserRole

ApplicaationUser.cs内继承IdentityUser在命名空间using Microsoft.AspNetCore.Identity;下
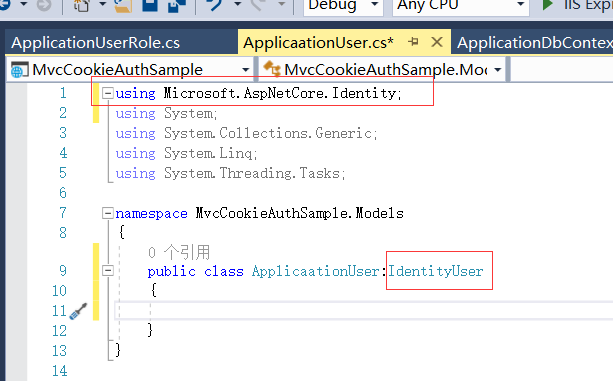
如果我们想改主键的类型为guid的话,就需要给他一个泛型的参数
这里我们设置主键的类型为int类型的
ApplicationUserRole继承:IdentityRole<int>
修改ApplicationDbContext
同时我们还需要一个构造函数来接收我们的DbContextOptions
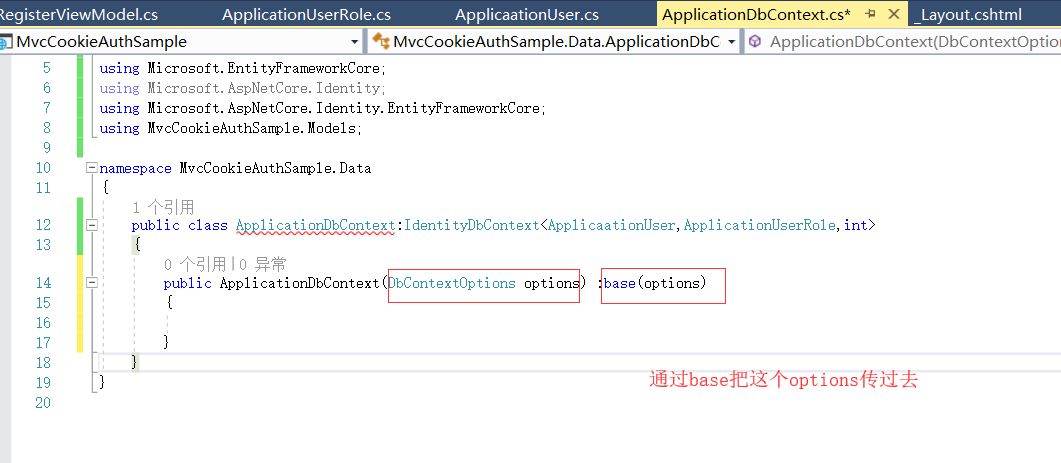
这里加上ApplicationDbContext

StartUp.cs
注册Identity
先引入命名空间:
using MvcCookieAuthSample.Data;

再引入命名空间:
using Microsoft.EntityFrameworkCore;

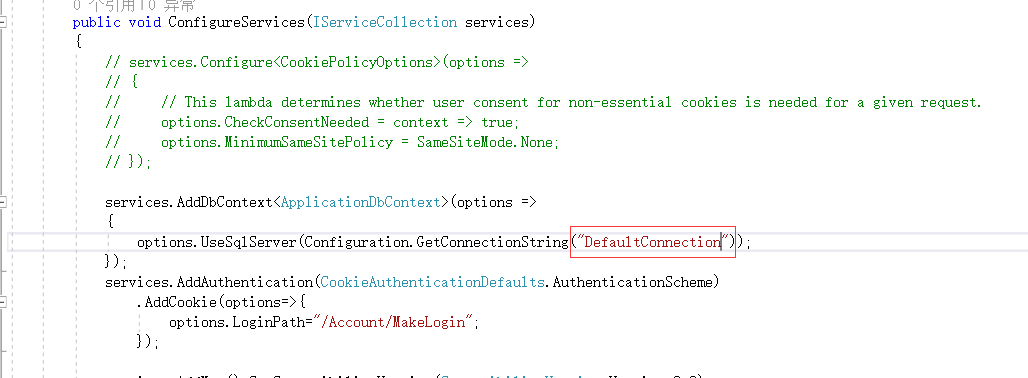
Configuration.GetConnectionString()是来获取配置文件内配置的数据库链接字符串
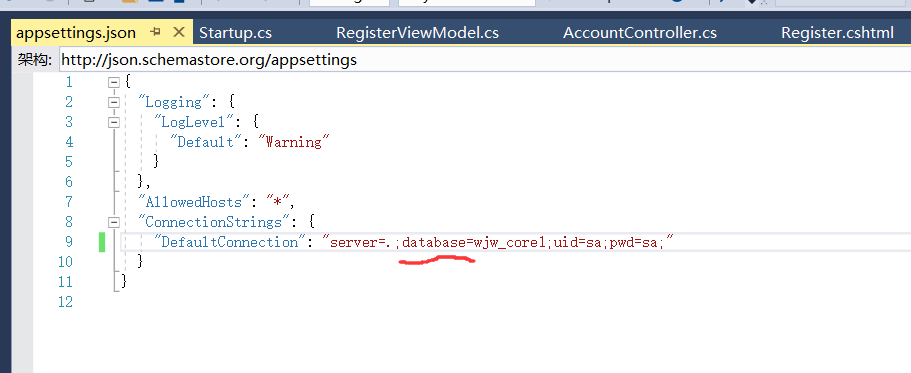
在appsettings.json中自己加上链接字符串:
"ConnectionStrings": {
    "DefaultConnection": "server=.;databse=wjw_core1;uid=sa;pwd=sa;"
  }
然后把我们配置的链接字符串拷贝过来。
把Identity加进来
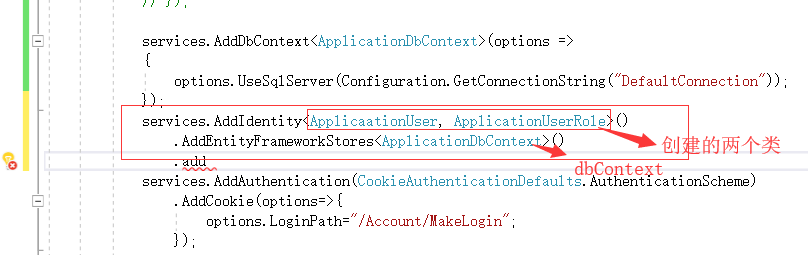
再引入命名空间
using Microsoft.AspNetCore.Identity;
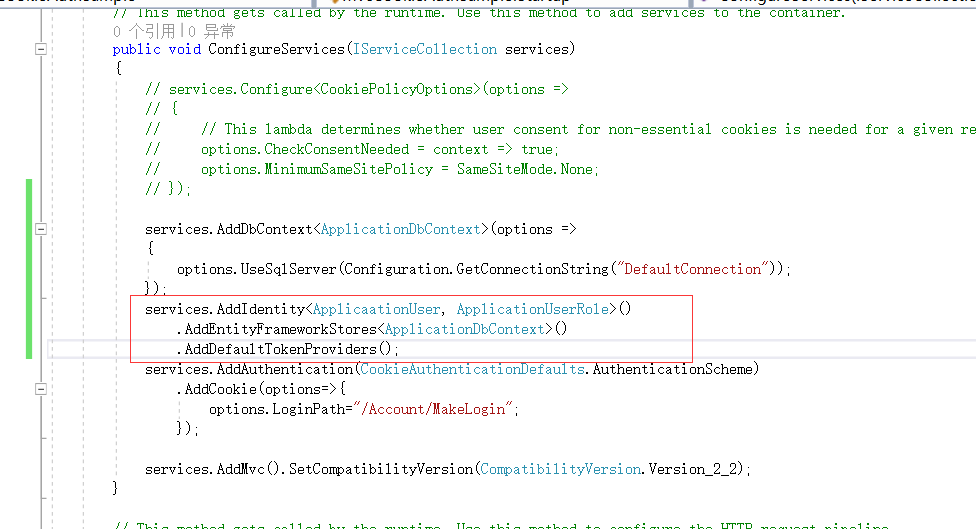
密码限制
在identity下有一些默认的密码的限制,会很严格,这里我们改一下:

这样最终的代码

public void ConfigureServices(IServiceCollection services) { // services.Configure<CookiePolicyOptions>(options => // { // // This lambda determines whether user consent for non-essential cookies is needed for a given request. // options.CheckConsentNeeded = context => true; // options.MinimumSameSitePolicy = SameSiteMode.None; // }); services.AddDbContext<ApplicationDbContext>(options => { options.UseSqlServer(Configuration.GetConnectionString("DefaultConnection")); }); services.AddIdentity<ApplicaationUser, ApplicationUserRole>() .AddEntityFrameworkStores<ApplicationDbContext>() .AddDefaultTokenProviders(); services.AddAuthentication(CookieAuthenticationDefaults.AuthenticationScheme) .AddCookie(options=>{ options.LoginPath="/Account/Login"; });services.Configure</span><IdentityOptions>(options =><span style="color: #000000;"> { options.Password.RequireLowercase </span>= <span style="color: #0000ff;">false</span><span style="color: #000000;">; options.Password.RequireNonAlphanumeric </span>= <span style="color: #0000ff;">false</span><span style="color: #000000;">; options.Password.RequireUppercase </span>= <span style="color: #0000ff;">false</span><span style="color: #000000;">; }); services.AddMvc().SetCompatibilityVersion(CompatibilityVersion.Version_2_2); }</span></pre>
修改这里默认的登陆页面
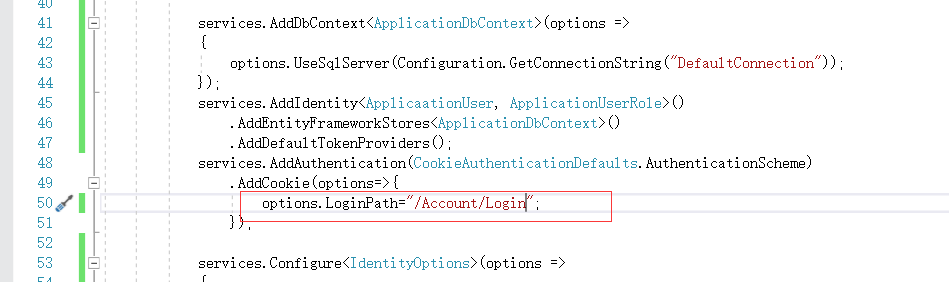
AccountAcontroller中
UserManager是用来创建用户的
之前我们的ApplicationUser的单词进错了 这里我们统一的修改一下
SignInManager主要是用来登陆的
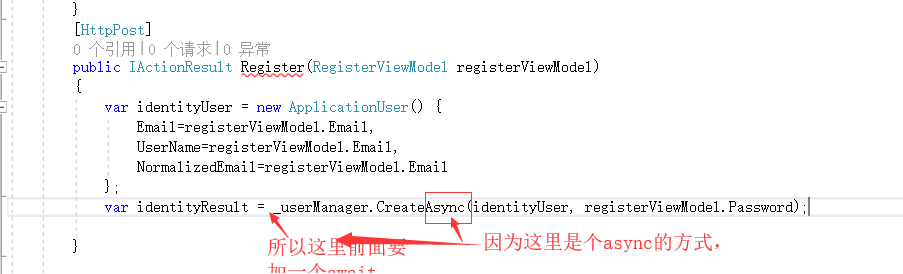
然后这个Action也必须是async的 同时返回的类型用Task去接收

加上判断,如果注册成功就跳转到首页上去

9分58秒
这行我们注册的代码就完成了。下面可以进行代码的测试
密码暴露了。修改密码框的类型为password 。同时确认密码的字段我们修改了为 ConfirmedPassword

重新创建数据库
通过nuget引入包:Microsoft.EntityFrameworkCore.Tools

没有这个包的话 EF的命令是没法用的
11分42秒
执行Migrations
执行EF的migrations命令报了个错误

上面写着让我用dotnet ef migrations remove方法。然后我就用了一下,然后就报了一个错误。发现应该是链接字符串的单词拼写错了
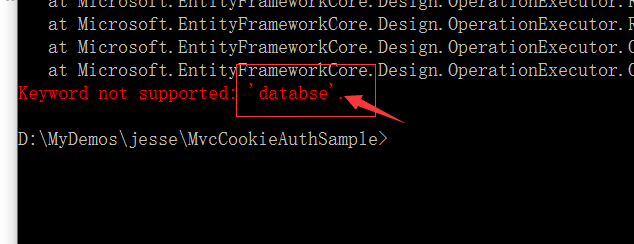
之前这的单词拼写错了。将链接字符串拼成正确的

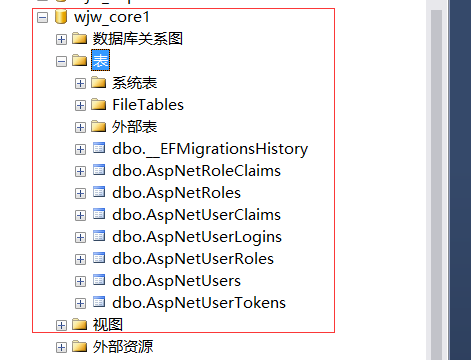
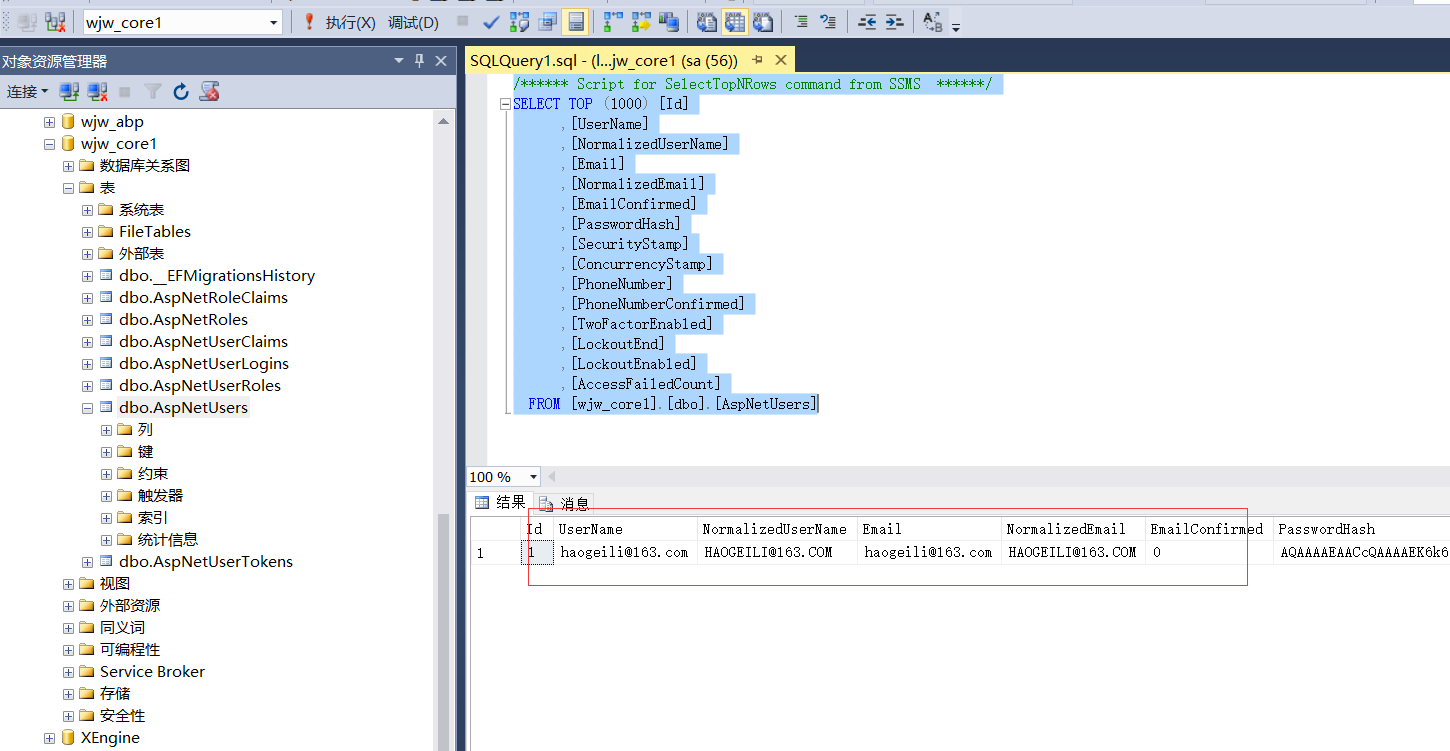
打开sql server 局看到创建好的数据库了。
运行注册
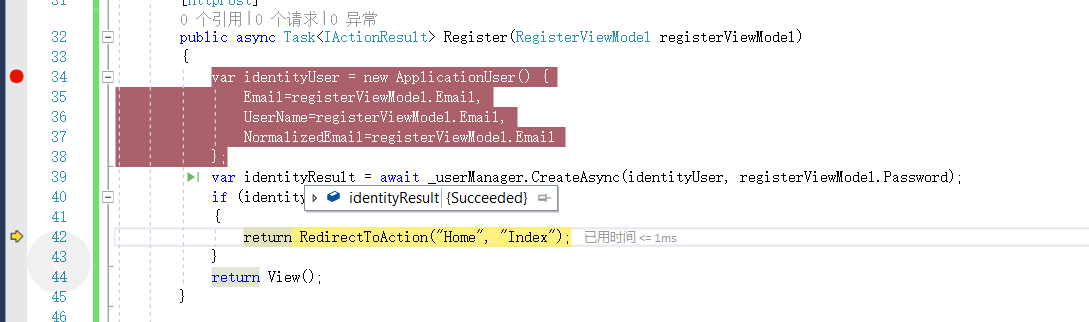
运行页面执行注册。在AccountController里面加断点测试程序是否执行成功了。
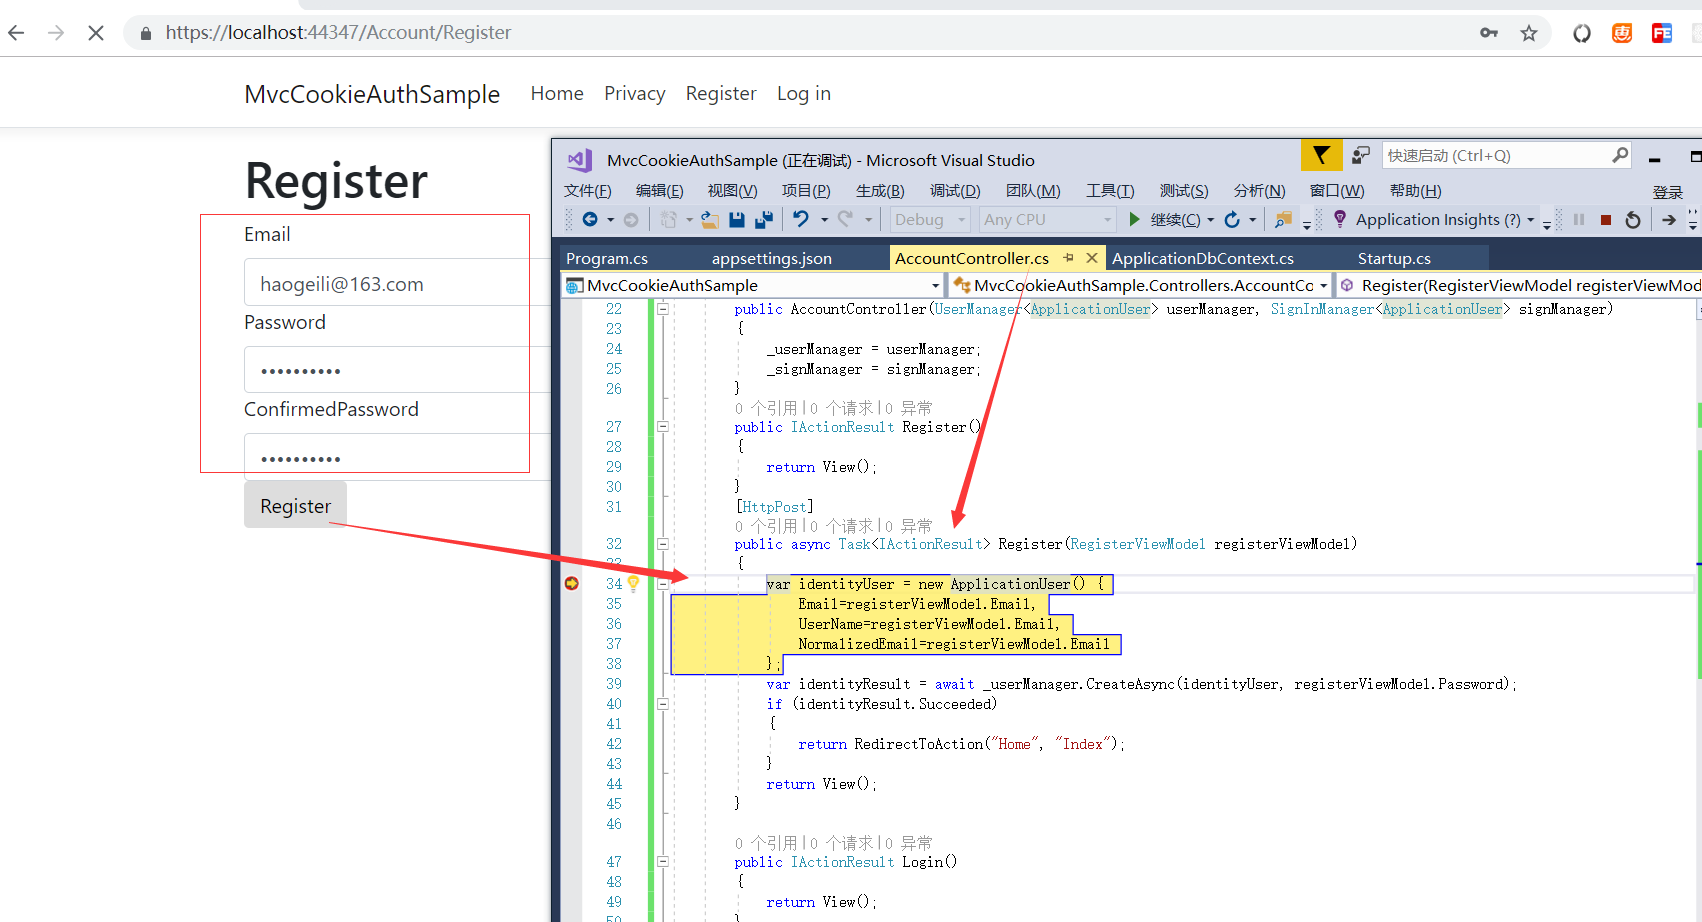
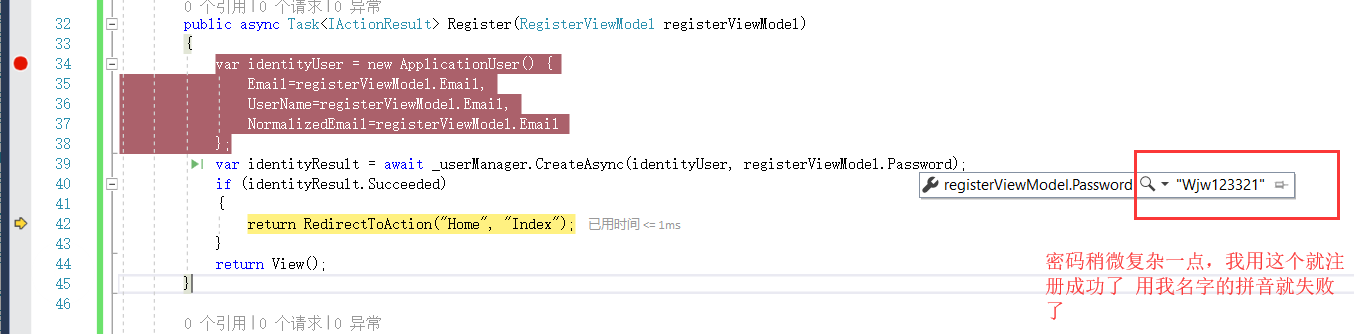
这是注册成功的效果:
正常跳转是跳转到首页。这里跳转的地方,应该前面是是Action 后面是Home的控制器。上面代码我写反了 进行修正。
  public async Task<IActionResult> Register(RegisterViewModel registerViewModel)
        {
            var identityUser = new ApplicationUser() {
                Email=registerViewModel.Email,
                UserName=registerViewModel.Email,
                NormalizedEmail=registerViewModel.Email
            };
            var identityResult = await _userManager.CreateAsync(identityUser, registerViewModel.Password);
            if (identityResult.Succeeded)
            {
                return RedirectToAction("Index", "Home");
            }
            return View();
        }
看一下数据库内的表 就有了我们创建的数据了。
完成
如果您觉得阅读本文对您有帮助,请点一下“推荐”按钮,您的“推荐”将是我最大的写作动力!欢迎各位转载,但是未经作者本人同意,转载文章之后必须在文章页面明显位置给出作者和原文连接,否则保留追究法律责任的权利。
JSOI2004 平衡点 / 吊打XXX
SDOI2017 数字表格
CQOI2015 选数
BZOJ2741 【FOTILE模拟赛】L
BZOJ4103 [Thu Summer Camp 2015]异或运算
BZOJ3689 异或之
BZOJ4128 Matrix
HNOI2006 最短母串问题
SCOI2013 密码