事件和信号
事件
signals and slots 被其他人翻译成信号和槽机制,(⊙o⊙)…我这里还是不翻译好了。
所有的应用都是事件驱动的。事件大部分都是由用户的行为产生的,当然也有其他的事件产生方式,比如网络的连接,窗口管理器或者定时器等。调用应用的exec_()方法时,应用会进入主循环,主循环会监听和分发事件。
在事件模型中,有三个角色:
- 事件源
- 事件
- 事件目标
事件源就是发生了状态改变的对象。事件是这个对象状态改变的内容。事件目标是事件想作用的目标。事件源绑定事件处理函数,然后作用于事件目标身上。
PyQt5处理事件方面有个signal and slot机制。Signals and slots用于对象间的通讯。事件触发的时候,发生一个signal,slot是用来被Python调用的(相当于一个句柄?这个词也好恶心,就是相当于事件的绑定函数)slot只有在事件触发的时候才能调用。
Signals & slots
下面是signal & slot的演示
#!/usr/bin/python3
# -*- coding: utf-8 -*-

"""
ZetCode PyQt5 tutorial

In this example, we connect a signal
of a QSlider to a slot of a QLCDNumber.

Author: Jan Bodnar
Website: zetcode.com
Last edited: January 2017
"""

import sys
from PyQt5.QtCore import Qt
from PyQt5.QtWidgets import (QWidget, QLCDNumber, QSlider,
    QVBoxLayout, QApplication)


class Example(QWidget):

    def __init__(self):
        super().__init__()

        self.initUI()


    def initUI(self):

        lcd = QLCDNumber(self)
        sld = QSlider(Qt.Horizontal, self)

        vbox = QVBoxLayout()
        vbox.addWidget(lcd)
        vbox.addWidget(sld)

        self.setLayout(vbox)
        sld.valueChanged.connect(lcd.display)

        self.setGeometry(300, 300, 250, 150)
        self.setWindowTitle('Signal and slot')
        self.show()


if __name__ == '__main__':

    app = QApplication(sys.argv)
    ex = Example()
    sys.exit(app.exec_())
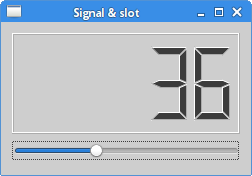
上面的例子中,显示了QtGui.QLCDNumber和QtGui.QSlider模块,我们能拖动滑块让数字跟着发生改变。
sld.valueChanged.connect(lcd.display)
这里是把滑块的变化和数字的变化绑定在一起。
sender是信号的发送者,receiver是信号的接收者,slot是对这个信号应该做出的反应。
程序展示:
重构事件处理器
在PyQt5中,事件处理器经常被重写(也就是用自己的覆盖库自带的)。
#!/usr/bin/python3
# -*- coding: utf-8 -*-

"""
ZetCode PyQt5 tutorial

In this example, we reimplement an
event handler.

Author: Jan Bodnar
Website: zetcode.com
Last edited: August 2017
"""

import sys
from PyQt5.QtCore import Qt
from PyQt5.QtWidgets import QWidget, QApplication

class Example(QWidget):

    def __init__(self):
        super().__init__()

        self.initUI()


    def initUI(self):

        self.setGeometry(300, 300, 250, 150)
        self.setWindowTitle('Event handler')
        self.show()


    def keyPressEvent(self, e):

        if e.key() == Qt.Key_Escape:
            self.close()


if __name__ == '__main__':

    app = QApplication(sys.argv)
    ex = Example()
    sys.exit(app.exec_())
这个例子中,我们替换了事件处理器函数keyPressEvent()。
def keyPressEvent(self, e):

    if e.key() == Qt.Key_Escape:
        self.close()
此时如果按下ESC键程序就会退出。
程序展示:
这个就一个框,啥也没,就不展示了。
事件对象
事件对象是用python来描述一系列的事件自身属性的对象。
#!/usr/bin/python3
# -*- coding: utf-8 -*-

"""
ZetCode PyQt5 tutorial

In this example, we display the x and y
coordinates of a mouse pointer in a label widget.

Author: Jan Bodnar
Website: zetcode.com
Last edited: August 2017
"""

import sys
from PyQt5.QtCore import Qt
from PyQt5.QtWidgets import QWidget, QApplication, QGridLayout, QLabel

class Example(QWidget):

    def __init__(self):
        super().__init__()

        self.initUI()


    def initUI(self):

        grid = QGridLayout()
        grid.setSpacing(10)

        x = 0
        y = 0

        self.text = "x: {0},  y: {1}".format(x, y)

        self.label = QLabel(self.text, self)
        grid.addWidget(self.label, 0, 0, Qt.AlignTop)

        self.setMouseTracking(True)

        self.setLayout(grid)

        self.setGeometry(300, 300, 350, 200)
        self.setWindowTitle('Event object')
        self.show()


    def mouseMoveEvent(self, e):

        x = e.x()
        y = e.y()

        text = "x: {0},  y: {1}".format(x, y)
        self.label.setText(text)


if __name__ == '__main__':

    app = QApplication(sys.argv)
    ex = Example()
    sys.exit(app.exec_())
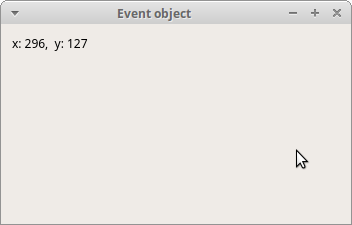
这个示例中,我们在一个组件里显示鼠标的X和Y坐标。
self.text = "x: {0},  y: {1}".format(x, y)

self.label = QLabel(self.text, self)
X Y坐标显示在QLabel组件里
self.setMouseTracking(True)
鼠标追踪默认没有开启,当有鼠标点击事件发生后才会开启。
def mouseMoveEvent(self, e):

    x = e.x()
    y = e.y()

    text = "x: {0},  y: {1}".format(x, y)
    self.label.setText(text)
e代表了事件对象。里面有我们触发事件(鼠标移动)的事件对象。x()和y()方法得到鼠标的x和y坐标点,然后拼成字符串输出到QLabel组件里。
程序展示:
事件发送
有时候我们会想知道是哪个组件发出了一个信号,PyQt5里的sender()方法能搞定这件事。
#!/usr/bin/python3
# -*- coding: utf-8 -*-

"""
ZetCode PyQt5 tutorial

In this example, we determine the event sender
object.

Author: Jan Bodnar
Website: zetcode.com
Last edited: August 2017
"""

import sys
from PyQt5.QtWidgets import QMainWindow, QPushButton, QApplication


class Example(QMainWindow):

    def __init__(self):
        super().__init__()

        self.initUI()


    def initUI(self):

        btn1 = QPushButton("Button 1", self)
        btn1.move(30, 50)

        btn2 = QPushButton("Button 2", self)
        btn2.move(150, 50)

        btn1.clicked.connect(self.buttonClicked)
        btn2.clicked.connect(self.buttonClicked)

        self.statusBar()

        self.setGeometry(300, 300, 290, 150)
        self.setWindowTitle('Event sender')
        self.show()


    def buttonClicked(self):

        sender = self.sender()
        self.statusBar().showMessage(sender.text() + ' was pressed')


if __name__ == '__main__':

    app = QApplication(sys.argv)
    ex = Example()
    sys.exit(app.exec_())
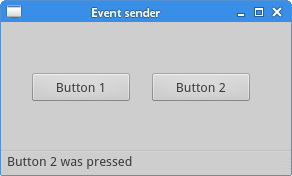
这个例子里有俩按钮,buttonClicked()方法决定了是哪个按钮能调用sender()方法。
btn1.clicked.connect(self.buttonClicked)
btn2.clicked.connect(self.buttonClicked)
两个按钮都和同一个slot绑定。
def buttonClicked(self):

    sender = self.sender()
    self.statusBar().showMessage(sender.text() + ' was pressed')
我们用调用sender()方法的方式决定了事件源。状态栏显示了被点击的按钮。
程序展示:
信号发送
QObject实例能发送事件信号。下面的例子是发送自定义的信号。
#!/usr/bin/python3
# -*- coding: utf-8 -*-

"""
ZetCode PyQt5 tutorial

In this example, we show how to
emit a custom signal.

Author: Jan Bodnar
Website: zetcode.com
Last edited: August 2017
"""

import sys
from PyQt5.QtCore import pyqtSignal, QObject
from PyQt5.QtWidgets import QMainWindow, QApplication


class Communicate(QObject):

    closeApp = pyqtSignal()


class Example(QMainWindow):

    def __init__(self):
        super().__init__()

        self.initUI()


    def initUI(self):

        self.c = Communicate()
        self.c.closeApp.connect(self.close)

        self.setGeometry(300, 300, 290, 150)
        self.setWindowTitle('Emit signal')
        self.show()


    def mousePressEvent(self, event):

        self.c.closeApp.emit()


if __name__ == '__main__':

    app = QApplication(sys.argv)
    ex = Example()
    sys.exit(app.exec_())
我们创建了一个叫closeApp的信号,这个信号会在鼠标按下的时候触发,事件与QMainWindow绑定。
class Communicate(QObject):

    closeApp = pyqtSignal()
Communicate类创建了一个pyqtSignal()属性的信号。
self.c = Communicate()
self.c.closeApp.connect(self.close)
closeApp信号QMainWindow的close()方法绑定。
def mousePressEvent(self, event):

    self.c.closeApp.emit()
点击窗口的时候,发送closeApp信号,程序终止。
程序展示:
这个也是啥也没。