线程池和异步编排
线程池
初始化线程的方式
在实际开发中,有很多异步场景,为了节约时间或者提高系统的吞吐量,要做一些异步任务,在 Java 中要实现异步通常都是利用 Thread,开启一个线程 Thread。开启线程有四种方式,分别为:
- 继承 Thread
- 实现 Runnable 接口
- 实现 Callable 接口 + Future Task
- 使用线程池
对于方式一和方式二,主线程无法获取线程的执行结果,但是不适用大部分场景。
对于方式三,主线程可以获取线程的执行结果,但是不利于控制线程资源。
对于方式四,性能稳定,可以获取线程的执行结果,并且可以捕获异常。但是,在业务复杂情况下,一个异步调用可能会依赖于另一个异步调用的执行结果。有两种方式初始化线程池:
Excutors.newFiexedThreadPool(nThreads);new ThreadPoolExecutor(corePoolSize, maximumPoolSize, keepAliveTime,TimeUnit unit, workQuene,threadFactory,handler);
代码示例:
package cn.parzulpan.shopping.search.thread;

import java.util.concurrent.*;

/**
 * @author parzulpan
 * @version 1.0
 * @date 2021-04
 * @project shopping
 * @package cn.parzulpan.shopping.search.thread
 * @desc 初始化线程的四种方式
 */

public class ThreadTest {

    // 创建线程池方式一
    public static ExecutorService executorService = Executors.newFixedThreadPool(10);
    // 创建线程池方式二
    public static ThreadPoolExecutor threadPoolExecutor = new ThreadPoolExecutor(5, 200, 10L, TimeUnit.SECONDS, new LinkedBlockingDeque<Runnable>(10000), Executors.defaultThreadFactory(), new ThreadPoolExecutor.AbortPolicy());

    public static void main(String[] args) {
        System.out.println("main start...");

        // 1. 继承 Thread
//        Thread01 thread01 = new Thread01();
//        thread01.start();

        // 2. 实现 Runnable 接口
//        Runnable01 runnable01 = new Runnable01();
//        new Thread(runnable01).start();

        // 3. 实现 Callable 接口 + Future Task
//        FutureTask<Double> futureTask = new FutureTask<>(new Callable01());
//        new Thread(futureTask).start();
//        Double aDouble = null;
//        try {
//            aDouble = futureTask.get();
//        } catch (InterruptedException | ExecutionException e) {
//            e.printStackTrace();
//        }
//        System.out.println("阻塞等待整个线程执行完成,获得返回结果为:" + aDouble);

        // 4. 使用线程池
//        executorService.execute(new Runnable01());
//        executorService.submit(new Runnable01());
        threadPoolExecutor.execute(new Runnable01());


        System.out.println("main end...");
    }

    public static class Thread01 extends Thread {
        @Override
        public void run() {
            System.out.println("当前线程 Id:" + Thread.currentThread().getId());
            double v = 3.14 * 3.14;
            System.out.println("运行结果:" + v);
        }
    }

    public static class Runnable01 implements Runnable{
        @Override
        public void run() {
            System.out.println("当前线程 Id:" + Thread.currentThread().getId());
            double v = 3.14 * 3.14 * 3.14;
            System.out.println("运行结果:" + v);
        }
    }

    public static class Callable01 implements Callable<Double>{

        @Override
        public Double call() throws Exception {
            System.out.println("当前线程 Id:" + Thread.currentThread().getId());
            double v = 3.14 * 3.14 * 3.14 * 3.14;
            System.out.println("运行结果:" + v);
            return v;
        }
    }
}
使用线程池的原因
- 降低资源消耗:通过重复利用已经创建好的线程,可以减少线程创建和销毁带来的系统开销。
- 提高响应速度:线程池中的线程数没有超过线程池的最大上限时,有的线程处于等待分配任务的状态,当任务来时无需创建新的线程就能执行。
- 提高可管理性:线程池会根据当前系统特点对池内的线程进行优化处理。
线程池的七大参数
ThreadPoolExecutor 源码:
public ThreadPoolExecutor(int corePoolSize,
                              int maximumPoolSize,
                              long keepAliveTime,
                              TimeUnit unit,
                              BlockingQueue<Runnable> workQueue,
                              ThreadFactory threadFactory,
                              RejectedExecutionHandler handler) {
        if (corePoolSize < 0 ||
            maximumPoolSize <= 0 ||
            maximumPoolSize < corePoolSize ||
            keepAliveTime < 0)
            throw new IllegalArgumentException();
        if (workQueue == null || threadFactory == null || handler == null)
            throw new NullPointerException();
        this.acc = System.getSecurityManager() == null ?
                null :
                AccessController.getContext();
        this.corePoolSize = corePoolSize;
        this.maximumPoolSize = maximumPoolSize;
        this.workQueue = workQueue;
        this.keepAliveTime = unit.toNanos(keepAliveTime);
        this.threadFactory = threadFactory;
        this.handler = handler;
    }
- corePoolSize – 保留在池中的线程数(即使它们处于空闲状态),除非设置了allowCoreThreadTimeOut。即线程池核心线程数量。
- maximumPoolSize – 池中允许的最大线程数。即线程池最大线程数量。
- keepAliveTime – 当线程数大于内核数时,这是多余的空闲线程(maximumPoolSize - corePoolSize )将在终止之前等待新任务的最长时间。即空闲线程存活时间。
- unit – keepAliveTime参数的时间单位。即存活时间的时间单位。
- workQueue – 用于在执行任务之前保留任务的队列。此队列将仅保存execute方法提交的Runnable任务。即线程池所使用的缓冲队列。
- threadFactory – 执行程序创建新线程时要使用的工厂。即线程池创建线程使用的工厂。
- handler – 因达到线程边界和队列容量而被阻止执行时使用的处理程序。即线程池对拒绝任务的处理策略。
线程池的常见类型
Executors.newSingleThreadExecutor拥有单个线程的线程池,串行执行任务。Executors.newFixedThreadPool固定数量的线程池,每提交一个事务,使用一个线程,当主要线程使用完了,往队列里放,队列里放完了,在创建线程,直到创建至最大线程数。Executors.newCachedThreadPool可缓存线程池,当线程池大小超过了处理任务所需的线程,那么就会回收部分空闲(一般是60秒无执行)的线程,当有任务来时,又智能的添加新线程来执行。Executors.newScheduledThreadPool创建一个定长的线程池,支持定时和周期性的执行任务。
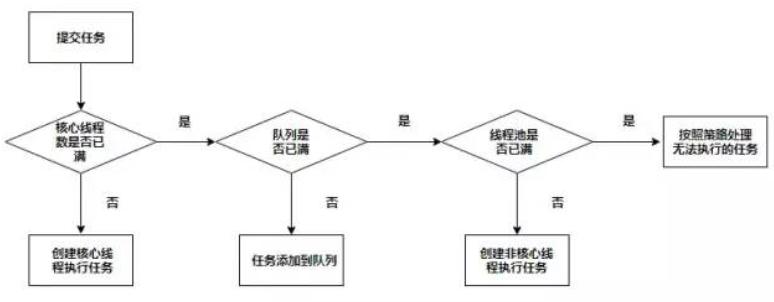
线程池的工作原理
- 线程池创建,准备好 corePoolSize 数量的核心线程,准备接受任务
- 如果核心线程已满,会将任务放入阻塞队列中,空闲的核心线程就会自己去阻塞队列中获取任务
- 如果阻塞队列已满,就直接开启新线程执行,但是最大不超过 maximumPoolSize 数
- 超过 maximumPoolSize 数后,就会使用拒绝策略拒绝任务,当执行完成后,在指定的时间(keepAliveTime) 以后,释放 maximumPoolSize - corePoolSize 这些数量的线程
// ThreadPoolExecutor.excute(Runnable command) 源码
public void execute(Runnable command) {
        if (command == null)
            throw new NullPointerException();
        /*
         * Proceed in 3 steps:
         *
         * 1. If fewer than corePoolSize threads are running, try to
         * start a new thread with the given command as its first
         * task.  The call to addWorker atomically checks runState and
         * workerCount, and so prevents false alarms that would add
         * threads when it shouldn't, by returning false.
         *
         * 2. If a task can be successfully queued, then we still need
         * to double-check whether we should have added a thread
         * (because existing ones died since last checking) or that
         * the pool shut down since entry into this method. So we
         * recheck state and if necessary roll back the enqueuing if
         * stopped, or start a new thread if there are none.
         *
         * 3. If we cannot queue task, then we try to add a new
         * thread.  If it fails, we know we are shut down or saturated
         * and so reject the task.
         */

    	// ctl维护了线程池的状态
        int c = ctl.get();
    	// 活动线程数小于核心线程数,创建核心线程执行,否则往下走
        if (workerCountOf(c) < corePoolSize) {
            if (addWorker(command, true))
                return;
            c = ctl.get();
        }
    	// 如果线程池正常运行,则加入线程缓冲队列,如果offer返回false,往下走
        if (isRunning(c) && workQueue.offer(command)) {
            int recheck = ctl.get();
            if (! isRunning(recheck) && remove(command))
                reject(command);
            else if (workerCountOf(recheck) == 0)
                addWorker(null, false);
        }
    	// 创建非核心线程,如果失败,则拒绝
        else if (!addWorker(command, false))
            reject(command);
    }
线程池参数的定义
对于不同的任务:
- CPU 密集型:线程池的大小推荐为 CPU数量 + 1,CPU 数量可以使用
Runtime.availableProcessors方法获取 - IO 密集型:线程池的大小推荐为 CPU数量 * CPU利用率 * (1 + 线程等待时间 / 线程CPU时间)
- 混合型:将任务分为 CPU密集型 和 IO密集型,然后分别使用不同的线程池去处理,从而使每个线程池可以根据各自的工作负载来调整
对于阻塞队列和拒绝策略:
- 阻塞队列:推荐使用有界队列,有界队列有助于避免资源耗尽的情况发生
- 拒绝策略:默认采用的是 AbortPolicy 拒绝策略,直接在程序中抛出 RejectedExecutionException 异常,这种处理方式不够优雅。处理拒绝策略有以下几种比较推荐:
- 在程序中捕获 RejectedExecutionException 异常,在捕获异常中对任务进行处理。
- 使用 CallerRunsPolicy 拒绝策略,该策略会将任务交给调用 execute 的线程执行(一般为主线程),此时主线程将在一段时间内不能提交任何任务,从而使工作线程处理正在执行的任务。此时提交的线程将被保存在 TCP 队列中,TCP 队列满将会影响客户端,这是一种平缓的性能降低。
- 自定义拒绝策略,只需要实现 RejectedExecutionHandler 接口即可。
- 如果任务不是特别重要,使用 DiscardPolicy 和 DiscardOldestPolicy 拒绝策略将任务丢弃也是可以的。
面试题一:
为什么不建议使用 Executors 中的静态方法来创建线程池?
解析:线程池不建议使用 Executors 去创建,需要通过 ThreadPoolExecutor 去创建线程池。这样更能明白线程池的运行原理,从而避免资源浪费和因为使用静态方法创建而产生 OOM(OutOfMemoryError)。具体为:
- FixedThreadPool 和 SingleThreadPool:允许的请求队列长度为 Integer.MAX_VALUE,可能会堆积大量的请求,从而导致 OOM;
- CachedThreadPool 和 ScheduledThreadPool:允许的创建线程数量为 Integer.MAX_VALUE,可能会创建大量的线程,从而导致 OOM。
如果使用 Executors 的静态方法创建 ThreadPoolExecutor 对象,可以通过使用 Semaphore 对任务的执行进行限流也可以避免出现 OOM。
面试题二:
一个线程池的 corePoolSize 为 7,maximumPoolSize 为 20,workQueue 的长度为 50,请问 100 个并发任务进来怎么分配?
解析:先有 7 个能直接得到执行,接下来 50 个进入阻塞队列排队,还有 13 个也会开启新线程继续执行。总计有 70 个被安排好了,剩下的 30 个将执行默认的拒绝策略。
CompletableFuture 异步编排
创建异步对象
CompletableFuture 提供了四个静态方法来创建一个异步操作:
// 没有指定 Executor 的方法会使用 ForkJoinPool.commonPool() 作为它的线程池执行异步代码。
// 如果指定线程池,则使用指定的线程池运行。

// runAsync 不支持返回值
public static CompletableFuture<Void> runAsync(Runnable runnable)
public static CompletableFuture<Void> runAsync(Runnable runnable, Executor executor)
// supplyAsync 支持返回值
public static <U> CompletableFuture<U> supplyAsync(Supplier<U> supplier)
public static <U> CompletableFuture<U> supplyAsync(Supplier<U> supplier, Executor executor)
runAsync 示例:
package cn.parzulpan.shopping.search.thread;

import java.util.concurrent.*;

/**
 * @author parzulpan
 * @version 1.0
 * @date 2021-04
 * @project shopping
 * @package cn.parzulpan.shopping.search.thread
 * @desc 异步编排
 */

public class CompletableFutureTest {
    public static ThreadPoolExecutor threadPoolExecutor = new ThreadPoolExecutor(5, 100, 3L, TimeUnit.SECONDS, new LinkedBlockingDeque<Runnable>(1000), Executors.defaultThreadFactory(), new ThreadPoolExecutor.AbortPolicy());

    public static void main(String[] args) {
        System.out.println("start...");

        runAsyncT();

        System.out.println("end...");
        threadPoolExecutor.shutdown();

    }

    /**
     * runAsync 示例
     */
    public static void runAsyncT() {
        CompletableFuture<Void> future = CompletableFuture.runAsync(() -> {
            System.out.println("当前线程:" + Thread.currentThread().getName());
            int i = 10 / 2;
            System.out.println("计算结果:" + i);
        }, threadPoolExecutor);

        // 什么都不返回,调用get方法,就变成了阻塞操作!
        try {
            future.get();
        } catch (InterruptedException | ExecutionException e) {
            e.printStackTrace();
        }

    }

}
supplyAsync 示例:
public class CompletableFutureTest {
    public static ThreadPoolExecutor threadPoolExecutor = new ThreadPoolExecutor(5, 100, 3L, TimeUnit.SECONDS, new LinkedBlockingDeque<Runnable>(1000), Executors.defaultThreadFactory(), new ThreadPoolExecutor.AbortPolicy());

    public static void main(String[] args) {
        System.out.println("start...");

        supplyAsyncT();

        System.out.println("end...");
        threadPoolExecutor.shutdown();

    }

    /**
     * supplyAsync 示例
     */
    public static void supplyAsyncT() {
        CompletableFuture<Integer> future = CompletableFuture.supplyAsync(() -> {
            System.out.println("当前线程:" + Thread.currentThread().getName());
            int i = 10 / 2;
            System.out.println("计算结果:" + i);
            return i;
        }, threadPoolExecutor);

        try {
            // 获取返回结果,调用get方法,就变成了阻塞操作
            Integer integer = future.get();
            System.out.println("返回结果:" + integer);
        } catch (InterruptedException | ExecutionException e) {
            e.printStackTrace();
        }
    }

}
计算完成时的回调方法
当 CompletableFuture 的处理完成,或者抛出异常的时候,可以执行特定的 Action。主要使用的方法:
// 方法不以 Async 结尾是指 执行当前任务的线程执行继续执行 whenComplete 的任务
// 方法以 Async 结尾是指 执行whenComplete 的任务的线程执行完成后,会提交给其他线程执行
public CompletableFuture<T> whenComplete(BiConsumer<? super T,? super Throwable> action)
public CompletableFuture<T> whenCompleteAsync(BiConsumer<? super T,? super Throwable> action)
public CompletableFuture<T> whenCompleteAsync(BiConsumer<? super T,? super Throwable> action, Executor executor)

public CompletableFuture<T> exceptionally(Function<Throwable,? extends T> fn)

// Action,它可以处理正常的计算结果,或者异常情况。
BiConsumer<? super T, ? super U>
runAsync 示例:
/**
     * runAsync 示例
     */
    public static void runAsyncT() {
        CompletableFuture<Void> future = CompletableFuture.runAsync(() -> {
            System.out.println("当前线程:" + Thread.currentThread().getName());
            int i = 10 / 2;
            System.out.println("计算结果:" + i);
        }, threadPoolExecutor);

        // 什么都不返回,调用get方法,就变成了阻塞操作!
        try {
            future.get();
        } catch (InterruptedException | ExecutionException e) {
            e.printStackTrace();
        }

        future.whenComplete(new BiConsumer<Void, Throwable>() {
            @Override
            public void accept(Void unused, Throwable throwable) {
                System.out.println("whenComplete 执行完成!" + Thread.currentThread().getName());
            }
        });

        future.whenCompleteAsync(new BiConsumer<Void, Throwable>() {
            @Override
            public void accept(Void unused, Throwable throwable) {
                System.out.println("whenCompleteAsync 执行完成!" + Thread.currentThread().getName());
            }
        });

        future.exceptionally(new Function<Throwable, Void>() {
            @Override
            public Void apply(Throwable throwable) {
                System.out.println("执行失败!" + throwable.getMessage());
                return null;
            }
        });

    }
supplyAsync 示例:
/**
     * supplyAsync 示例
     */
    public static void supplyAsyncT() {
        CompletableFuture<Integer> future = CompletableFuture.supplyAsync(() -> {
            System.out.println("当前线程:" + Thread.currentThread().getName());
            int i = 10 / 2;
            System.out.println("计算结果:" + i);
            return i;
        }, threadPoolExecutor);

        future.whenComplete((result, exception) -> {
            // 虽然能得到异常信息,但是无法修改返回数据
            System.out.println("whenComplete异步任务完成了,结果是:" + result + ";异常是:" + exception);
        });

        future.whenCompleteAsync((result, exception) -> {
            System.out.println("whenCompleteAsync异步任务完成了,结果是:" + result + ";异常是:" + exception);
        });

        future.exceptionally(throwable -> {
            // 如果执行失败,可以设置默认返回值
            return 10;
        });

        try {
            // 获取返回结果,调用get方法,就变成了阻塞操作
            Integer integer = future.get();
            System.out.println("返回结果:" + integer);
        } catch (InterruptedException | ExecutionException e) {
            e.printStackTrace();
        }
    }
Handle 方法
handle 是执行任务完成时对结果的处理。
handle 方法和 thenApply 方法处理方式基本一样。不同的是 handle 是在任务完成后再执行,还可以处理异常的任务。thenApply 只可以执行正常的任务,任务出现异常则不执行 thenApply 方法。
示例:
/**
     * supplyAsync 示例
     */
    public static void supplyAsyncT() {
        CompletableFuture<Integer> future = CompletableFuture.supplyAsync(() -> {
            System.out.println("当前线程:" + Thread.currentThread().getName());
            int i = 10 / 2;
            System.out.println("计算结果:" + i);
            return i;
        }, threadPoolExecutor);

        future.whenComplete((result, exception) -> {
            // 虽然能得到异常信息,但是无法修改返回数据
            System.out.println("whenComplete异步任务完成了,结果是:" + result + ";异常是:" + exception);
        });

        future.whenCompleteAsync((result, exception) -> {
            System.out.println("whenCompleteAsync异步任务完成了,结果是:" + result + ";异常是:" + exception);
        });


        // handle 与 exceptionally 都可以控制返回值,谁先被调用就以谁的为准(先被调用者的返回值为准)
        future.handle((result, throwable) -> {
            if (result != null) {
                return result * 2;
            }
            if (throwable != null) {
                return 1;
            }
            return 0;
        });

        future.exceptionally(throwable -> {
            // 如果执行失败,可以设置默认返回值
            return 10;
        });

        try {
            // 获取返回结果,调用get方法,就变成了阻塞操作
            Integer integer = future.get();
            System.out.println("返回结果:" + integer);
        } catch (InterruptedException | ExecutionException e) {
            e.printStackTrace();
        }
    }
线程串行化方法
线程串行化主要有以下方法:
// 当一个线程依赖另一个线程时,可以使用 thenApply 方法来把这两个线程串行化
public <U> CompletableFuture<U> thenApply(Function<? super T,? extends U> fn)
public <U> CompletableFuture<U> thenApplyAsync(Function<? super T,? extends U> fn)
public <U> CompletableFuture<U> thenApplyAsync(Function<? super T,? extends U> fn, Executor executor)

// 接收任务的处理结果,并消费处理,无返回结果
public CompletionStage<Void> thenAccept(Consumer<? super T> action);
public CompletionStage<Void> thenAcceptAsync(Consumer<? super T> action);
public CompletionStage<Void> thenAcceptAsync(Consumer<? super T> action,Executor executor);

// 跟 thenAccept 方法不一样的是,不关心任务的处理结果。只要上面的任务执行完成,就开始执行 thenRun
public CompletionStage<Void> thenRun(Runnable action);
public CompletionStage<Void> thenRunAsync(Runnable action);
public CompletionStage<Void> thenRunAsync(Runnable action,Executor executor);
thenApply 示例:
/**
     * thenApply 示例
     */
    public static void thenApplyT() {
        CompletableFuture<String> future = CompletableFuture.supplyAsync(() -> {
            System.out.println("当前线程:" + Thread.currentThread().getName());
            int i = 10 / 2;
            System.out.println("计算结果:" + i);
            return i;
        }, threadPoolExecutor).thenApplyAsync(result -> {
            System.out.println("任务 2 开启了,上一步的结果为:" + result);
            return "thenApplyAsync的新结果";
        }, threadPoolExecutor);

        try {
            String s = future.get();
            System.out.println("返回结果:" + s);
        } catch (InterruptedException | ExecutionException e) {
            e.printStackTrace();
        }
    }
thenAccept 示例:
/**
     * thenAccept 示例
     */
    public static void thenAcceptT() {
        CompletableFuture<Void> future = CompletableFuture.supplyAsync(() -> {
            System.out.println("当前线程:" + Thread.currentThread().getName());
            int i = 10 / 2;
            System.out.println("计算结果:" + i);
            return i;
        }, threadPoolExecutor).thenAcceptAsync(result -> {
            System.out.println("任务 2 开启了,上一步的结果为:" + result);
        }, threadPoolExecutor);
    }
thenRun 示例:
    /**
     * thenRun 示例
     */
    public static void thenRunT() {
        CompletableFuture<Void> future = CompletableFuture.supplyAsync(() -> {
            System.out.println("当前线程:" + Thread.currentThread().getName());
            int i = 10 / 2;
            System.out.println("计算结果:" + i);
            return i;
        }, threadPoolExecutor).thenRunAsync(() -> {
            System.out.println("任务 2 开启了");
        }, threadPoolExecutor);
    }
两任务组合-都要完成
// 两个CompletionStage,都完成了计算才会执行下一步的操作
public CompletionStage<Void> runAfterBoth(CompletionStage<?> other,Runnable action);
public CompletionStage<Void> runAfterBothAsync(CompletionStage<?> other,Runnable action);
public CompletionStage<Void> runAfterBothAsync(CompletionStage<?> other,Runnable action,Executor executor);
示例:
/**
     * runAfterBoth 示例
     */
    public static void runAfterBothT() {
        CompletableFuture<Integer> future1 = CompletableFuture.supplyAsync(new Supplier<Integer>() {
            @Override
            public Integer get() {
                int t = new Random().nextInt(3);
                try {
                    TimeUnit.SECONDS.sleep(t);
                } catch (InterruptedException e) {
                    e.printStackTrace();
                }
                System.out.println("f1 = " + t);
                return t;
            }
        });
        CompletableFuture<Integer> future2 = CompletableFuture.supplyAsync(new Supplier<Integer>() {
            @Override
            public Integer get() {
                int t = new Random().nextInt(3);
                try {
                    TimeUnit.SECONDS.sleep(t);
                } catch (InterruptedException e) {
                    e.printStackTrace();
                }
                System.out.println("f2 = " + t);
                return t;
            }
        });
        future1.runAfterBoth(future2, new Runnable() {
            @Override
            public void run() {
                System.out.println("future1 和 future2 都执行完成了...");
            }
        });
    }
两任务组合-一个完成
// 两个 CompletionStage,任何一个完成了都会执行下一步的操作
public CompletionStage<Void> runAfterEither(CompletionStage<?> other,Runnable action);
public CompletionStage<Void> runAfterEitherAsync(CompletionStage<?> other,Runnable action);
public CompletionStage<Void> runAfterEitherAsync(CompletionStage<?> other,Runnable action,Executor executor);
示例:
/**
     * runAfterEither 示例
     */
    public static void runAfterEitherT() {
        CompletableFuture<Integer> future1 = CompletableFuture.supplyAsync(new Supplier<Integer>() {
            @Override
            public Integer get() {
                int t = new Random().nextInt(3);
                try {
                    TimeUnit.SECONDS.sleep(t);
                } catch (InterruptedException e) {
                    e.printStackTrace();
                }
                System.out.println("f1 = " + t);
                return t;
            }
        });
        CompletableFuture<Integer> future2 = CompletableFuture.supplyAsync(new Supplier<Integer>() {
            @Override
            public Integer get() {
                int t = new Random().nextInt(3);
                try {
                    TimeUnit.SECONDS.sleep(t);
                } catch (InterruptedException e) {
                    e.printStackTrace();
                }
                System.out.println("f2 = " + t);
                return t;
            }
        });
        future1.runAfterEither(future2, new Runnable() {
            @Override
            public void run() {
                System.out.println("future1 或 future2 执行完成了...");
            }
        });
    }
多任务组合
// 两个 CompletionStage 的任务都执行完成后,把两个任务的结果一块交给 thenCombine 来处理
public <U,V> CompletionStage<V> thenCombine(CompletionStage<? extends U> other,BiFunction<? super T,? super U,? extends V> fn);
public <U,V> CompletionStage<V> thenCombineAsync(CompletionStage<? extends U> other,BiFunction<? super T,? super U,? extends V> fn);
public <U,V> CompletionStage<V> thenCombineAsync(CompletionStage<? extends U> other,BiFunction<? super T,? super U,? extends V> fn,Executor executor);

// 两个 CompletionStage 都执行完成后,把结果一块交给 thenAcceptBoth 来进行消耗
public <U> CompletionStage<Void> thenAcceptBoth(CompletionStage<? extends U> other,BiConsumer<? super T, ? super U> action);
public <U> CompletionStage<Void> thenAcceptBothAsync(CompletionStage<? extends U> other,BiConsumer<? super T, ? super U> action);
public <U> CompletionStage<Void> thenAcceptBothAsync(CompletionStage<? extends U> other,BiConsumer<? super T, ? super U> action,     Executor executor);

// 两个 CompletionStage 进行流水线操作,第一个操作完成时,将其结果作为参数传递给第二个操作
public <U> CompletableFuture<U> thenCompose(Function<? super T, ? extends CompletionStage<U>> fn);
public <U> CompletableFuture<U> thenComposeAsync(Function<? super T, ? extends CompletionStage<U>> fn) ;
public <U> CompletableFuture<U> thenComposeAsync(Function<? super T, ? extends CompletionStage<U>> fn, Executor executor) ;

// 两个 CompletionStage,谁执行返回的结果快,用那个 CompletionStage 的结果进行下一步的转化操作
public <U> CompletionStage<U> applyToEither(CompletionStage<? extends T> other,Function<? super T, U> fn);
public <U> CompletionStage<U> applyToEitherAsync(CompletionStage<? extends T> other,Function<? super T, U> fn);
public <U> CompletionStage<U> applyToEitherAsync(CompletionStage<? extends T> other,Function<? super T, U> fn,Executor executor);

// 两个 CompletionStage,谁执行返回的结果快,用那个 CompletionStage 的结果进行下一步的消耗操作
public CompletionStage<Void> acceptEither(CompletionStage<? extends T> other,Consumer<? super T> action);
public CompletionStage<Void> acceptEitherAsync(CompletionStage<? extends T> other,Consumer<? super T> action);
public CompletionStage<Void> acceptEitherAsync(CompletionStage<? extends T> other,Consumer<? super T> action,Executor executor);
示例:
/**
     * thenCombine 示例
     */
    public static void thenCombineT() throws ExecutionException, InterruptedException {
        CompletableFuture<String> future1 = CompletableFuture.supplyAsync(new Supplier<String>() {

            @Override
            public String get() {
                return "hello";
            }
        });
        CompletableFuture<String> future2 = CompletableFuture.supplyAsync(new Supplier<String>() {

            @Override
            public String get() {
                return "world";
            }
        });
        CompletableFuture<String> result = future1.thenCombine(future2, new BiFunction<String, String, String>() {
            @Override
            public String apply(String s, String s2) {
                return s + " " + s2;
            }
        });

        System.out.println(result.get());
    }
/**
     * thenAcceptBoth 示例
     */
    public static void thenAcceptBothT() {
        CompletableFuture<Integer> future1 = CompletableFuture.supplyAsync(new Supplier<Integer>() {
            @Override
            public Integer get() {
                int t = new Random().nextInt(3);
                try {
                    TimeUnit.SECONDS.sleep(t);
                } catch (InterruptedException e) {
                    e.printStackTrace();
                }
                System.out.println("f1 = " + t);
                return t;
            }
        });
        CompletableFuture<Integer> future2 = CompletableFuture.supplyAsync(new Supplier<Integer>() {
            @Override
            public Integer get() {
                int t = new Random().nextInt(3);
                try {
                    TimeUnit.SECONDS.sleep(t);
                } catch (InterruptedException e) {
                    e.printStackTrace();
                }
                System.out.println("f2 = " + t);
                return t;
            }
        });
        future1.thenAcceptBoth(future2, new BiConsumer<Integer, Integer>() {
            @Override
            public void accept(Integer integer, Integer integer2) {
                System.out.println("f1 = " + integer +" , f2 = " + integer2);
            }
        });

    }

    /**
     * thenCompose 示例
     */
    public static void thenComposeT() throws ExecutionException, InterruptedException {
        CompletableFuture<Integer> future = CompletableFuture.supplyAsync(new Supplier<Integer>() {
            @Override
            public Integer get() {
                int t = new Random().nextInt(3);
                System.out.println("t1 = " + t);
                return t;
            }
        }).thenCompose(new Function<Integer, CompletionStage<Integer>>() {
            @Override
            public CompletionStage<Integer> apply(Integer integer) {
                return CompletableFuture.supplyAsync(new Supplier<Integer>() {
                    @Override
                    public Integer get() {
                        int t = integer * 2;
                        System.out.println("t2 = " + t);
                        return t;
                    }
                });
            }
        });

        System.out.println("result: " + future.get());
    }

    /**
     * applyToEither 示例
     */
    public static void applyToEitherT() throws ExecutionException, InterruptedException {
        CompletableFuture<Integer> future1 = CompletableFuture.supplyAsync(new Supplier<Integer>() {
            @Override
            public Integer get() {
                int t = new Random().nextInt(3);
                try {
                    TimeUnit.SECONDS.sleep(t);
                } catch (InterruptedException e) {
                    e.printStackTrace();
                }
                System.out.println("f1 = " + t);
                return t;
            }
        });
        CompletableFuture<Integer> future2 = CompletableFuture.supplyAsync(new Supplier<Integer>() {
            @Override
            public Integer get() {
                int t = new Random().nextInt(3);
                try {
                    TimeUnit.SECONDS.sleep(t);
                } catch (InterruptedException e) {
                    e.printStackTrace();
                }
                System.out.println("f2 = " + t);
                return t;
            }
        });
        CompletableFuture<Integer> result = future1.applyToEither(future2, new Function<Integer, Integer>() {
            @Override
            public Integer apply(Integer integer) {
                System.out.println(integer);
                return integer * 2;
            }
        });

        System.out.println(result.get());
    }

    /**
     * acceptEither 示例
     */
    public static void acceptEitherT() {
        CompletableFuture<Integer> future1 = CompletableFuture.supplyAsync(new Supplier<Integer>() {
            @Override
            public Integer get() {
                int t = new Random().nextInt(3);
                try {
                    TimeUnit.SECONDS.sleep(t);
                } catch (InterruptedException e) {
                    e.printStackTrace();
                }
                System.out.println("f1 = " + t);
                return t;
            }
        });
        CompletableFuture<Integer> future2 = CompletableFuture.supplyAsync(new Supplier<Integer>() {
            @Override
            public Integer get() {
                int t = new Random().nextInt(3);
                try {
                    TimeUnit.SECONDS.sleep(t);
                } catch (InterruptedException e) {
                    e.printStackTrace();
                }
                System.out.println("f2 = " + t);
                return t;
            }
        });
        future1.acceptEither(future2, new Consumer<Integer>() {
            @Override
            public void accept(Integer integer) {
                System.out.println(integer);
            }
        });
    }