Springboot集成JPA,环境配置如下:JDK8+Eclipse+Maven+mysql
第一步:创建SpringBoot工程;
第二步:在pom.xml中添加依赖;
<dependency>
    <groupId>org.springframework.boot</groupId>
    <artifactId>spring-boot-starter-web</artifactId>
</dependency>
<!---Spring Data JPA->
<dependency>
    <groupId>org.springframework.boot</groupId>
    <artifactId>spring-boot-starter-data-jpa</artifactId>
</dependency>
<!---mysql->
<dependency>
    <groupId>mysql</groupId>
    <artifactId>mysql-connector-java</artifactId>
    <scope>runtime</scope>
</dependency>
<dependency>
    <groupId>org.springframework.boot</groupId>
    <artifactId>spring-boot-starter-test</artifactId>
    <scope>test</scope>
</dependency>
第三步:创建数据库及数据库表:
//创建数据库
create database spring_data;
//创建Customer表
create table customer(
    id int not null auto_increment,
    firstName varchar(20) not null,
    lastName varchar(20) not null,
    primary key(id)
);
第四步:创建实体:
@Entity
public class Customer {

    @Id
    @GeneratedValue(strategy=GenerationType.AUTO)
    private Long id;
    private String firstName;
    private String lastName;


    public Long getId() {
        return id;
    }

    public void setId(Long id) {
        this.id = id;
    }

    public String getFirstName() {
        return firstName;
    }

    public void setFirstName(String firstName) {
        this.firstName = firstName;
    }

    public String getLastName() {
        return lastName;
    }

    public void setLastName(String lastName) {
        this.lastName = lastName;
    }

    protected Customer() {}

    public Customer(String firstName, String lastName) {
        this.firstName = firstName;
        this.lastName = lastName;
    }

    @Override
    public String toString() {
        return String.format("Customer[id=%d,firstName='%s',lastName='%s']",
                id,firstName,lastName);
    }
第五步:创建repository:
public interface CustomerRepository extends CrudRepository<Customer, Long> {
    List<Customer> findByLastName(String lastName);
}
第六步:创建Controller:
@RestController
public class CustomerController {

    @Autowired
    CustomerRepository repository;

    @RequestMapping("/add")
    public @ResponseBody String addCustomer(@RequestParam String firstName,@RequestParam String lastName) {
        Customer customer = new Customer(firstName, lastName);
        Customer result = repository.save(customer);
        return result.toString();
    }

    @RequestMapping("/all")
    public @ResponseBody Iterable<Customer> queryAll() {

        Iterable<Customer> result = repository.findAll();
        return result;
    }
}
第七步:配置数据源信息,在application.yml中,注意:
ddl-auto:create----每次运行该程序,没有表格会新建表格,表内有数据会清空
ddl-auto:create-drop----每次程序结束的时候会清空表
ddl-auto:update----每次运行程序,没有表格会新建表格,表内有数据不会清空,只会更新
ddl-auto:validate----运行程序会校验数据与数据库的字段类型是否相同,不同会报错
spring:
  jpa:
    hibernate:
      ddl-auto: create
  datasource:
    url: jdbc:mysql://localhost:3306/spring_data
    username: root
    password: 111111
    driver-class-name: com.mysql.cj.jdbc.Driver
  mvc:
    servlet:
      path: /demo
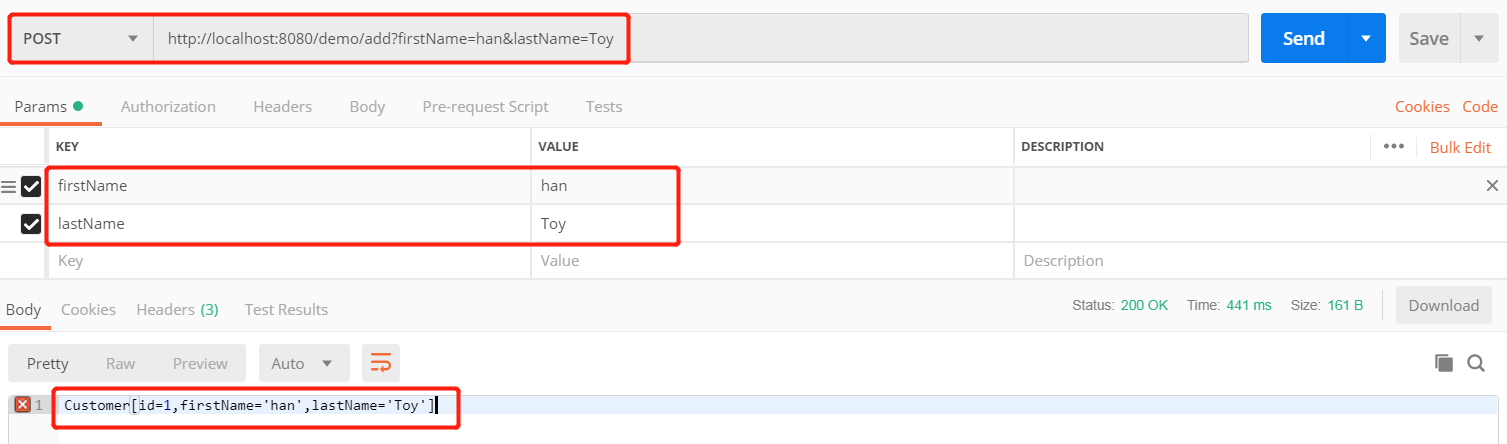
第八步:启动测试,采用postman进行测试:

集成完毕。