前面基本的unittest及ddt已经学过了,现在我们系统把这些知识结合起来,写一个简单的UTP自动化测试框架;
我们先来建基础目录,首先新建一个项目,项目下建父目录UTP,conf目录,用来存放配置文件信息;data目录,用来存放测试数据;cases目录用来存放测试用例,common用来存放通用方法,report用来存放生成的测试报告,log用来存放生成的日志;bin目录用来存放执行文件;基本的目录结构就建好了;如下:

下面我们来完善具体代码。
先来分析一下思路:
1、编写配置文件信息
2、编写测试数据,yml文件
3、生成测试用例(调用接口的方法),Python文件
4、获取测试用例
5、通过unittest执行测试用例
6、生成测试报告,发送邮件
首先在conf目录下新建setting.py文件,用来存放配置信息
import os
#当前目录的父目录
BASE_PATH=os.path.dirname(os.path.dirname(os.path.abspath(__file__)))
#测试用例路径
CASE_PATH=os.path.join(BASE_PATH,'cases')
#测试数据路径
DATA_PATH=os.path.join(BASE_PATH,'data')
#日志路径
LOG_PATH=os.path.join(BASE_PATH,'log','utp.log')
#测试报告路径
REPORT_PATH=os.path.join(BASE_PATH,'report')
#测试用例示例路径
EG_PATH=os.path.join(BASE_PATH,'conf')

USER_MAIL='发件箱'
MAIL_PASSWD='密码,QQ为授权码'
MAIL_HOST='smtp.qq.com'
RECV_MAIL='收件箱'
在data目录下新建yml格式的测试数据;示例如下:
-
 url : http://www.xxxx.com/user/loginAction
 method : post
 data:
  username : pei
  password : 123456
 check : '请输入正确的用户名和密码'
 header:
    Connection: keep-alive
-
 url : http://www.xxxx.com/user/loginAction
 method : post
 data:
  password : 123456
 check : '请输入正确的用户名和密码'
 header:
    Connection: keep-alive
在cases目录下新建testcase.py,
import os
import ddt
import requests
import unittest


@ddt.ddt
class Test_login(unittest.TestCase):
    @ddt.file_data(r'C:esttestuntitled1UTPdatalogin.yml')
    @ddt.unpack
    def test_login(self,**kwargs):
        url=kwargs.get('url')
        method=kwargs.get('method')
        data=kwargs.get('data',{})
        header=kwargs.get('header',{})
        is_json=kwargs.get('is_json',0)
        cookie=kwargs.get('cookie',{})
        check=kwargs.get('check')
        if method.upper=='POST':
            if is_json:
                req=requests.post(url=url,json=data,headers=header,cookies=cookie).text
            else:
                req=requests.post(url=url,data=data,headers=header,cookies=cookie).text
        else:
            req=requests.get(url=url,params=data,headers=header,cookies=cookie).text
        self.assertIn(check,req)
在写测试用例的过程中我们发现,由于测试用例基本格式一致,只是调用的测试数据不同,生成的测试用例名称不同,,所以我们可以通过写代码来实现,根据测试用例模板,自动创建测试用例py文件,这个时候我们把testcase.py文件改名为testcase.eg,作为测试用例的一个示例;把class名参数化,把yml文件参数化,同时把测试用例模板放到conf目录下;
import os
import ddt
import requests
import unittest
@ddt.ddt
class %s(unittest.TestCase):
    def setup(self):
        print('初始化')
    def tearDown(self):
        print('执行结束')
    @ddt.file_data(r'%s')
    @ddt.unpack
    def test_login(self,**kwargs):
        url=kwargs.get('url')
        method=kwargs.get('method')
        data=kwargs.get('data',{})
        header=kwargs.get('header',{})
        is_json=kwargs.get('is_json',0)
        cookie=kwargs.get('cookie',{})
        check=kwargs.get('check')
        if method.upper=='POST':
            if is_json:
                req=requests.post(url=url,json=data,headers=header,cookies=cookie).text
            else:
                req=requests.post(url=url,data=data,headers=header,cookies=cookie).text
        else:
            req=requests.get(url=url,params=data,headers=header,cookies=cookie).text
        self.assertIn(check,req)
然后编写生成测试用例的方法;
import os
from conf.setting import EG_PATH,CASE_PATH,DATA_PATH

class GetCase(object):
    def creat_case(self):
        #打开示例文件
        with open(os.path.join(EG_PATH,'testcase.eg'),encoding='utf-8') as fw:
            #读取出文件内容
            test_case_str=fw.read()
        #获取出yml测试数据
        file_list=os.listdir(DATA_PATH)
        for file_name in file_list:
            #yml文件的绝对路径
            file_path=os.path.join(DATA_PATH,file_name)
            if file_name.endswith('yml') or file_name.endswith('yaml'):
                #生成的测试用例的文件名
                abs_case_path=os.path.join(CASE_PATH,'test_'+file_name.split('.')[0]+'.py')
                #生成的测试用例中的方法名
                class_name='Test_'+file_name.split('.')[0]
                #生成py文件
                with open(abs_case_path,'w+',encoding='utf-8') as f:
                    f.write((test_case_str)%(class_name,file_path))


if __name__ == '__main__':
    getcase=GetCase()
    getcase.creat_case()
测试通过,可以正常根据示例生成测试用例的Python文件;

接下来编写执行用例的文件;
import os
import sys
#添加到环境变量里
BASE_PATH=os.path.dirname(os.path.dirname(os.path.abspath(__file__)))
sys.path.insert(0,BASE_PATH)
import unittest
import BeautifulReport
from conf.setting import CASE_PATH,REPORT_PATH,USER_MAIL,MAIL_PASSWD,MAIL_HOST,RECV_MAIL
from common.getTestCase import GetCase
import time
from common.sendemail import SendMail
def Run_Case():
#实例化生成获取测试用例的方法
cases=GetCase()
#生成py的测试用例
cases.creat_case()
#创建测试套件
suite=unittest.TestSuite()
#获取所有的测试用例
all_case=unittest.defaultTestLoader.discover(CASE_PATH,'test*py')
#将测试用例添加到测试套件里执行
[suite.addTests(case) for case in all_case]
#生成测试结果
result=BeautifulReport.BeautifulReport(suite)
#生成测试报告名称
report_name=time.strftime('%Y%m%d%H%M%S')+'_report.html'
#生成测试报告
result.report(description='接口自动化测试',filename=report_name,log_path=REPORT_PATH)
#测试报告的绝对路径
abs_report_path=os.path.join(REPORT_PATH,report_name)
#实例化邮件
mail=SendMail(
username=USER_MAIL,
passwd=MAIL_PASSWD,
recv=RECV_MAIL,
title='接口自动化测试报告',
content=' 各位,此次是本次自动化测试结果,具体结果请查看测试报告',
file=abs_report_path, ssl=True,
email_host=MAIL_HOST)
#发送邮件
mail.send_mail()
if __name__ == '__main__':
Run_Case()
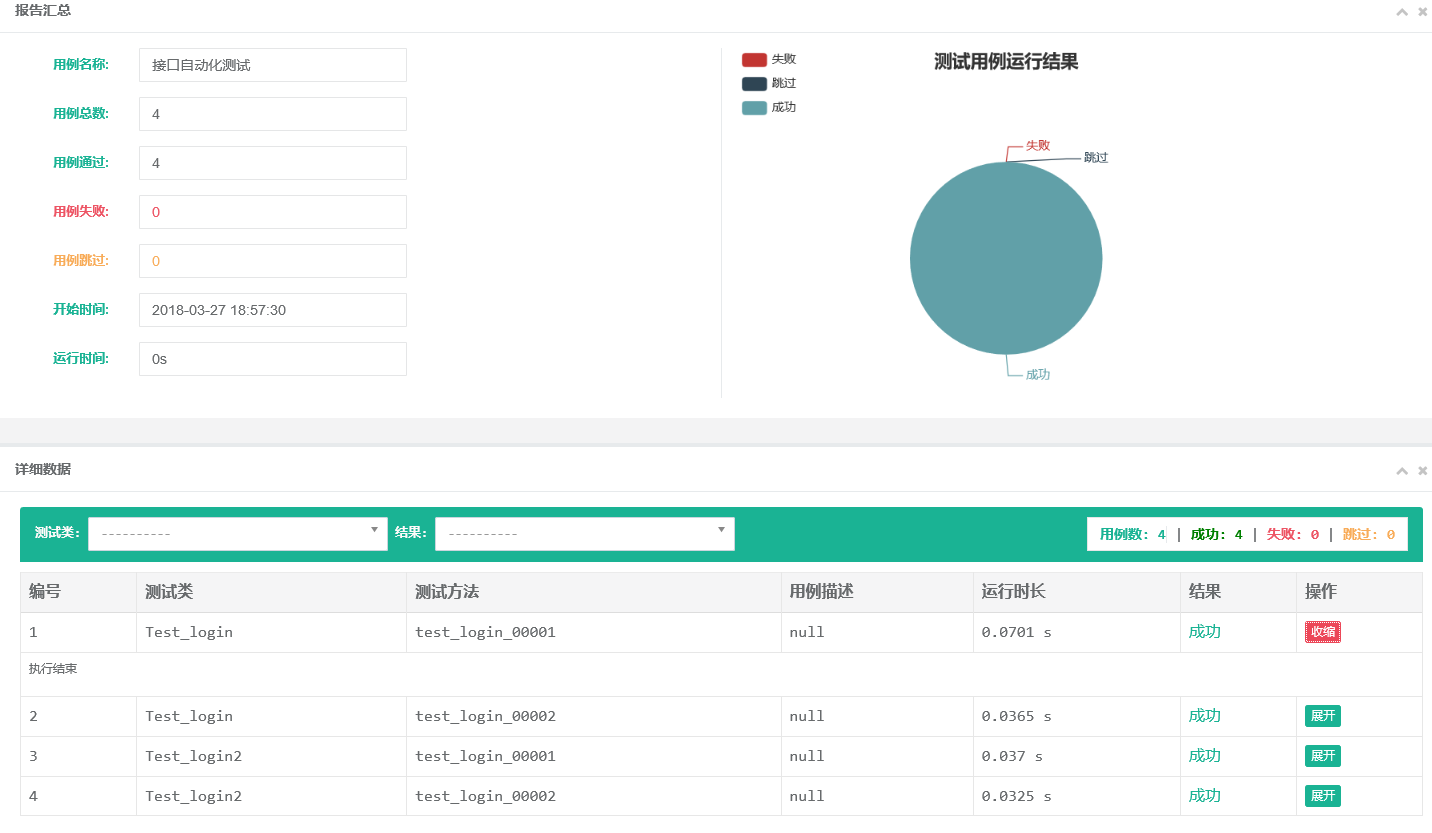
执行查看结果:
在report目录下生成了测试测试报告,打开测试报告显示此次测试结果:

再附上发送邮件的类方法:
import smtplib,os
from email.mime.text import MIMEText
from email.mime.multipart import MIMEMultipart
import base64

class SendMail(object):
    def __init__(self,username,passwd,recv,title,content,
                 file=None,ssl=False,
                 email_host='smtp.163.com',port=25,ssl_port=465):
        '''
        :param username: 用户名
        :param passwd: 密码
        :param recv: 收件人,多个要传list ['a@qq.com','b@qq.com]
        :param title: 邮件标题
        :param content: 邮件正文
        :param file: 附件路径,如果不在当前目录下,要写绝对路径,默认没有附件
        :param ssl: 是否安全链接,默认为普通
        :param email_host: smtp服务器地址,默认为163服务器
        :param port: 非安全链接端口,默认为25
        :param ssl_port: 安全链接端口,默认为465
        '''
        self.username = username #用户名
        self.passwd = passwd #密码
        self.recv = recv #收件人,多个要传list ['a@qq.com','b@qq.com]
        self.title = title #邮件标题
        self.content = content #邮件正文
        self.file = file #附件路径,如果不在当前目录下,要写绝对路径
        self.email_host = email_host #smtp服务器地址
        self.port = port #普通端口
        self.ssl = ssl #是否安全链接
        self.ssl_port = ssl_port #安全链接端口
    def send_mail(self):
        msg = MIMEMultipart()
        #发送内容的对象
        if self.file:#处理附件的
            file_name = os.path.split(self.file)[-1]#只取文件名,不取路径
            try:
                f = open(self.file, 'rb').read()
            except Exception as e:
                raise Exception('附件打不开!!!!')
            else:
                att = MIMEText(f,"base64", "utf-8")
                att["Content-Type"] = 'application/octet-stream'
                #base64.b64encode(file_name.encode()).decode()
                new_file_name='=?utf-8?b?' + base64.b64encode(file_name.encode()).decode() + '?='
                #这里是处理文件名为中文名的,必须这么写
                att["Content-Disposition"] = 'attachment; filename="%s"'%(new_file_name)
                msg.attach(att)
        msg.attach(MIMEText(self.content))#邮件正文的内容
        msg['Subject'] = self.title  # 邮件主题
        msg['From'] = self.username  # 发送者账号
        msg['To'] = ','.join(self.recv)  # 接收者账号列表
        if self.ssl:
            self.smtp = smtplib.SMTP_SSL(self.email_host,port=self.ssl_port)
        else:
            self.smtp = smtplib.SMTP(self.email_host,port=self.port)
        #发送邮件服务器的对象
        self.smtp.login(self.username,self.passwd)
        try:
            self.smtp.sendmail(self.username,self.recv,msg.as_string())
            pass
        except Exception as e:
            print('出错了。。',e)
        else:            print('发送成功!')        self.smtp.quit()
该方法可以通用于邮件发送,以下就是整个框架的完整结构了,一个简单的自动化测试框架就完成了,大家也来试试吧。

上述是基于数据驱动的自动化测试,后面我们继续学代码驱动,用来编写有关联关系的测试用例