前言
上一篇博客介绍了Android的TextView控件,这篇博客来说一下EditText控件。EditText为一个文本控件,提供了文本输入的功能,而且继承自TextView,可以理解为可以输入的TextView。因为继承的关系,很多TextView可以用到的方法,在EditText都可以用到。
EditText
对于EditText,在很多平台上都有用到,最大的用处就是供用户输入一些信息,所以主要的方法就两个:
- setText():设置TextView控件中显示的内容。
- getText() 获取TextView控件中显示的内容。
示例程序
现在通过两个示例程序,来讲解一下EditText的使用。
第一个例子,在EditText中插入表情图片,无论是开发任何系统,这个都是常用的实现。在编码之前,需要找到一些表情图片的资源,我这里就随机找了十张图片,注意资源文件的文件名必须是小写的,放在/res/drawable文件夹下。这样在清单文件R中,就可以看到与Drawable资源对于的资源清单ID,对于在清单文件中的资源,可以通过R类访问,但是访问到的为一个int类型的资源ID,如果需要访问详细内容,需要使用getResource()方法访问到所有的资源,在其中有特定资源的访问方法。关于资源清单文件R,以后再进行详细讲解。
在Android中,使用图片资源会用到一个Bitmap的类,此类代表一个位图资源,是一个final类,需要使用BitmapFactory类的静态方法decodeXxx()转化获得,此静态方法有多种重载模式,可以适应不同的资源来源。
下面直接上代码,对于布局而言,很简单的只有两个控件:
 1 <?xml version="1.0" encoding="utf-8"?>
 2 <LinearLayout xmlns:android="http://schemas.android.com/apk/res/android"
 3     android:layout_width="match_parent"
 4     android:layout_height="match_parent"
 5     android:orientation="vertical" >
 6
 7     <EditText
 8         android:id="@+id/edImage"
 9         android:layout_width="match_parent"
10         android:layout_height="wrap_content"
11         android:layout_marginTop="20dp"/>
12
13     <Button
14         android:id="@+id/btnInImg"
15         android:text="添加表情"
16          android:layout_width="match_parent"
17         android:layout_height="wrap_content"/>
18 </LinearLayout>
实现InImageActivity.java代码:
 1 package cn.bgxt.androiduiedittext;
 2
 3 import java.util.Random;
 4
 5 import android.app.Activity;
 6 import android.graphics.Bitmap;
 7 import android.graphics.BitmapFactory;
 8 import android.graphics.drawable.Drawable;
 9 import android.os.Bundle;
10 import android.text.Spannable;
11 import android.text.SpannableString;
12 import android.text.style.ImageSpan;
13 import android.view.View;
14 import android.widget.Button;
15 import android.widget.EditText;
16
17 public class InImageActivity extends Activity  {
18
19     private Button btnInImg;
20     private EditText edImage;
21     //获取Drawable资源的Id数组
22     private final int[] DRAW_IMG_ID=
23         {
24             R.drawable.image0,
25             R.drawable.image1,
26             R.drawable.image2,
27             R.drawable.image3,
28             R.drawable.image4,
29             R.drawable.image5,
30             R.drawable.image6,
31             R.drawable.image7,
32             R.drawable.image8,
33             R.drawable.image9
34         };
35     public InImageActivity() {
36         // TODO Auto-generated constructor stub
37     }
38
39     @Override
40     protected void onCreate(Bundle savedInstanceState) {
41         super.onCreate(savedInstanceState);
42         setContentView(R.layout.edittextinimg_activity);
43
44         btnInImg=(Button)findViewById(R.id.btnInImg);
45         edImage=(EditText)findViewById(R.id.edImage);
46
47         btnInImg.setOnClickListener(new View.OnClickListener() {
48             @Override
49             public void onClick(View v) {
50                 // 参数一个0-9的随机数
51                 int  random=new Random().nextInt(9);
52                 //通过bitmapFactory获得位图资源
53                 Bitmap bit=BitmapFactory.decodeResource(getResources(), DRAW_IMG_ID[random]);
54                 //一个ImageSpan,用于插入的存放待插入的图片
55                 ImageSpan imageSpan=new ImageSpan(InImageActivity.this,bit);
56                 SpannableString spannableString=new SpannableString("img");
57                 spannableString.setSpan(imageSpan, 0, 3, Spannable.SPAN_EXCLUSIVE_EXCLUSIVE);
58                 edImage.append(spannableString);
59             }
60         });
61
62     }
63
64
65
66
67 }
显示效果,点击按钮随机添加标签:

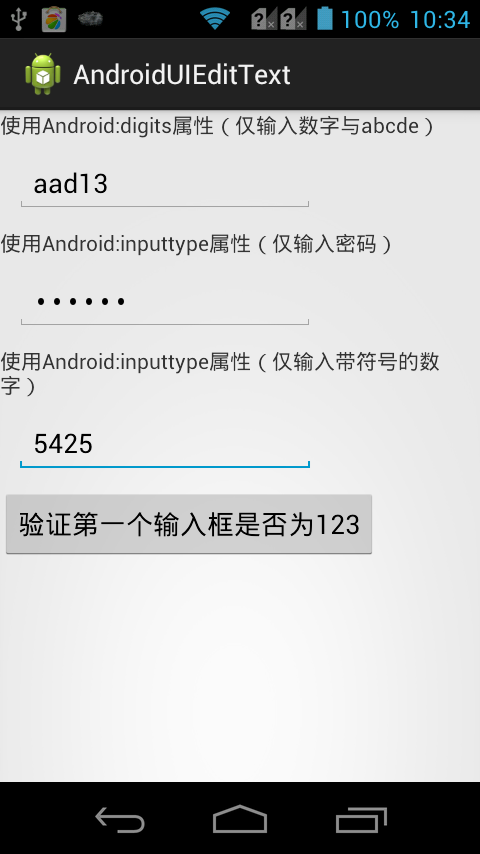
既然EditText主要是用来获取用户输入的信息的,那么第二个例子就来讲讲用户输入时候内容的验证吧。在XML Attribute中,有一些属性可以设置输入验证的范围内容,不过此为TextView类的属性,因为TextView无法输入,此处在EditText中讲解说明。
- android:digits:指定特定能被输入的字符。
- android:inputType:设定输入的类型,下面仅介绍一些常用的,多项可以使用“|”分割。
- textUri:必须是一个URL。
- textEmailAddress:Email地址
- textPassword:密码。
- number:数字。
- android:numeric:指定数字输入类型,多项可以使用“|”分割。
- integer:数字。
- decimal:浮点类型。
- signed:带符号。
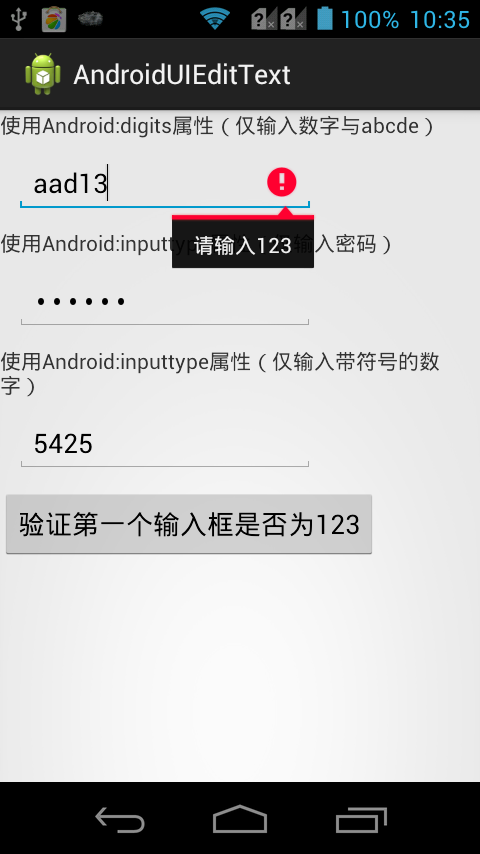
以上属性仅仅是为了限制用户的输入,还有一些输入需要给用户以提示错误信息。这里将使用到setError()方法,如果设定了错误提示信息,会在EditText旁边以感叹号的形式显示。
布局代码:
 1 <?xml version="1.0" encoding="utf-8"?>
 2 <LinearLayout xmlns:android="http://schemas.android.com/apk/res/android"
 3     android:layout_width="match_parent"
 4     android:layout_height="match_parent"
 5     android:orientation="vertical" >
 6
 7     <TextView
 8         android:layout_width="wrap_content"
 9         android:layout_height="wrap_content"
10         android:text="使用Android:digits属性(仅输入数字与abcde)" />
11
12     <EditText
13         android:id="@+id/etNum"
14         android:layout_width="200dp"
15         android:layout_height="wrap_content"
16         android:layout_margin="10dp"
17         android:digits="123456789abcde"
18         />
19 <TextView
20         android:layout_width="wrap_content"
21         android:layout_height="wrap_content"
22         android:text="使用Android:inputtype属性(仅输入Email)" />
23
24     <EditText
25         android:layout_width="200dp"
26         android:layout_height="wrap_content"
27         android:layout_margin="10dp"
28         android:inputType="textPassword"
29         />
30     <TextView
31         android:layout_width="wrap_content"
32         android:layout_height="wrap_content"
33         android:text="使用Android:inputtype属性(仅输入密码)" />
34
35     <EditText
36         android:layout_width="200dp"
37         android:layout_height="wrap_content"
38         android:layout_margin="10dp"
39         android:numeric="decimal|signed"
40         />
41     <Button
42         android:id="@+id/btnValidation"
43         android:text="验证第一个输入框是否为123"
44          android:layout_width="wrap_content"
45         android:layout_height="wrap_content"/>
46 </LinearLayout>
Java代码:
 1 package cn.bgxt.androiduiedittext;
 2
 3 import android.app.Activity;
 4 import android.os.Bundle;
 5 import android.view.View;
 6 import android.widget.Button;
 7 import android.widget.EditText;
 8
 9 public class EditValidationActivity extends Activity {
10
11     private Button btnValidation;
12     private EditText etNum;
13     public EditValidationActivity() {
14         // TODO Auto-generated constructor stub
15     }
16     @Override
17     protected void onCreate(Bundle savedInstanceState) {
18         // TODO Auto-generated method stub
19         super.onCreate(savedInstanceState);
20         setContentView(R.layout.editvalidation_activity);
21         btnValidation=(Button)findViewById(R.id.btnValidation);
22         etNum=(EditText)findViewById(R.id.etNum);
23
24         btnValidation.setOnClickListener(new View.OnClickListener() {
25
26             @Override
27             public void onClick(View v) {
28                 // TODO Auto-generated method stub
29                 String num=etNum.getText().toString().trim();
30                 if(!num.equals("123"))
31                 {
32                     etNum.setError("请输入123");
33                 }
34             }
35         });
36
37
38     }
39 }
效果展示:
如果点击验证按钮,而第一个文本框输入的不是123,则提示错误信息:
总结
以上就讲解了EditText在实际项目中常用的效果,虽然大部分使用的是TextView的属性设置的效果,但是Android下还有一些其他的供用户输入的控件,可以使用,所以才以这样的继承结构实现属性。
请支持原创,尊重原创,转载请注明出处。谢谢。