bind这个东西争议很多,用起来很迷,而且不利于编译优化,很多人都推荐用lambda而非bind。简单说,bind就是通过库抽象实现了lambda里需要写进语言标准的东西,变量捕获,参数绑定,延迟求值等。但是以此带来的缺陷就是,虽然bind生成的可调用对象的结构是编译期确定的,但是它的值,尤其是被调用的函数,全部是在运行期指定的,并且可调用对象也只是一个普通的类,因此很难进行优化。除此之外,标准库的bind实现,只提供了20个placeholder进行参数绑定,无法扩展,这也是实现的一个坑。因此,在有条件的情况下,应该使用lambda而非bind,lambda是写入语言标准的特性,编译器面对一个你写的lambda,和bind生成的普通的对象相比,可以更加清楚你想要做什么,并进行针对性的优化。
虽说如此,bind怎么实现的还是很trick的,这篇文章就讲一讲bind的实现。
bind的使用
bind的使用分两步,第一步是生成可调用对象,使用你想要bind的东西和需要捕获和延迟绑定的参数调用bind,生成一个新的callable。
std::string s;

auto f = mq::bind(&std::string::push_back, std::ref(s), mq::ph<0>);
这里用的是我自己的实现,bind的第一个参数是你要绑定的callable,这里是一个成员函数,后面的是用来调用的参数,因为是一个成员函数指针,所以参数的第一个应该是一个对象实例,这里是一个引用包装的字符串 std::ref(s) ,最后是一个placeholder,他表示对于生成的可调用对象,在调用时第0个参数要被传到这里。这里和标准不一样,标准的placeholder是从1开始的。
使用起来就是这样的
  f('a');
f('b');
这里用来调用的参数就会被传给绑定进去的push_back的第0个参数。
bind的实现
首先就是bind生成的对象,要做的就是把callable和后面传的参数都丢进一个类里面,这样就构成了一个绑定对象,bind是这么实现的,lambda的内部也是这么实现的。生成的对象叫binder。
template<class TFunc, class... TCaptures>
class binder
{
    using seq = std::index_sequence_for<TCaptures...>;
    using captures = std::tuple<std::decay_t<TCaptures>...>;
    using func = std::decay_t<TFunc>;

    func _func;
    captures _captures;
public:
    explicit binder(TFunc&& func, TCaptures&&... captures)
        : _func(std::forward<TFunc>(func))
        , _captures(std::forward<TCaptures>(captures)...)
    {
    }
    //...
这个实现相当的直接,func就是被绑定的函数,captures是一个tuple,里面装了bind调用时第1个参数后面的所有参数,构造函数把这些东西都forward进去存住。注意所有的类型参数都decay过,这是因为要去掉所有的引用,数组退化成指针,不然没法放进tuple。
而bind,简单点,就是用调用的参数构造binder而已。
template<class TFunc, class... TCaptures>
decltype(auto) bind(TFunc&& func, TCaptures&&... captures)
{
    return detail::binder<TFunc, TCaptures...>{ std::forward<TFunc>(func), std::forward<TCaptures>(captures)... };
}
这里用了C++14的decltype(auto)返回值,这个写法就是通过return语句直接推断返回类型,并且不做任何decay操作。
binder构造好了,下面就是构造它的operator()重载,函数签名也是相当的直接:
    //class binder
    template<class... TParams>
    decltype(auto) operator()(TParams&&... params);
};
接受不定数量的参数而已,这里不同于标准的实现,我没有用任何的SFINAE来做参数的限制,如果调用的参数有错,那么大概会出一大片编译错误。
它的实现是这样的,我把上面binder的实现再复制过来一份一起看
template<class TFunc, class... TCaptures>
class binder
{
    using seq = std::index_sequence_for<TCaptures...>;
    using captures = std::tuple<std::decay_t<TCaptures>...>;
    using func = std::decay_t<TFunc>;

    func _func;
    captures _captures;
public:
    explicit binder(TFunc&& func, TCaptures&&... captures)
        : _func(std::forward<TFunc>(func))
        , _captures(std::forward<TCaptures>(captures)...)
    {
    }

    template<class... TParams>
    decltype(auto) operator()(TParams&&... params);
};

template<class TFunc, class... TCaptures>
template<class... TParams>
decltype(auto) binder<TFunc, TCaptures...>::operator()(TParams&&... params)
{
    return bind_invoke(seq{}, _func, _captures, std::forward_as_tuple(std::forward<TParams>(params)...));
}
这里operator()的实现就是调用的bind_invoke,参数是什么呢,一个index_sequence,之前绑定好的函数和捕获参数,和这里传入的参数列表,参数列表也转发成tuple,为什么要做成tuple呢,因为tuple好用啊,后面就看出来了。
bind_invoke获得了上面这一大坨,它来负责params和_captures正确的组合出来,拿来调用_func。
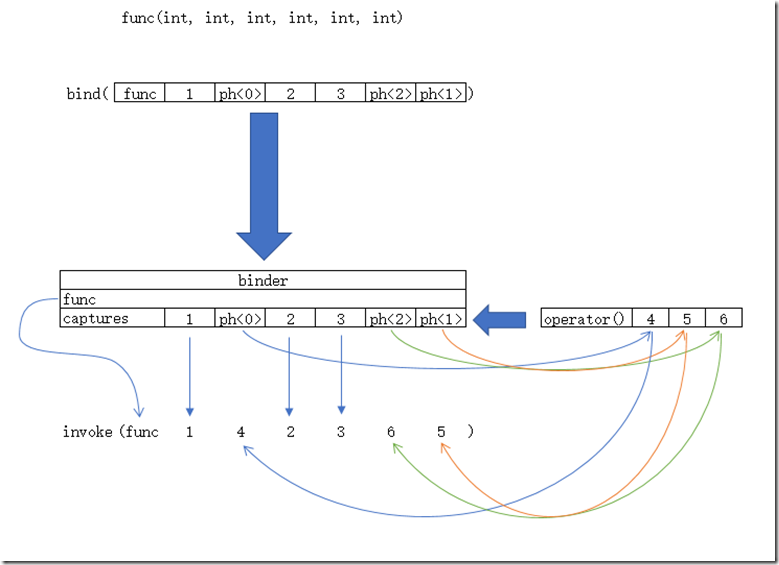
我们想一下_func应该怎么调用,这里可以使用C++17的invoke,invoke(_func, 参数1, 参数2, ...)
而这些参数1,参数2,是怎么来的呢,回去看一下调用bind时的captures,如果这个capture不是placeholder,那么这个就是要放进invoke的对应的位置,而如果是placeholder<I>,那么就从params里面取对应的第I个参数放进invoke的位置。
画个图就是这个样子的:
那么,怎么实现这种参数的选择呢,通过包展开
template<size_t... idx, class TFunc, class TCaptures, class TParams>
decltype(auto) bind_invoke(std::index_sequence<idx...>, TFunc& func, TCaptures& captures, TParams&& params)
{
    return std::invoke(func, select_param(std::get<idx>(captures), std::move(params))...);
}bind_invoke的内部直接调用了标准的std::invoke,传入了func,和后面的select_param包展开的结果,仔细看以下select_param的部分,这里是每个select_param对应一个captures的元素和一整个params tuple
那么select_param的实现大家也基本能猜出来, 对于第一个参数是placeholder<I>的情况,就返回后面的tuple的第I个元素,如果不是,那就返回它的第一个参数。
这里需要注意,select_param是不能用简单的重载的,因为对于
template<size_t I>
void foo(plaecholder<I>)
template<class T>
void foo(T)placeholder<I>和其他参数的,需要用SFINAE过滤,而我选择另一种解法,用模板特化,这样更好扩展。
template<class TCapture, class TParams>
struct do_select_param
{
    decltype(auto) operator()(TCapture& capture, TParams&&)
    {
        return capture;
    }
};

template<size_t idx, class TParams>
struct do_select_param<placeholder<idx>, TParams>
{
    decltype(auto) operator()(placeholder<idx>, TParams&& params)
    {
        return std::get<idx>(std::move(params));
    }
};do_select_param的实现(上)和它的一个特化版本(下),特化版本匹配了参数是placeholder的情况。
而select_param函数本身,就是转发对do_select_param的调用而已
template<class TCapture, class TParams>
decltype(auto) select_param(TCapture& capture, TParams&& params)
{
    return do_select_param<TCapture, TParams>{}(capture, std::move(params));
}
template<size_t idx>
struct placeholder
{
};placeholder<0>{}的代码
template<size_t idx>
constexpr auto ph = placeholder<idx>{};扩展支持嵌套bind
标准的bind是支持嵌套的,比如如下代码
// nested bind subexpressions share the placeholders
auto f2 = std::bind(f, _3, std::bind(g, _3), _3, 4, 5);
f2(10, 11, 12); // makes a call to f(12, g(12), 12, 4, 5);
template<class TFunc, class... TCaptures, class TParams>
struct do_select_param<binder<TFunc, TCaptures...>, TParams>
{
    decltype(auto) operator()(binder<TFunc, TCaptures...>& binder, TParams& params)
    {
        return apply(binder, std::move(params));
    }
};至此,bind的实现就完成了,这个实现可以通过cppreference上的所有测试代码,我没有做进一步的测试,如果有错,欢迎在下面评论区指出,谢谢。

