【GiantPandaCV导语】这学期参加了一个比赛,有比较大的代码量,在这个过程中暴露出来很多问题。由于实验记录很糟糕,导致结果非常混乱、无法进行有效分析,也没能进行有效的回溯。趁比赛完结,打算重构一下代码,顺便参考一些大型项目的管理方法。本文将总结如何高效、标准化管理深度学习实验。以下总结偏个人,可能不适宜所有项目,仅供参考。
1. 目前的管理方法
因为有很多需要尝试的想法,但是又按照下图这种时间格式来命名文件夹,保存权重。每次运行尝试的方法只是记录在本子上和有道云笔记上。

笔记截图:
总体来说,这种管理方法不是很理想。一个实验运行的时间比较久,跨度很久,而之前调的参数、修改的核心代码、想要验证的想法都已经很模糊了,甚至有些时候可能看到一组实验跑完了,忘记了这个实验想要验证什么。
这样的实验管理是低效的,笔者之前就了解到很多实验管理的方法、库的模块化设计,但这些方法都沉寂在收藏夹中,无用武之地。趁着这次比赛结束,好好对代码进行重构、完善实验管理方法、总结经验教训。同时也参考了交流群里蒋神、雪神等大佬的建议,总结了以下方法。
2. 大型项目实例
先推荐一个模板,是L1aoXingyu@Github分享的模板项目,链接如下:
https://github.com/L1aoXingyu/Deep-Learning-Project-Template
如果长期维护一个深度学习项目,代码的组织就比较重要了。如何设计一个简单而可扩展的结构是非常重要的。这就需要用到软件工程中的OOP设计

简单介绍一下:
- 实验配置的管理(实验配置就是深度学习实验中的各种参数)
- 使用yacs管理配置。
- 配置文件一般分默认配置(default)和新增配置(argparse)
- 模型的管理
- 使用工厂模式,根据传入参数得到对应模型。
├──  config
│    └── defaults.py  - here's the default config file.
│
│
├──  configs
│    └── train_mnist_softmax.yml  - here's the specific config file for specific model or dataset.
│
│
├──  data
│    └── datasets  - here's the datasets folder that is responsible for all data handling.
│    └── transforms  - here's the data preprocess folder that is responsible for all data augmentation.
│    └── build.py  		   - here's the file to make dataloader.
│    └── collate_batch.py   - here's the file that is responsible for merges a list of samples to form a mini-batch.
│
│
├──  engine
│   ├── trainer.py     - this file contains the train loops.
│   └── inference.py   - this file contains the inference process.
│
│
├── layers              - this folder contains any customed layers of your project.
│   └── conv_layer.py
│
│
├── modeling            - this folder contains any model of your project.
│   └── example_model.py
│
│
├── solver             - this folder contains optimizer of your project.
│   └── build.py
│   └── lr_scheduler.py
│
│
├──  tools                - here's the train/test model of your project.
│    └── train_net.py  - here's an example of train model that is responsible for the whole pipeline.
│
│
└── utils
│    ├── logger.py
│    └── any_other_utils_you_need
│
│
└── tests					- this foler contains unit test of your project.
     ├── test_data_sampler.py
另外推荐一个封装的非常完善的库,deep-person-reid, 链接:https://github.com/KaiyangZhou/deep-person-reid,这次总结中有一部分代码参考自以上模型库。
3. 熟悉工具
与上边推荐的模板库不同,个人觉得可以进行简化处理,主要用到的python工具有:
- argparse
- yaml
- logging
前两个用于管理配置,最后一个用于管理日志。
3.1 argparse
argparse是命令行解析工具,分为四个步骤:
-
import argparse
-
parser = argparse.ArgumentParser()
-
parser.add_argument()
-
parser.parse_args()
第2步创建了一个对象,第3步为这个对象添加参数。
parser.add_argument('--batch_size', type=int, default=2048,
                    help='batch size')  # 8192
parser.add_argument('--save_dir', type=str,
                    help="save exp floder name", default="exp1_sandwich")
--batch_size将作为参数的key,它对应的value是通过解析命令行(或者默认)得到的。type可以选择int,str。
parser.add_argument('--finetune', action='store_true',
                    help='finetune model with distill')
action可以指定参数处理方式,默认是“store”代表存储的意思。如果使用"store_true", 表示他出现,那么对应参数为true,否则为false。
第4步,解析parser对象,得到的是可以通过参数访问的对象。比如可以通过args.finetune 得到finetune的参数值。
3.2 yaml
yaml是可读的数据序列化语言,常用于配置文件。
支持类型有:
- 标量(字符串、证书、浮点)
- 列表
- 关联数组 字典
语法特点:
- 大小写敏感
- 缩进表示层级关系
- 列表通过 "-" 表示,字典通过 ":"表示
- 注释使用 "#"
安装用命令:
pip install pyyaml
举个例子:
name: tosan
age: 22
skill:
  name1: coding
  time: 2years
job:
  - name2: JD
    pay: 2k
  - name3: HW
    pay: 4k
注意:关键字不能重复;不能使用tab,必须使用空格。
处理的脚本:
import yaml

f = open("configs/test.yml", "r")

y = yaml.load(f)

print(y)
输出结果:
YAMLLoadWarning: calling yaml.load() without Loader=... is deprecated, as the default Loader is unsafe. Please read https://msg.pyyaml.org/load for full details.
  y = yaml.load(f)
{'name': 'tosan', 'age': 22, 'skill': {'name1': 'coding', 'time': '2years'}, 'job': [{'name2': 'JD', 'pay': '2k'}, {'name3': 'HW', 'pay': '4k'}]}
这个警告取消方法是:添加默认loader
import yaml

f = open("configs/test.yml", "r")

y = yaml.load(f, Loader=yaml.FullLoader)

print(y)
保存:
content_dict = {
	'name':"ch",
}

f = open("./config.yml","w")

print(yaml.dump(content_dict, f))
支持的类型:
# 支持数字,整形、float
pi: 3.14

# 支持布尔变量
islist: true
isdict: false

# 支持None
cash: ~

# 时间日期采用ISO8601
time1: 2021-6-9 21:59:43.10-05:00

#强制转化类型
int_to_str: !!str 123
bool_to_str: !!str true

# 支持list
- 1
- 2
- 3

# 复合list和dict
test2:
  - name: xxx
    attr1: sunny
    attr2: rainy
    attr3: cloudy
3.3 logging
日志对程序执行情况的排查非常重要,通过日志文件,可以快速定位出现的问题。本文将简单介绍使用logging生成日志的方法。
logging模块介绍
logging是python自带的包,一共有五个level:
- debug: 查看程序运行的信息,调试过程中需要使用。
- info: 程序是否如预期执行的信息。
- warn: 警告信息,但不影响程序执行。
- error: 出现错误,影响程序执行。
- critical: 严重错误
logging用法
import logging

logging.basicConfig(format='%(asctime)s - %(message)s', datefmt='%d-%b-%y %H:%M:%S')

logging.info("program start")
format参数设置了时间,规定了输出的格式。
import logging
 #先声明一个 Logger 对象
logger = logging.getLogger(__name__)
logger.setLevel(level=logging.INFO)
#然后指定其对应的 Handler 为 FileHandler 对象
handler = logging.FileHandler('Alibaba.log')
#然后 Handler 对象单独指定了 Formatter 对象单独配置输出格式
formatter = logging.Formatter('%(asctime)s - %(name)s - %(levelname)s - %(message)s')
handler.setFormatter(formatter)
logger.addHandler(handler)
Filehandler是用于将日志写入到文件,如这里将所有日志输出到Alibaba.log文件夹中。
3.4 补充argparse和yaml的配合
# process argparse & yaml
if not args.config:
    opt = vars(args)
    args = yaml.load(open(args.config), Loader=yaml.FullLoader)
    opt.update(args)
    args = opt
else:  # yaml priority is higher than args
    opt = yaml.load(open(args.config), Loader=yaml.FullLoader)
    opt.update(vars(args))
    args = argparse.Namespace(**opt)
4. 实验管理
实验的完整记录需要以下几方面内容:
- 日志文件:记录运行全过程的日志。
- 权重文件:运行过程中保存的checkpoint。
- 可视化文件:tensorboard中运行得到的文件。
- 配置文件:详细记录当前运行的配置(调参必备)。
- 文件备份:用于保存当前版本的代码,可以用于回滚。
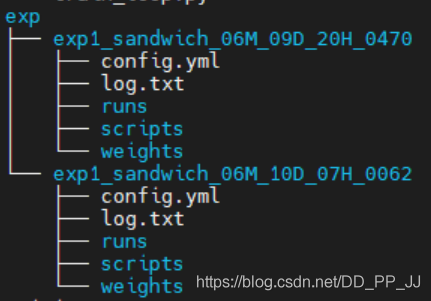
那么按照以下方式进行组织:
exp
	- 实验名+日期
		- runs: tensorboard保存的文件
		- weights: 权重文件
		- config.yml: 配置文件
		- scripts: 核心文件备份
			- train.py
			- xxxxxxxx
代码实现:
import logging
import argparse
import yaml

parser = argparse.ArgumentParser("ResNet20-cifar100")
parser.add_argument('--batch_size', type=int, default=2048,
                    help='batch size')  # 8192
parser.add_argument('--learning_rate', type=float,
                    default=0.1, help='init learning rate')  parser.add_argument('--config', help="configuration file",
                    type=str, default="configs/meta.yml")
parser.add_argument('--save_dir', type=str,
                    help="save exp floder name", default="exp1")
args = parser.parse_args()

# process argparse & yaml
if not args.config:
    opt = vars(args)
    args = yaml.load(open(args.config), Loader=yaml.FullLoader)
    opt.update(args)
    args = opt
else:  # yaml priority is higher than args
    opt = yaml.load(open(args.config), Loader=yaml.FullLoader)
    opt.update(vars(args))
    args = argparse.Namespace(**opt)

args.exp_name = args.save_dir + "_" + datetime.datetime.now().strftime("%mM_%dD_%HH") + "_" +
    "{:04d}".format(random.randint(0, 1000))

# 文件处理
if not os.path.exists(os.path.join("exp", args.exp_name)):
    os.makedirs(os.path.join("exp", args.exp_name))


# 日志文件
log_format = "%(asctime)s %(message)s"
logging.basicConfig(stream=sys.stdout, level=logging.INFO,
                    format=log_format, datefmt="%m/%d %I:%M:%S %p")

fh = logging.FileHandler(os.path.join("exp", args.exp_name, 'log.txt'))
fh.setFormatter(logging.Formatter(log_format))
logging.getLogger().addHandler(fh)
logging.info(args)

# 配置文件
with open(os.path.join("exp", args.exp_name, "config.yml"), "w") as f:
    yaml.dump(args, f)

# Tensorboard文件
writer = SummaryWriter("exp/%s/runs/%s-%05d" %
                       (args.exp_name, time.strftime("%m-%d", time.localtime()), random.randint(0, 100)))

# 文件备份
create_exp_dir(os.path.join("exp", args.exp_name),
               scripts_to_save=glob.glob('*.py'))

def create_exp_dir(path, scripts_to_save=None):
    if not os.path.exists(path):
        os.mkdir(path)
    print('Experiment dir : {}'.format(path))

    if scripts_to_save is not None:
        if not os.path.exists(os.path.join(path, 'scripts')):
            os.mkdir(os.path.join(path, 'scripts'))
        for script in scripts_to_save:
            dst_file = os.path.join(path, 'scripts', os.path.basename(script))
            shutil.copyfile(script, dst_file)
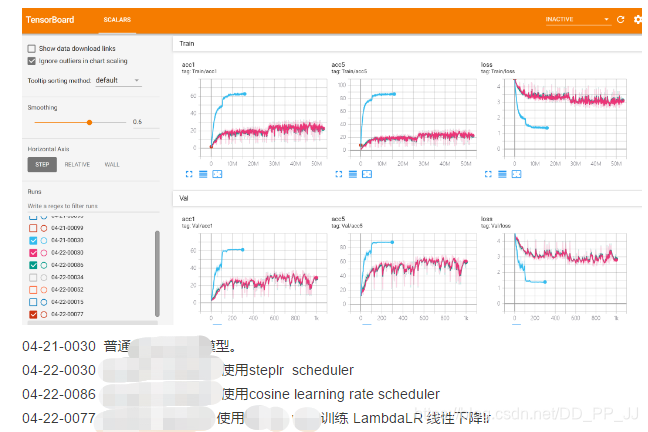
5. 结果
6. 参考文献
https://github.com/L1aoXingyu/Deep-Learning-Project-Template
https://sungwookyoo.github.io/tips/ArgParser/
https://github.com/KaiyangZhou/deep-person-reid
https://www.cnblogs.com/pprp/p/10624655.html