python_way day12
1、RabbitMQ
2、pymysql
RabbitMQ
1、基本用法
"""
producer
"""


import pika

connection = pika.BlockingConnection(pika.ConnectionParameters(host='192.168.109.134'))
#创建链接

channle = connection.channel()
#创建频道

channle.queue_declare(queue='chan1')
#定义对列,当对列存在就没有意义了.因为producer和consumer谁先连接不一定

channle.basic_publish(exchange='',routing_key='chan1',body="hello world")
#1、exchange:定义exchange类型不填写默认是decodle, routing_key 就是往哪个频道发

#向chan1中发送消息

connection.close()
"""
consumer
"""

import pika
connection = pika.BlockingConnection(pika.ConnectionParameters(host='192.168.109.134'))

channle = connection.channel()
#创建频道

channle.queue_declare(queue='chan1')
#定义对列

def  callback(ch, method, properties, body):
    print("recv body%r" % body) #内容
    print("recv ch%r" % ch)   #频道
    print("recv method%r" % method)
    print("recv properties" % properties)       #属性


channle.basic_consume(callback, queue='chan1', no_ack=True)
#取数据,no_ack 不传确认值,这样可以增加效率,但是可能不是很稳定

channle.start_consuming()
2、保证数据不会丢失
试想一下,如果我们从队列中取完数据,但是我们还没有来得及获取数据,这个时候宕机了,但是数据被取走了,那我们改怎么办?
可以防止这些情况的数据丢失(its channel is closed, connection is closed, or TCP connection is lost)
这是就要在 【收消息一方】 一端用到no_ack了
"""
consumer
"""

import pika
connection = pika.BlockingConnection(pika.ConnectionParameters(host='192.168.109.134'))

channle = connection.channel()
#创建频道

channle.queue_declare(queue='chan1')
#定义对列

def  callback(ch, method, properties, body):
    print("recv body %r %r" % (str(body,"utf8"), type(body)))
    ch.basic_ack(delivery_tag = method.delivery_tag)
    #ch就是处理回复确认信息,上面代码处理完我就给队列发送一条消息,如果没有给队列发送消息队列就把取走的信息再放一边

channle.basic_consume(callback, queue='chan1', no_ack=False)
#取数据,no_ack设置成False就是要回复的意思

channle.start_consuming()
#性能上要比上面不回复的差一些,但是安全性提高了
3、这是rabbitmq挂掉了怎么办?
我们可以把数据做持久化
durable
这里就需要在【发数据】一端写上一个字段,告诉rabbitmq
"""
producer
"""
import pika

connection = pika.BlockingConnection(pika.ConnectionParameters(host='192.168.109.134'))
#创建链接

channle = connection.channel()
#创建频道

channle.queue_declare(queue='chan1', durable=True,)  #这里写上就报错,是否需要写??    #这里是队列持久化,但是用了就报错
#这里我们使用了durable =True ,意思就是在发数据的时候告诉rabbitmq chan1里的数据要持久化的保存

channle.basic_publish(exchange='',routing_key='chan1',body="hello world",properties=pika.BasicProperties(delivery_mode=2))    #alex 是消息持久化
#properties=pika.BasicProperties(delivery_mode=2)  发数据时就告诉rabbitmq 这条数据给我持久化

#向chan1中发送消息

connection.close()
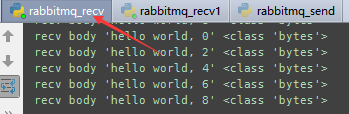
4、获取消息的顺序
取消息,默认情况下取消息是按照间隔取消息,
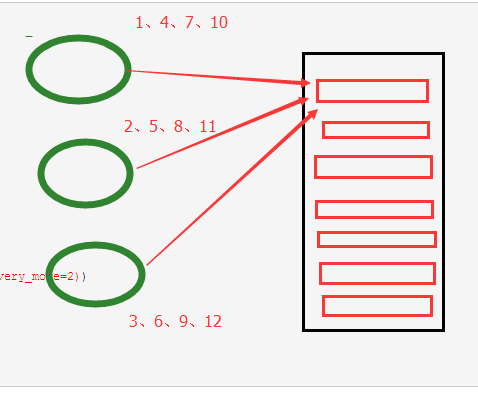
但是这样取如果第一个实行的特别慢,二第二个执行的特别快,第二个已经执行到11了,二第一个还在执行1
第1个接收程序
第二个接收程序
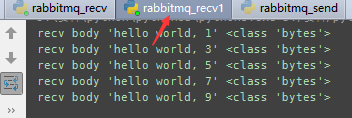
如果我们获取队列中按照顺序就要指定 channel.basic_qos(prefetch_count=1) 表示谁来谁取,不再按照奇偶数排列
"""
consumer
"""

import pika
connection = pika.BlockingConnection(pika.ConnectionParameters(host='192.168.109.134'))

channle = connection.channel()
#创建频道

channle.queue_declare(queue='chan1')
#定义对列

def  callback(ch, method, properties, body):
    print("recv body %r %r" % (str(body,"utf8"), type(body)))
    ch.basic_ack(delivery_tag = method.delivery_tag)
    #ch就是处理回复确认信息

channle.basic_qos(prefetch_count=1)
#谁来谁获取当前排到的队列中的元素

channle.basic_consume(callback, queue='chan1', no_ack=False)
#取数据,no_ack设置成False就是要回复的意思

channle.start_consuming()
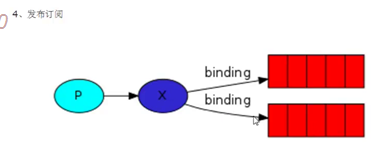
5、exchange

有了exchange我们只需要向exchange发消息,让exchange判断我们要把消息发给哪一个队列
a. exchange type = fanout ,同时接收消息
这样就是和exchange关联的队列都会接收到消息


import pika

connection = pika.BlockingConnection(pika.ConnectionParameters
                                     (host='192.168.109.134'))
channle = connection.channel()  #创建频道

channle.exchange_declare(exchange='logs_fanout',type='fanout')
#创建一个队列组,指定队列类型为fanout : 可以将多个队列同时绑定到一个队列组logs_fanout中

result = channle.queue_declare(exclusive=True)
queue_name = result.method.queue
#随机创建一个队列
#生成一个随机名字

channle.queue_bind(exchange='logs_fanout',queue=queue_name)
#将随机队列和队列组绑定


def callback(ch, method, propertise, body):
    print(" [x] Received %r " % body)

channle.basic_consume(callback,queue=queue_name,no_ack=True)
#获取这个随机队列名中的消息

channle.start_consuming()
import pika
import sys

connection = pika.BlockingConnection(pika.ConnectionParameters(
        host='192.168.109.134'))
channel = connection.channel()

channel.exchange_declare(exchange='logs_fanout',
                         type='fanout')

message = ' '.join(sys.argv[1:]) or "info: Hello World!"
channel.basic_publish(exchange='logs_fanout',
                      routing_key='',
                      body=message)
print(" [x] Sent %r" % message)
connection.close()
#这样就可以多开几个这个 【消费者】,他们可以同时的收到信息了
b.exchange type = direct 关键字发送

import pika
import sys

connection = pika.BlockingConnection(pika.ConnectionParameters(
        host='192.168.109.134'))
channel = connection.channel()

channel.exchange_declare(exchange='direct_logs',
                         type='direct')
#指定 exchanges type = direct

result = channel.queue_declare(exclusive=True)
queue_name = result.method.queue
#指定队列名字为随机

severities = sys.argv[1:]
if not severities:
    sys.stderr.write("Usage: %s [info] [warning] [error]
" % sys.argv[0])
    sys.exit(1)

for severity in severities:
    #循环用户输入的内容
    channel.queue_bind(exchange='direct_logs',
                       queue=queue_name,
                       routing_key=severity)
#routing_key=severity 绑定exchange和队列名与关键字的关系,我要监听那个队列这个队列

def callback(ch, method, properties, body):
    print(" [x] %r:%r" % (method.routing_key, body))

channel.basic_consume(callback,
                      queue=queue_name,
                      no_ack=True)

channel.start_consuming()
import pika
import sys

connection = pika.BlockingConnection(pika.ConnectionParameters(
        host='192.168.109.134'))
channel = connection.channel()

channel.exchange_declare(exchange='direct_logs',
                         type='direct')

severity = sys.argv[1] if len(sys.argv) > 1 else 'info'
#关键字等于输入的第二个字段,如果argv小于1 severity就为info
message = ' '.join(sys.argv[2:]) or 'Hello World!'
#消息为argv的第二个字段或者hello world

channel.basic_publish(exchange='direct_logs',
                      routing_key=severity,
                      body=message)
#把messages往severity这个关键字中间发送

print(" [x] Sent %r:%r" % (severity, message))
connection.close()
.
c.exchange type = topic 模糊匹配

在topic类型下,可以让队列绑定几个模糊的关键字,之后发送者将数据发送到exchange,exchange将传入”路由值“和 ”关键字“进行匹配,匹配成功,则将数据发送到指定队列。
- # 表示可以匹配 0 个 或 多个 单词
- * 表示只能匹配 一个 单词
发送者路由值              队列中
old.boy.python          old.*  -- 不匹配
old.boy.python          old.#  -- 匹配
 消费者
import pika
import sys

connection = pika.BlockingConnection(pika.ConnectionParameters(
        host='192.168.109.134'))
channel = connection.channel()

channel.exchange_declare(exchange='topic_logs',
                         type='topic')

routing_key = sys.argv[1] if len(sys.argv) > 1 else 'anonymous.info'
message = ' '.join(sys.argv[2:]) or 'Hello World!'
channel.basic_publish(exchange='topic_logs',
                      routing_key=routing_key,
                      body=message)
print(" [x] Sent %r:%r" % (routing_key, message))
connection.close()
import pika
import sys

connection = pika.BlockingConnection(pika.ConnectionParameters(
        host='192.168.109.134'))
channel = connection.channel()

channel.exchange_declare(exchange='topic_logs',
                         type='topic')

result = channel.queue_declare(exclusive=True)
# queue_name = result.method.queue
queue_name = "chan1"
#自定的名字,就这证明 topic_logs 这个通道只给chan1这个队列

topic_keys = sys.argv[1:]
if not topic_keys:
    sys.stderr.write("Usage: %s [topic_key]...
" % sys.argv[0])
    sys.exit(1)

for topic_key in topic_keys:
    channel.queue_bind(exchange='topic_logs',
                       queue=queue_name,
                       routing_key=topic_key)

print(' [*] Waiting for logs. To exit press CTRL+C')

def callback(ch, method, properties, body):
    print(" [x] %r:%r" % (method.routing_key, body))

channel.basic_consume(callback,
                      queue=queue_name,
                      no_ack=True)

channel.start_consuming()
#实验结果,如果一条信息中的 routing_key 同时被两个队列匹配,消费者是轮询拿结果的。不是同时都能拿到。这个和上面的 direct 不同
作业

二、pymysql
1、使用pymysql执行简单的sql语句
import pymysql

conn = pymysql.connect(host='192.168.109.129',port=3306,user='root',passwd='hanxu',db='d1')

# 创建游标
cursor = conn.cursor()

# 执行SQL,并返回受影响的行数
effect_row = cursor.execute("create table d1.t3(nid int,name char(10))")

# 执行SQL,并返回受影响行数

#使用占位符,第二个参数是个元组,就是放替换的元素的,
effect_row = cursor.execute("update hosts set host = '1.1.1.2' where nid > %s", (1,))

# 执行SQL,并返回受影响行数
#同时插入多个数据
effect_row = cursor.executemany("insert into hosts(host,color_id)values(%s,%s)", [("1.1.1.11",1),("1.1.1.11",2)])
print(effect_row)

#把上面这些写到内存的数据提交给数据库
conn.commit()

cursor.close()
conn.close()
2、获取新创建的自增id
#!/usr/bin/env python
# -*- coding:utf-8 -*-
import pymysql

conn = pymysql.connect(host='127.0.0.1', port=3306, user='root', passwd='123', db='t1')
cursor = conn.cursor()
cursor.executemany("insert into hosts(host,color_id)values(%s,%s)", [("1.1.1.11",1),("1.1.1.11",2)])
effect_row = cursor.execute("create table d1.t4(nid int not null auto_increment primary key,name char(10))") #新增一个t4表,nid为主键切自增。
conn.commit()
cursor.close()
conn.close()

# 获取最新自增ID
new_id = cursor.lastrowid
#因为上面新增加了2条数据,所以取到的只是最后一条的自增id
3、获取查询数据
#!/usr/bin/env python
# -*- coding:utf-8 -*-
import pymysql

conn = pymysql.connect(host='127.0.0.1', port=3306, user='root', passwd='123', db='t1')
cursor = conn.cursor()
cursor.execute("select * from hosts")

# 获取第一行数据
row_1 = cursor.fetchone()

# 获取前n行数据
# row_2 = cursor.fetchmany(3)

# 获取所有数据
# row_3 = cursor.fetchall()
print(row_1)
print(row_2)
print(row_3)
(1, 'han')
((2, 'xu'), (3, 'tian'), (4, 'huoa'))
None
#注意在一个代码块中每查询一次游标会向下走一行,所以当我们执行完row_1时,在执行row_2这是是从第二行开始向下打印三行的。

conn.commit()
cursor.close()
conn.close()
注:在fetch数据时按照顺序进行,可以使用cursor.scroll(num,mode)来移动游标位置,如:
- cursor.scroll(1,mode='relative') # 相对当前位置移动 1向下一个位置,-1向上一个
- cursor.scroll(2,mode='absolute') # 相对绝对位置移动
cursor=pymysql.cursors.DictCursor,以字典方式获取查询到的值
上面我们获取的表内容是以元组形式展现的,但是标签我们却不知道
import pymysql

conn = pymysql.connect(host='192.168.109.129',port=3306,user='root',passwd='hanxu',db='d1')

# 创建游标
cursor = conn.cursor(cursor=pymysql.cursors.DictCursor)  #在创建游标的时候指定使用dict

#查询
cursor.execute("select * from d1.t4")

raw_all = cursor.fetchall()
print(raw_all)
[{'name': 'han', 'nid': 1}, {'name': 'xu', 'nid': 2}, {'name': 'tian', 'nid': 3}, {'name': 'huoa', 'nid': 4}, {'name': 'hua', 'nid': 5}, {'name': 'hou', 'nid': 6}]
#这样得到的值就会有标签和参数了。

conn.commit()
cursor.close()
conn.close()