https://docs.gitlab.com/ee/ci/README.html
GitLab CI/CD is a tool built into GitLab for software development through the continuous methodologies:
- Continuous Integration (CI)
- Continuous Delivery (CD)
- Continuous Deployment (CD)
1 Continuous Integration works by pushing small code chunks to your application’s code base hosted in a Git repository, and, to every push,
run a pipeline of scripts to build, test, and validate the code changes before merging them into the main branch.
2 Getting started
GitLab CI/CD is configured by a file called .gitlab-ci.yml placed at the repository’s root . This file creates a pipeline, which runs for changes to the code in the repository.
Pipelines consist of one or more stages that run in order and can each contain one or more jobs that run in parallel. These jobs (or scripts) get executed by the GitLab Runner agent.
上面的翻译 (此文件创建了一个管道,用于运行对存储库中代码的更改。管道由一个或多个按顺序运行的阶段组成,每个阶段可以包含一个或多个并行运行的作业。这些作业(或脚本)由GitLab Runner代理执行)
Introduction to CI/CD methodologies
The continuous methodologies of software development are based on automating the execution of scripts to minimize the chance of introducing errors while developing applications. They require less human intervention or even no intervention at all, from the development of new code until its deployment.
It involves continuously building, testing, and deploying code changes at every small iteration, reducing the chance of developing new code based on bugged or failed previous versions.
There are three main approaches to this methodology, each of them to be applied according to what best suits your strategy (这个方法有三种主要的方法,每种方法都要根据最适合你的策略来应用)
Continuous Integration
Consider an application that has its code stored in a Git repository in GitLab. Developers push code changes every day, multiple times a day. For every push to the repository, you can create a set of scripts to build and test your application automatically, decreasing the chance of introducing errors to your app. (减少向应用程序引入错误的机会。)
This practice is known as Continuous Integration; for every change submitted to an application - even to development branches - it’s built and tested automatically and continuously, ensuring the introduced changes pass all tests, guidelines, and code compliance standards you established for your app.
GitLab itself is an example of using Continuous Integration as a software development method. For every push to the project, there’s a set of scripts the code is checked against.
Continuous Delivery
Continuous Delivery is a step beyond Continuous Integration. Your application is not only built and tested at every code change pushed to the codebase, but, as an additional step,
it’s also deployed continuously, though the deployments are triggered manually.(它还可以连续部署,尽管部署是手动触发的。)
This method ensures the code is checked automatically but requires human intervention to manually and strategically trigger the deployment of the changes. (
此方法确保自动检查代码,但需要人工干预以手动和策略性地触发更改的部署。)
Continuous Deployment
Continuous Deployment is also a further step beyond Continuous Integration, similar to Continuous Delivery. The difference is that instead of deploying your application manually, you set it to be deployed automatically. It does not require human intervention at all to have your application deployed.
.gitlab-ci.yml
GitLab CI/CD pipelines are configured using a YAML file called .gitlab-ci.yml within each project.
The .gitlab-ci.yml file defines the structure and order of the pipelines and determines:
- What to execute using GitLab Runner.
- What decisions to make when specific conditions are encountered. For example, when a process succeeds or fails.
The .gitlab-ci.yml file tells the GitLab Runner what to do. A simple pipeline commonly has three stages:
buildtestdeploy
You do not need to use all three stages; stages with no jobs are ignored
WHY
What is .gitlab-ci.yml
The .gitlab-ci.yml file is where you configure what CI does with your project. It lives in the root of your repository.
On any push to your repository, GitLab will look for the .gitlab-ci.yml file and start jobs on Runners according to the contents of the file, for that commit.
Because .gitlab-ci.yml is in the repository and is version controlled, old versions still build successfully
.gitlab-ci.yml is a YAML file so you have to pay extra attention to indentation. Always use spaces, not tabs
To effectively use GitLab CI/CD, you need:
- A valid
.gitlab-ci.ymlfile present at the root directory of your project. - A runner properly set up.
https://docs.gitlab.com/ee/ci/enable_or_disable_ci.html 看到这里了
How GitLab CI/CD works
To use GitLab CI/CD, all you need is an application codebase hosted in a Git repository, and for your build, test, and deployment scripts to be specified in a file called .gitlab-ci.yml, located in the root path of your repository.
In this file, you can define the scripts you want to run, define include and cache dependencies, choose commands you want to run in sequence and those you want to run in parallel, define where you want to deploy your app, and specify whether you will want to run the scripts automatically or trigger any of them manually. Once you’re familiar with GitLab CI/CD you can add more advanced steps into the configuration file.
To add scripts to that file, you’ll need to organize them in a sequence that suits your application and are in accordance with the tests you wish to perform. To visualize the process, imagine that all the scripts you add to the configuration file are the same as the commands you run on a terminal on your computer.
Once you’ve added your .gitlab-ci.yml configuration file to your repository, GitLab will detect (发现)it and run your scripts with the tool called GitLab Runner, which works similarly to your terminal.
示例
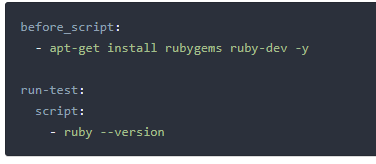
The before_script attribute would install the dependencies for your app before running anything, and a job called run-test would print the Ruby version of the current system.
Both of them compose a pipeline triggered at every push to any branch of the repository.
GitLab CI/CD not only executes the jobs you’ve set but also shows you what’s happening during execution, as you would see in your terminal: (会在gitlab 中的 CI/CD菜单下的菜单中的终端显示执行过程的信息)
You create the strategy for your app and GitLab runs the pipeline for you according to what you’ve defined. Your pipeline status is also displayed by GitLab:
At the end, if anything goes wrong, you can easily roll back all the changes:

Once you’re happy with your implementation:
- Get your code reviewed and approved.
- Merge the feature branch into the default branch.
- GitLab CI/CD deploys your changes automatically to a production environment.
- And finally, you and your team can easily roll it back if something goes wrong

GitLab CI/CD is capable of doing a lot more, but this workflow exemplifies GitLab’s ability to track the entire process,
without the need for an external tool to deliver your software. And, most usefully, you can visualize all the steps through the GitLab UI
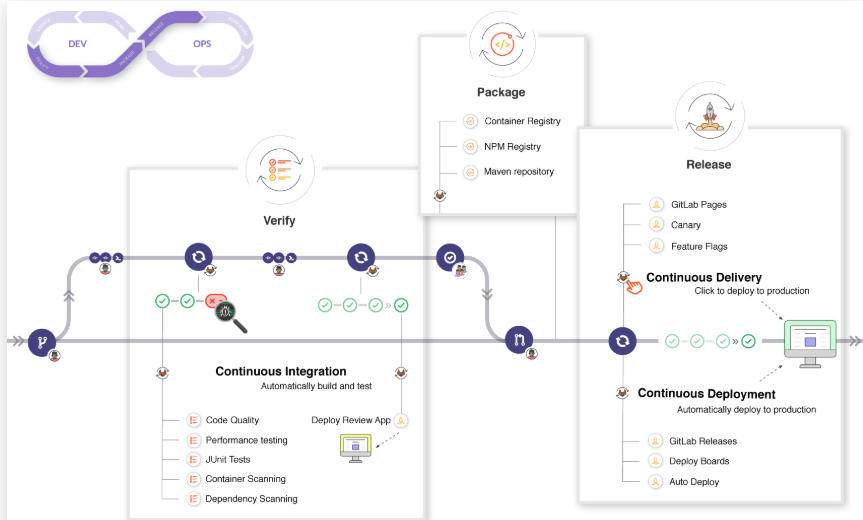
A deeper look into the CI/CD basic workflow
If we take a deeper look into the basic workflow, we can see the features available in GitLab at each stage of the DevOps lifecycle, as shown in the illustration below.
Custom CI configuration path(修改 gitlab.yml默认路径)
By default we look for the .gitlab-ci.yml file in the project’s root directory. If needed, you can specify an alternate path and file name, including locations outside the project.
To customize the path:
- Go to the project’s Settings > CI / CD.
- Expand the General pipelines section.
- Provide a value in the Custom CI configuration path field.
- Click Save changes.
If the CI configuration is stored within the repository in a non-default location, the path must be relative to the root directory. Examples of valid paths and file names include:
If the CI configuration will be hosted in a different project within GitLab, the path must be relative to the root directory in the other project, with the group and project name added to the end:
(如果CI配置将托管在GitLab中的其他项目中,则路径必须相对于其他项目中的根目录,并在末尾添加组和项目名称:)
.gitlab-ci.yml@mygroup/another-projectmy/path/.my-custom-file.yml@mygroup/another-project
修改配置文件的默认位置 https://docs.gitlab.com/ee/ci/pipelines/settings.html#custom-ci-configuration-path
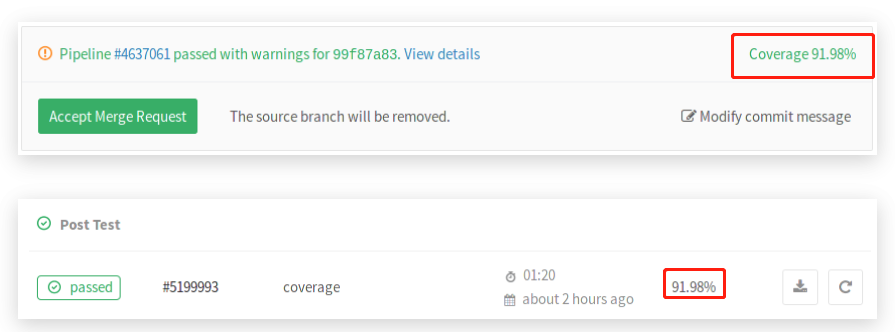
Test coverage parsing
If you use test coverage in your code, GitLab can capture its output in the job log using a regular expression. In the pipelines settings, search for the “Test coverage parsing” section.
If the pipeline succeeds, the coverage is shown in the merge request widget and in the jobs table.
A few examples of known coverage tools for a variety of languages can be found in the pipelines settings page.
Visibility of pipelines
Pipeline visibility is determined by:
- Your current user access level.
- The Public pipelines project setting under your project’s Settings > CI/CD > General pipelines.
If Public pipelines is enabled (default):
- For public projects, anyone can view the pipelines and related features.
- For internal projects, any logged in user can view the pipelines and related features.
- For private projects, any project member (guest or higher) can view the pipelines and related features.
If Public pipelines is disabled:
- For public projects, anyone can view the pipelines, but only members (reporter or higher) can access the related features.
- For internal projects, any logged in user can view the pipelines. However, only members (reporter or higher) can access the job related features.
- For private projects, only project members (reporter or higher) can view the pipelines or access the related features
pipeline 启停
Per-project user setting
To enable or disable GitLab CI/CD Pipelines in your project:
- Navigate to Settings > General > Visibility, project features, permissions.
- Expand the Repository section
- Enable or disable the Pipelines toggle as required.