前言:
本篇文章对我的学习内容做一个归纳梳理,同时也记录一些学习过程中遇上的问题及注意事项等等,可以帮助新入门的朋友们消除一些误区与盲区,希望能帮上一些正在学习的朋友们。在编写时会引用一些mybatis开发手册中的内容。本篇中所采用的一些组件版本如下:mybatis—3.4.2、junit—4.12、mysql-connector—5.0.7。
ps:吐槽一下开发手册,一些地方写的有点不太清楚,中文版还有一股机翻的味道。。。如果觉得写的好就点个赞呗,如果觉得写的不好就提提建议吧!_(:з」∠)_
目录:
一、快速入门
二、xml配置文件
三、xml映射文件基础
四、进阶应用
正文:
一、快速入门
1.导入mybatis的jar包
要使用 MyBatis,只需将 mybatis-x.x.x.jar 文件置于 classpath 中即可。如果使用 Maven 来构建项目,则需将下面的 dependency 代码置于 pom.xml 文件中:


1 <dependency>
2   <groupId>org.mybatis</groupId>
3   <artifactId>mybatis</artifactId>
4   <version>x.x.x</version>
5 </dependency
2.从xml配置文件中构建sessionFactory
简单来说分为两步:①从配置文件中获取输入流。②使用sqlSessionFactoryBuilder.build()方法,将输入流传入,获取sqlSessionFactory。
String resource = "org/mybatis/example/mybatis-config.xml";
InputStream inputStream = Resources.getResourceAsStream(resource);
sqlSessionFactory = new SqlSessionFactoryBuilder().build(inputStream);
配置文件:
 1 <?xml version="1.0" encoding="UTF-8" ?>
 2 <!DOCTYPE configuration
 3   PUBLIC "-//mybatis.org//DTD Config 3.0//EN"
 4   "http://mybatis.org/dtd/mybatis-3-config.dtd">
 5 <configuration>
 6   <environments default="development">
 7     <environment id="development">
 8       <transactionManager type="JDBC"/>
 9       <dataSource type="POOLED">
10         <property name="driver" value="${driver}"/>
11         <property name="url" value="${url}"/>
12         <property name="username" value="${username}"/>
13         <property name="password" value="${password}"/>
14       </dataSource>
15     </environment>
16   </environments>
17   <mappers>
18     <mapper resource="org/mybatis/example/BlogMapper.xml"/>
19   </mappers>
20 </configuration>
3.从sessionFactory内获得session
1 SqlSession session = sqlSessionFactory.openSession();
4.执行已映射SQL语句
映射文件,配置SQL语句
1 <?xml version="1.0" encoding="UTF-8" ?>
2 <!DOCTYPE mapper
3   PUBLIC "-//mybatis.org//DTD Mapper 3.0//EN"
4   "http://mybatis.org/dtd/mybatis-3-mapper.dtd">
5 <mapper namespace="org.mybatis.example.BlogMapper">
6   <select id="selectBlog" resultType="Blog">
7     select * from Blog where id = #{id}
8   </select>
9 </mapper>
执行:采用 "namespace.id(语句)" 的方式进行调用。
1 Blog blog = (Blog) session.selectOne("org.mybatis.example.BlogMapper.selectBlog", 101);
5.关于作用域与生命周期
sqlSessionFactoryBuilder:一般不长久保持实例,构建完sessionFactory即可销毁。
sqlSessionFactory:一旦被创建就应该在运行期间一直存在,没有理由清除或重建。建议使用单例模式来对待它。
sqlSession:因为是线程不安全的,存在线程安全问题,不建议以静态的方式存在,建议在方法或请求结束后调用close()方法销毁。
二、xml配置文件
1.enviroments和environment
1 <!--environments:环境集,内部可包含多个环境
2         default:环境的集默认环境,可以自定义
3         通常——developement:开发模式 、work:工作模式-->
4     <environments default="development">
5         <!--environment:环境,id:指定环境对应的模式,可以自定义-->
6         <environment id="development">
关于default和id的对应关系:在开发手册中介绍的不够完善,而我在视频中学习时只是说,id与default必须一致,详细也没有多说。经过我的测试,default表示默认采用的环境属性,在环境集中必须有至少一个的该类型环境。也就是说在构建sessionFactory时,如果没有设定指定的环境参数,它就会按照default的参数去寻找一个环境来使用,所以必须得有一个同名的环境存在。而如果在环境集中有多个环境存在,在构建sessionFactory时如果不想使用默认环境,则应指定环境参数。
2.transactionManager
1             <!-- transactionManager:指定事务管理方式,type:事务管理模式,分为JDBC和MANAGED
2                  JDBC – 这个配置就是直接使用了 JDBC 的提交和回滚设置,它依赖于从数据源得到的连接来管理事务作用域。
3                  MANAGED – 不进行事务管理交由容器来管理事务,如spring,j2ee服务器上下文。 默认情况下会关闭连接,
4                              然而一些容器并不希望这样,因此需要将 closeConnection 属性设置为 false 来阻止它默认的关闭行为。 -->
5             <transactionManager type="MANAGED">
6                   <property name="closeConnection" value="false"/>
7             </transactionManager>
3.dataSource
1 <!-- dataSource:数据源,配置关于数据库连接的信息
2                     type:连接类型,分为三种 [UNPOOLED|POOLED|JNDI] -->
3             <dataSource type="POOLED">
4                 <!-- 在这里使用的是driver和url,而一些配置文件中则会使用driverClass和jdbcUrl,注意别写错 -->
5                 <property name="driver" value="${driverClass}" />
6                 <property name="url" value="${jdbcUrl}" />
7                 <property name="username" value="${username}" />
8                 <property name="password" value="${password}" />
9             </dataSource>
POOLED:"池"类型连接,减少了创建新的连接实例时所必需的初始化和认证时间。是一种使得并发 Web 应用快速响应请求的流行处理方式。
UNPOOLED:按照请求来打开和关闭连接,对于不使用连接池的情况下使用。由于频繁打开和关闭会导致性能效率较低,对性能要求不高时也可以使用。
JNDI: 这个数据源的实现是为了能在如 EJB 或应用服务器这类容器中使用,容器可以集中或在外部配置数据源,然后放置一个 JNDI 上下文的引用。
4.mappers和mapper
 1     <!-- mappers:mapper的集合,mapper标签都位于此标签下 -->
 2     <mappers>
 3         <!-- mapper:注册映射文件或映射类,也就是告诉mybatis去哪里找映射。有4种注册方式: -->
 4          <!-- 1.使用工程内的路径结构指定映射文件 -->
 5         <mapper resource="cn/edu/mybatis/test1/PeopleMapper.xml" />
 6         <!-- 2.使用全类名指定映射类 -->
 7         <mapper class="cn.edu.mybatis.test1.PeopleMapper"/>
 8         <!-- 3.指定mybatis的扫描基础包,将会自动包含该包下所有映射文件及映射文件 (该种方式在typeAliases时会再详细介绍) -->
 9         <package name="cn.edu.mybatis.test1"/>
10         <!-- 4.采用统一资源定位符指定映射文件 (这种方式有点看不懂,测了几个也测不出来,所以用官方的样例,望有知道使用方式的朋友能告知一下!) -->
11         <mapper url="file:///var/mappers/BlogMapper.xml"/>
12     </mappers>
5.properties
1  <!-- 定义一个properties,用于引用外部proerties,也可以使用标签下的<property>来构造一个properties
2             resource:引用文件路径 -->
3     <properties resource="db.properties">
4         <!-- 注:当property与外部文件的属性重名时,结果为外部文件的值,不会产生覆盖 -->
5         <property name="password" value="124567"/>
6     </properties>
在声明好properties之后,可以采用 “${键}” 的方式来获取对应的值,提高配置的简洁及通用性。例:
1  <dataSource type="POOLED">
2    <property name="driver" value="${driverClass}" />
3    <property name="url" value="${jdbcUrl}" />
4    <property name="username" value="${username}" />
5    <property name="password" value="${password}" />
6  </dataSource>
6.typeAliases
1   <typeAliases>
2         <!-- 为一个全类名声明一个别名,以后使用别名便等于使用全类名
3                 注:即使声明了别名,全类名也可以使用,即两者可以混用,但一般不建议混用-->
4          <typeAlias type="cn.edu.mybatis.test1.People" alias="_People"/>
5         <!-- 将某个包内的全部类设定一个默认别名 -->
6         <package name="cn.edu.mybatis.test1"/>
7     </typeAliases>
关于typeAlias:可以使用@Alias注解来为一个类声明别名,减少配置文件的使用。如:
1 @Alias("people")
2 public class People {...}
关于package和@Alias:在有@Alias注解的情况下,注解中声明的别名优先。在开发手册中写的默认别名为首字母小写的类名,但经过测试,默认别名为类名的不区分大小写形式,如:cn.edu.mybatis.test1.People的默认别名可以为:people、People、pEopLe,但一般还是建议使用首字母小写的类名。
注:在下面的介绍中将使用别名代替全类名。
7.其它
其它的一些,如:设置(sesttings),对象工厂(objectFactory)等等,由于篇幅过长及不是很常用等一些问题,在这里不进行赘述,有兴趣的朋友可以自行去了解。
三、xml映射文件基础
1.基础CRUD标签
表结构:people(id,name,age)
实体类结构:
 1 package cn.edu.mybatis.test1;
 2
 3 public class People {
 4     private int id;//标识id,自增长
 5     private String name;//姓名
 6     private int age;//年龄
 7
 8     public int getId() {
 9         return id;
10     }
11
12     public void setId(int id) {
13         this.id = id;
14     }
15
16     public String getName() {
17         return name;
18     }
19
20     public void setName(String name) {
21         this.name = name;
22     }
23
24     public int getAge() {
25         return age;
26     }
27
28     public void setAge(int age) {
29         this.age = age;
30     }
31
32     public People(String name, int age) {
33         super();
34         this.name = name;
35         this.age = age;
36     }
37
38     public People() {
39         super();
40     }
41
42     @Override
43     public String toString() {
44         return "People [id=" + id + ", name=" + name + ", age=" + age + "]";
45     }
46
47 }
基础查询:
1   <!-- select:查询语句,具体sql语句写在标签内
2           parameterType:传入参数类型,大多数情况可以不写,mybatis会自动识别
3           resultType:传出参数类型
4            #{变量名}:表示占位符,替代传入的参数,只有一个传入参时可以不使用变量名作为占位符-->
5   <select id="findPeople" parameterType="int" resultType="cn.edu.mybatis.test1.People" >
6     select * from people where id = #{id}
7   </select>
增、删、改:将标签改为对应的insert、delete、update即可,传入传出参数同查询,sql语句也是自己自定义。
当传入参数为一个类的时候,语句的写法:
1   <update id="insert" parameterType="cn.edu.mybatis.test1.People">
2       insert into people(name,age) values(#{name},#{age})
3   </update>
此时占位符将会与类的属性进行一一对应,因此必须使用与属性同名的占位符。
注:可以在sql语句中使用${xxx}插入一个动态的字符串实现动态sql,但这种方式会导致sql注入风险,不建议使用。mybatis有提供更好的动态sql方式,在后面会介绍。
2.调用sql语句的三种方式
 1     public void select() {
 2         /* 调用方法1: */
 3         People people = session.selectOne("cn.edu.mybatis.test1.PeopleMapper.findPeople", 1);
 4         System.out.println(people);
 5         /* 调用方法2: */
 6         PeopleMapper mapper = session.getMapper(PeopleMapper.class);
 7         people = mapper.findPeople(1);
 8         System.out.println(people);
 9         /* 调用方法3: */
10         people = mapper.findPeopleById(1);
11         System.out.println(people);
12     }
第一种方式为调用session的方法的方式,传入 "命名空间.语句id"及参数,进行调用。增删改同理。
第二种方式声明了一个接口,在接口内声明了一个与映射文件中某个标签的id相同,传入传出参数也相同的方法。然后通过session.getMapper()方法获取该接口的实现,再使用接口进行调用方法。这种方法更加的贴近面向对象的操作方式,同时使用了接口进行了一定程度的隔离,也免除了过长的字符串编写带来的一些隐患。是推荐的一种调用方式。
1 public interface PeopleMapper {
2     People findPeople(int id);
3 }
第三种方式看起来和第二种方式区别不大,属于一个小小的变种。它采用了注解的配置方式,直接将sql语句写在注解内,减少了配置文件的出现。建议在编写一些功能逻辑简单的sql语句时使用这种方式,可以极大的减轻配置文件带来的负担。同样,对应的也有@Insert、@Update、@Delete。
1     @Select("select * from people where id = #{id}")
2     People findPeopleById(int id);
注:在只使用注解的情况下需要在配置文件的mapper中进行注册该映射类,如果之前注册过的某个映射文件内的namespace与映射类的全类名相同的话,则不用再次注册。
3.查询返回多条结果的写法、解决字段名和属性名不同的冲突
多条结果的情况,只需声明结果集内的类型即可,mybatis会自动封装。
1   <select id="findAllPeople" resultType="cn.edu.test.People" >
2       select * from people
3   </select>
4.解决字段名和属性名不同的冲突——resultMap
当数据库的字段与实体的属性名不同时,会导致属性无法获取的情况发生。如,在数据类型相同,但表为PEOPLE(p_id,p_name,p_age)的情况下,再使用前面用到的查询语句,将会返回null,这是由于反射机制导致的。解决方法有两种:第一种,在sql语句中使用as,就可以将查询结果改名成与属性名相同,这种方式比较繁琐笨重。第二种,mybatis提供的更好的解决方式,resultMap。
1 <resultMap type="cn.edu.mybatis.test1.People" id="peopleMap">
2       <!-- column:数据库字段名  property:对应属性名-->
3       <id column="p_id" property="id"/>
4       <result column="p_name" property="name"/>
5       <result column="p_age" property="age"/>
6   </resultMap>
查询语句中将resultType改为resultMap:
1   <select id="findAllPeople" resultMap="peopleMap" >
2       select * from people
3   </select>
使用这种方式便可以解决冲突的问题。一些更加复杂的映射就不进行赘述了,需要的朋友可以自行查询。顺便一提,通常数据库列使用大写单词命名,单词间用下划线分隔;而java属性一般遵循驼峰命名法。在配置文件中的setting标签内,有一个mapUnderscoreToCamelCase属性,将其设置为true可以使这两种命名方式进行自动映射转换。
四、进阶应用
1.1to1关联映射及1toN关联映射
预备知识:
在进行正式的学习之前,我们需要了解一些预备知识,以加速加深对mybatis内关联映射的理解。首先是对于SQL语言,在SQL语言中,如果查询的信息在多张表内,那么我们一般有两种方式进行查询,即子查询和连接查询;而在mybatis内也是采用这两种的类似原理进行关联映射,手册中称之为嵌套查询和嵌套结果。
稍微了解了映射思想后,我们来梳理下mybatis的查询流程(自我梳理,如有不对请指正): 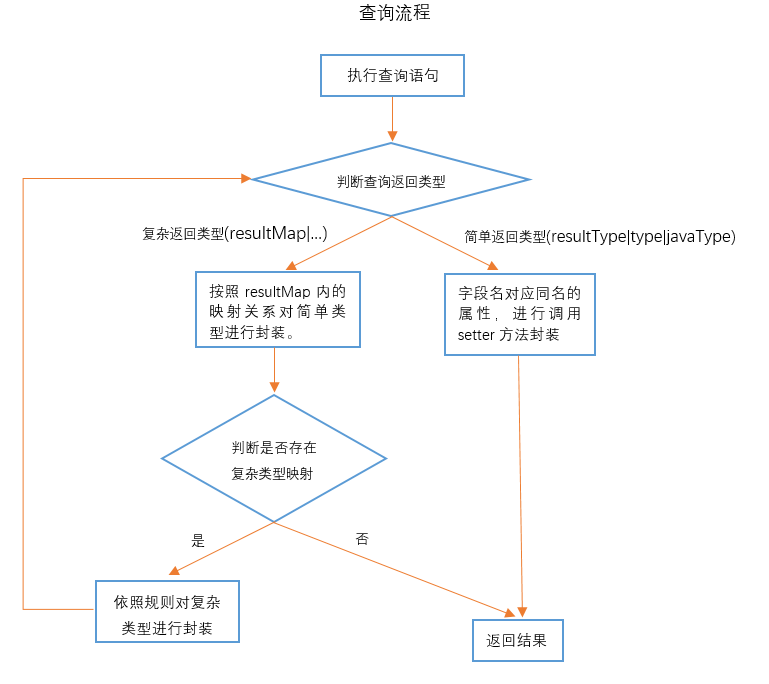
按照这个流程,那么嵌套查询和嵌套结果的区别就在于"依照规则对复杂类型进行封装"这步,嵌套查询在这一步会再调用另一个查询进行结果的返回 ,嵌套结果则在这一步将连接查询的结果集按照我们设置的映射规则进行封装。如果对以上概念理解的差不多了,那么就可以开始我们接下来的映射学习了。
1to1数据库:employee(id,name,age)、department(id,dname,mid)外键为mid依赖于employee的id
1to1实体类:
 1 package cn.edu.mybatis.entities;
 2
 3 public class Department {
 4     private int id; //标识id,自增长
 5     private String dname; //部门名
 6     private Employee manager; //部门管理员,经理
 7
 8     public int getId() {
 9         return id;
10     }
11
12     public void setId(int id) {
13         this.id = id;
14     }
15
16     public String getDname() {
17         return dname;
18     }
19
20     public void setDname(String dname) {
21         this.dname = dname;
22     }
23
24     public Employee getManager() {
25         return manager;
26     }
27
28     public void setManager(Employee manager) {
29         this.manager = manager;
30     }
31
32     public Department() {
33         super();
34     }
35
36     @Override
37     public String toString() {
38         return "Department [id=" + id + ", dname=" + dname + ", Manager=" + manager + "]";
39     }
40
41 }
 1 package cn.edu.mybatis.entities;
 2
 3 public class Employee {
 4     private int id;//标识id,自增长
 5     private String name;//员工名
 6     private int age;//员工年龄
 7
 8     public int getId() {
 9         return id;
10     }
11
12     public void setId(int id) {
13         this.id = id;
14     }
15
16     public String getName() {
17         return name;
18     }
19
20     public void setName(String name) {
21         this.name = name;
22     }
23
24     public int getAge() {
25         return age;
26     }
27
28     public void setAge(int age) {
29         this.age = age;
30     }
31
32     public Employee(String name, int age) {
33         super();
34         this.name = name;
35         this.age = age;
36     }
37
38     public Employee() {
39         super();
40     }
41
42     @Override
43     public String toString() {
44         return "Employee [id=" + id + ", name=" + name + ", age=" + age + "]";
45     }
46
47 }
1to1的嵌套查询式:
1     <select id="findEmployeeById" parameterType="int" resultType="employee">
2         select * from employee where id = #{id}
3     </select>
4     <select id="findDepartmentById" parameterType="int" resultMap="departmentResult">
5         select * from department where id = #{id}
6     </select>
7     <resultMap type="department" id="departmentResult">
8         <association property="manager" column="mid" select="findEmployeeById"></association>
9     </resultMap>
1to1的嵌套结果式:
 1     <select id="findDepartmentById2" parameterType="int" resultMap="departmentResult2">
 2         select * from department d,employee e where d.mid=e.id and d.id=#{id}
 3     </select>
 4     <resultMap type="department" id="departmentResult2">
 5         <id property="id" column="id"/>
 6         <result property="dname" column="dname"/>
 7         <association property="manager" javaType="employee">
 8             <id property="id" column="mid"/>
 9             <result property="name" column="name"/>
10             <result property="age" column="age"/>
11         </association>
12     </resultMap>
1toN的嵌套查询式:
 1     <select id="findClassById" resultMap="classResult">
 2         select * from class where cid=#{id}
 3     </select>
 4     <!-- 由于是1toN映射,在此处应查询有外键关联的那个字段 -->
 5     <select id="findStudentForClass" resultType="student">
 6         select * from student where c_id=#{id}
 7     </select>
 8         <!--
 9             ofType:指明多的那方的类型,mybatis会按该类型进行封装。
10             javaType:可以省略,mybatis会自动转换。用于指明多的一方的载体类型,如:List、ArrayList等等
11             property、column、select与1to1中的用途一致,不再介绍。
12         -->
13     <resultMap type="class" id="classResult">
14         <collection property="students" column="cid" ofType="student" select="findStudentForClass"></collection>
15     </resultMap>
1toN的嵌套结果式:
 1     <select id="findClassById2" resultMap="classResult2">
 2         select * from class c,student s where s.c_id = c.cid and c.cid = #{id}
 3     </select>
 4     <!--
 5         将结果映射封装成Class对象,与以上相同,使用嵌套结果方式时,即使名称相同必须写出全部的映射关系。
 6         注意:由于该连接查询会返回多条结果,而方法只返回一个对象,若是映射配置有误,将会抛出tooManyResultException
 7      -->
 8     <resultMap type="class" id="classResult2">
 9         <id property="cid" column="cid"/>
10         <result property="cname" column="cname"/>
11         <!-- 必须指定property及ofType,功能与嵌套查询内的一致,不再作介绍 -->
12         <collection property="students" ofType="student">
13             <id property="sid" column="sid"/>
14             <result property="sname" column="sname"/>
15             <result property="sage" column="sage"/>
16         </collection>
17     </resultMap>
NtoN映射:
在手册中并没有详细介绍,但根据以往经验,推测实现方法为:建立第三张关联关系表,而后分别对这张表进行1toN的映射来实现NtoN的映射。以后有空会附上实现。
2.动态sql
使用的数据库:employee(id,name,age)
对应的实体类:
 1 public class Employee {
 2     private int id;//标识id,自增长
 3     private String name;//员工名
 4     private int age;//员工年龄
 5
 6     public int getId() {
 7         return id;
 8     }
 9
10     public void setId(int id) {
11         this.id = id;
12     }
13
14     public String getName() {
15         return name;
16     }
17
18     public void setName(String name) {
19         this.name = name;
20     }
21
22     public int getAge() {
23         return age;
24     }
25
26     public void setAge(int age) {
27         this.age = age;
28     }
29
30     public Employee(String name, int age) {
31         super();
32         this.name = name;
33         this.age = age;
34     }
35
36     public Employee() {
37         super();
38     }
39
40     @Override
41     public String toString() {
42         return "Employee [id=" + id + ", name=" + name + ", age=" + age + "]";
43     }
44
45 }
假设现在有一个需求:查询出employee中年龄在10到50之间的,名字中带有"o"的对象。
那么对于这个要求,利用我们已学习过的知识可以轻松写出,首先先建立一个查询条件类,包含这几个查询参数,用于查询条件的传递
 1 public class EmployeeCondition {
 2     private String name;
 3     private int minAge;
 4     private int maxAge;
 5
 6     public String getName() {
 7         return name;
 8     }
 9
10     public void setName(String name) {
11         this.name = name;
12     }
13
14     public Integer getMinAge() {
15         return minAge;
16     }
17
18     public void setMinAge(int minAge) {
19         this.minAge = minAge;
20     }
21
22     public Integer getMaxAge() {
23         return maxAge;
24     }
25
26     public void setMaxAge(int maxAge) {
27         this.maxAge = maxAge;
28     }
29
30     @Override
31     public String toString() {
32         return "DynamicCondition [name=" + name + ", minAge=" + minAge + ", maxAge=" + maxAge + "]";
33     }
34
35     public EmployeeCondition(String name, int minAge, int maxAge) {
36         super();
37         this.name = name;
38         this.minAge = minAge;
39         this.maxAge = maxAge;
40     }
41
42     public EmployeeCondition() {
43         super();
44     }
45
46 }
接下来可以根据我们的已有知识轻松的写出sql语句
1     <select id="findEmployeeByCondition" resultType="employee">
2         <!-- 注:此处只使用#{name} 在外部传递时使用"%o%" -->
3         select * from employee where name like #{name} and age between #{minAge} and #{maxAge}
4     </select>
当然,这样写是可以完成我们的需求。但是在许多实际的情况下,查询的条件一般都是可以自由组合的,比如X宝,X东等购物网站中,经常有对搜索结果的筛选,在筛选时可以自由的选择需要的条件及不需要的条件。那么回过头看我们刚才写的sql语句,则必须传递齐所有参数,不然将会报错,明显不适合于实际的情况。那么在此时就会需要用到动态sql的技术,接下来介绍一下动态sql:
动态sql的基本标签有:if、choose (when, otherwise)、trim (where, set)
if:
使用if标签,参照需求可以将刚才的sql语句改为:
1  <select id="findEmployeeByCondition2" resultType="employee">
2         select * from employee where 1=1
3         <if test="name != null">
4             and name like #{name}
5         </if>
6         <if test="minAge != 0 and maxAge != 0">
7             and age between #{minAge} and #{maxAge}
8         </if>
9     </select>
但是,如果只使用if标签,我们必须加上 "where 1=1" 来保证语句在任意的组合情况下都正确。虽然这样做不是特别复杂,也不会有什么大的影响,但未免有点不太合适。这时就要用上where标签
where:
where可以帮我们自动添加"where"并且可以自动识别消除语句前的"and ",刚才的sql可以改为以下形式:
 1     <select id="findEmployeeByCondition3" resultType="employee">
 2         select * from employee
 3         <where>
 4             <if test="name != null">
 5                 and name like #{name}
 6             </if>
 7             <if test="minAge != 0 and maxAge != 0">
 8                 and age between #{minAge} and #{maxAge}
 9             </if>
10         </where>
11     </select>
set:
类似的也有set标签,用于update语句,用于自动添加"set",并消除语句后的",",比如我们的更新语句就可以改为:
1     <update id="updateEmployee">
2         update employee
3         <set>
4             <if test="name != null">name=#{name},</if>
5             <if test="age != 0">age=#{age},</if>
6             <trim ></trim>
7         </set>
8         where id = #{id}
9     </update>
trim:
where和set的本质就是trim标签,可以自动的添加消除前缀及后缀:
 1      <!--
 2      <trim
 3              prefix:自动添加的前缀  prefixOverrides:自动忽略的前缀(多个忽略采用"|"分隔)
 4              suffix:自动添加的后缀 suffixOverrides:自动忽略的后缀(多个忽略采用"|"分隔)
 5      </trim>
 6      -->
 7      <!-- where标签等价于,注意:and后的空格不可省略 -->
 8      <trim prefix="where" prefixOverrides="and |or "></trim>
 9      <!-- set标签等价于 -->
10      <trim prefix="set" suffixOverrides=","></trim>
回到我们一开始的if标签中,会发现我们的if标签不支持"else"的功能,那么如果需求中多个条件之间是互斥的情况应该怎么处理呢?mybatis提供了类似于switch的语句,用于完成switch的功能以及else的替代。
choose:修改一下刚才的需求,在查询时如果不指定年龄区间,则默认查询出年龄在20到40之间的员工,使用choose标签可以写成以下形式
 1     <select id="findEmployeeByCondition4" resultType="employee">
 2         select * from employee
 3         <where>
 4                <if test="name != null">
 5                 and name like #{name}
 6             </if>
 7             <choose>
 8             <when test="minAge != 0 and maxAge != 0">
 9                 and age between #{minAge} and #{maxAge}
10             </when>
11             <otherwise>
12                 and age between 20 and 40
13             </otherwise>
14         </choose>
15         </where>
16     </select>
其中when就相当于case,otherwise则相当于default。利用choose标签可以实现互斥条件的查询,也可以用于设置缺省值时的查询。
3.传递多个参数
在前一节中,我们将查询条件封装成了一个EmployeeCondition的实体类,但一般情况下极少会这样封装,因为这样会大幅增加代码的复杂度和冗余度。接下来就来看看怎么使用mybatis进行传递多个参数来编写sql。传递多个参数的方法,我们在这里先介绍3种:索引方式、注解声明方式、map封装方式
使用的数据库:employee(id,name,age),id自增长
对应的实体类:
 1 public class Employee {
 2     private int id;//标识id,自增长
 3     private String name;//员工名
 4     private int age;//员工年龄
 5
 6     public int getId() {
 7         return id;
 8     }
 9
10     public void setId(int id) {
11         this.id = id;
12     }
13
14     public String getName() {
15         return name;
16     }
17
18     public void setName(String name) {
19         this.name = name;
20     }
21
22     public int getAge() {
23         return age;
24     }
25
26     public void setAge(int age) {
27         this.age = age;
28     }
29
30     public Employee(String name, int age) {
31         super();
32         this.name = name;
33         this.age = age;
34     }
35
36     public Employee() {
37         super();
38     }
39
40     @Override
41     public String toString() {
42         return "Employee [id=" + id + ", name=" + name + ", age=" + age + "]";
43     }
44
45 }
同样是前一节的需求,为了缩短篇幅就不采用动态sql及配置文件了,注解可用的查询语句放到配置文件中也同样可用。
索引方式:
百度许多,都是写的老版本的索引方法,如:#{0}、#{1}、...,这样的索引方式在mybatis3.4之中是不被识别的,经过一番测试后,发现目前版本的支持两种索引方式:
1     /*#{arg索引}标识,需要注意arg方式索引从0开始*/
2     @Select("select * from employee where name like #{arg0} and age between #{arg1} and #{arg2}")
3     List<Employee> findEmployeeByCondition(String name,Integer minAge,Integer maxAge);
4
5     /*#{param索引}标识,需要注意param方式索引从1开始*/
6     @Select("select * from employee where name like #{param1} and age between #{param2} and #{param3}")
7     List<Employee> findEmployeeByCondition2(String name,Integer minAge,Integer maxAge);
索引方式的缺点比较明显,需要修改占位符的编写方式,降低配置方面的可读性。
注解声明方式:
采用注解声明方式就是在映射接口中使用@Param来为我们的变量声明一个名字,使用这种方式占位符按原方式编写,具有较高通用性,从两个方面看可读性都比较高,是我个人比较建议的一种方式。
1     @Select("select * from employee where name like #{name} and age between #{minAge} and #{maxAge}")
2     List<Employee> findEmployeeByCondition3(@Param("name")String name,
3                                             @Param("minAge")Integer minAge,
4                                             @Param("maxAge")Integer maxAge);
map封装方式:
在parameterMap被废弃的这个版本,也是可以通过java的Map来传递多个参数的。其中,key声明为String,map的key与占位符需对应,有多个参数不同类型时,将map的value声明为Object即可。
1     @Select("select * from employee where name like #{name} and age between #{minAge} and #{maxAge}")
2     List<Employee> findEmployeeByCondition4(Map<String, Object> map);
1     Map<String, Object> map = new HashMap<>();
2     map.put("name", "%c%");
3     map.put("minAge", 10);
4     map.put("maxAge", 50);
5     System.out.println(dao.findEmployeeByCondition4(map));
map方式的缺点也很明显,单从方法的角度来看,可读性不高。
传入多个引用类型:
这种方式不是很常用,但是顺便一提吧,有时可能会遇到传入多个类的情况,那么就可以写成以下形式:
1     @Select("select * from employee where name like #{ec2.name} and age between #{ec2.minAge} and #{ec2.maxAge}")
2     List<Employee> findEmployeeByCondition5(@Param("ec1")EmployeeCondition ec1,
3                                             @Param("ec2")EmployeeCondition ec2);
不过,从这个例子可以看出,占位符内是支持变量名.属性方式调用的,这点与el表达式类似。
4.用List封装多参数(foreach)——批量操作
使用List需要用到foreach标签,先来看个例子:
1     <select id="findEmployeeByIds" resultType="employee">
2         select * from employee where id in
3         <foreach collection="ids" index="index" item="id" open="(" separator="," close=")">
4             #{id}
5         </foreach>
6     </select>
以上功能为根据id集来查询获得对象集,等价于sql语句:select * from employee where id in (xx,xx,...),接下来详细介绍下foreach标签:
        foreach:用于集合迭代,操作与JSTL中的foreach标签类似
            collection:指定要迭代集合的名称,自定义名称需要使用@param注解标明,不使用注解的情况下,List默认名为list或collection,数组默认名为array
            index:当前迭代次数,用于判断语句中使用,名称可自定义(可选)
            item:当前迭代的对象,名称可自定义
            open:整个集合开始时在左边添加的字符(可选)
            separator:每次迭代结束后在右边添加的字符,即分隔符(可选)
            close:整个集合结束时在右边添加的字符(可选)
有了foreach标签的支撑,就可以实现一些批量操作了,比如常用的批量插入及批量更新。
批量插入:
1     <insert id="addEmployeeByList">
2         insert into employee(name,age)
3         values
4         <foreach collection="employees" item="employee" separator=",">
5             (#{employee.name},#{employee.age})
6         </foreach>
7     </insert>
批量更新:
 1     <update id="updateEmployeeByList">
 2         <foreach collection="employees" item="employee" separator=";">
 3             update employee
 4             <set>
 5                 name=#{employee.name},
 6                 age=#{employee.age}
 7             </set>
 8             where id=#{employee.id}
 9         </foreach>
10     </update>
当使用这种方式的批量更新时,如果数据库是mysql则需要添加allowMultiQueries=true参数,如:
jdbc:mysql://localhost:3306/mybatis?useUnicode=true&characterEncoding=UTF-8&allowMultiQueries=true
此外,foreach是可以嵌套使用的,若是类中有数组时,可以嵌套使用。
5.mybatis缓存机制
正如大多数持久层框架一样,mybatis同样提供了一级缓存和二级缓存的支持
一级缓存:基于PerpetualCache的HashMap本地缓存,其存储作用域为Session,当Session被flush或close之后,该Session中的所有Cache就将清空。
二级缓存:与一级缓存机制相同,默认也是采用PerpetualCache,HashMap存储,不同在于其存储作用域为Mapper(namespace),并且自定义存储源,如Ehcache。
缓存数据更新机制:当某一个作用域(一级缓存Session/二级缓存Namespaces)的进行了增/删/改操作后,默认该作用域下所有的select缓存将被clear。
6.mybatis调用存储过程并返回值
首先先看下parameterMap,在很多描述中调用存储过程需要用到。但是,在官方手册中:
parameterMap– 已废弃!老式风格的参数映射。内联参数是首选,这个元素可能在将来被移除,这里不会记录。
废弃了,没办法。搜索了许久,找到现版本的用法,把parameter的参数写在占位符内传递,如:#{eid,mode=IN,jdbcType=INTEGER}。知道了替代的方式之后,就可以使用mybatis调用存储过程了。存储过程:
1 CREATE PROCEDURE test(IN eid INTEGER,OUT ename VARCHAR(50))
2 BEGIN
3     SELECT name into ename
4     from employee
5     where id = eid;
6 END
调用:
1     <select id="callProcedure" statementType="CALLABLE">
2         call test(#{eid,mode=IN,jdbcType=INTEGER},#{ename,mode=OUT,jdbcType=VARCHAR})
3     </select>
1 public interface ProcedureDao {
2     void callProcedure(Map<String, Object> map);
3 }
1     String ename = null;
2     Map<String, Object> map = new HashMap<>();
3     map.put("eid", 1);
4     map.put("ename", ename);
5     dao.callProcedure(map);
6     System.out.println(map.get("ename"));//有值
7     System.out.println(ename);//null
注意事项:
- statementType设置为CALLABLE才能识别调用call语句。
- 只能采用map封装的方式进行传递,才能获取到OUT出来的值,索引方式和注解方式不能获取。
- 占位符内设置属性时采用的是enum类型,故必须大写。
获取函数的返回值,类似这样:
1     <select id="callProcedure" statementType="CALLABLE">
2         {#{d,mode=OUT,jdbcType=INTEGER}=call test(#{eid,mode=IN,jdbcType=INTEGER},#{ename,mode=OUT,jdbcType=VARCHAR})}
3     </select>
如果要接受结果集,采用resultMap封装成Map传出即可。
7.与spring整合
在实际应用中,mybatis常常需要和spring一起使用,那么mybatis与spring整合是整合什么呢?mybatis与spring整合主要是以下几点:
- 将事务管理交给spring。
- 将sqlSessionFactory及sqlSession交由springIOC容器管理。
- 将Mapper接口及配置文件交由springIOC容器管理。
环境准备:除去spring的基础需要包以外,还需要mybatis-spring-1.3.1.jar。此处spring版本为4.3.3,故采用1.3.1版本文件。
配置文件:
其配置主要在spring中,一个的简单配置文件样例如下:
 1 <?xml version="1.0" encoding="UTF-8"?>
 2 <beans xmlns="http://www.springframework.org/schema/beans"
 3     xmlns:xsi="http://www.w3.org/2001/XMLSchema-instance" xmlns:aop="http://www.springframework.org/schema/aop"
 4     xmlns:context="http://www.springframework.org/schema/context" xmlns:tx="http://www.springframework.org/schema/tx"
 5     xsi:schemaLocation="http://www.springframework.org/schema/beans http://www.springframework.org/schema/beans/spring-beans.xsd
 6         http://www.springframework.org/schema/context http://www.springframework.org/schema/context/spring-context-4.2.xsd
 7         http://www.springframework.org/schema/aop http://www.springframework.org/schema/aop/spring-aop-4.2.xsd
 8         http://www.springframework.org/schema/tx http://www.springframework.org/schema/tx/spring-tx-4.2.xsd">
 9
10     <!-- 1.配置数据源:DriverManagerDataSource -->
11     <bean id="dataSource"
12         class="org.springframework.jdbc.datasource.DriverManagerDataSource">
13          <property name="url" value="jdbc:mysql://localhost:3306/mybatis"></property>
14         <property name="driverClassName" value="com.mysql.jdbc.Driver"></property>
15         <property name="username" value="root"></property>
16         <property name="password" value="root"></property>
17     </bean>
18     <!-- 2.创建sqlSessionFactory:SqlSessionFactoryBean -->
19     <bean id="sqlSessionFactory" class="org.mybatis.spring.SqlSessionFactoryBean">
20         <!-- 2-1.为sessionFactory附上数据源 -->
21         <property name="dataSource" ref="dataSource"></property>
22         <!-- 2-2.设置扫描别名的包,一般设置实体类所在包 等价于原先package标签 -->
23         <property name="typeAliasesPackage" value="cn.edu.mybatis.entities"></property>
24     </bean>
25     <!-- 3.配置自动扫描mybatis接口/配置文件的类:MapperScannerConfigurer -->
26     <bean class="org.mybatis.spring.mapper.MapperScannerConfigurer">
27         <!-- 3-1.配置对应的sqlSessionFactory -->
28          <property name="sqlSessionFactory" ref="sqlSessionFactory"></property>
29         <!-- 3-2.配置扫描基础包 -->
30         <property name="basePackage" value="cn.edu.mybatis.dao"></property>
31     </bean>
32     <!-- 4.配置事务管理器:DataSourceTransactionManager -->
33     <bean id="transactionManager"
34         class="org.springframework.jdbc.datasource.DataSourceTransactionManager">
35         <!-- 需要设置数据源 -->
36         <property name="dataSource" ref="dataSource"></property>
37     </bean>
38     <!-- 5.配置声明式事务 -->
39     <tx:annotation-driven transaction-manager="transactionManager" />
40 </beans>
配置完成后就可以使用@Autowired和@Resource对Mapper接口进行注入使用了,事务也交由spring进行管理。