ajax简介
AJAX(Asynchronous Javascript And XML)翻译成中文就是 “异步的 Javascript 和 XML”。即使用 Javascript 语言与服务器进行异步交互,传输的数据为 XML(当然,传输的数据不只是 XML)。
AJAX 不是新的编程语言,而是一种使用现有标准的新方法。
AJAX 最大的优点是在不重新加载整个页面的情况下,可以与服务器交换数据并更新部分网页内容。(这一特点给用户的感受是在不知不觉中完成请求和响应过程)
AJAX 不需要任何浏览器插件,但需要用户允许JavaScript在浏览器上执行。
- 同步交互:客户端发出一个请求后,需要等待服务器响应结束后,才能发出第二个请求;
- 异步交互:客户端发出一个请求后,无需等待服务器响应结束,就可以发出第二个请求。
ajax常见应用情景
搜索引擎根据用户输入的关键字,自动提示检索关键字。
还有一个很重要的应用场景就是注册时候的用户名的查重。
其实这里就使用了 AJAX 技术!当文件框发生了输入变化时,使用 AJAX 技术向服务器发送一个请求,然后服务器会把查询到的结果响应给浏览器,最后再把后端返回的结果展示出来。
- 整个过程中页面没有刷新,只是刷新页面中的局部位置而已
- 当请求发出后,浏览器还可以进行其他操作,无需等待服务器的响应
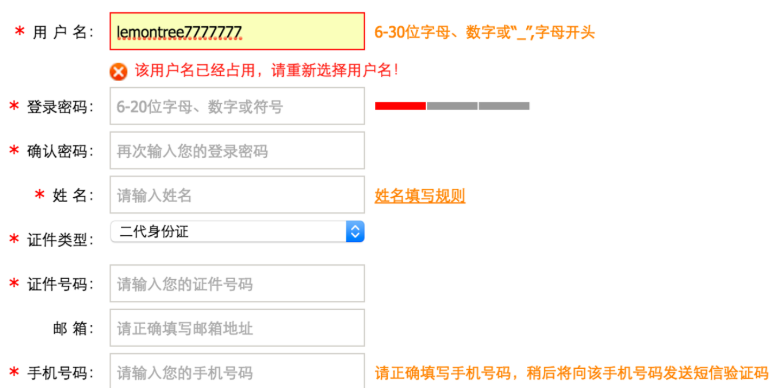
当输入用户名后,把光标移动到其他表单项上时,浏览器会使用 AJAX 技术向服务器发出请求,服务器会查询名为 lemontree7777777 的用户是否存在,最终服务器返回 true 表示名为 lemontree7777777 的用户已经存在了,浏览器在得到结果后显示 “用户名已被注册!”。
- 整个过程中页面没有刷新,只是局部刷新了
- 在请求发出后,浏览器不用等待服务器响应结果就可以进行其他操作
优点
- AJAX使用 Javascript 技术向服务器发送异步请求
- AJAX 无须刷新整个页面
示例
页面输入两个整数,通过AJAX传输到后端计算出结果并返回。
<!DOCTYPE html>
<html lang="en">
<head>
    <meta charset="UTF-8">
    <script src="/static/jquery-3.2.1.min.js"></script>
    <title>Ajax局部刷新示例</title>
</head>
<body>

<input type="text" id="num1">+
<input type="text" id="num2">=
<input type="text" id="sum">
<button id="submit">计算</button>

<script>
    $("#submit").click(function () {
        $.ajax({
            url: '/test_ajax/',
            type: 'post',
            data: {
                n1: $("#num1").val(),
                n2: $("#num2").val()
            },
            success: function (data) {
                console.log(data)
                $("#sum").val(data)
            },

        })
    })
</script>
</body>
</html>
def test_ajax(requests):
    n1=int(requests.POST.get('n1'))
    n2=int(requests.POST.get('n2'))
    return HttpResponse(n1+n2)
ajax实现登录
def login(request):
    dic = {
        'status': 100,
        'msg': None
    }
    if request.method == 'GET':
        return render(request, 'login.html')
    if request.method == 'POST':
        # ajax的data里面的name和pwd
        username = request.POST.get('name')
        password = request.POST.get('pwd')
        if username == 'xi' and password == '123':
            dic['msg'] = '登录成功'
            # 让前端跳转
            dic['url'] = 'http://www.baidu.com/'
        else:
            # return HttpResponse('用户名或密码错误')
            # 返回json格式
            dic['status'] = 101
            dic['msg'] = '用户名或密码错误'
        return JsonResponse(dic)
<!DOCTYPE html>
<html>
<head>
    <meta charset="UTF-8">
    <script src="/static/jquery-3.3.1.js"></script>
    <title>Title</title>
</head>
<body>
    <p>用户名:<input type="text" id="username"></p>
    <p>密码:<input type="password" id="password"></p>
    <input type="button" value="登录" id="login">
    <span id="error"></span>
</body>

<script>
    $('#login').click(function () {
        $.ajax({
            url: '/login/',
            type: 'post',
            data: {
                // 这里的name和pwd是后台需要取的数据
                name: $('#username').val(),
                pwd: $('#password').val(),
            },
            success: function (data) {
                // 后台用JsonResponse返回数据
                // data就会被自动转成对象(python字典对应的json格式)
                // 这里的默认编码方式为urlencoded, 会自动转码成 name=xi&pwd=123
                console.log(data);

                // 后台用HttpResponse, 拿到的data就是json格式的字符串, 需要手动转成json格式对象
                var data1 = JSON.parse(data)
                console.log(typeof data1)

                if (data1.status == 100) {
                    // 成功, 跳转到指定页面(location.href等于一个地址, 前端就会跳转到指定的url)
                    location.href = data1.url
                } else {
                    $("#error").text(data1.msg)
                }
            }
        })
    })
</script>
</html>
往后台提交 json 格式数据
from django.shortcuts import render, HttpResponse
from django.http import JsonResponse
import json


# Create your views here.

def login(request):
    dic = {
        'status': 100,
        'msg': None
    }
    if request.method == 'GET':
        return render(request, 'login.html')
    if request.method == 'POST':
        # ajax的data里面的name和pwd
        username = request.POST.get('name')
        password = request.POST.get('pwd')
        if username == 'xi' and password == '123':
            dic['msg'] = '登录成功'
            # 让前端跳转
            dic['url'] = 'http://www.baidu.com/'
        else:
            # return HttpResponse('用户名或密码错误')
            # 返回json格式
            dic['status'] = 101
            dic['msg'] = '用户名或密码错误'
        return JsonResponse(dic)


def login_json(request):
    dic = {
        'status': 100,
        'msg': None
    }
    if request.method == 'POST':
        print(request.POST)
        print(request.GET)
        print(request.body)
        ret = json.loads(str(request.body, encoding='utf-8'))
        username = ret.get('name')
        password = ret.get('pwd')
        print(username, password)
        return HttpResponse('OK')
<!DOCTYPE html>
<html>
<head>
    <meta charset="UTF-8">
    <script src="/static/jquery-3.3.1.js"></script>
    <title>Title</title>
</head>
<body>
    <p>用户名:<input type="text" id="username"></p>
    <p>密码:<input type="password" id="password"></p>
    <input type="button" value="登录" id="login">
    <input type="button" value="提交json格式数据" id="sub">
    <span id="error"></span>
</body>

<script>
    $('#login').click(function () {
        $.ajax({
            url: '/login/',
            type: 'post',
            data: {
                // 这里的name和pwd是后台需要取的数据
                name: $('#username').val(),
                pwd: $('#password').val(),
            },
            success: function (data) {
                // 后台用JsonResponse返回数据
                // data就会被自动转成对象(python字典对应的json格式)
                // 这里的默认编码方式为urlencoded, 会自动转码成 name=xi&pwd=123
                console.log(data);

                // 后台用HttpResponse, 拿到的data就是json格式的字符串, 需要手动转成json格式对象
                var data1 = JSON.parse(data)
                console.log(typeof data1)

                if (data1.status == 100) {
                    // 成功, 跳转到指定页面(location.href等于一个地址, 前端就会跳转到指定的url)
                    location.href = data1.url
                } else {
                    $("#error").text(data1.msg)
                }
            }
        })
    })

    $('#sub').click(function () {
        post_data = {
            name: $('#username').val(),
            pwd: $('#password').val(),
        },
        $.ajax({
            url: '/login_json/',
            type: 'post',
            // 指定提交的编码格式是json格式, 就不会自动转码, 就会原封不动的传到后台
            contentType: 'application/json',
            // 传json格式字符串, 同时还需要手动指定编码方式
            data: JSON.stringify(post_data),
            success: function (data) {
                console.log(data)
            }
        })
    })
</script>
</html>
写一个装饰器,既能处理 urlencoded 格式,又能处理 json 格式
from django.shortcuts import render, HttpResponse
import json

# Create your views here.


def outer(func):
    def inner(request, *args, **kwargs):
        # 为了防止错误,主要是处理urlencoded这种编码,让它不处理
        try:
            request.POST = json.loads(request.body)
        except Exception as e:
            print(e)
        ret = func(request, *args, **kwargs)
        return ret
    return inner


@outer
def login(request):
    if request.method == 'GET':
        return render(request, 'login.html')
    if request.is_ajax():
        print(request.body)
        print(request.POST)
        # request.body是二进制,loads可以直接传
        # request_dic = json.loads(request.body)
        # request.POST = request_dic
        name = request.POST.get('name')
        pwd = request.POST.get('pwd')
        print(name, pwd)
        return HttpResponse('OK')
<!DOCTYPE html>
<html lang="en">
<head>
    <meta charset="UTF-8">
    <script src="/static/jquery-3.3.1.js"></script>
    <title>Title</title>
</head>
<body>
    <p>用户名:<input type="text" id="name"></p>
    <p>密码:<input type="password" id="pwd"></p>
    <button id="btn">提交</button>
</body>
<script>
    $("#btn").click(function () {
        $.ajax({
            url: '/login/',
            type: 'post',
            contentType: 'application/json',
            // 把json对象转成字符串
            data: JSON.stringify({
                name: $("#name").val(),
                pwd: $("#pwd").val(),
            }),
            success: function (data) {
                console.log(data)
            },
        })
    })
</script>
</html>
文件上传
基于form表单上传
<!DOCTYPE html>
<html lang="en">
<head>
    <meta charset="UTF-8">
    <script src="/static/jquery-3.3.1.js"></script>
    <title>Title</title>
</head>
<body>
    <h2>基于form表单上传</h2>
    <form action="/file_upload/" method="post" enctype="multipart/form-data">
        <p>名字:<input type="text" name="name"></p>
        <p>文件:<input type="file" name="myfile"></p>
        <p><input type="submit" value="上传"></p>
    </form>
</body>
</html>
from django.shortcuts import HttpResponse

def file_upload(request):
    print(request.POST.get('name'))
    # 文件对象
    myfile = request.FILES.get('myfile')
    with open(myfile.name, 'wb') as f:
        for line in myfile:
            f.write(line)

    return HttpResponse('上传成功')
基于ajax上传
基于ajax上传,要先取到文件

<!DOCTYPE html>
<html lang="en">
<head>
    <meta charset="UTF-8">
    <script src="/static/jquery-3.3.1.js"></script>
    <title>Title</title>
</head>
<body>
    <h2>基于AJAX上传</h2>
    <p>名字:<input type="text" id="id_name"></p>
    <p>文件:<input type="file" id="id_myfile"></p>
    <button id="btn_file">ajax上传</button>
</body>
<script>
    $("#btn_file").click(function () {
        // 取到文件
        var myfile = $("#id_myfile")[0].files[0];
        var formdata = new FormData();
        // 放值
        formdata.append('name', $("#id_name").val());
        // 放文件
        formdata.append('myfile', myfile);
        $.ajax({
            url: '/file_upload/',
            type: 'post',
            processData: false, // 不预处理数据,FormData已处理好
            contentType: false, // 不指定编码,FormData已指定好
            data: formdata,
            success: function (data) {
                console.log(data)
            },
        })
    })
</script>
</html>
from django.shortcuts import HttpResponse

def file_upload(request):
    print(request.POST.get('name'))
    # 文件对象
    myfile = request.FILES.get('myfile')
    with open(myfile.name, 'wb') as f:
        for line in myfile:
            f.write(line)

    return HttpResponse('上传成功')
序列化
把对象序列化成 json 字符串
from django.core import serializers

def test(request):
    book_list = models.Book.objects.all()[0:10]
    ret = serializers.serialize("json", book_list)
    return HttpResponse(ret)