Zookeeper集群搭建
这个大数据吧,我目前觉得什么恶心?搭环境恶心。跟着教程你一步一步的细节都不落下的也能报错。就今天我跟着教程学习搭建Zookeeper集群,好不容易配好了集群环境。心想呀这舒服啊,总算是搭好了环境。那就连客户端吧。哎哟嚯,这个客户端可算把我整糊了!卧槽,怎么连都连不上Vmware 上的 集群,卧槽到处检查。检查linux上的防火墙啊、配置文件啊、本地防火墙啊。。。哎哟我去,真的恶心,看了网上到处博客,没用。 我靠,心态快崩了。都想不干了,但想想这要是就不干了还学个屁。后面搞了5个小时吧~!总算是找到问题了,网上有个博客管用,说连接时要停10秒,然后再访问。我想卧槽这什么操作。有这么慢吗?也不管了,拿上一试还真管用。我去。。。 嗯哼,大数据你真好。 好了不说了,写写学习笔记。
环境
我搞了3台cenos6.4的装的mini版(最小安装版)放在vmware中
然后centos配置如下
server1:192.168.25.141
server2:192.168.25.142
server2:192.168.25.142
jdk
zookeeper3.4.5
服务器之间可以相互访问
将zookeeper解压后我就直接放在 /root/apps/ 下,绝对路径为 /root/apps/zookeeper-3.4.5/
为了方面3台服务器都解压后的路径都一样
配置
搞完上面那些后搞配置
jdk 我是这样配置的 直接在 /etc/profile 文件配置
直接在 /etc/profile 文件末尾追加
#this is jdk home
export JAVA_HOME=/home/apps/jdk1.7
export PATH=$PATH:$JAVA_HOME/bin
然后再搞zookeeper的配置文件
cd /root/apps/zookeeper-3.4.5/conf/ 进入配置目录下他最初有一个 zoo_sample.cfg 你要复制一份并命名为zoo.cfg这是我们要改写的文件, 使用 cp zoo_sample.cfg zoo.cfg 后大概是这个样子的

然后就搞zoo.cfg 文件 vi zoo.cfg 后 搞成这个样子的就可以了
# The number of milliseconds of each tick
tickTime=2000
# The number of ticks that the initial
# synchronization phase can take
initLimit=10
# The number of ticks that can pass between
# sending a request and getting an acknowledgement
syncLimit=5
# the directory where the snapshot is stored.
# do not use /tmp for storage, /tmp here is just
# example sakes.
dataDir=/root/zkdata
# the port at which the clients will connect
clientPort=2181
#
# Be sure to read the maintenance section of the
# administrator guide before turning on autopurge.
#
# http://zookeeper.apache.org/doc/current/zookeeperAdmin.html#sc_maintenance
#
# The number of snapshots to retain in dataDir
#autopurge.snapRetainCount=3
# Purge task interval in hours
# Set to "0" to disable auto purge feature
#autopurge.purgeInterval=1
server.1=192.168.25.141:2888:3888
server.2=192.168.25.142:2888:3888
server.3=192.168.25.143:2888:3888
然后还要在 /root/ 目录下建立一个 zookeeper的数据文件 zkdata
执行 mkdir /root/zkdata
并在 zkdata目录下建立一个 myid 文件;假设当前是你的第一台服务器那么文件内容为 1,如果是第二台那么为2,以此类推。
之后每台服务器都这么干,就可以了。
假设第一台那么建立向下面这样的,记住每一台都要建立

![]()
再看一下第二台服务器配置

![]()
记住每一台都要配置上述步骤
测试
然后每个服务器切换到 cd /root/apps/zookeeper-3.4.5/bin/ 目录下 大概如下
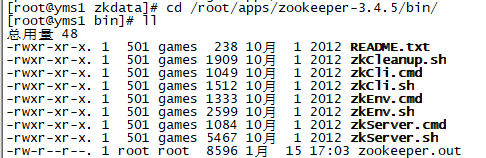
然后就每台服务器都运行这个 ./zkServer.sh start 就OK
 或者
或者
说明成功了。
Java客户端连接
就是这个java客户端给我整蒙了,足足搞了我5个多小时。
之后参考 https://www.cnblogs.com/zjiacun/p/7654894.html 该博客解决了我的问题

上我的客户端连接
import java.util.List;

import org.apache.zookeeper.CreateMode;
import org.apache.zookeeper.KeeperException;
import org.apache.zookeeper.WatchedEvent;
import org.apache.zookeeper.Watcher;
import org.apache.zookeeper.ZooDefs.Ids;
import org.junit.Before;
import org.junit.Test;
import org.apache.zookeeper.ZooKeeper;
import org.apache.zookeeper.data.Stat;

public class SimpleZkClient {
	private static final String connectString = "192.168.25.141:2181,192.168.25.142:2181,192.168.25.143:2181";
	private static final int sessionTimeout = 2000;

	ZooKeeper zkClient = null;

	public static void main(String[] args) throws Exception {
		ZooKeeper zk = new ZooKeeper("192.168.25.141:2181", 2000, null);

		System.out.println("o1k");
		Thread.sleep(10000);
		System.out.println("ok");

		System.out.println(zk.getClass());
		if (zk.exists("/test", false) == null) {
			zk.create("/test", "znode1".getBytes(), Ids.OPEN_ACL_UNSAFE, CreateMode.PERSISTENT);
		}
		System.out.println(new String(zk.getData("/test", false, null)));
	}

	@Before()
	public void init() throws Exception {
		zkClient = new ZooKeeper(connectString, sessionTimeout, new Watcher() {

			@Override
			public void process(WatchedEvent event) {
				// TODO Auto-generated method stub
				System.out.println(event.getType() + "------------" + event.getPath());
				try {
					zkClient.getChildren("/", true);
				} catch (Exception e) {
					// TODO Auto-generated catch block
					e.printStackTrace();
				}
			}
		});
		System.out.println("连接成功");
		Thread.sleep(10000);//等待10s 不然就报错,其他人报不报错我不知道,反正我的不停救报错
	}

	/**
	 * 创建数据节点到zk中
	 */
	@Test
	public void testCreate() throws Exception {
		String nodeCreated = zkClient.create("/eclipse", "hellozk".getBytes(), Ids.OPEN_ACL_UNSAFE,
				CreateMode.PERSISTENT);
		//上传的数据可以是任意类型,但都要转换成byte []

		// System.out.println("nodeCreated = "+nodeCreated);
	}

	/**
	 * 测试某数据是否存在
	 * @throws Exception
	 */
	@Test
	public void testExsit() throws Exception {
		Stat stat = zkClient.exists("/eclipse", false);
		System.out.println(stat==null?"not exsit":"exsit");
	}

	/**
	 * 获取子节点
	 * @throws Exception
	 */
	@Test
	public void getChildren() throws Exception {
		List<String> children = zkClient.getChildren("/", true);
		for (String child : children) {
			System.out.println(child);
		}
		Thread.sleep(Long.MAX_VALUE);
	}

	/**
	 * 获取 znode 数据
	 * @throws Exception
	 */
	@Test
	public void getData() throws Exception {
		byte [] data = zkClient.getData("/eclipse", false, null);
		System.out.println(new String(data));
	}

	/**
	 * 删除znode数据
	 * @throws Exception
	 */
	@Test
	public void deleteZnode() throws Exception {
		//参数2 => 表示要参数的版本, -1表示删除所有版本
		zkClient.delete("/eclipse", -1);
	}

	/**
	 * 修改znode数据
	 * @throws Exception
	 */
	@Test
	public void setZnode() throws Exception {
		zkClient.setData("/eclipse", "change data".getBytes(), -1);
	}

}
来源:https://blog.csdn.net/yangmingsen1999/article/details/86499585