一、环境安装
由于资源限制,在虚拟机中模拟测试,一台虚拟机,所有软件均安装到该虚拟机内
安装系统:CentOS Linux release 7.4.1708 (Core)
CentOS安装选择版本:Basic Web Server
redis版本:5.0.2
jdk版本:1.8.0_191
nginx版本:1.14.1
tomcat版本:9.0.13
1、安装gcc
yum -y installed gcc
2、安装redis
2.1、解压
tar -zxvf redis-5.0.2.tar.gz -C /usr/local/
2.2、进入redis安装目录
cd /usr/local/redis-5.0.2
2.3、安装
make && make install
2.4、启动redis
/usr/local/redis-5.0.2/src/redis-server --protected-mode no &
3、安装jdk
3.1、查询已安装jdk
rpm -qa | grep jdk | grep -v grep
3.2、若为openjdk或者非1.8版本,则卸载
rpm -e --nodeps “具体安装jdk”
3.3、安装
rpm -ivh jdk-8u191-linux-x64.rpm
3.4、设置环境变量
/etc/profile中添加如下配置
export JAVA_HOME=/usr/java/jdk1.8.0_191-amd64/
export CLASSPATH=.:$JAVA_HOME/lib/dt.jar:$JAVA_HOME/lib/tools.jar
export PATH=$PATH:$JAVA_HOME/bin/
3.5、使配置生效
source /etc/profile
4、安装tocmat
4.1、新建两个tocmat
tar -zxvf apache-tomcat-9.0.13.tar.gz -C /usr/local/
cd /usr/local/
mv apache-tomcat-9.0.13 tocmat1

tar -zxvf apache-tomcat-9.0.13.tar.gz -C /usr/local/
cd /usr/local/
mv apache-tomcat-9.0.13 tocmat2
4.2、配置tomcat端口
tomcat1 Connector port改为8081
tomcat2  server port改为8006,Connector port改为8082,AJP Connector port改为8010
如果有需要,可在tomcat/bin目录下新建setenv.sh文件,来设置内存大小等参数,也可在catalina.sh中直接设置,本例属于测试,未进行该设置
CATALINA_PID="$CATALINA_BASE/tomcat.pid"
JAVA_OPTS="-server -Xms1000m -Xmx1000m -XX:PermSize=128M -XX:MaxPermSize=128M"
export JAVA_OPTS
export JAVA_HOME=$JAVA_HOME
5、安装nginx
5.1、安装依赖包
yum install -y pcre pcre-devel
yum install -y zlib zlib-devel
yum install -y openssl openssl-devel
5.2、解压
tar -zxvf nginx-1.14.1.tar.gz
5.3、进入安装目录
cd nginx-1.14.1
5.4、测试安装环境,默认将安装在/usr/local/nginx下
./configure
若configure未通过,则需要处理出现的异常,否则直接make && make install也是会出错
5.5、编译安装
make && install
5.6、检查是否安装成功
http://192.168.3.12
若启动正常,页面不能访问,则检查是否防火墙未关闭或者80端口未允许访问,关闭防火墙方法
systemctl stop firewalld
二、session共享和负载均衡配置
1、tocmat配置
1.1、在tomcat/conf/context.xml中增加RedissonSessionManager,tomcat1和tomcat2都要配置
<Manager className="org.redisson.tomcat.RedissonSessionManager"
configPath="${catalina.base}/redisson.conf" readMode="MEMORY" updateMode="DEFAULT"/>
具体参数可参考:
https://github.com/redisson/redisson/blob/dfcf183fb99e2718a748148942926256f650ee24/redisson-tomcat/README.md
配置redisson
1.2、在tomcat安装目录下新建redisson.conf,添加如下配置
{
   "singleServerConfig":{
      "idleConnectionTimeout":10000,
      "pingTimeout":1000,
      "connectTimeout":10000,
      "timeout":3000,
      "retryAttempts":3,
      "retryInterval":1500,
      "password":null,
      "subscriptionsPerConnection":5,
      "clientName":null,
      "address": "redis://127.0.0.1:6379",
      "subscriptionConnectionMinimumIdleSize":1,
      "subscriptionConnectionPoolSize":50,
      "connectionMinimumIdleSize":32,
      "connectionPoolSize":64,
      "database":0,
      "dnsMonitoringInterval":5000
   },
   "threads":0,
   "nettyThreads":0,
   "codec":{
      "class":"org.redisson.codec.JsonJacksonCodec"
   },
   "transportMode":"NIO"
}
本例中使用的为单实例redis,具体参数配置可参考:
https://github.com/redisson/redisson/wiki/2.-Configuration#26-single-instance-mode
redis集群可参考如下链接中其他配置
https://github.com/redisson/redisson/wiki/2.-Configuration
1.3、拷贝jar包
https://github.com/redisson/redisson/tree/dfcf183fb99e2718a748148942926256f650ee24/redisson-tomcat下载redisson-all-3.9.1.jar和redisson-tomcat-9-3.9.1.jar,拷贝到${catalina.base}/lib下
分别启动tomcat1和tomcat2,验证是否可正常访问
http://192.168.3.12:8081/mytest/index.jsp
http://192.168.3.12:8082/mytest/index.jsp
1.4、nginx配置
修改nginx.conf配置
http节点中添加如下配置
upstream backend {
        server 127.0.0.1:8081 max_fails=1 fail_timeout=10s;
        server 127.0.0.1:8082 max_fails=1 fail_timeout=10s;
}
location节点中增加proxy_pass项
location / {
            root   html;
            index  index.html index.htm;
            proxy_pass http://backend;
        }
三、测试
1、tomcat1/webapps/新建目录mytest,mytest目录下新建index.jsp,内容如下
<%@ page language="java" %>
<html>
  <head><title>tomcat1</title></head>
  <body>
    <table align="centre" border="1">
      <tr>
        <td>SessionID</td>
        <td><%= session.getId() %></td>
      </tr>
      <tr>
        <td>SessionCreatedTime</td>
        <td><%= session.getCreationTime() %></td>
     </tr>
     <tr>
        <td>ServerName</td>
        <td><%=request.getServerName()%></td>
     </tr>
     <tr>
        <td>SessionPort</td>
        <td><%=request.getServerPort()%></td>
     </tr>
      <tr>
        <td>CustomString</td>
        <td>This is the first tomcat</td>
     </tr>
    </table>
  </body>
</html>
2、tomcat2/webapps/新建目录mytest,mytest目录下新建index.jsp,内容如下
<%@ page language="java" %>
<html>
  <head><title>tomcat2</title></head>
  <body>
    <table align="centre" border="1">
      <tr>
        <td>SessionID</td>
        <td><%= session.getId() %></td>
      </tr>
      <tr>
        <td>SessionCreatedTime</td>
        <td><%= session.getCreationTime() %></td>
     </tr>
     <tr>
        <td>ServerName</td>
        <td><%=request.getServerName()%></td>
     </tr>
     <tr>
        <td>SessionPort</td>
        <td><%=request.getServerPort()%></td>
     </tr>
      <tr>
        <td>CustomString</td>
        <td>This is the second tomcat</td>
     </tr>
    </table>
  </body>
</html>
3、重新启动redis,tomcat,nginx
4、输入地址访问
http://192.168.3.12/mytest/
5、结果
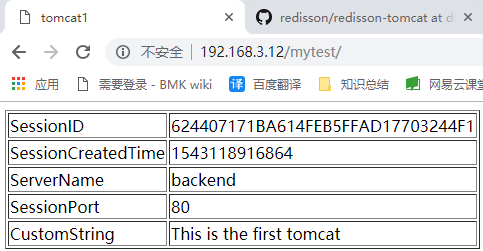
点击刷新按钮

可以发现,两次访问,SessionID都是相同的,并且title和自定义的字符串不一样,说明分别访问了tomcat1和tomcat2
登陆redis
redis-cli
输入以下命令可发现,session已经存放到了redis中,并且默认的超时时间为30 min
