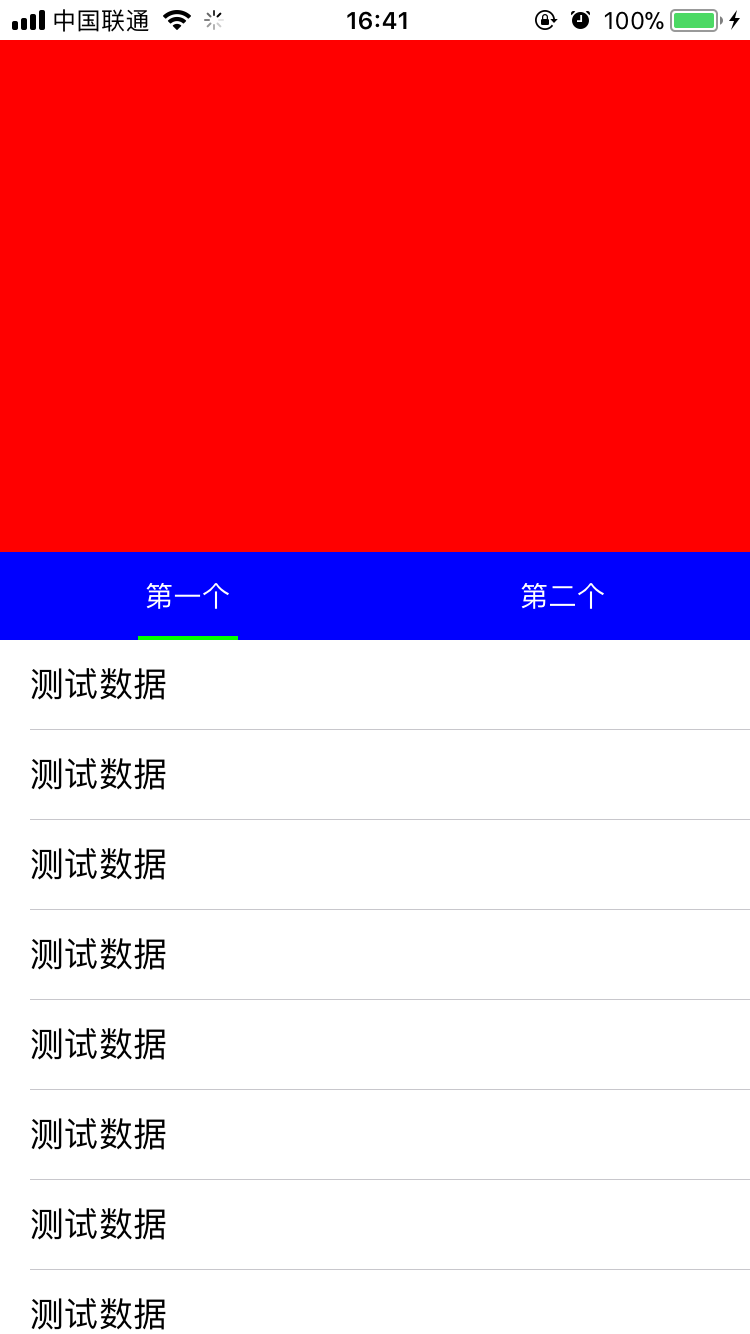
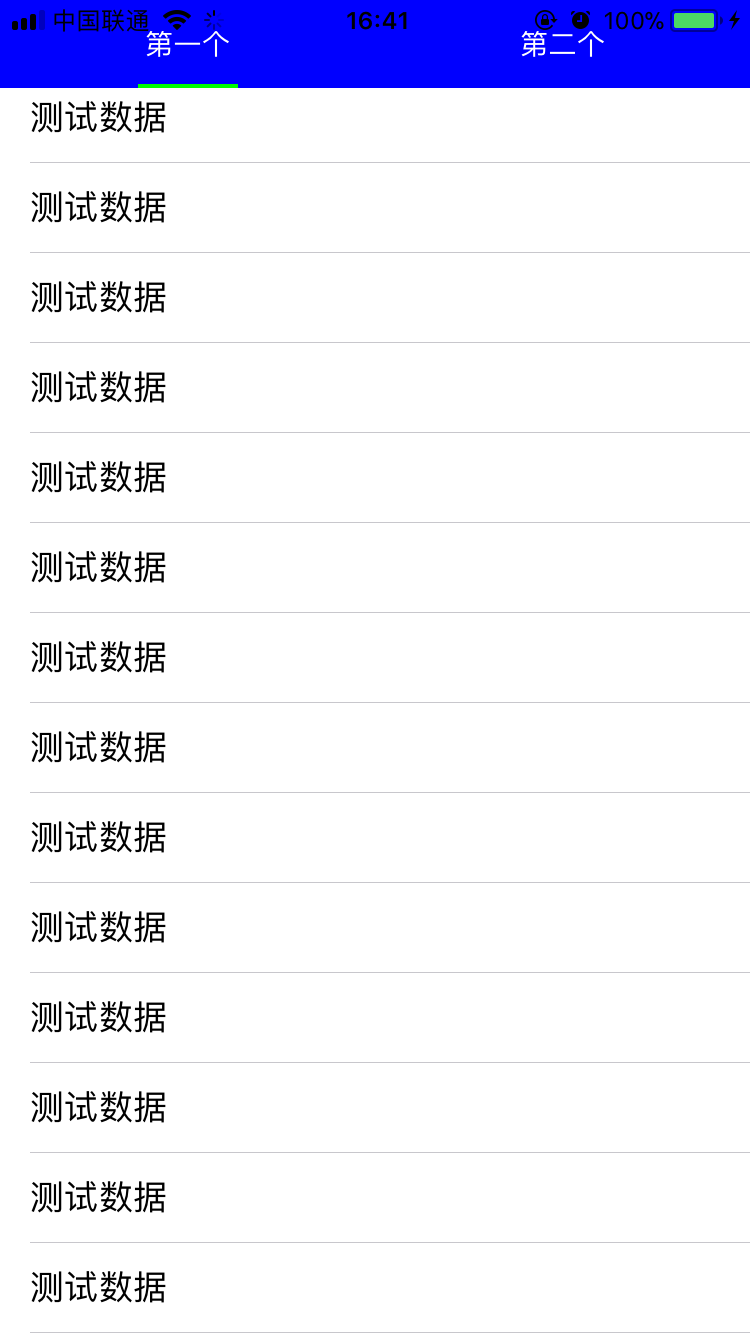

项目中经常会有这样的需求,scrollView有个头部,当scrollView滚动的时候头部也跟着滚动,同时头部还有一个tab会锁定在某个位置,scrollView中可以放很多不同的view,这些view可以在scrollView中横向滚动,要实现这样的需求,按理说如果头部是固定不动的,那么在scrollView嵌套多层view,同时控制这些view的在scrollView中的位置,是很好实现的,这里的难点在scrollView的头部也是可以滚动的。
解决以上问题有2中方法可以考虑
方法1:
不用scrollView,直接用一个tableView,头部作为tableView的tableHeaderView。当头部的tab被点击了,切换tableView的数据源,通过一个index来标识当前选中了那个tab,然后让tableView去刷新指定的数据源。如果你用这种方法好处是很快就可以实现功能,我想遇到这样的需求,大部分人都是采用的这种方案吧。缺点了也是很明显,所有tab公用一个tableView,就会导致tableView中的业务相当复杂,tableView中的代码会非常多,并且可拓展性也不强。
方法2:
用scrollView,让scrollView覆盖其父视图的整个界面,然后创建多个view作为scrollView的子视图,这里的view不限定是tableView,collectionView也是可以的,把创建的n个View依次添加到scrollView中,注意这些view的x轴,同时设置scrollview的contentsize,我们再创建一个headerView,作为scrollView的头部。同时通过addSubview的方式把headerView添加到scrollView中,注意要保证headerView要在最上层,防止其被遮住。每个tableView在被创建的时候提供一个setHeader的方法,并且传入这个创建headerView,在setheader方法中,我们拿到headerView的真实宽高,并为该tableView添加一个相同高度的tableHeaderView,其实大概意思就是为所有tableView都添加一个和scrollView的headview大小相同的tableViewHeaderView,由于我们的scrollView的header浮在最上层,刚好完美的遮住这些tableView的tableHeaderView,当我们tableView上下滑动的时候控制headerView和tableView的tableHeaderView同步滑动就可以了,当我们需要横向滑动的时候,监听scrollView的contentoffset,让headrView的x轴跟随scrollView滑动,这样联动就算完成了。剩下的就是处理点击事件,处理滑动事件的问题了。说了这么多,估计都有点糊涂了把,还是直接上代码把,这里把部分核心代码帖处理,并且在文章结束的时候送上测试demo
#import "ViewController.h"
#import "UIView+XYView.h"
#import "TYTableView1.h"
#import "TableView2.h"
#import "TYHeaderView.h"

#define kHeadHeight    300

@interface ViewController ()<UIScrollViewDelegate,headerViewDelegate>

@property (nonatomic, strong) UIScrollView *scrollView;

@property (nonatomic, strong) TYHeaderView *headerView;

@property (nonatomic, strong) TYTableView1 *tableView1;

@property (nonatomic, strong) TableView2 *tableView2;

@property (nonatomic, assign) CGPoint lastContentOffset;


@end

@implementation ViewController

- (void)viewDidLoad {
    [super viewDidLoad];
    // Do any additional setup after loading the view, typically from a nib.

    [self setupUI];

}


-(TYHeaderView *)headerView{
    if (!_headerView) {
        _headerView = [[TYHeaderView alloc] initWithFrame:CGRectMake(0, 0, SCREEN_WIDTH, kHeadHeight)];
        _headerView.backgroundColor = [UIColor redColor];
        _headerView.delegate = self;
    }
    return _headerView;
}

-(UIScrollView *)scrollView{
    if (!_scrollView) {
        _scrollView = [[UIScrollView alloc] initWithFrame:CGRectMake(0, 0, SCREEN_WIDTH, SCREEN_HEIGHT)];
        _scrollView.delegate = self;
        _scrollView.pagingEnabled = YES;
        _scrollView.showsVerticalScrollIndicator = NO;
        _scrollView.showsHorizontalScrollIndicator = NO;
        _scrollView.contentSize = CGSizeMake(SCREEN_WIDTH *2, 0);
    }
    return _scrollView;
}

-(UITableView *)tableView1{
    if (!_tableView1) {
        _tableView1 = [[TYTableView1 alloc] initWithFrame:CGRectMake(0, 0,SCREEN_WIDTH, self.scrollView.height)];
        _tableView1.showsHorizontalScrollIndicator = NO;
        _tableView1.showsVerticalScrollIndicator = NO;
        _tableView1.headerView = self.headerView;
    }
    return _tableView1;
}

-(UITableView *)tableView2{
    if (!_tableView2) {
        _tableView2 = [[TableView2 alloc] initWithFrame:CGRectMake(SCREEN_WIDTH, 0,SCREEN_WIDTH, self.scrollView.height)];
        _tableView2.showsHorizontalScrollIndicator = NO;
        _tableView2.showsVerticalScrollIndicator = NO;
        _tableView2.headerView = self.headerView;
    }
    return _tableView2;
}

-(void)setupUI{
    [self.view addSubview:self.scrollView];
    [self.scrollView addSubview:self.tableView1];
    [self.scrollView addSubview:self.tableView2];
    [self.scrollView addSubview:self.headerView];

}

#pragma mark - ScrollViewDelegate
-(void)scrollViewDidScroll:(UIScrollView *)scrollView{
    if (scrollView == self.scrollView) {
        self.headerView.x = scrollView.contentOffset.x;
        int index = 0;

        if (self.lastContentOffset.x < scrollView.contentOffset.x) {
            //往右滑动,向上取整
            index = ceil((scrollView.contentOffset.x/SCREEN_WIDTH));
        }else if (self.lastContentOffset.x > scrollView.contentOffset.x)
        {
            //往左滑动,向下取整
            index = floor((scrollView.contentOffset.x/SCREEN_WIDTH));
        }else
        {
            //没动
            index = (scrollView.contentOffset.x/SCREEN_WIDTH);
        }

        CGFloat mobileDistance = (0-self.headerView.y);
        switch (index) {
            case 0:{
                //修改circleTableView
                if (self.tableView1.contentOffset.y<mobileDistance) {
                    [self.tableView1 setContentOffset:CGPointMake(0, mobileDistance) animated:NO];
                }
            }
                break;
            case 1:{
                //修改photoView
                if (self.tableView2.contentOffset.y<mobileDistance) {
                    [self.tableView2 setContentOffset:CGPointMake(0, mobileDistance) animated:NO];
                }
            }
                break;
            default:
                break;

        }
        self.lastContentOffset = scrollView.contentOffset;
    }
}

-(void)scrollViewDidEndDecelerating:(UIScrollView *)scrollView{
    static int lastIndex = 0;
    int index = 0;

    if (self.lastContentOffset.x < scrollView.contentOffset.x) {
        //往右滑动,向上取整
        index = ceil((scrollView.contentOffset.x/SCREEN_WIDTH));
    }else if (self.lastContentOffset.x > scrollView.contentOffset.x)
    {
        //往左滑动,向下取整
        index = floor((scrollView.contentOffset.x/SCREEN_WIDTH));
    }else
    {
        //没动
        index = (scrollView.contentOffset.x/SCREEN_WIDTH);
    }
//    if (lastIndex != index) {  //让headerView重新设置选中的item
        self.headerView.selectIndex = index;
//    }
    lastIndex = index;
}

#pragma mark - headerViewDelegate
-(void)headerView:(TYHeaderView *)headerView SelectionIndex:(NSInteger)index{
    //让scrollView滚动到指定位置
    [self.scrollView setContentOffset:CGPointMake(self.scrollView.width*index, 0) animated:YES];
}
上面这段代码主要就怎么给scrollView添加子视图 如果设置子视图的位置和headerView的位置
#import "TYTableView1.h"

@interface TYTableView1 ()<UITableViewDelegate,UITableViewDataSource>
@property (nonatomic, assign) CGPoint lastContentOffset;

@end

@implementation TYTableView1

-(void)setHeaderView:(TYHeaderView *)headerView{
    _headerView = headerView;
    self.dataSource = self;
    self.delegate = self;
    self.scrollIndicatorInsets = UIEdgeInsetsMake(headerView.height, 0, 0, 0);
    UIView *tableHeaderView = [[UIView alloc] initWithFrame:CGRectMake(0, 0, SCREEN_WIDTH, self.headerView.height)];
    self.tableHeaderView = tableHeaderView;
    [self reloadData];
}

#pragma mark - ScrollViewDelegate
-(void)scrollViewDidScroll:(UIScrollView *)scrollView{
    CGFloat placeHolderHeight = self.headerView.height - 44;
    CGFloat offsetY = scrollView.contentOffset.y;
    if (offsetY >= 0 && offsetY <= placeHolderHeight) {
        if (offsetY > self.lastContentOffset.y) {
            //往上滑动
            if (offsetY>(-self.headerView.y)) {
                self.headerView.y = -offsetY;
            }
        }else
        {
            //往下滑动
            if (offsetY<(-self.headerView.y)) {
                self.headerView.y = -offsetY;
            }
        }
    }
    else if (offsetY > placeHolderHeight) {
        if (self.headerView.y != (-placeHolderHeight)) {
            if (offsetY > self.lastContentOffset.y) {
                //往上滑动
                self.headerView.y = self.headerView.y - (scrollView.contentOffset.y-self.lastContentOffset.y);
            }
            if (self.headerView.y < (-placeHolderHeight)) {
                self.headerView.y = -placeHolderHeight;
            }
            if (self.headerView.y>=0) {
                self.headerView.y = 0;
            }
        }
    }
    else if (offsetY <0) {
        self.headerView.y =  - offsetY;
    }

//    if (offsetY>50) {
//        self.headerView.navView.transparency = 1;
//    }else
//    {
//        self.headerView.navView.transparency = 0;
//    }

    self.lastContentOffset = scrollView.contentOffset;
}

#pragma mark - UITableViewDelegate && UITableViewDataSource
-(NSInteger)numberOfSectionsInTableView:(UITableView *)tableView{
    return 1;
}

-(NSInteger)tableView:(UITableView *)tableView numberOfRowsInSection:(NSInteger)section{
    return 20;
}

-(UITableViewCell *)tableView:(UITableView *)tableView cellForRowAtIndexPath:(NSIndexPath *)indexPath{
    UITableViewCell *cell = [tableView dequeueReusableCellWithIdentifier:@"cell"];
    if (cell == nil) {
        cell = [[UITableViewCell alloc] initWithStyle:UITableViewCellStyleDefault reuseIdentifier:@"cell"];
    }
    cell.textLabel.text = @"测试数据";
    return cell;
}
这一段主要是目的就是如果setHederView,并且设置一个同header同样宽高的tableViewHeaderView,并且监听tableView的滚动,保证headerView的滚动和tableHeaderView同步,第一个tableView的设置是这样的,第二个,第三个tableView的设置也是一样的,这里就不在多说了,这里还有一个注意点,就是当header滚动要一定程度了之后需要控制headerView的最大滚动区域,这样才可以保障tab始终悬浮在tableView的最顶部。
整体的实现思路和相关代码都已经贴出来,多的我也就不废话了,
demo的下载地址 https://github.com/qqcc1388/xmDemo