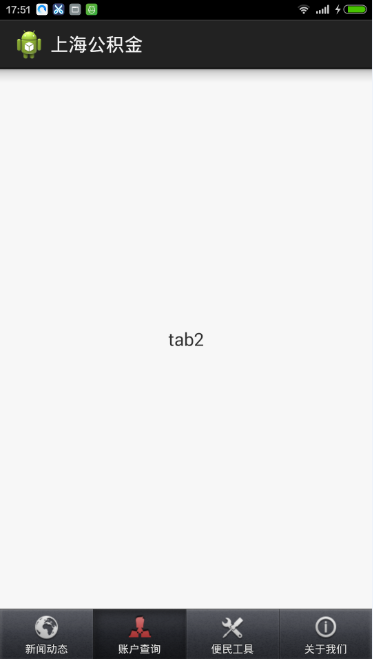
源代码及可执行文件下载地址:http://files.cnblogs.com/rainboy2010/tabnavigation.zip


现在很多Android应用界面都采用底部导航栏的设计方式,这样可以使用户灵活的切换不同的页面。采用TabHost控件很容易实现一个底部导航栏的功能,下面以模仿鲁大师客户端底部导航栏为例小试牛刀
1.设计主界面,布局文件tab_ludashi.xml如下:
<?xml version="1.0" encoding="utf-8"?>
<FrameLayout xmlns:android="http://schemas.android.com/apk/res/android"
    android:id="@+id/container"
    android:layout_width="fill_parent"
    android:layout_height="fill_parent" >

    <TabHost
        android:id="@android:id/tabhost"
        android:layout_width="fill_parent"
        android:layout_height="fill_parent"
        android:background="@drawable/bg"
     >

        <LinearLayout
            android:layout_width="fill_parent"
            android:layout_height="fill_parent"
            android:orientation="vertical" >

             <FrameLayout
                android:id="@android:id/tabcontent"
                android:layout_width="fill_parent"
                android:layout_height="0.0dp"
                android:layout_weight="1"
              >
             </FrameLayout>
             <TabWidget
                android:id="@android:id/tabs"
                android:layout_width="fill_parent"
                android:layout_height="@dimen/tabwidget_height"
                android:gravity="center"
                android:showDividers="none"
             >
             </TabWidget>

        </LinearLayout>

    </TabHost>

</FrameLayout>
每一个TabItem对应的布局文件tab_ludashi_item.xml如下,图片在上部,文字在下部
<LinearLayout xmlns:android="http://schemas.android.com/apk/res/android"
    android:id="@+id/tabwidget_item_layout"
    android:layout_width="fill_parent"
    android:layout_height="@dimen/tabwidget_height"
    android:orientation="vertical"
    android:gravity="center"
    android:background="@drawable/selector_ludashi_tabitem_bg"
   >
    <RelativeLayout
      android:layout_width="fill_parent"
      android:layout_height="wrap_content"
    >
      <ImageView
          android:id="@+id/tabwidget_item_image"
          android:layout_width="wrap_content"
          android:layout_height="wrap_content"
          android:layout_centerInParent="true"
          android:contentDescription="@null"
          android:scaleType="fitCenter"
       />
       <ImageView
          android:id="@+id/tabwidget_item_dot"
          android:layout_width="wrap_content"
          android:layout_height="wrap_content"
          android:layout_alignParentTop="true"
          android:layout_toRightOf="@id/tabwidget_item_image"
          android:contentDescription="@null"
          android:scaleType="fitCenter"
          android:visibility="invisible"
          android:src="@drawable/red_dot"
       />
    </RelativeLayout>

    <TextView
       android:id="@+id/tabwidget_item_text"
       android:layout_width="wrap_content"
       android:layout_height="wrap_content"
       android:gravity="center_vertical"
       android:layout_marginTop="3dp"
       android:textSize="12sp"
       android:textColor="@drawable/selector_ludashi_tabitem_text"
    />

</LinearLayout>
选中状态和未选中状态下背景对应的xml文件selector_ludashi_tabitem_bg.xml为:
<?xml version="1.0" encoding="utf-8"?>
<selector xmlns:android="http://schemas.android.com/apk/res/android" >
    <item android:state_pressed="true" android:drawable="@drawable/ludashi_tabitem_selected" />
    <item android:state_selected="true" android:drawable="@drawable/ludashi_tabitem_selected" />
    <item android:drawable="@android:color/transparent" />
</selector>
选中状态和未选中状态下文字颜色对应的xml文件selector_ludashi_tabitem_text.xml为:
<?xml version="1.0" encoding="utf-8"?>
<selector xmlns:android="http://schemas.android.com/apk/res/android">
    <item android:state_pressed="true" android:color="#ff00a5df" />
    <item android:state_selected="true" android:color="#ff00a5df" />
    <item android:color="#ff797979" />
</selector>
2.设计每一个TabItem选中状态和未选中状态对应的图片,以第一个Item为例,对应的xml文件selector_ludashi_tabitem_image_myphone.xml如下:
<?xml version="1.0" encoding="utf-8"?>
<selector xmlns:android="http://schemas.android.com/apk/res/android" >
    <item android:state_pressed="true" android:drawable="@drawable/ludashi_tabitem_myphone_pressed" />
    <item android:state_selected="true" android:drawable="@drawable/ludashi_tabitem_myphone_pressed" />
    <item android:drawable="@drawable/ludashi_tabitem_myphone_normal" />
</selector>
3.编写Java代码,如下:
@SuppressWarnings("deprecation")
public class LudashiActivity extends TabActivity
{

    private TabHost mTabHost;
    private int []mTabImage=new int[]{R.drawable.selector_ludashi_tabitem_image_myphone,R.drawable.selector_ludashi_tabitem_image_bench,
    R.drawable.selector_ludashi_tabitem_image_optimize,R.drawable.selector_ludashi_tabitem_image_find};
    private int []mTabText=new int[]{R.string.ludashi_tab1,R.string.ludashi_tab2,R.string.ludashi_tab3,R.string.ludashi_tab4};
    private String[]mTabTag=new String[]{"tab1","tab2","tab3","tab4"};
    private Class<?>[] mTabClass=new Class<?>[]{Tab1.class,Tab2.class,Tab3.class,Tab4.class};

    @Override
    protected void onCreate(Bundle savedInstanceState)
    {
        super.onCreate(savedInstanceState);
        setContentView(R.layout.tab_ludashi);

        initUI();

    }

    private void initUI()
    {
        this.setTitle(R.string.button2);

        this.mTabHost=this.getTabHost();
        this.mTabHost.setup();

        //设置显示的图片和文字
        for(int i=0;i<mTabClass.length;i++)
        {
           View view=LayoutInflater.from(this).inflate(R.layout.tab_ludashi_item, null);

          ((ImageView)view.findViewById(R.id.tabwidget_item_image)).setImageResource(mTabImage[i]);
          ((TextView)view.findViewById(R.id.tabwidget_item_text)).setText(mTabText[i]);

           this.mTabHost.addTab(this.mTabHost.newTabSpec(mTabTag[i]).setIndicator(view).setContent(new Intent(this,mTabClass[i])));
        }

        //设置默认选中项
        this.mTabHost.setCurrentTab(0);
    }
}