分类:C#、Android、VS2015;
创建日期:2016-02-19
一、简介
Android 从5.0开始包含了一个全新的卡片视图小部件,这个新的小部件默认就像一张带有圆角和轻微阴影的白色卡片,称为卡片视图。
1、需要安装Xamarin.Android.Support.v7.CardView软件包
CardView是由Android Support v7支持库提供的,用C#编写Android应用程序时,要使用CardView,项目中必须包括Xamarin.Android.Support.v7.CardView软件包。
软件包的具体添加办法见10.2节的介绍。
2、CardView的常用属性
(1)布局属性
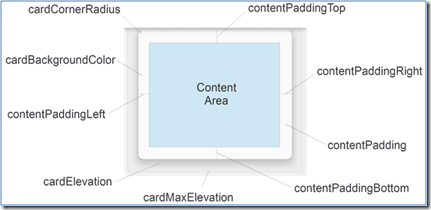
可以设置其padding、elevation、圆角半径、背景颜色等属性指定CardView的布局。每个属性还可以通过调用对应的CardView方法动态更改布局。注意这些属性除了背景颜色外其他都接受维度值,例如,11.5dp指定11.5密度无关的像素。
(2)Padding
CardView提供了五个内边距属性来定位卡片的内边距。可以在XML布局中设置,也可在代码中调用类似的方法:
(3)Elevation
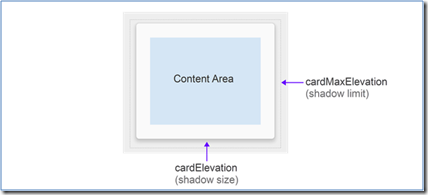
CardView提供了两个高程属性:

其中,cardElevation表示CardView的Z轴阴影大小,cardMaxElevation表示CardView的Z轴阴影最大值。
高程(Elevation)的含义是:当增加cardElevation的值使阴影变大时,CardView看起来似乎悬浮在阴影背景的上方。cardElevation属性还可以确定重叠视图中的绘制顺序,较大值的cardElevation会覆盖较小值的cardElevation。
cardMaxElevation对于动态更改cardElevation很有用,它可以防止阴影扩展到比限定的最大值还大。
(4)圆角半径和背景色
可以用圆角半径和背景色来控制CardView的整体风格:
这些属性如下所示:
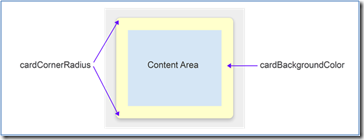
cardCornerRadius — — 各个角的CardView圆角半径.
cardBackgroundColor — —CardView的背景色.
例如,将cardCornerRadius设置为10dp ,cardBackgroundColor设置为"#FFFFCC" (淡黄色)。
3、必须在XML中为CardView指定一个命名空间
由于CardView是由Android Support v7支持库提供的,所以不能直接通过android命名空间获取或设置其属性。换言之,必须自定义一个XML命名空间作为CardView属性的前缀。例如,下面的代码声明了一个名为“cardview”的命名空间:
xmlns:cardview="http://schemas.android.com/apk/res-auto"
命名空间的名是你自己起的,此命名空间的范围仅限于本文件。
指定命名空间后,就可以通过该前缀来修改CardView的属性:
<LinearLayout xmlns:android="http://schemas.android.com/apk/res/android"
xmlns:card_view="http://schemas.android.com/apk/res-auto"
……>
<android.support.v7.widget.CardView
android:layout_width="fill_parent"
android:layout_height="245dp"
android:layout_gravity="center_horizontal"
cardview:cardElevation="4dp"
cardview:cardCornerRadius="5dp"/>
</ LinearLayout>
4、在Androd 4.4.2(Api 19)下使用CadView
在低于api21的设备上使用CardView时略有不同的行为:
- 需要添加额外的空白边距让CardView呈现阴影。
- CardView不会剪切与CardView圆角相交的子视图。
为了解决这些兼容性差异,CardView提供了两个附加的属性:
- cardPreventCornerOverlap –将此属性设置为true,可在比api21低的版本上运行的应用程序中实现阴影填充,此设置可防止CardView内容与CardView圆角相交。
- cardUseCompatPadding –如果希望在比Android 5.0更低的设备上使用CardView并且想让它看起来和Android 5.0或更高版本上运行的效果相同,需要将此属性设置为true。当启用此属性时,CardView会在低版本的设备上添加额外的填充以画出阴影,这有助于克服不同版本填充阴影效果的差异。
除了这些差别之外,其他设计步骤与在Android 6.0下的设计步骤都相同。
二、示例—ch1002CardViewDemo
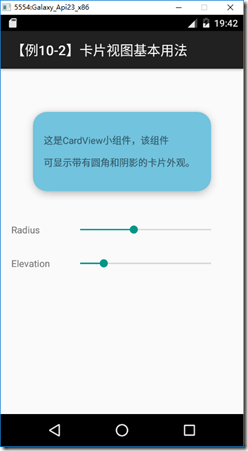
1、运行截图
2、主要设计步骤
(1)安装Xamarin.Android.Support.v7.CardView软件包
具体安装办法见10.2节的介绍。
(2)添加ch1002_CardviewDemo.axml文件
在Resources/layout文件夹下添加该文件。
<?xml version="1.0" encoding="utf-8"?>
<LinearLayout xmlns:android="http://schemas.android.com/apk/res/android"
    xmlns:cardview="http://schemas.android.com/apk/res-auto"
    android:paddingBottom="16dp"
    android:paddingTop="16dp"
    android:paddingLeft="16dp"
    android:paddingRight="16dp"
    android:orientation="vertical"
    android:layout_width="fill_parent"
    android:layout_height="fill_parent">
    <android.support.v7.widget.CardView
        android:id="@+id/cardview1"
        android:layout_width="fill_parent"
        android:layout_height="wrap_content"
        cardview:cardElevation="100dp"
        cardview:cardPreventCornerOverlap="true"
        cardview:cardBackgroundColor="#71C3DE"
        cardview:cardCornerRadius="8dp"
        android:layout_marginTop="48dp"
        android:layout_marginLeft="32dp"
        android:layout_marginRight="32dp">
        <TextView
            android:layout_width="wrap_content"
            android:layout_height="wrap_content"
            android:layout_margin="16dp"
            android:text="
这是CardView小组件,该组件

可显示带有圆角和阴影的卡片外观。
" />
    </android.support.v7.widget.CardView>
    <LinearLayout
        android:layout_width="fill_parent"
        android:layout_height="wrap_content"
        android:layout_marginTop="32dp"
        android:orientation="horizontal">
        <TextView
            android:layout_width="70dp"
            android:layout_height="wrap_content"
            android:layout_gravity="center_vertical"
            android:text="Radius" />
        <SeekBar
            android:id="@+id/seekbarRadius"
            android:layout_width="fill_parent"
            android:layout_height="wrap_content"
            android:layout_margin="16dp" />
    </LinearLayout>
    <LinearLayout
        android:layout_width="fill_parent"
        android:layout_height="wrap_content"
        android:orientation="horizontal">
        <TextView
            android:layout_width="70dp"
            android:layout_height="wrap_content"
            android:layout_gravity="center_vertical"
            android:text="Elevation" />
        <SeekBar
            android:id="@+id/seekbarElevation"
            android:layout_width="fill_parent"
            android:layout_height="wrap_content"
            android:layout_margin="16dp" />
    </LinearLayout>
</LinearLayout>
(3)添加ch1002CardviewDemo.cs文件
在SrcDemos文件夹下添加该文件。
using Android.App;
using Android.OS;
using Android.Widget;
using Android.Support.V7.Widget;

namespace MyDemos.SrcDemos
{
    [Activity(Label = "【例10-2】卡片视图基本用法")]
    public class ch1002CardviewDemo : Activity
    {
        protected override void OnCreate(Bundle savedInstanceState)
        {
            base.OnCreate(savedInstanceState);
            SetContentView(Resource.Layout.ch1002_CardviewDemo);
            var cardview = FindViewById<CardView>(Resource.Id.cardview1);
            var seekbarRadius = FindViewById<SeekBar>(Resource.Id.seekbarRadius);
            seekbarRadius.ProgressChanged += (s, e) =>
            {
                cardview.Radius = e.Progress;
            };
            var seekbarElevation = FindViewById<SeekBar>(Resource.Id.seekbarElevation);
            seekbarElevation.ProgressChanged += (s, e) =>
            {
                cardview.Elevation = e.Progress;
            };
        }
    }
}


