本文翻译自“Prepare the environment for developing Linux kernel with qemu”,在原文基础上进行了部分精简和修正。
编译Linux Kernel
- 软件包安装
$ sudo apt install git
$ sudo apt install build-essential kernel-package fakeroot libncurses5-dev libssl-dev ccache flex bison libelf-dev
- 同步Linux kernel 源代码
$ git clone https://git.kernel.org/pub/scm/linux/kernel/git/next/linux-next.git
$ cd linux-next
$ git checkout master
$ git fetch origin
$ git reset --hard remotes/origin/master
- 生成Linux kernel配置
$ make ARCH=x86_64 x86_64_defconfig
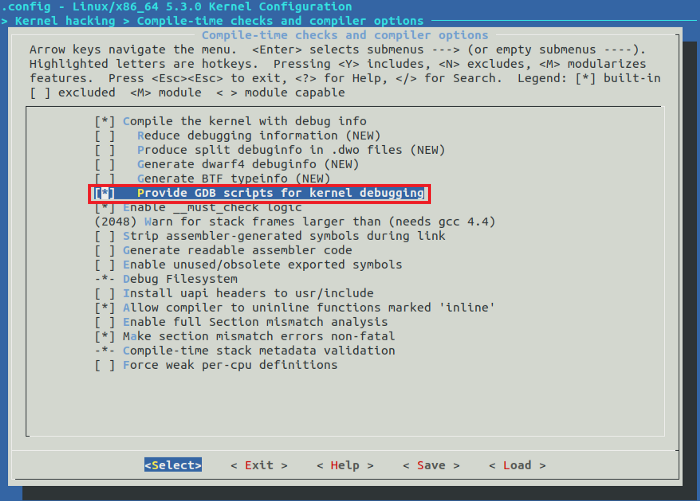
- 使用menuconfig配置GDB debugger选项
$ make ARCH=x86_64 menuconfig
- 进入“Kernel hacking”菜单

- 勾选“Compile the kernel with debug info”

- 勾选“Provide GDB scripts for kernel debugging” ,同时保持“Reduce debugging information”不勾选状态,保存并退出。
- 编译Linux kernel镜像
$ make -j8
- 安装qemu
$ sudo apt install qemu qemu-system
- 使用qemu-system-x86_64测试生成的Linux kernel镜像,按“Ctrl + c”退出qemu。
$ qemu-system-x86_64 -no-kvm -kernel arch/x86/boot/bzImage -hda /dev/zero -append "root=/dev/zero console=ttyS0" -serial stdio -display none
使用GDB调试Linux Kernel
- 安装GDB
$ sudo apt install gdb
- 在调试模式下启动qemu,其中“-s”选项表示:使用tcp 1234端口;“-S”选项表示只有在GDB连上tcp 1234端口后,CPU才会继续执行。
$ qemu-system-x86_64 -s -S -no-kvm -kernel arch/x86/boot/bzImage -hda /dev/zero -append "root=/dev/zero console=ttyS0 nokaslr" -serial stdio -display none
- 新建terminal并运行GDB
$ cd linux-next
$ gdb vmlinuz
- 在GDB命令中输入“target remote localhost:1234”
(gdb) target remote localhost:1234
- 设置断点为"start_kernel"
(gdb) break start_kernel
- GDB相关命令
’n’ (next)
‘c’ (continue)
使用Buildroot来创建根文件系统
- 使用git同步Buildroot源代码(访问buildroot网站可能需要代理,请根据实际情况自行配置)
$ git clone git://git.buildroot.net/buildroot
$ cd buildroot
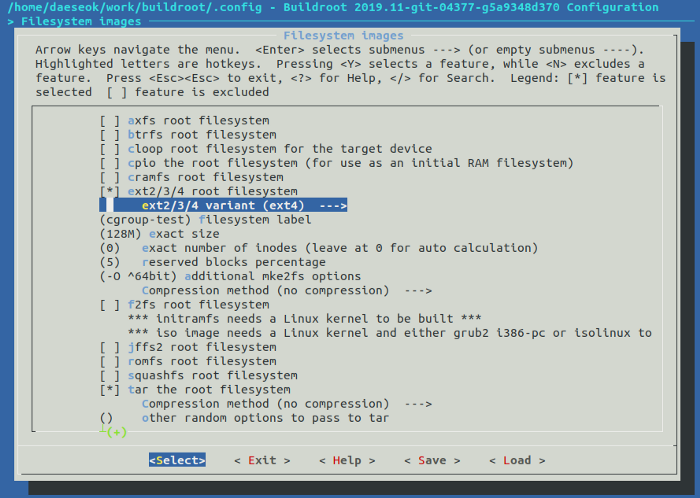
- 配置Buildroot
$ make menuconfig
- 将文件系统配置为ext4
“Target Options” → “Target Architecture” → “Filesystem images” → “ext2/3/4 root file system” → “ext4”

- 编译Buildroot
$ make -j8
- 使用qemu运行Linux kernel和Buildroot根文件系统(注意buildroot路径)
$ cd linux-next
$ qemu-system-x86_64 -kernel arch/x86/boot/bzImage -boot c -m 2049M -hda ../buildroot/output/images/rootfs.ext4 -append "root=/dev/sda rw console=ttyS0,115200 acpi=off nokaslr"-serial stdio -display none
- 登录用户名为root
Welcome to Buildroot
buildroot login:
使用GDB调试带Buildroot根文件系统的Linux Kernel
- 使用qemu启动Linux Kernel和Buildroot根文件系统
$ qemu-system-x86_64 -s -kernel arch/x86/boot/bzImage -boot c -m 2049M -hda ../buildroot/output/images/rootfs.ext2 -append "root=/dev/sda rw console=ttyS0,115200 acpi=off nokaslr" -serial stdio -display none
...
Welcome to Buildroot
buildroot login:
- 新建terminal并运行GDB,并在GDB命令中输入“target remote localhost:1234”连接qemu
$ gdb ./vmlinux
...
(gdb) target remote :1234
总结
使用qemu可以方便地使用GDB调试Linux Kernel。