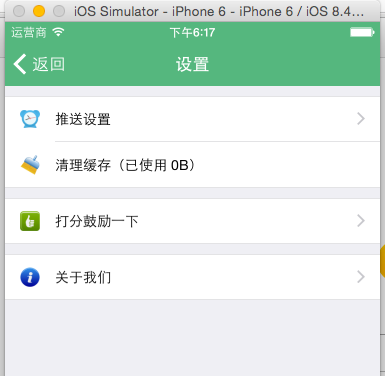
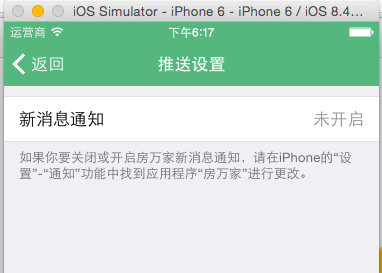
二十:设置界面
设置界面类似于我的页面,不多做解释。

二十一:手势返回
因为设置界面是我的页面过来的,可以加上鼠标手势用来返回。你也可以百度下"interactivePopGestureRecognizer"方法。本APP未用,因为我想自定义哪些页面可以返回或不返回或者右滑动调用其他函数。
viewDidload方法加载。
    //添加手势 右滑动可以返回上一页
    UISwipeGestureRecognizer *swipRecognizer = [[UISwipeGestureRecognizer alloc] initWithTarget:self action:@selector(handlerSwip:)];
    swipRecognizer.direction = UISwipeGestureRecognizerDirectionRight;
    [self.view addGestureRecognizer:swipRecognizer];
调用方法。
#pragma mark - 手势判断
-(void)handlerSwip:(UISwipeGestureRecognizer *)recognizer
{
    [self.navigationController popViewControllerAnimated:YES];
}
二十二:清理缓存
因为系统使用了SDWebImage,我们给予用户一个设置可以清理缓存。
计算缓存大小。
    //初始化我的信息
    NSUInteger intg = [[SDImageCache sharedImageCache] getSize];
    NSString *strcacheSize = [NSString stringWithFormat:@"清理缓存(已使用 %@)",[ToolsHelper fileSizeWithIntege:intg]];
点击清理缓存调用的方法,用了alertview和委托
UIAlertView *alert = [[UIAlertView alloc] initWithTitle:@"确认" message:@"您确定要清理图片缓存吗?" delegate:self cancelButtonTitle:@"取消" otherButtonTitles:@"确定", nil];
[alert show];
委托方法
-(void)alertView:(UIAlertView *)alertView clickedButtonAtIndex:(NSInteger)buttonIndex
{
    if (buttonIndex == 1) {
        //清理缓存
        [ToolsHelper ShowHUDWithTitle:@"清理中..."];
        [[SDImageCache sharedImageCache] clearDisk];
        [[SDImageCache sharedImageCache] clearMemory];

        NSUInteger intg=[[SDImageCache sharedImageCache] getSize];
        NSString *str=[NSString stringWithFormat:@"清理缓存(已使用 %@)",[ToolsHelper fileSizeWithIntege:intg]];

        UITableViewCell *cell = [self.tableView cellForRowAtIndexPath:[NSIndexPath indexPathForRow:1 inSection:0]];
        cell.textLabel.text = str;
        [self.view makeToast:@"缓存清理成功" duration:3.0 position:CSToastPositionCenter];
        [ToolsHelper CloseHUD];
    }
}
二十三:打分鼓励
其实就是调用url,跳转到appstore即可。CURRENT_APPID我定义在了Const.h里面了
//打分鼓励一下
NSString *str = [NSString stringWithFormat:@"itms-apps://itunes.apple.com/app/id%@",CURRENT_APPID];
[[UIApplication sharedApplication] openURL:[NSURL URLWithString:str]];
二十四:推送设置
跳转到推送设置页面。
//推送设置
RDPushSetupViewController *pushvc = [[RDPushSetupViewController alloc]init];
self.navigationItem.backBarButtonItem =[[UIBarButtonItem alloc] initWithTitle:@"返回" style:UIBarButtonItemStyleDone target:nil action:nil];
[self.navigationController pushViewController:pushvc animated:NO];
推送设置页面也很简单,我贴一下判断是否开启或关闭的方法。
    //获取推送的设置
    if (IS_IOS8_AND_UP) {
        if ([[UIApplication sharedApplication] currentUserNotificationSettings].types) {
            strPushSetup = @"开启";
        }else{
            strPushSetup=@"关闭";
        }
    }else{
        if ([[UIApplication sharedApplication] enabledRemoteNotificationTypes] == UIRemoteNotificationTypeNone) {
            strPushSetup=@"关闭";
        }else{
            strPushSetup=@"开启";
        }
    }
因为系统尚未集成通知推送,此页面作为备用,后面完善的时候还会使用,目前给予提示是否开启提醒。

二十五:关于我们
很简单的一个页面。获取当前版本号的函数。
    //版本
    UILabel *lblversion = [[UILabel alloc] initWithFrame:CGRectMake(0, lblcontact.frame.origin.y+lblcontact.frame.size.height, SCREEN_WIDTH, 30)];
    lblversion.textAlignment=NSTextAlignmentCenter;
    NSDictionary *infodict = [[NSBundle mainBundle] infoDictionary];
    lblversion.text=[NSString stringWithFormat:@"当前版本:%@",[infodict objectForKey:@"CFBundleShortVersionString"]];
    lblversion.font= [UIFont systemFontOfSize:16];
    lblversion.textColor = [UIColor grayColor];
    [self.view addSubview:lblversion];